The AEM and Magento are integrated using the Commerce Integration Framework (CIF); the CIF framework enables AEM to access magneto commerce instances through GraphQL API.
In this post series, let us see how to set up local Magento and AEM platforms and enable the CIF framework in AEM to integrate with Magento to build the storefront in AEM.
Let us start with setting up a local Magento instance.
I am going to use XAMPP on windows to enable the Magento servers.
Install Elastic search:
The latest Magento version requires Elasticsearch or OpenSearch for indexing but not support MySQL indexing.
Installed elastic search 7.17.3, https://artifacts.elastic.co/downloads/elasticsearch/elasticsearch-7.17.3-windows-x86_64.zip
You will see the below screen on successful installation

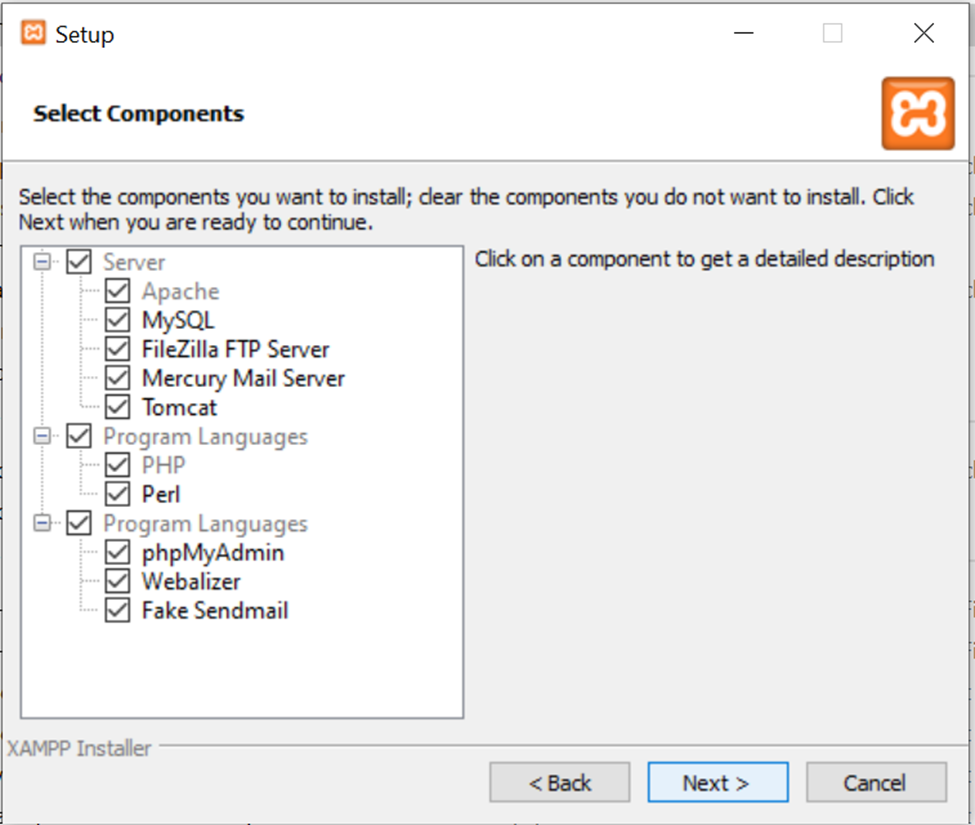
Download and Install XAMPP:
As a first step, download and install the XAMPP server, including Apache, PHP, MySQL, and PHP admin.
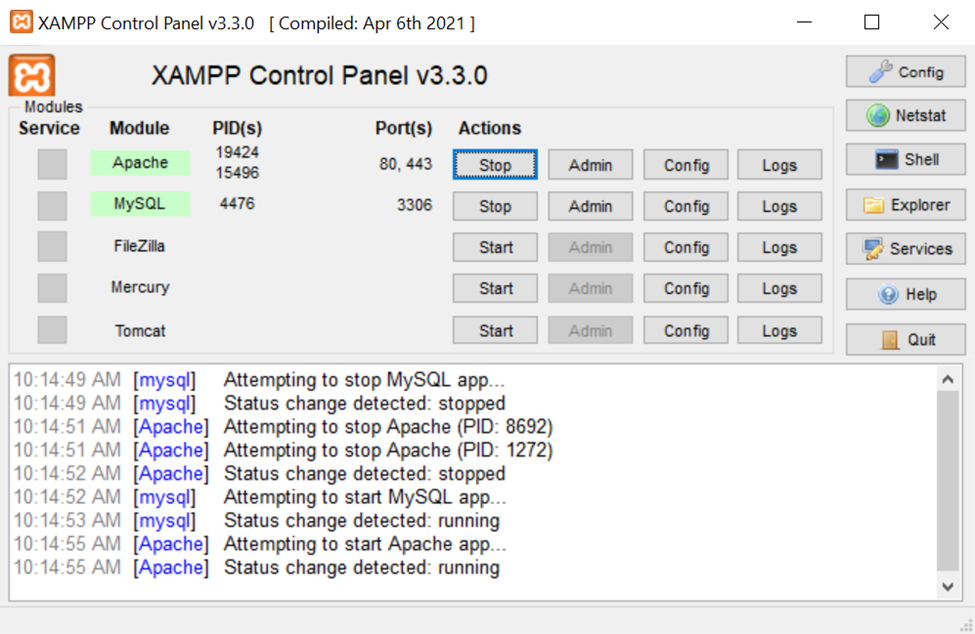
Now you should be able to manage the Apache and MySQL servers through the XAMPP control panel.
Start MySQL and Apache servers
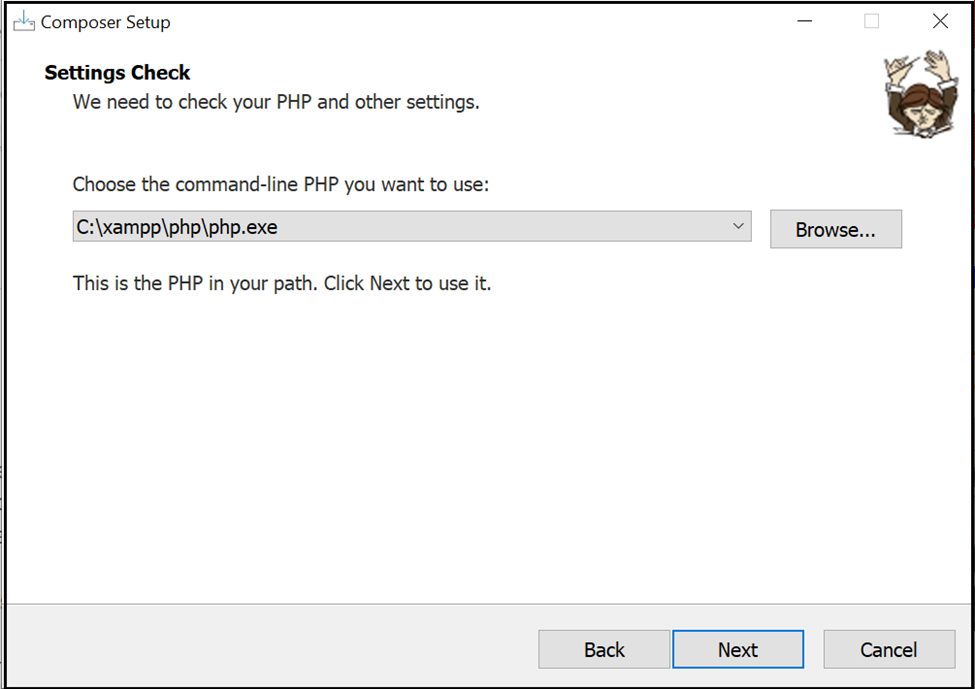
Install Composer:
Install composer — A Dependency Manager for PHP, downloaded the latest version(v2.3.5) from https://getcomposer.org/download/.
Select PHP under XAMPP

Change the MySQL admin password:
Click on Shell in the XAMPP control panel

Execute mysqladmin -u root password — Enter the admin password

Add the new password to the config.inc.php file for auto-login


Create a Magento database:
Create a new database(e.g., magento2) for Magento, login to http://localhost/phpmyadmin/

Enable Required Extensions:
Enable the below extensions on the php.ini file (to enable removing the semicolon from the extension)

extension=gd
extension=intl
extension=soap
extension=sockets
extension=sodium
extension=xsl
Enable VirtualHost for the Magento Pub folder:
Enable the below virtual hosts to C:\xampp\apache\conf\extra\httpd-vhosts.conf (change the server name accordingly)
<VirtualHost *:80>
 DocumentRoot “C:/xampp/htdocs/magento/pub”
 ServerName albin.magento.com
 </VirtualHost>
 <VirtualHost *:80>
 DocumentRoot “C:/xampp/htdocs”
 ServerName localhost
 </VirtualHost>
Add the below entry to C:\Windows\System32\drivers\etc\hosts file to support the local domain, e.g., albin.magento.com
127.0.0.1 albin.magento.com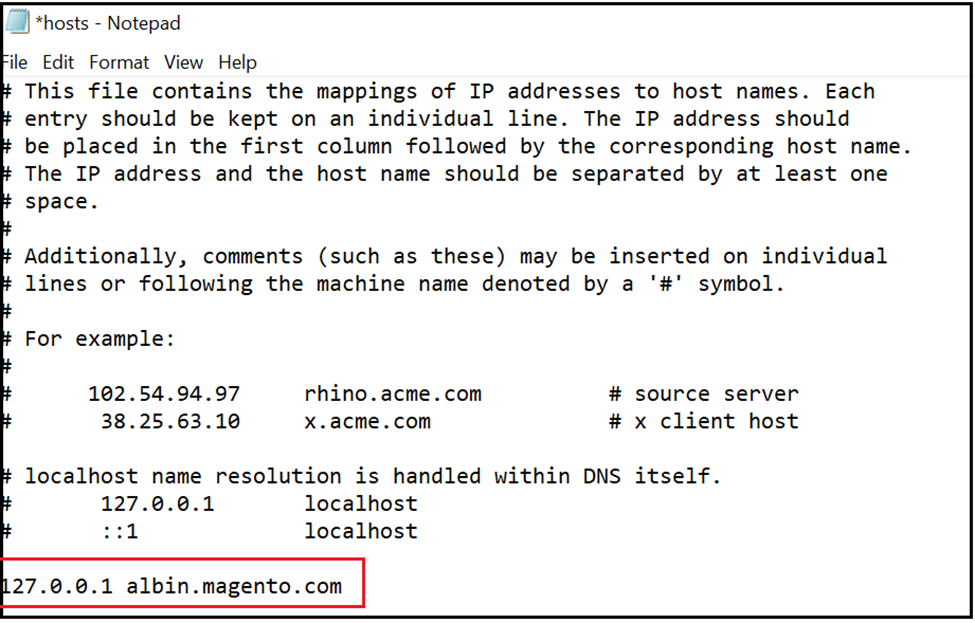
Download Magento:
Download Magento( v 2.4.4) within Apache htdocs folder
composer create-project --repository-url=https://repo.magento.com/ magento/project-community-edition:2.4.4 C:\xampp\htdocs\magento
On completion, this will download Magento into C:\xampp\htdocs\magento directory
Setup authentication for Magento repo:
We should enable the Magento repository authentication before downloading the Magento software.
Create a file with the name auth.json under C:\xampp\htdocs\magento and add the below content
{
 “bitbucket-oauth”: {},
 “github-oauth”: {},
 “gitlab-oauth”: {},
 “gitlab-token”: {},
 “http-basic”: {
 “repo.magento.com”: {
 “username”: “<public-key>”,
 “password”: “<private-key>”
 }
 },
 “bearer”: {}
 }
To generate the keys, login to https://marketplace.magento.com/ (register for an account if not already)
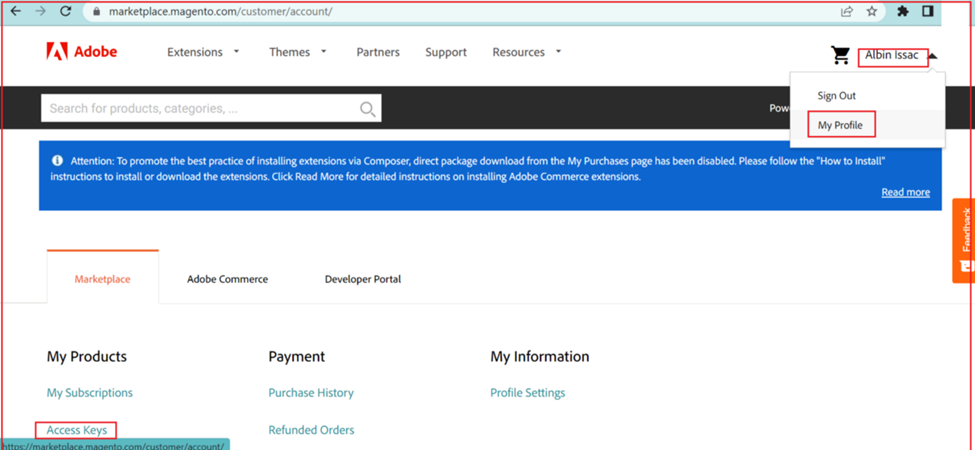

Create A New Access Key — Enter a name, and copy the generated private and public keys.
Install Magento:
Execute the below command from the magneto root folder C:\xampp\htdocs\magento change the DB name, password, and base URL accordingly)
php bin/magento setup:install --base-url="http://albin.magento.com/" --db-host="localhost" --db-name="magento2" --db-user="root" --db-password="magento" --admin-firstname="admin" --admin-lastname="admin" --admin-email="[email protected]" --admin-user="admin" --admin-password="Admin123!" --language="en_US" --currency="USD" --timezone="America/Chicago" --use-rewrites="1" --backend-frontname="admin" --search-engine=elasticsearch7 --elasticsearch-host="localhost" --elasticsearch-port=9200You may encounter the below issue during the installation

To resolve the issue, replace validateURLScheme function in C:\xampp\htdocs\magento\vendor\magento\framework\Image\Adapter\Gd2.php file with the below one
private function validateURLScheme(string $filename) : bool
 {
 $allowed_schemes = [‘ftp’, ‘ftps’, ‘http’, ‘https’];
 $url = parse_url($filename);
 if ($url && isset($url[‘scheme’]) && !in_array($url[‘scheme’], $allowed_schemes) && !file_exists($filename)) {
 return false;
 }return true;
 }
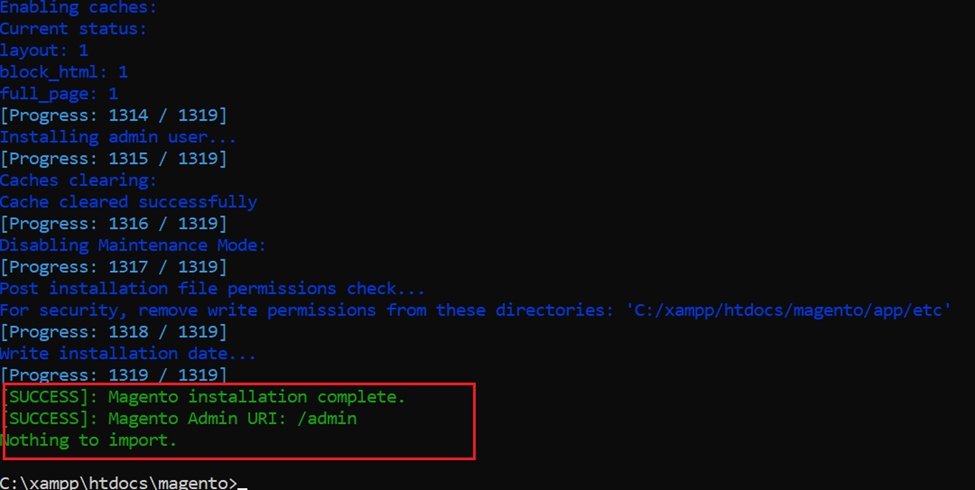
Rerun the install command — you will see the “Magento installation complete” message.
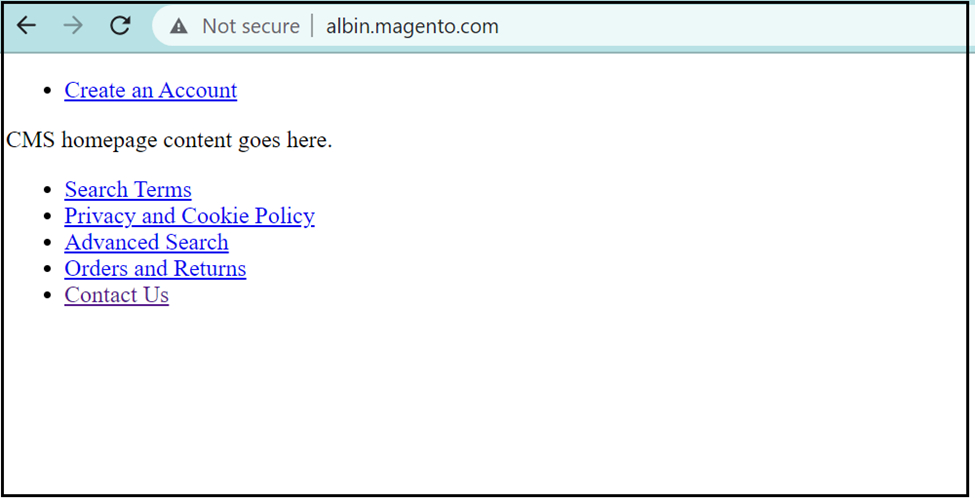
Restart the Apache server through the XAMPP control panel and access the storefront → albin.magento.com
You may see the below broken experience
To fix that
Go to: C:\xampp\htdocs\magento\vendor\magento\framework\View\Element\Template\File\Validator.phpReplace — $realPath = $this->fileDriver->getRealPath($path);with the below code and save the file$realPath = str_replace(‘\\’, ‘/’, $this->fileDriver->getRealPath($path));

 Go to C:\xampp\htdocs\magento\app\etc\di.xmlReplace Magento\Framework\App\View\Asset\MaterializationStrategy\Symlink with Magento\Framework\App\View\Asset\MaterializationStrategy\Copy
Execute the below commands
php bin/magento indexer:reindex
php bin/magento setup:upgrade
php bin/magento setup:static-content:deploy -f
php bin/magento cache:flush
Install sample data:
Install the latest sample data — Execute the below commands
php bin/magento sampledata:deploy
php bin/magento indexer:reindex
php bin/magento setup:upgrade
php bin/magento setup:static-content:deploy -f
php bin/magento cache:flush
Now access the storefront URL and admin console
http://albin.magento.com/admin (admin/<password specified while installation)

You may receive the below exception while accessing the admin console
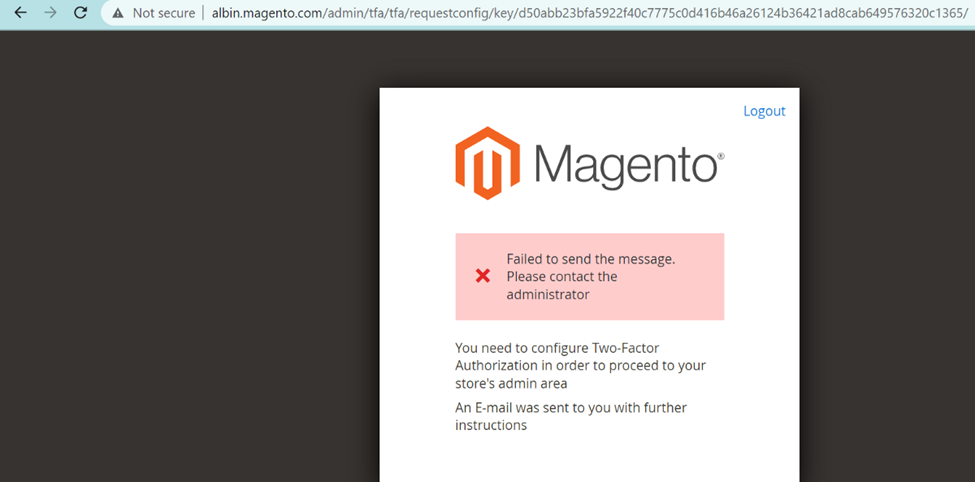
To fix the issue, disable the Two factor authentication
php bin/magento module:disable Magento_TwoFactorAuth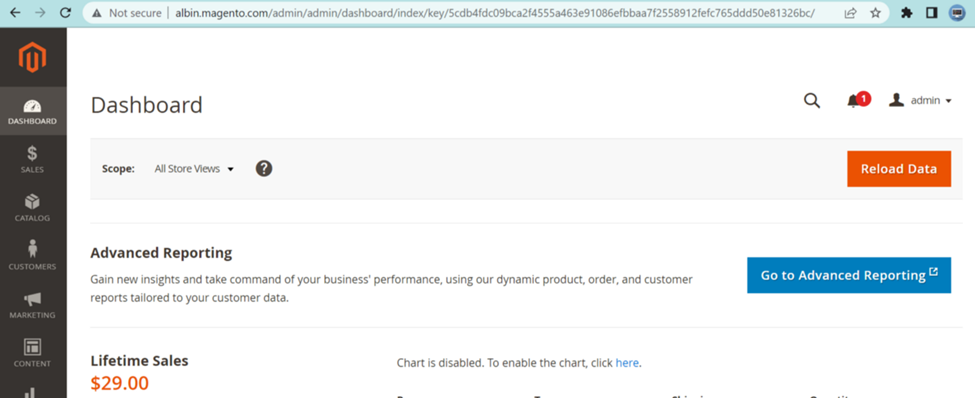
You can now add products to your cart and checkout.


Track order from admin console — http://albin.magento.com/admin
Sales →Orders

GraphQL API:
The Magento data is also accessible through GraphQL API to enable the headless ecommerce experiences — the URL to access the GraphQL endpoint is http://albin.magento.com/graphql
e.g., API to fetch specific product SKU data
{
 storeConfig {
 store_code
 store_name
 is_default_store
 store_group_code
 is_default_store_group
 locale
 base_currency_code
 default_display_currency_code
 timezone
 weight_unit
 base_url
 base_link_url
 base_static_url
 base_media_url
 secure_base_url
 secure_base_link_url
 secure_base_static_url
 secure_base_media_url
 }
 }
I am using the Altair GraphQL Chrome plugin to test the API(use any GraphQL client.

The Local Magento platform is ready to support the headless eCommerce experience from the AEM storefront; in the next post, let us see how to enable the AEM CIF framework to build the headless eCommerce experience between AEM and Magento.