Thursday, July 2, 2020

Geo Location Based Redirects with CloudFront and Apache | Redirect Web traffic Based on Country of Origin with CloudFront

This tutorial explain the approach to enable Geo Location based redirects with CloudFront and Apache.

Geo IP based redirection

Geo IP based redirection is the process of automatically redirecting a website visitor by their geolocation.

There are multiple options to enable the location based redirects in Apache, one of the option is using Geo IP database like MaxMind Geo IP database to map users’s IP to their location. Maxmind Geo IP database can be enabled through Apache module.

If you are using any of the CDN e.g CloudFront provides specific headers with request location, CloudFront will detect the user’s country of origin and pass along the county code to origin server in the CloudFront-Viewer-Country header. You can use this information to customize your responses e.g redirecting the users to specific URL based on origin country.

Prerequisites

Website enabled with CloudFront CDN and Apache

CloudFront Configurations

As a first step white list the CloudFront-Viewer-Country header in Cloudfront distribution

Access <<CloudFront Distribution>> →Behaviors → <<Specific Behavior>>
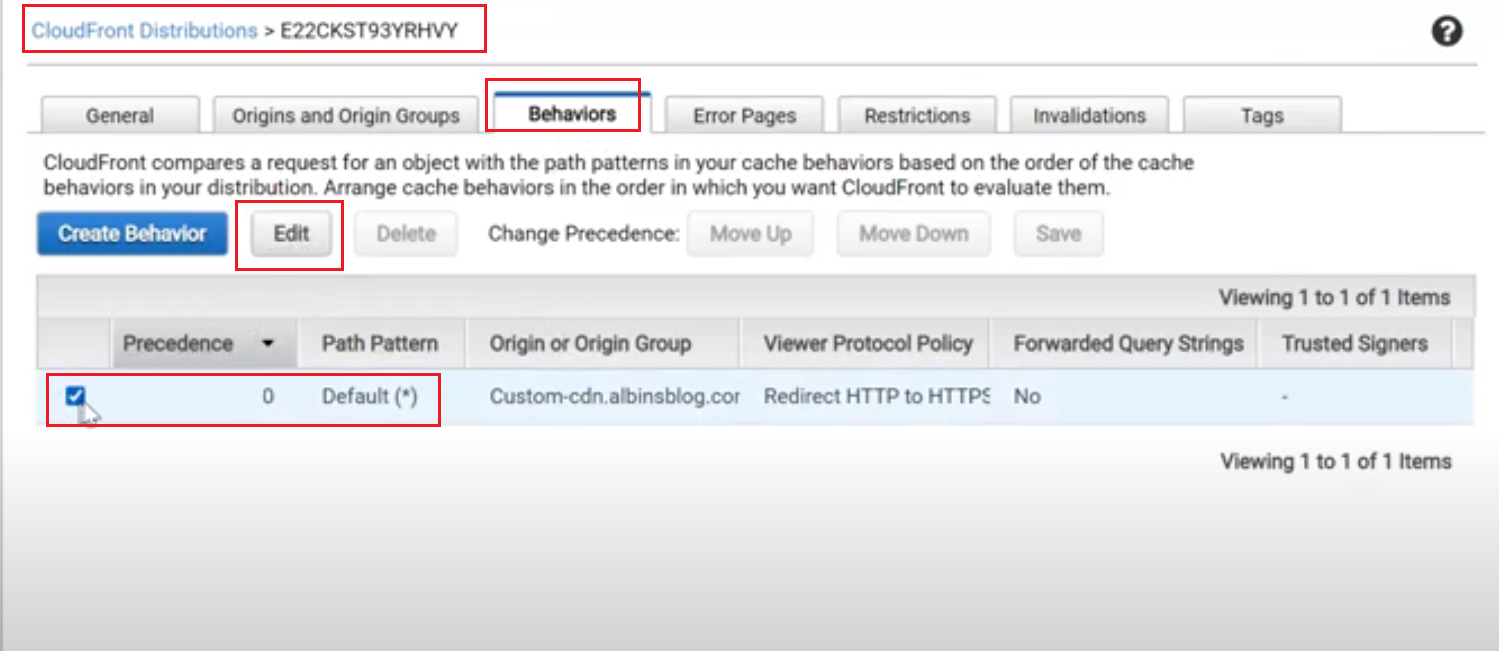
Edit the behavior

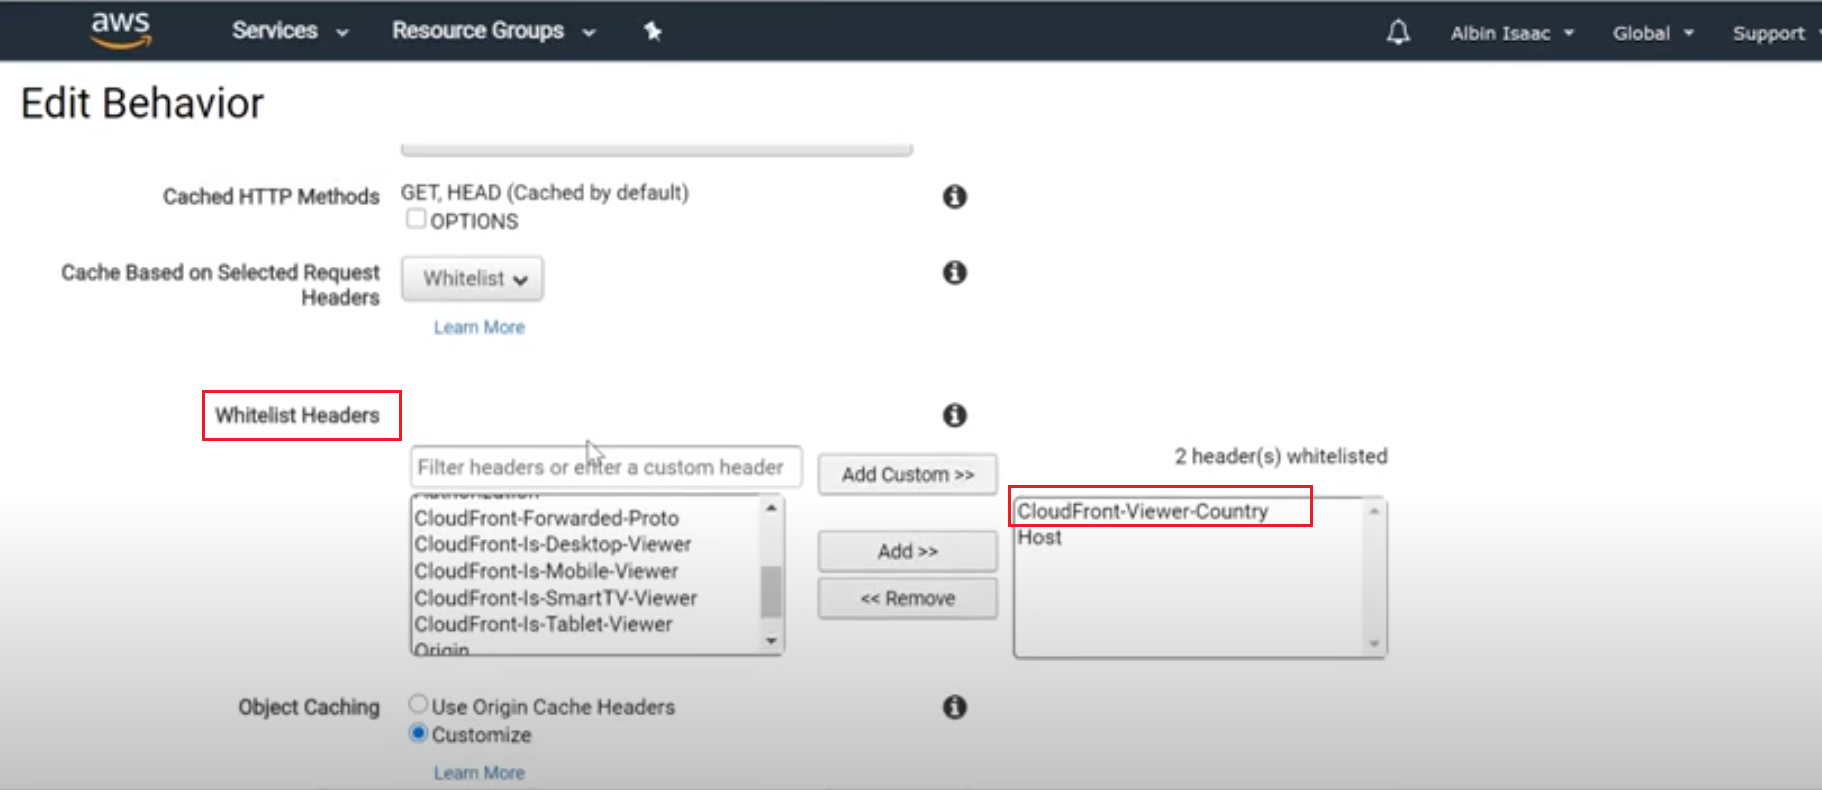
Whitelist CloudFront-Viewer-Country header — the header with user’s country of origin will be sent to origin server(Apache) on every request.

CloudFront-Viewer-Country header will have the two letter country code based on the request origin.

Enable Apache Redirect

Let us now enable the required redirect configuration to virtualhost, add the below redirect rules to enable the the country specific redirects

<VirtualHost *:80>

ServerAdmin [email protected]
DocumentRoot "C:\opt\communique\dispatcher\cache"
ServerName test.albinsblog.com
ServerAlias localhost

RewriteEngine On

RewriteCond %{REQUEST_URI} ^/content/we-retail.html
RewriteCond %{HTTP:CLOUDFRONT-VIEWER-COUNTRY} ^US$
RewriteRule ^.*$ https://test.albinsblog.com/content/we-retail/us/en.html [R=302,L]
RewriteCond %{REQUEST_URI} ^/content/we-retail.html
RewriteCond %{HTTP:CLOUDFRONT-VIEWER-COUNTRY} ^IT$
RewriteRule ^.*$ https://test.albinsblog.com/content/we-retail/it/it.html [R=302,L]
RewriteCond %{REQUEST_URI} ^/content/we-retail.html
RewriteCond %{HTTP:CLOUDFRONT-VIEWER-COUNTRY} ^CA
RewriteRule ^.*$ https://test.albinsblog.com/content/we-retail/ca/en.html [R=302,L]
RewriteCond %{REQUEST_URI} ^/content/we-retail.html
RewriteCond %{HTTP:CLOUDFRONT-VIEWER-COUNTRY} ^FR$
RewriteRule ^.*$ https://test.albinsblog.com/content/we-retail/fr/fr.html [R=302,L]
<Directory />
Options Indexes FollowSymLinks Includes
# Set includes to process .html files
AddOutputFilter INCLUDES .html
AddOutputFilterByType INCLUDES text/html
AllowOverride None
</Directory>

</VirtualHost>

I am using some VPN tool to initiate the connection from different origin country.

Connected the VPN to Canada

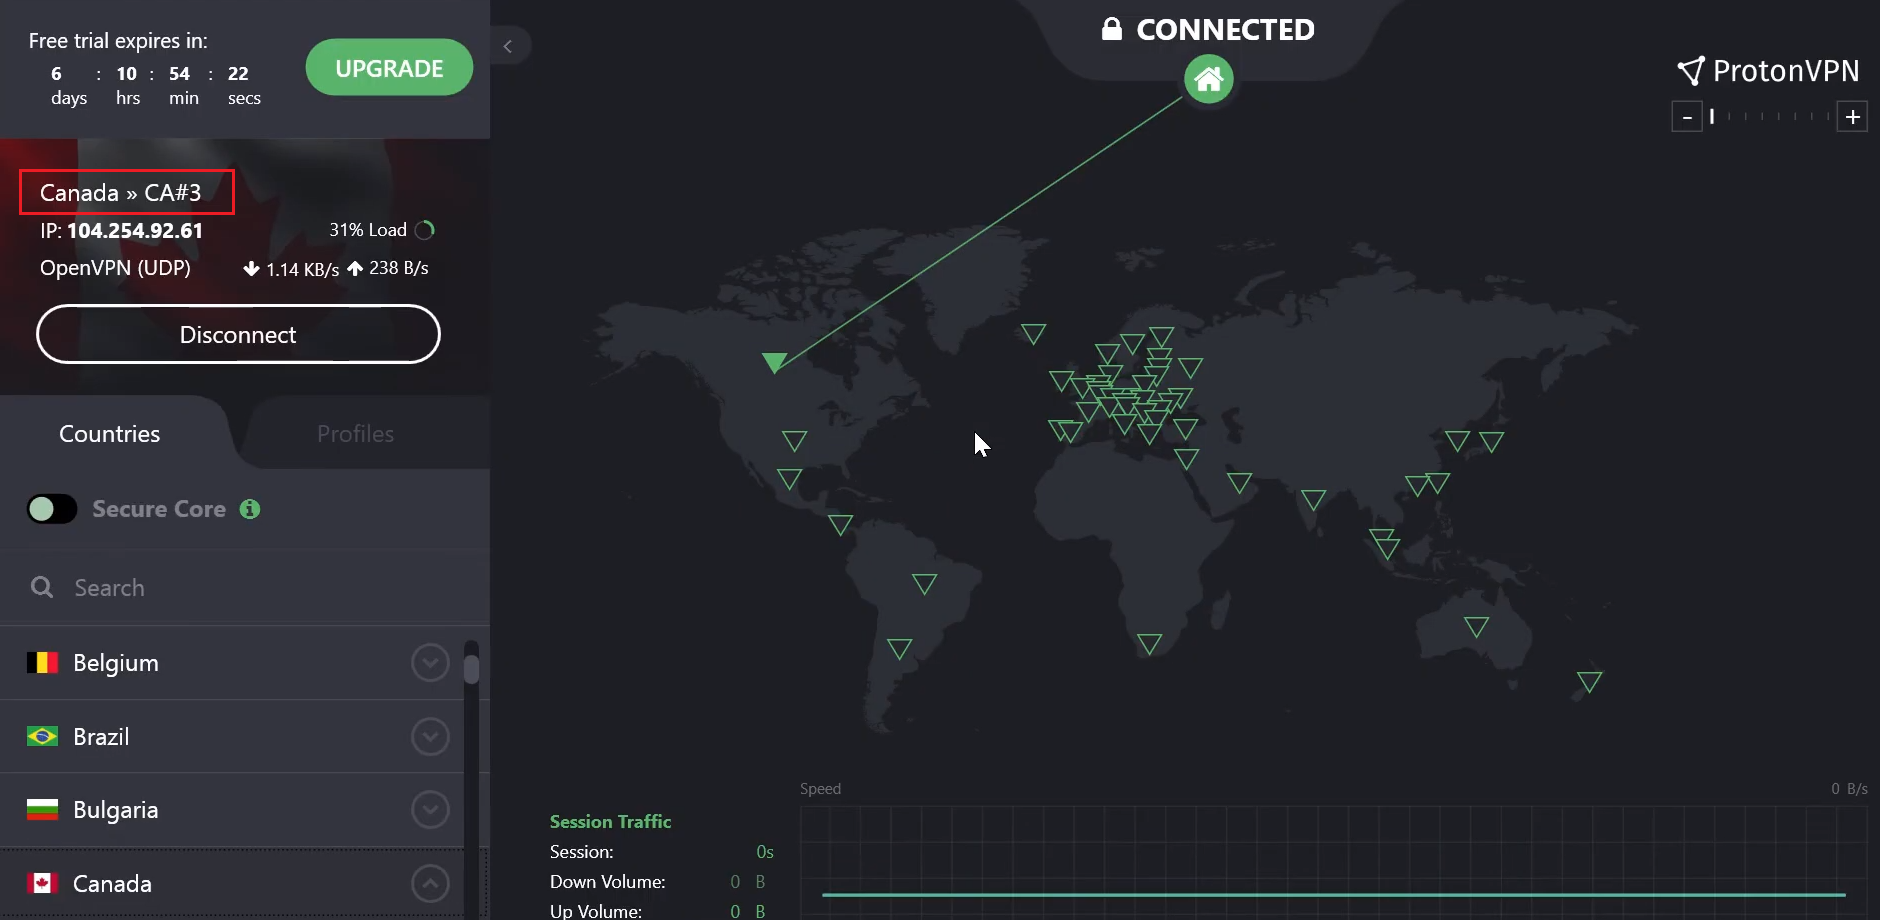
Now the user is redirected to Canada specific URL

The user is redirected to the country specific URL based on the users country of origin, CloudFront will detect the user’s country of origin and pass along the county code to origin server(Apache) in the CloudFront-Viewer-Country header. The Apache server redirect the user to the country specific URL’s based on the country code values in CloudFront-Viewer-Country header.


Friday, May 15, 2020

Error while creating the the new Maven projects - Caused by: java.lang.NoClassDefFoundError: org/apache/ivy/core/report/ResolveReport

Error while creating the new Maven projects - Caused by: java.lang.NoClassDefFoundError: org/apache/ivy/core/report/ResolveReport

I was getting the below exception while creating the AEM projects through Adobe Maven Arch Type 23, even the same issue was reported while generating the through Arch Type 22. 

mvn -e -B archetype:generate -D archetypeGroupId=com.adobe.granite.archetypes -D archetypeArtifactId=aem-project-archetype -D archetypeVersion=23 -D aemVersion=cloud -D appTitle="My Site" -D appId="mysite" -D groupId="com.mysite" -D frontendModule=general -D includeExamples=n -DappsFolderName=mysite

Enabled the flag -e to get more detailed errors - the below expection was thrown while executing the maven command

Number of foreign imports: 1
import: Entry[import  from realm ClassRealm[maven.api, parent: null]]

-----------------------------------------------------

    at org.apache.maven.plugin.DefaultBuildPluginManager.executeMojo (DefaultBuildPluginManager.java:169)
    at org.apache.maven.lifecycle.internal.MojoExecutor.execute (MojoExecutor.java:210)
    at org.apache.maven.lifecycle.internal.MojoExecutor.execute (MojoExecutor.java:156)
    at org.apache.maven.lifecycle.internal.MojoExecutor.execute (MojoExecutor.java:148)
    at org.apache.maven.lifecycle.internal.LifecycleModuleBuilder.buildProject (LifecycleModuleBuilder.java:117)
    at org.apache.maven.lifecycle.internal.LifecycleModuleBuilder.buildProject (LifecycleModuleBuilder.java:81)
    at org.apache.maven.lifecycle.internal.builder.singlethreaded.SingleThreadedBuilder.build (SingleThreadedBuilder.java:56)
    at org.apache.maven.lifecycle.internal.LifecycleStarter.execute (LifecycleStarter.java:128)
    at org.apache.maven.DefaultMaven.doExecute (DefaultMaven.java:305)
    at org.apache.maven.DefaultMaven.doExecute (DefaultMaven.java:192)
    at org.apache.maven.DefaultMaven.execute (DefaultMaven.java:105)
    at org.apache.maven.cli.MavenCli.execute (MavenCli.java:957)
    at org.apache.maven.cli.MavenCli.doMain (MavenCli.java:289)
    at org.apache.maven.cli.MavenCli.main (MavenCli.java:193)
    at sun.reflect.NativeMethodAccessorImpl.invoke0 (Native Method)
    at sun.reflect.NativeMethodAccessorImpl.invoke (NativeMethodAccessorImpl.java:62)
    at sun.reflect.DelegatingMethodAccessorImpl.invoke (DelegatingMethodAccessorImpl.java:43)
    at java.lang.reflect.Method.invoke (Method.java:498)
    at org.codehaus.plexus.classworlds.launcher.Launcher.launchEnhanced (Launcher.java:282)
    at org.codehaus.plexus.classworlds.launcher.Launcher.launch (Launcher.java:225)
    at org.codehaus.plexus.classworlds.launcher.Launcher.mainWithExitCode (Launcher.java:406)
    at org.codehaus.plexus.classworlds.launcher.Launcher.main (Launcher.java:347)
Caused by: java.lang.NoClassDefFoundError: org/apache/ivy/core/report/ResolveReport
    at java.lang.Class.getDeclaredMethods0 (Native Method)
    at java.lang.Class.privateGetDeclaredMethods (Class.java:2701)
    at java.lang.Class.getDeclaredMethods (Class.java:1975)
    at org.codehaus.groovy.reflection.CachedClass$3$1.run (CachedClass.java:84)
    at java.security.AccessController.doPrivileged (Native Method)
    at org.codehaus.groovy.reflection.CachedClass$3.initValue (CachedClass.java:81)
    at org.codehaus.groovy.reflection.CachedClass$3.initValue (CachedClass.java:79)
    at org.codehaus.groovy.util.LazyReference.getLocked (LazyReference.java:46)
    at org.codehaus.groovy.util.LazyReference.get (LazyReference.java:33)
    at org.codehaus.groovy.reflection.CachedClass.getMethods (CachedClass.java:250)

After a long struggle identified the issue was not specific to the arch type and caused by the corrupted local maven repository, the issue got resolved after removing the org folder folder from the maven repository(renamed the folder to org_bak)

Adobe-maven-arch-type-error


Tuesday, January 21, 2020

Same site Cookie Attribute

Same site Cookie Attribute

This video explains the details on new Same site cookie Attribute recently introduced.
  • SameSite=Strict
  • SameSite=Lax
  • SameSite=None


Tuesday, December 3, 2019

How to share the Wireless Network Connection with Hyper-V in Windows 10?

I was trying to configure Hyper-V virtual machine with RedHat Linux in my windows 10 laptop and encountering some issues. This blog explain the steps followed to share the Wireless Network Connection with Hyper-V and RedHat Linux in Windows 10

Ensure the system is connected to Wireless Network

Turn Off the Virtual Machine

windows10-hyper-v-wireless-network
Click on "Virtual Switch Manager"
Click on "new virtual network switch" and Select External as type

windows10-hyper-v-wireless-network

Enter a name and select the wireless adapter from the list
Click on Apply and OK

windows10-hyper-v-wireless-network

Start and Connect to the virtual machine

Login to the user account

windows10-hyper-v-wireless-network

Click on the Network icon and further click on the Connect

windows10-hyper-v-wireless-network

Now you will be able to connect to the network

windows10-hyper-v-wireless-network

To connect automatically on login

Click on "Wired Settings" 

windows10-hyper-v-wireless-network

Click on Settings

windows10-hyper-v-wireless-network

Select "Connect Automatically" and Apply

windows10-hyper-v-wireless-network

Now the network will be connected automatically on login - the wireless network on the system should be connected


Tuesday, December 25, 2018

com.google.appengine.tools.admin.AdminException: Unable to stage app: Cannot get the System Java Compiler. Please use a JDK, not a JRE - Google SDK App Deployment

I was getting the below exception while deploying the application through google cloud SDK command line interface - gcloud app deploy appengine-web.xml

gcloud-app-deploy-no-jdk

Unable to stage:
java.lang.RuntimeException: Cannot get the System Java Compiler. Please use a JDK, not a JRE.
at com.google.appengine.tools.admin.Application.compileJspJavaFiles(Application.java:1297)
at com.google.appengine.tools.admin.Application.compileJsps(Application.java:1273)
at com.google.appengine.tools.admin.Application.populateStagingDirectory(Application.java:983)
at com.google.appengine.tools.admin.Application.createStagingDirectory(Application.java:875)
at com.google.appengine.tools.admin.AppAdminImpl.stageApplication(AppAdminImpl.java:539)
at com.google.appengine.tools.admin.AppAdminImpl.stageApplicationWithDefaultResourceLimits(AppAdminImpl.java:492)
at com.google.appengine.tools.admin.AppCfg$StagingAction.execute(AppCfg.java:2508)
at com.google.appengine.tools.admin.AppCfg.executeAction(AppCfg.java:363)
at com.google.appengine.tools.admin.AppCfg.<init>(AppCfg.java:211)
at com.google.appengine.tools.admin.AppCfg.<init>(AppCfg.java:118)
at com.google.appengine.tools.admin.AppCfg.main(AppCfg.java:114)
com.google.appengine.tools.admin.AdminException: Unable to stage app: Cannot get the System Java Compiler. Please use a JDK, not a JRE.
at com.google.appengine.tools.admin.AppAdminImpl.stageApplication(AppAdminImpl.java:543)
at com.google.appengine.tools.admin.AppAdminImpl.stageApplicationWithDefaultResourceLimits(AppAdminImpl.java:492)
at com.google.appengine.tools.admin.AppCfg$StagingAction.execute(AppCfg.java:2508)
at com.google.appengine.tools.admin.AppCfg.executeAction(AppCfg.java:363)
at com.google.appengine.tools.admin.AppCfg.<init>(AppCfg.java:211)
at com.google.appengine.tools.admin.AppCfg.<init>(AppCfg.java:118)
at com.google.appengine.tools.admin.AppCfg.main(AppCfg.java:114)
Caused by: java.lang.RuntimeException: Cannot get the System Java Compiler. Please use a JDK, not a JRE.
at com.google.appengine.tools.admin.Application.compileJspJavaFiles(Application.java:1297)
at com.google.appengine.tools.admin.Application.compileJsps(Application.java:1273)
at com.google.appengine.tools.admin.Application.populateStagingDirectory(Application.java:983)
at com.google.appengine.tools.admin.Application.createStagingDirectory(Application.java:875)
at com.google.appengine.tools.admin.AppAdminImpl.stageApplication(AppAdminImpl.java:539)
... 6 more

The Java/Javac versions and the JAVA_HOME and PATH variables were configured properly.

gcloud-app-deploy-no-jdk

Also the java runtime was configured properly in appengine-web.xml

gcloud-app-deploy-no-jdk

After little struggle,  the root cause of the issue was with wrong configuration of PATH environment variable.

Other Java executables added to the PATH variable caused the SDK to choose the JRE version for deployment. 

gcloud-app-deploy-no-jdk


The issue got fixed after changing the order of PATH variable - moved up the JAVA bin path over other path configurations

gcloud-app-deploy-no-jdk


Saturday, December 15, 2018

How to include dynamic custom script to websites through GTM(Google Tag Manager) - Adobe Experience Manager(AEM)

How to include dynamic custom script to websites through GTM(Google Tag Manager) - Adobe Experience Manager(AEM)


Google Tag Manager is a tag management system that allows you to quickly and easily update tracking codes and related code fragments collectively known as "tags" on your website or mobile app. Once a small segment of Tag Manager code has been added to your project, you can easily configure and deploy your tag configurations from a web-based user interface without the need to deploy additional code in most cases. This reduces errors and frees you from having to involve a developer every time you need to make changes.

This post explains the approach to use Google Tag Manager(GTM) to include the dynamic scripts as part of Adobe Experience Manager(AEM) websites.


Create a free google tag manager account if one is not available

tagmanager-GTM


Install the GTM header and body scripts to the AEM website

tagmanager-GTM


tagmanager-GTM


Copy the head script to the header file and body script to body footer(start of body section)

tagmanager-GTM

tagmanager-GTM

tagmanager-GTM


Friday, May 5, 2017

How to display the git tags based on the environment in Jenkins parameter

How to get the basic profile details of a user in external clients through OAuth - AEM

This post will explain how to display the git tags based on the environment in Jenkins parameter - Displaying the dynamic list with tag names filtering the tags with environment name e.g. QA, UAT, PROD(the environment name should be included in the tag while creating)

Select "This build is parameterized" in Jenkins job configuration
Add new parameter of type Extensible Choice
Enter the name "Tag" and select the Choice Provider as "System Groovy Choice Parameter"
Enter the below script in "Groovy System Script"

def gettags = "git ls-remote -t https://username:[email protected]/project/repo.git".execute()
def tags = []
def t1 = []
gettags.text.eachLine {tags.add(it)}
for(i in tags)
{
   def tagName=i.split()[1].replaceAll('\\^\\{\\}', '').replaceAll('refs/tags/', '')
   if(tagName.contains('QA'))
      t1.add(tagName)
}
t1 = t1.unique()
return t1

Change the git repository details and the string based on that the tags should be filtered e.g QA, UAT, PROD


Click on "Run the script now" to test the script - this will displayed the filtered tags.
Save the configurations finally


Tuesday, April 25, 2017

Error while submitting the Eloqua form - Value must not contain any URL

Error while submitting the Eloqua form - Value must not contain any URL

I was getting the following error while submitting the Eloqua form

<!DOCTYPE html>
<html>
<body bgcolor="#ffffff">
<div align="center" style="margin: 60px;">
<!-- CONFIRMATION PAGE TITLE -->
<div align="left" style="width: 400px; font-size: 14pt; font-family: Tahoma, Arial, Helevtica; font-weight: bold;">
<img src="/EloquaImages/ConfirmationPage/error.gif" width="32" height="50" border="0" align="left">  The Information Provided is Incomplete or Invalid. </div>
<!-- CONFIRMATION PAGE INFORMATION -->
<div align="left" style="width: 400px; font-size: 10pt; font-family: Arial, Helevtica; padding-left: 45px; padding-top: 10px; padding-right: 45px;">
<p>Reference- Value must not contain any URL&#39;s<br/></p>
</div>
</body>
</html>

The Reference filed is configured as hidden in Eloqua and also sending the URL as the input.

Based on the reading Oracle Eloqua 483 Release enabled by default "Must Not Contain URL" validation on all hidden fields but user was not able to modify this validation. But Eloqua 487 Release provided the access to users to modify the validation on hidden fields

Disable "Must Not Contain URL" validation in the hidden field that expecting the URL as input.


Sunday, February 19, 2017

How to display the dynamic popup in a page through GTM?

How to display the dynamic popup in a page through GTM?

This post will explain how to display the dynamic popup in a page through GTM.

The assumption is the required JQuery scripts are included as part of the page.

Define the cookie type variable:

This will help us to display the popup for every new browser session(this step is not required if the popup should displayed every time visiting the page)
  • Click on Variable in left hand side menu.
  • Go to user defined variables and select new.
  • Select variable configuration as 1st party cookie 
  • Give cookie name as popUpDisplayed and check url decode cookie option.
  • Save the changes and give the name as popUpDisplayed.


Monday, May 30, 2016

Integration of Jenkins server with GIT Hub

Integration of Jenkins server with GIT Hub

We are having multiple blogs around this but could not able to find the complete information on this.

Thought of sharing this for my reference too. This post will explain how to integrate Jenkins in Linux with private GIT Hub.

Configuring the GIT plugin in Jenkins:

Jenkins Ã  Manage Jenkins à Manage Plugins
Make sure Jenkins GIT Client Plugin and Jenkins GIT plugins are installed.


Configure GIT in server:

Login to Jenkins server via puty
Execute the following command - sudo yum install git-all

Configure GIT executable path:

Jenkins àMange JenkinsàConfigure System
Enter the git executable path(git installed to the server in previous step)
My case the path is /usr/bin/git, change accordingly


SSH Configuration:

Login to Jenkins server via putty
Execute the following commad - sudo -u jenkins ssh-keygen -t rsa
Enter the details accordingly, Passphrase is optional if required then enter some string.
This will create private and public keys under /var/lib/jenkins/.ssh (default files are id_rsa and id_rsa.pub)


Thursday, April 28, 2016

java.util.concurrent.ExecutionException: hudson.util.IOException2: Failed to create a temporary file in xxxxx/figerprints/2c/73

java.util.concurrent.ExecutionException: hudson.util.IOException2: Failed to create a temporary file in xxxxx/figerprints/2c/73

We were receiving the following exception while executing the deployment jobs from Jenkins

java.util.concurrent.ExecutionException: hudson.util.IOException2: Failed to create a temporary file in xxxxx/figerprints/2c/73


Based on the analysis, the issue happened due to in sufficient space in the server.


The deployment got success after freeing some space in the server.


Saturday, February 13, 2016

Pending - Waiting for next available executor/Disk space too low on /tmp - Jenkins

Pending - Waiting for next available executor/Disk space too low on /tmp - Jenkins

While we were trying to execute the job, it was displaying "Pending - Waiting for next available executor". When looking into the Jenkins node from the console, the Master node is offline and the error message displayed was "Disk space too low. Only xxxGB on /tmp" but the /tmp folder has space around 1GB.


Steps are followed to resolve the issue

  • Increase the space available in /tmp folder. If not able to increase the space in /tmp folder then TemporarySpaceMonitor can be disabled or the memory threshold value of the TemporarySpaceMonitor can be reduced in $JENKINS_HOME/nodeMonitors.xml(make sure atleast minimum memory is available)


Friday, January 29, 2016

send-mail: fatal: open /etc/postfix/main.cf: No such file or directory - Linux

send-mail: fatal: open /etc/postfix/main.cf: No such file or directory - Linux

I was receiving the following exception "send-mail: fatal: open /etc/postfix/main.cf: No such file or directory" while trying to send the mail through cron job. But the main.cf file is available in the specified location /etc/postfix/main.cf.

I tried providing the complete permission to /etc/postfix/main.cf but this not resolved the issue.

Steps to fix the issue:


yum reinstall postfix

postfix stop
postfix start


Friday, May 15, 2015

window.location.href is not working while clicking on hyper link in IE

window.location.href is not working while clicking on hyper link  in IE

I was trying to redirect to a page while clicking on a hyper link with JQuery Ajax and java script windows.location.href

<a id="signout" href="">signOut<a/>

<script>
    $("#signout").click(function(){

                       $.ajax({
                        type : "POST",
                        async: false,
                        url : "/services/logout",                    
                        success : function() {
                                       window.location="/content/test/test.html";
 },
error : function() {
                                       window.location="/content/test/test.html";
}
});
    } );
</script>

This is working perfectly in both Firefox and Chrome but it is not working in IE.

In IE while redirecting the URL is stripped off to /content/test/(test.html got removed while performing the redirect)

The issue can be fixed as below by adding # in href attribute.

<a id="signout" href="#">signOut<a/>


Tuesday, April 7, 2015

How to enable SSH X11 forwarding in Linux?

How to enable SSH X11 forwarding in Linux?

The  X11 forwarding from putty using Xming was not working, the DISPLAY variable is not set(echo $DISPLAY) after opening the remote server session in putty(X11 forwarding is enabled in putty and also the display is specified as localhost:0.0)

The actual issue is the X11 forwarding was not enabled in remote linux server.

The following steps can be followed to enable the X11 forwarding in linux server.

Login to linux server through putty

vi /etc/ssh/sshd_config

Enable the following flags

AllowAgentForwarding yes
AllowTcpForwarding yes
X11Forwarding yes

Execute the following commands

service sshd restart

yum -y update xauth
yum -y install xauth

Now you will be able to perform X11 forwarding.


Tuesday, February 10, 2015

Expected a string but was BEGIN_ARRAY at line 1 column - Gson

Expected a string but was BEGIN_ARRAY at line 1 column 

I was receiving "Expected a string but was BEGIN_ARRAY at line 1 column" error while deserializing the json string to java object using Gson.

Model class:

public class EmailGroup{
private String type;
private String id;
private String name;
private String permissions;

public String getName() {
return name;
}
public void setName(String name) {
this.name = name;
}
public String getPermissions() {
return permissions;
}
public void setPermissions(String permissions) {
this.permissions = permissions;
}
}

JSON Response:

{"emailGroup":{"type":"EmailGroup","id":"1","depth":"minimal","description":"","name":"sample","permissions":[2,5,4,3]}}

Gson gson = new Gson();
EmailGroup obj = gson.fromJson(jsonstring, EmailGroup.class)

The root cause of the exception is the permissions attribute defined in the model class is of type String but the type of permissions in the jsonstring is List.

To fix the issue convert the type of permissions in the model class to List<String>(type string will change based on the type of the list entries)

public class EmailGroup{
private String type;
private String id;
private String name;
private List<String> permissions;

public String getName() {
return name;
}
public void setName(String name) {
this.name = name;
}
public List<String> getPermissions() {
return permissions;
}
public void setPermissions(List<String> permissions) {
this.permissions = permissions;
}
}