Welcome to Tech Mastery, your expert source for insights into technology and digital strategy. Explore topics like Adobe Experience Manager, AWS, Azure, generative AI, and advanced marketing strategies. Delve into MACH architecture, Jamstack, modern software practices, DevOps, and SEO. Our blog is ideal for tech professionals and enthusiasts eager to stay ahead in digital innovations, from Content Management to Digital Asset Management and beyond.
In this tutorial let us see the details on how to build a custom user report in AEM to get the user profile data along with last login details.
AEM won’t provide any OOTB feature to track the last login details of the users — timestamp of the user’s login.
Sometimes we may have the requirement to report the last login timestamp of the users for auditing purposes e.g identify the users who are not login to the system for the last 1 month, identify the inactive users, etc
This can be achieved by enabling a Custom AuthenticationInfoPostProcessor to capture the last login timestamp and building a custom ACS AEM Commons report to fetch the required user profile data along with the last login timestamp.
As a first step define a custom AuthenticationInfoPostProcessor component to update the last login timestamp to the user profile.
AuthenticationInfoPostProcessor
AuthenticationInfoPostProcessor allows bundles to modify the AuthenticationInfo object after authentication has been performed.
AuthenticationHandler#extractCredentials invokes AuthenticationInfoPostProcessor#postProcess with AuthenticationInfo on successful authentication. The “postProcess” can modify the AuthenticationInfo or perform other operations based on the requirement in our case updating the user profile with login timestamp.
Let us enable a custom AuthenticationInfoPostProcessor that will update the user profile with the last login timestamp.
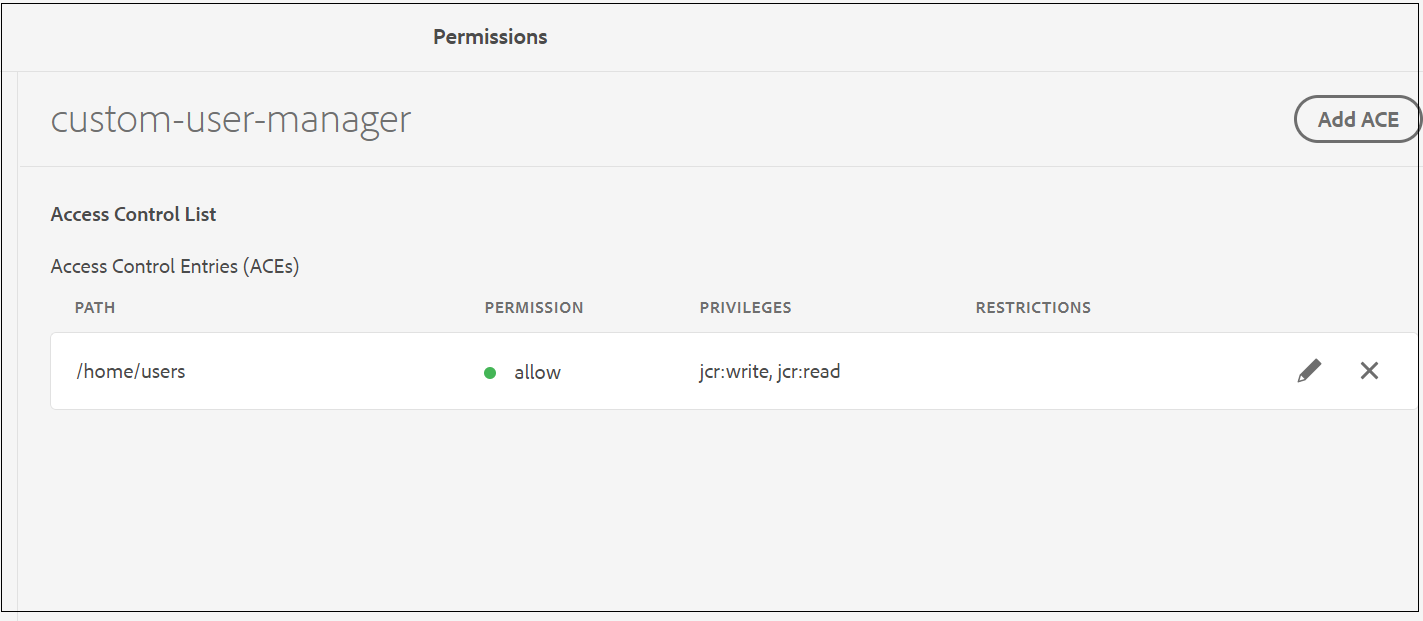
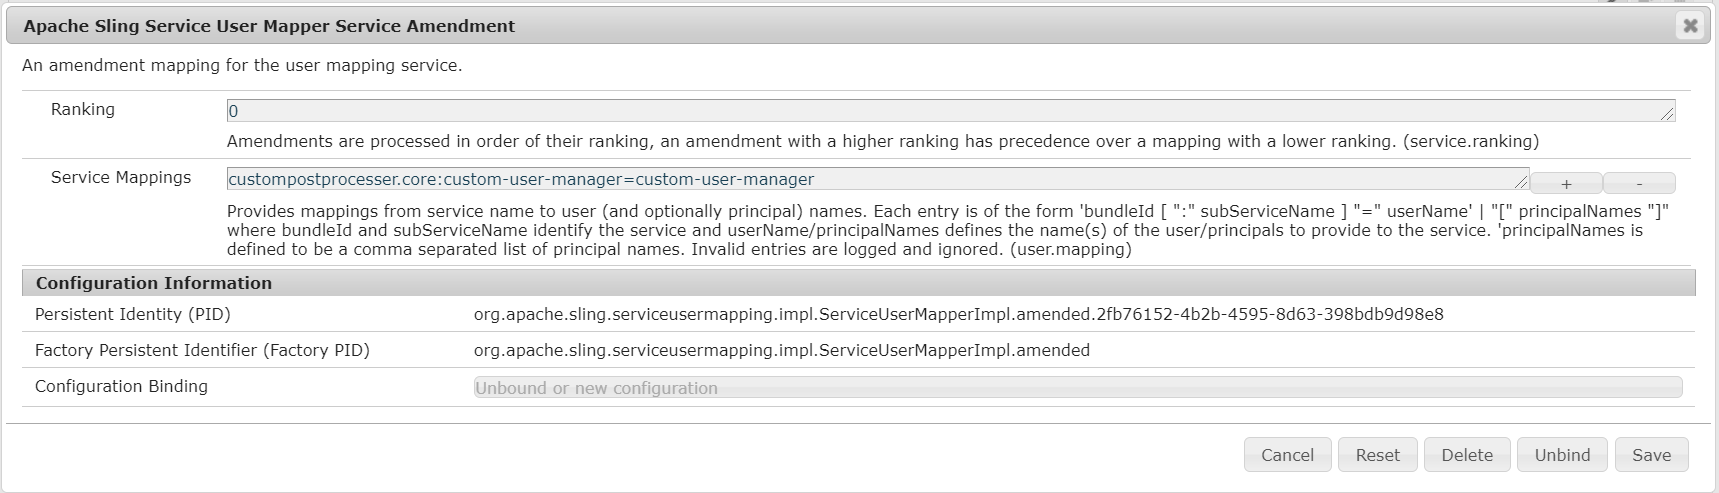
Enable a service user with the name “custom-user-manager” and provide the jcr:read/jcr:write access to /home/users also enable the user service mapping
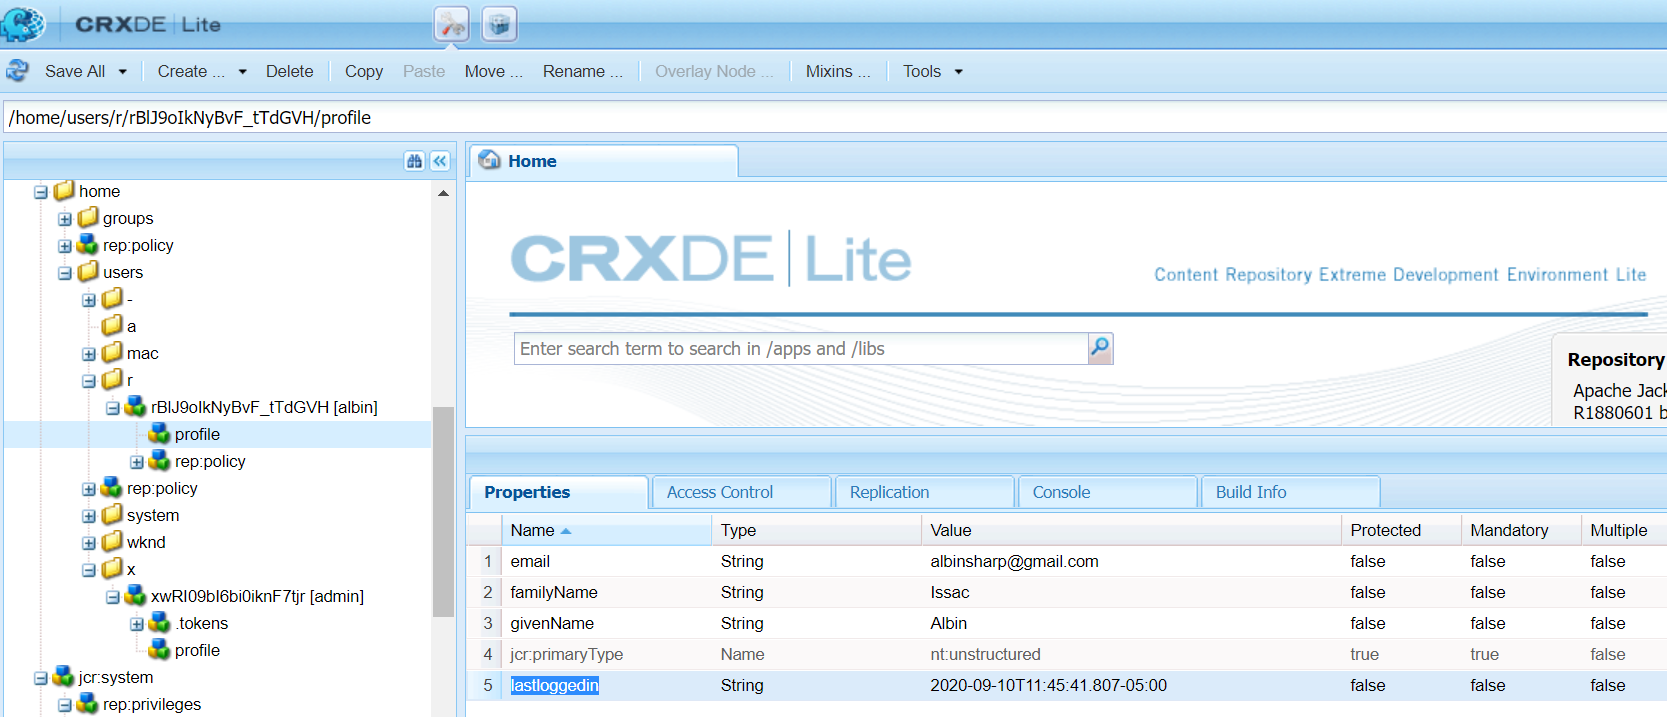
Now the user profile will be updated with the login timestamp on every login to the custom property “lastloggedin”.
Let us now build a custom ACS AEM Commons report to fetch the basic user data
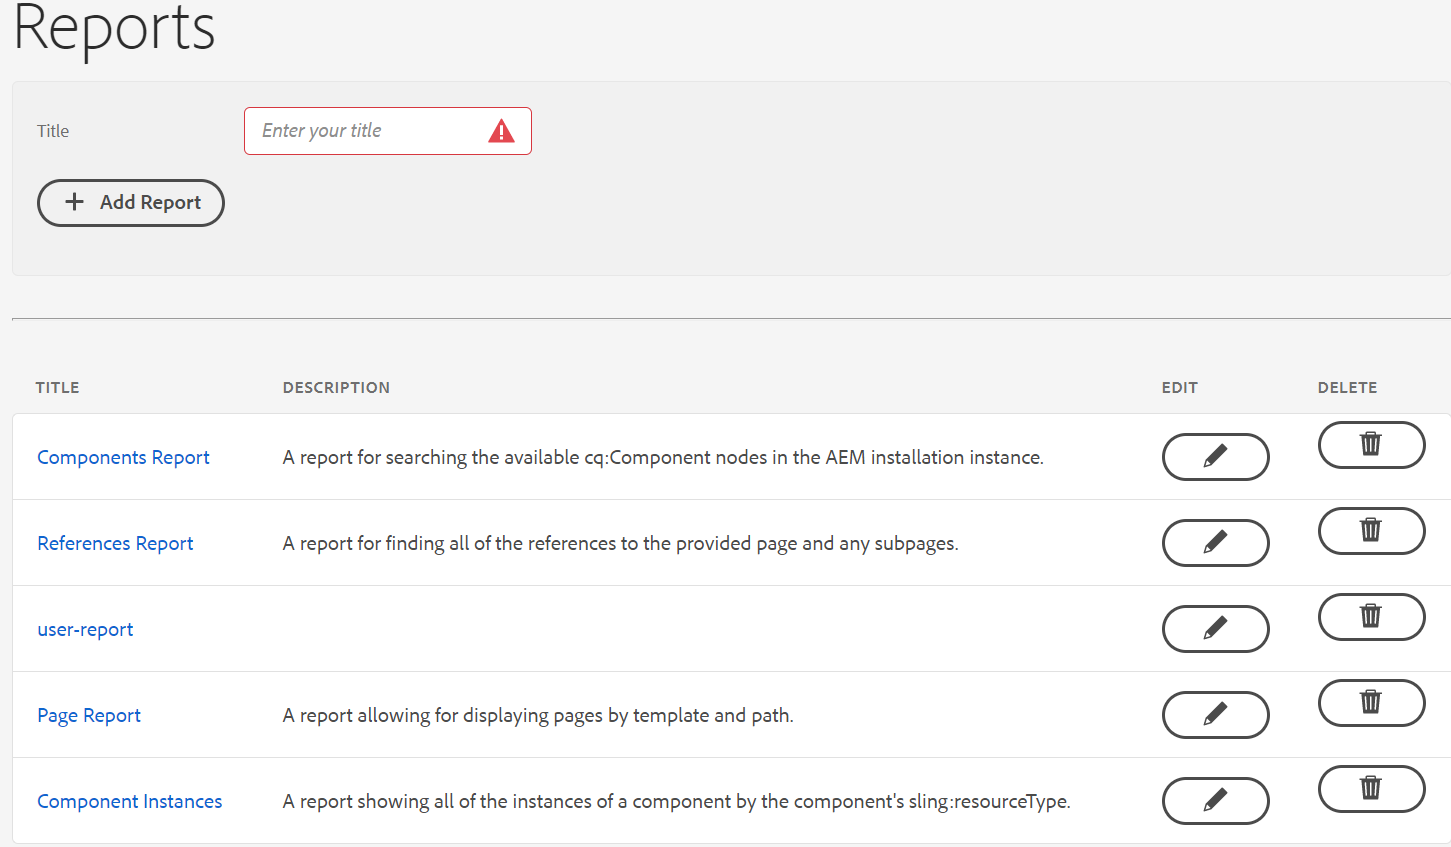
Tools →ACS AEM Commons →Reports
Add a new Report with the name “user-report” (I am generating this in AEM as Cloud Author instance with the latest — 4.8.0 ACS AEM Commons package)
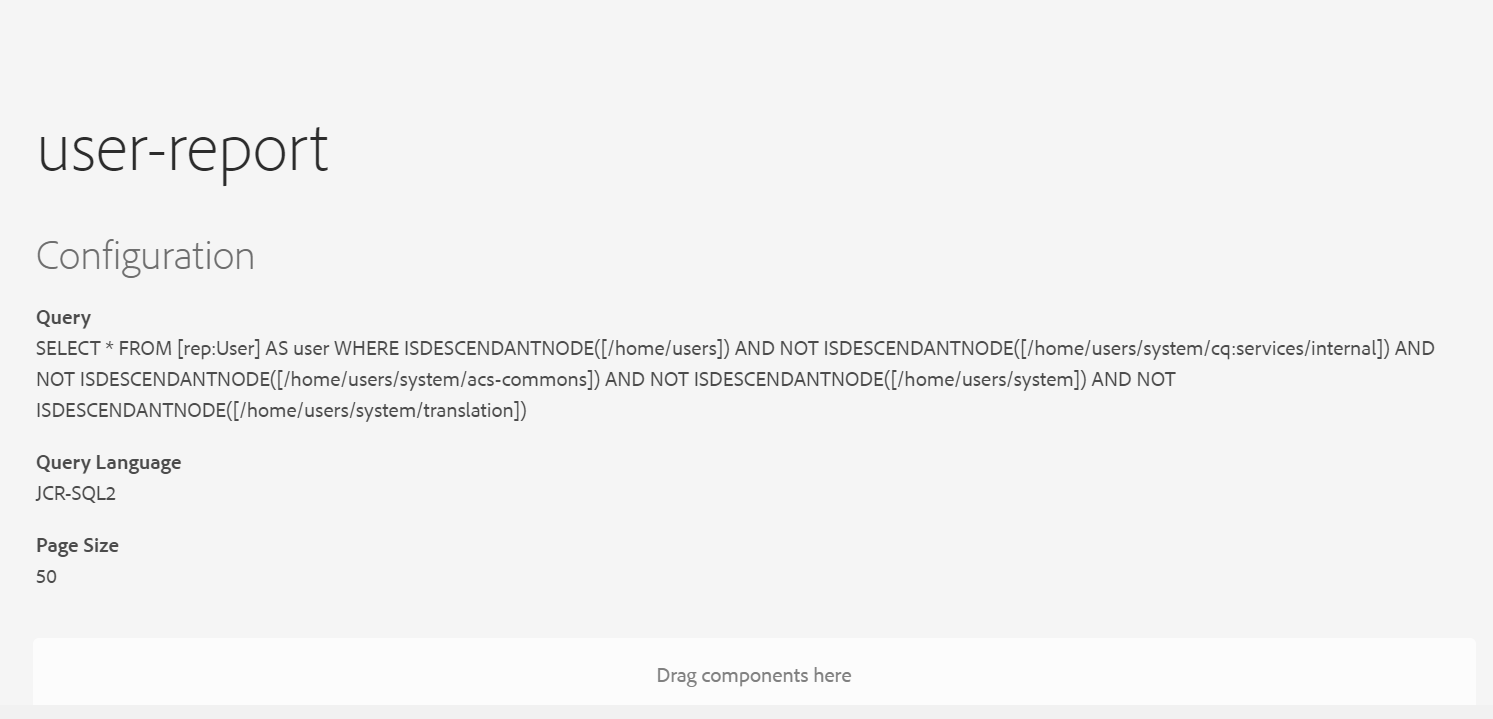
Edit the report and add the “JCR Query Report configuration” component in the Configuration section.
Query — this excludes the system-specific users, modify the query based on your requirement to fetch the report for different scenarios.
SELECT * FROM [rep:User] AS user WHERE ISDESCENDANTNODE([/home/users]) AND NOT ISDESCENDANTNODE([/home/users/system/cq:services/internal]) AND NOT ISDESCENDANTNODE([/home/users/system/acs-commons]) AND NOT ISDESCENDANTNODE([/home/users/system]) AND NOT ISDESCENDANTNODE([/home/users/system/translation])
Query Language — JCR SQL2
Page Size -50
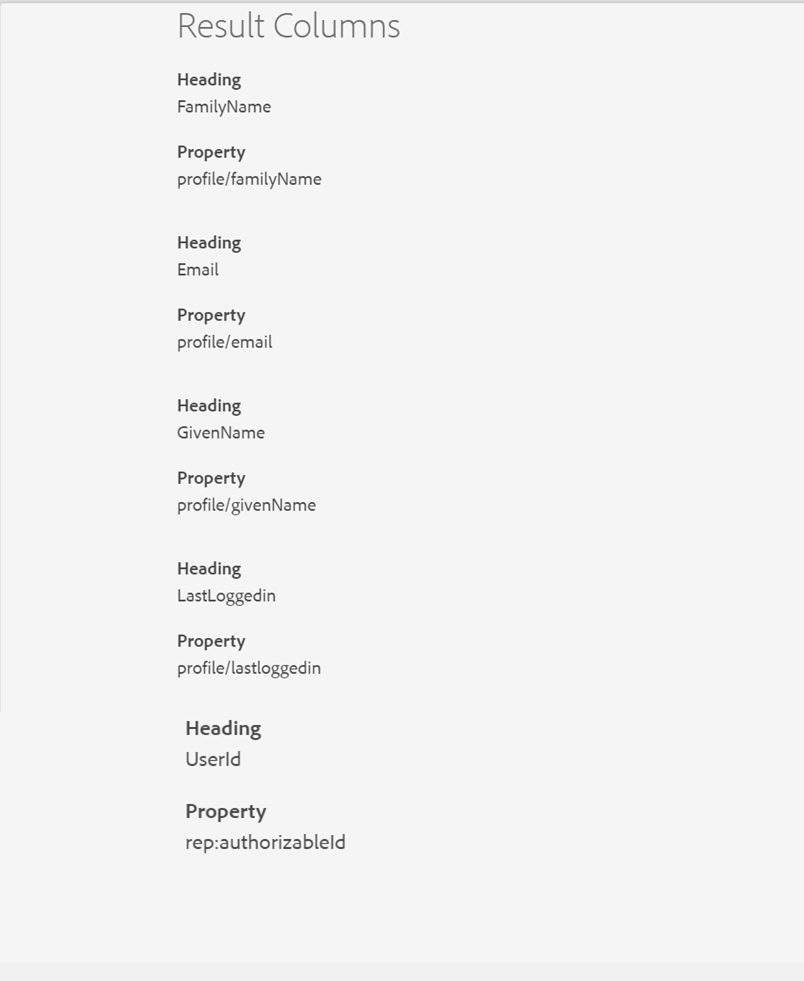
Now configure the required fields including “lastloggedin” under Result Columns with component Type “ACS Commons Report Builder Text Column”
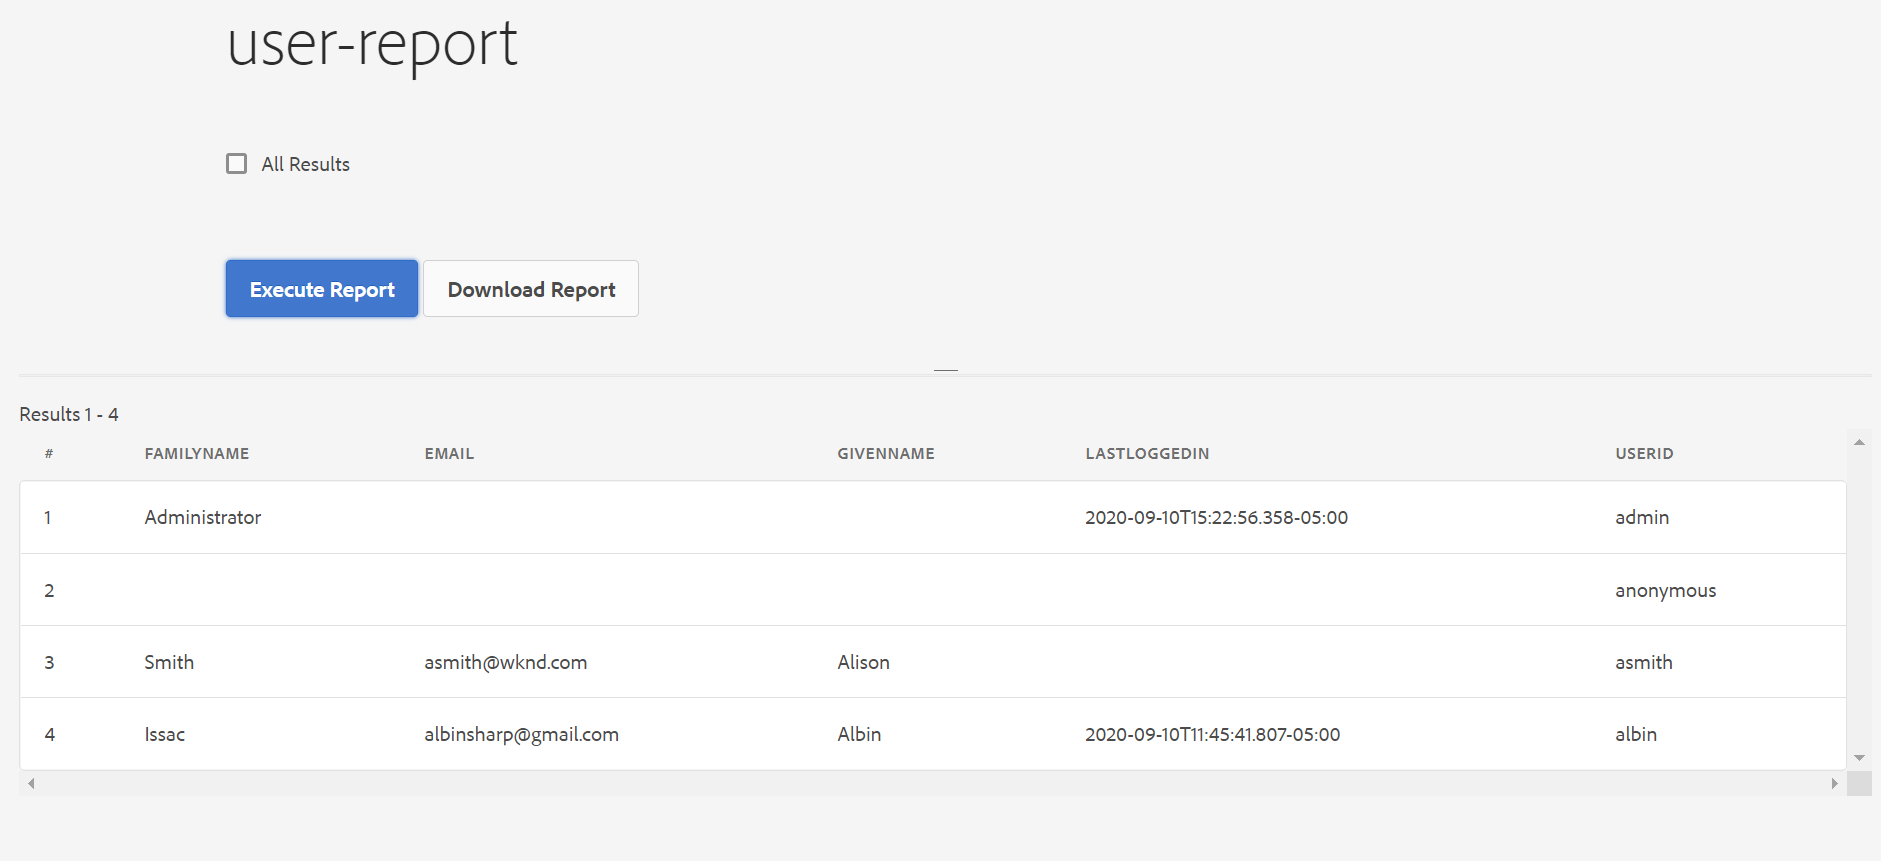
Now open the report and click on “Execute Report”, the report can be downloaded as a CSV file if required — the report now includes the last login timestamp of the users.
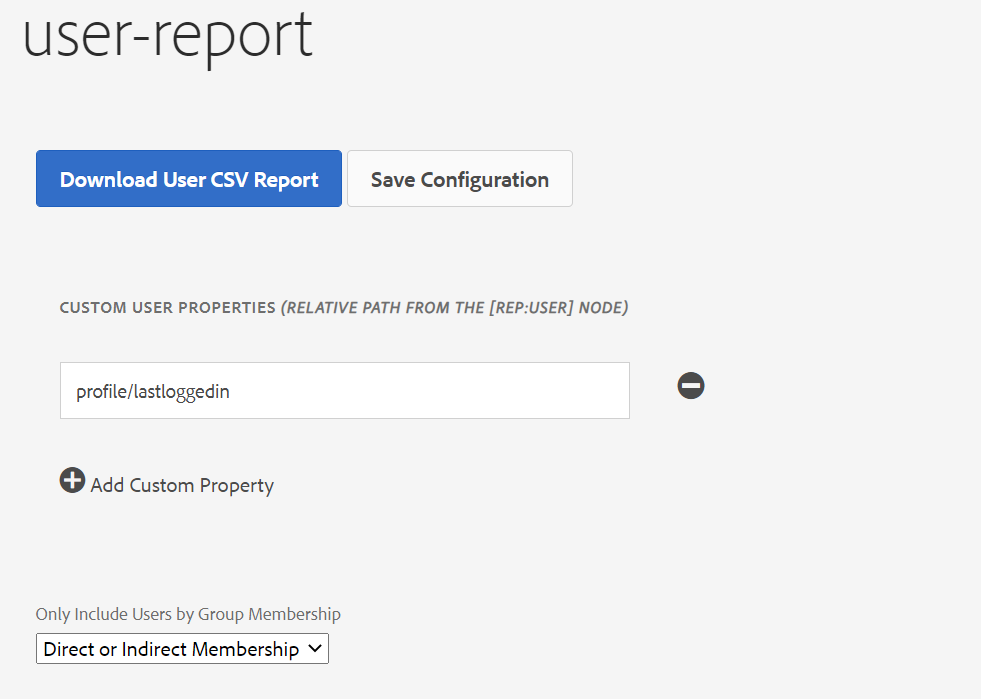
The same report can also be generated through Tools →ACS AEM Commons →User to CSV Exporter, this report includes the additional details like “group names” but includes all the users in the system, the report can be downloaded as a CSV file.
Even the query builder can be used to identify the user’s login to the system within a specific time( the parameters can be modified to fetch the data for different scenarios)
This tutorial explains the approach to define a preview solution for AEM(Adobe Experience Manager)/AMS(Adobe Managed Server) platform to preview the content through Author instance before activating the content to publishers.
Some of the options to enable the preview options are
Share the author URL with wcmmode=disabled, this requires the reviewer should be on-boarded into the Author environment to carry the review
Enable an additional preview(publish) instance, establish the workflow to send the content to the preview server for review/approval before publishing the content to live, the reviewer can use the dedicated review URL to review the content. This approach needs an additional server license to review the content.
Let us now see an alternative simple approach to enable the content review solution in AEM
Content in an AEM Author instance is accessible with a special query string parameter that disables the AEM authoring user interface — ?wcmmode=disabled.
Additionally, by configuring a read-only user account within AEM with an explicit password set, the default single sign-on (“SSO”) behavior that redirects regular users to SAML for authentication is bypassed when sending those credentials via a standard HTTP Authorization header.
Combining these facts, a reverse proxy configuration using CloudFront can be set up within an AWS account to provide a lightweight, scalable review solution with affordable CloudFront data transfer costs.
Cloudfront Configuration
As a first step, let us create the required configurations for CloudFront — the AMS managed CloudFront instance can’t be used to enable these configurations, the custom CloudFront should be used.
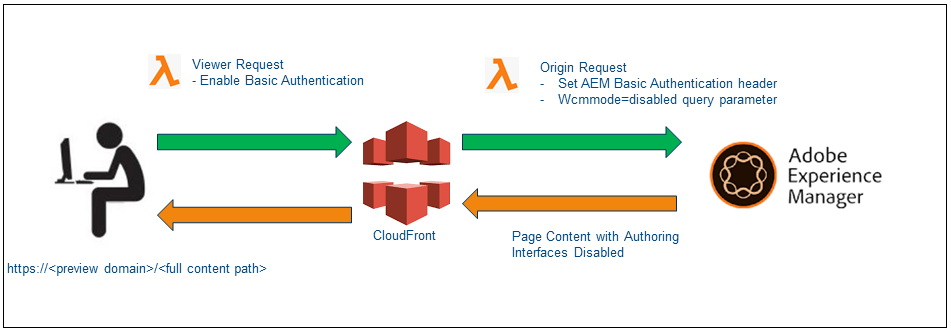
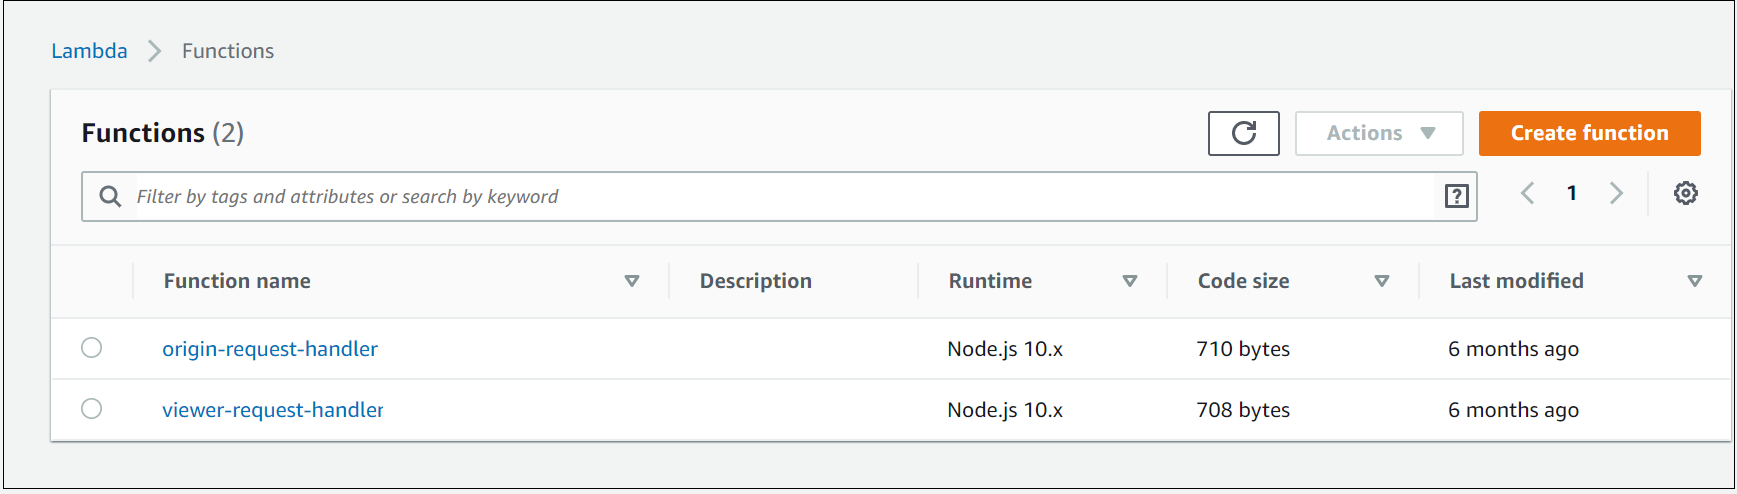
Create two distinct AWS Lambda@Edge functions(Node JS) to be fired on the viewer request and origin request events
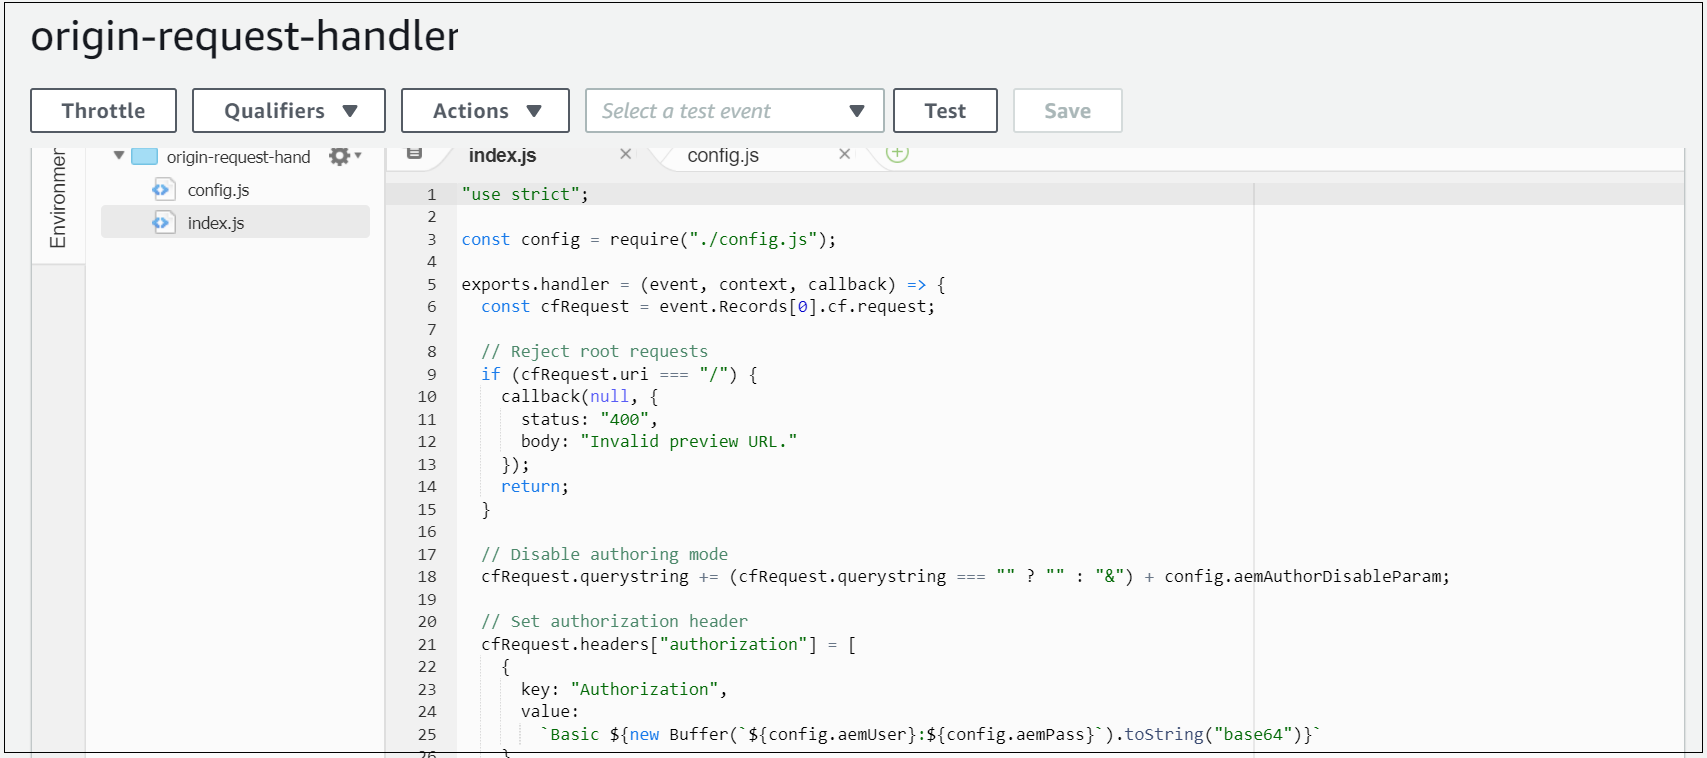
When a request hits this CloudFront request, the origin request Lambda script to append the ?wcmmode=disabled query string parameter to the end of the URL (merging with any existing parameters) before forwarding to the origin(AEM Author).
Additionally, ensures the HTTP Authorization header with AEM preview user is added before the origin request;
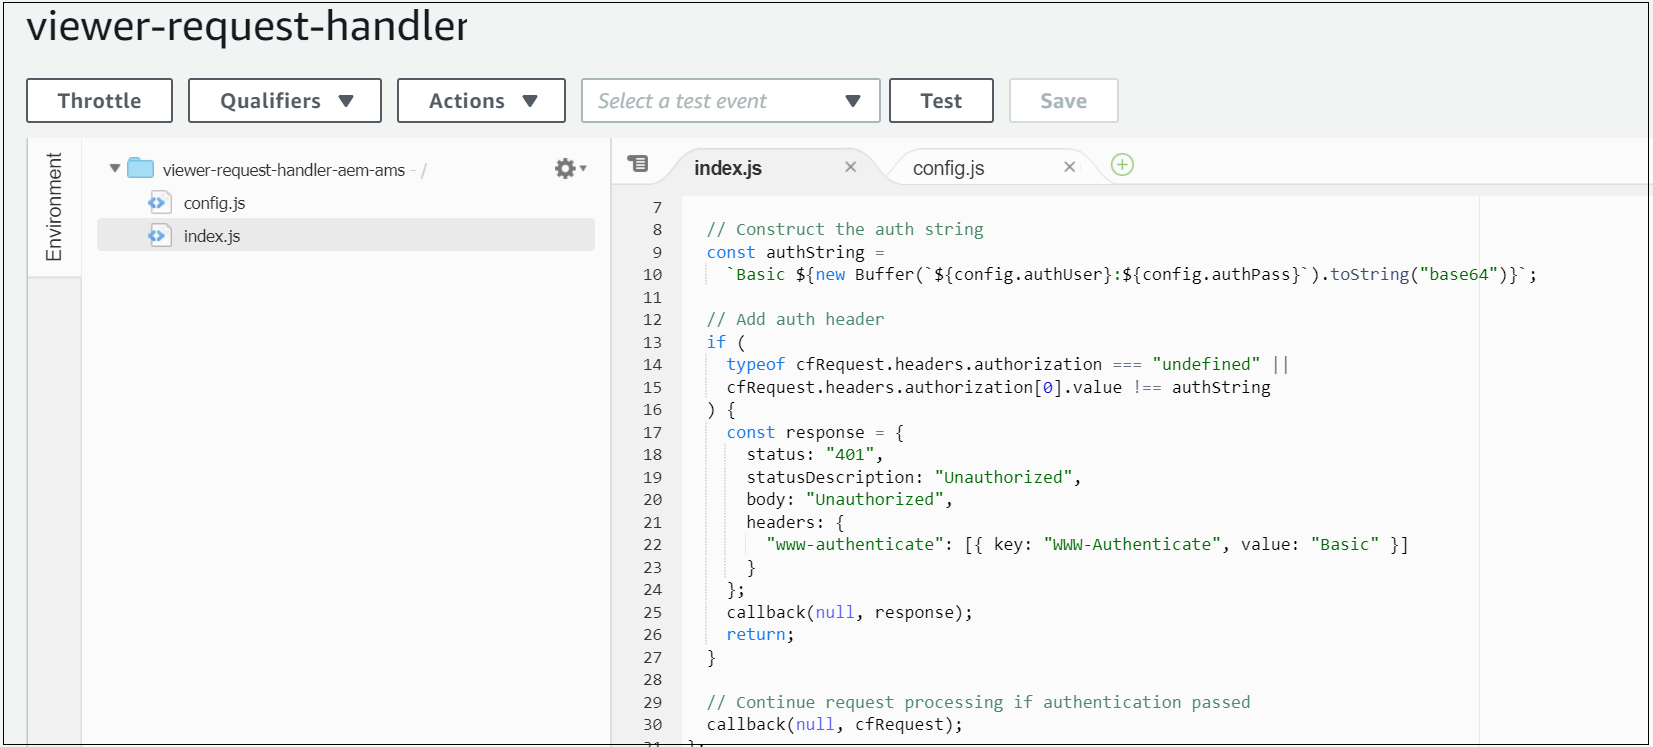
Sets an Authorization header when the viewer request event is fired, ensuring the content at this preview hostname is protected by a standard HTTP Basic Authentication prompt — users prompted with basic authentication to access the preview domain.
Configure a new CloudFront distribution with the below settings:
General
The alternative domain name (CNAMEs): preview-example.com
Add a custom SSL certificate corresponding to the above hostname Origin
Origin
Origin domain name: author-prod-example.com(the author domain name, this domain will be used CloudFront to connect to author server)
Origin protocol policy: HTTPS Only
Behavior
Origin protocol policy: HTTPS Only
Viewer Protocol Policy: Redirect HTTP to HTTPS
Allowed HTTP methods: GET, HEAD, OPTIONS, PUT, POST, PATCH, DELETE(enable the minimum required options)
Cache based on selected request headers: Whitelist
Whitelist: Authorization, Host
Minimum TTL, Maximum TTL, Default TTL: all set to 60 — CloudFront caches the request for a configurable duration (60 seconds, currently), to avoid applying an unnecessary load to the Author instance;
Forward cookies: None
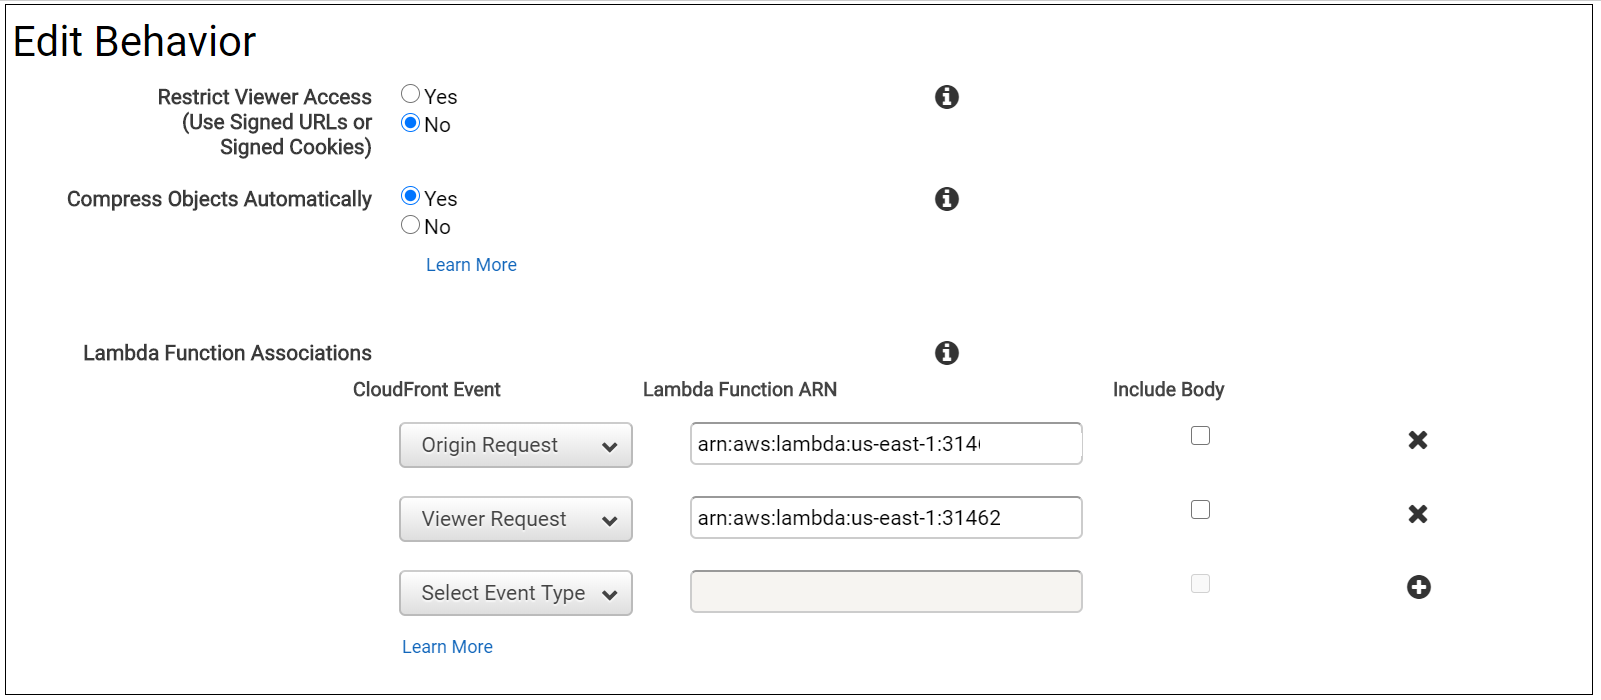
Compress objects automatically: Yes
Lambda function associations: Origin request: point to the ARN of the origin-request-handler Viewer request: point to the ARN of the viewer-request-handler
Point a new DNS hostname preview-author.example.com(CNAME) to a new AWS CloudFront distribution through DNS Zone manager(e.g xxxxxxxxx.cloudfront.net).
Create a preview user in the Author instance with read-only access to the appropriate content/DAM and an explicit password set- reviewaemuser/reviewaemuser!(Please validate with Adobe before implementing this solution if there is any licensing issue with this common user, my understanding is there should not be any impact)
The Author instance is configured with this preview hostname as an additional VHOST in author-vhosts.any — author-vhosts.any, this file enable the supported vhosts for author-farm.any, also disable the http to https redirect in the default.vhost for the specific domain, even though the preview URL is enabled through https the SSL forward related headers will not be sent to the Dispatcher e.g “X-Forwarded-Proto”
AEM renders the page in the Author instance with the AEM authoring user interface disabled, effectively producing HTML markup identical to the output of the Publish instance once activated
Now the configurations are ready, Web publishers can construct a URL similar to the below, reflecting a page location within AEM, and circulate this to any user needing to preview the currently-authored content before it is activated live to the public-facing website. This URL is accessible with complete content path, but behind the credentials provided(reviewaemuser/reviewaemuser!). https://preview-author.example.com/content/test/us/en/home.html
This tutorial is the continuation of earlier tutorials on Sling Content Distribution in AEM, refer the following URL for part 1 and part 2 tutorials.
This tutorial is created based on AEM as Cloud Service Local Author and Publish instances. The social user sync module is removed from AEM as Cloud due to that some additional configurations required to enable the sync distribution between publishers.
I am using the OSGi system console to enable the required configurations for the demo, use run mode specific OGGI configurations while implementing content distribution in the project.
In this tutorial let us see the details on Sling Sync Distribution on AEM.
Sync Distribution — Definition
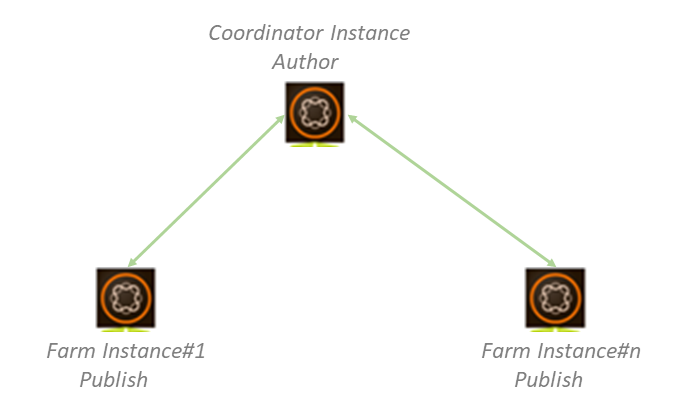
Sync distribution allows modifications made on one publish instance to be synchronized with other publish instances in the farm of publish instances via author instance
The modifications automatically synchronized across the publish instances in the farm and are not created on the author.
That is done by the author pulling the content from source instance(publish) and distribute it to the other publish instances on the farm.
Sling distribution only sends the modification data to non-originating publish instances, eliminating unnecessary traffic
The author pulls resources from n publish instances and push them to n-1 publish instances in the farm.
This will helps us to sync the data generated in n publish instances to (n-1) publish instances other than the source publish instance in a farm through Author instance as a coordinator but without creating the content in Author.
Sync Distribution — Configurations
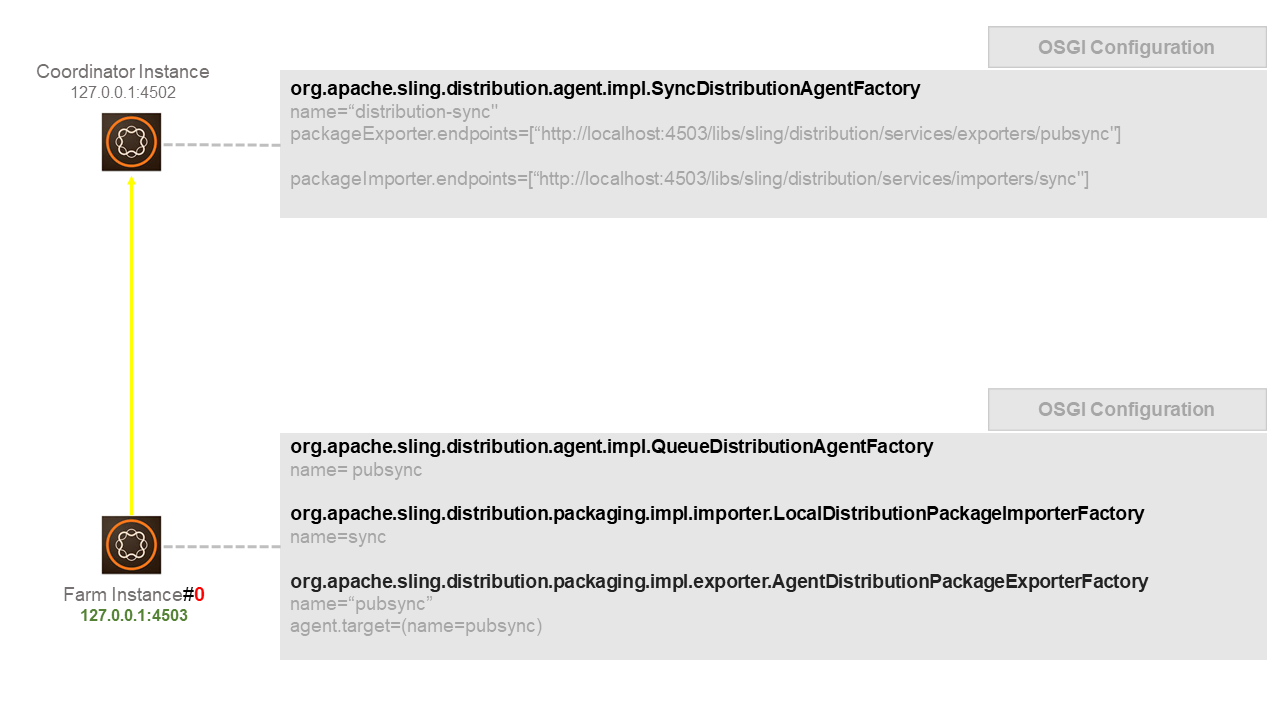
Configure a local importer, agent-based exporter and a “queue” agent on all the publish instances
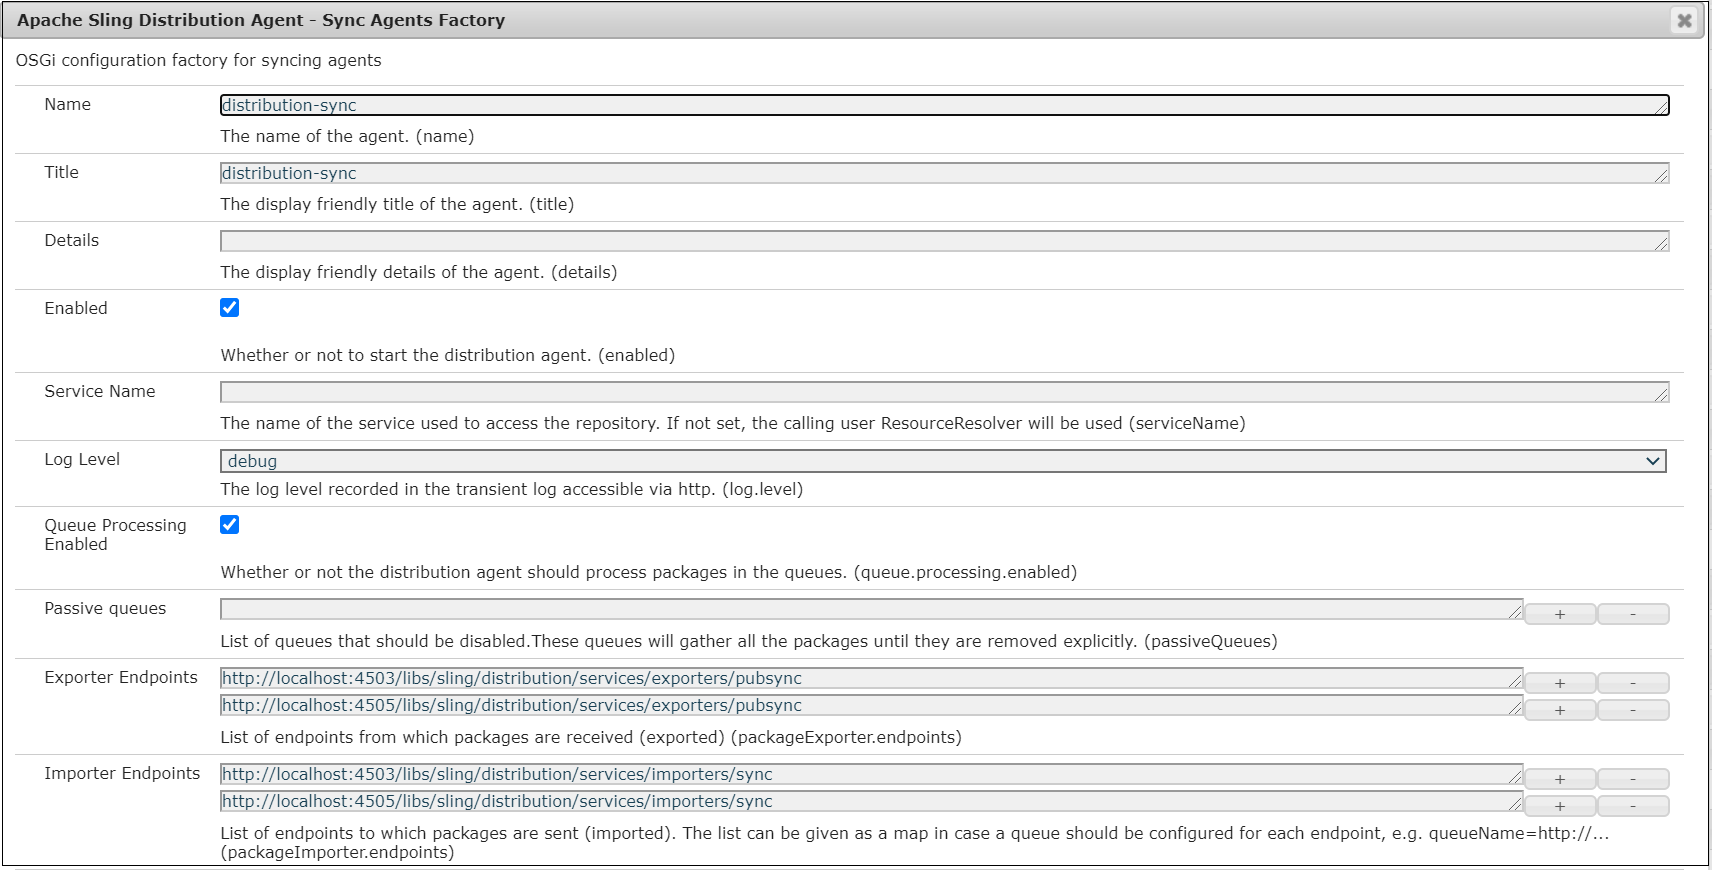
packageExporter.endpoints — pointing to the URL of the exporter on publish instance, configure the endpoints of all the publishers in the farm
packageImporter.endpoints — pointing to the URL of the importer on publish instance, configure the endpoints of all the publishers in the farm
Sync Distribution — Demo
Configure Authorized User
Adobe Granite Distribution — Encrypted Password Transport Secret Provider
Configure Queue agent and importer on Publisher
Configure Sync Distribution Agent on Author
Enable Triggers — Scheduled/JCREvent
Test — CURL/Triggers
Let us now see how to use the sync distribution to sync the content modifications between publish instances through Author instance(Coordinator) without creating the modifications in Author instance. The sync distribution can be used to sync any data between the farm of publishers.
Configure Authorized User
Create a new user with name — “usersync-admin” and add this user to the administrator group
Follow the amove steps in all the publish instances
Adobe Granite Distribution — Encrypted Password Transport Secret Provider
Once the authorized user is configured in all the publishers, enable Encrypted Password Transport Secret Provider in Author instance, this user will be used to sync the content between Author and Publish instances.
Follow the below steps before encrypting the password to sync the hmac and master files from Author to all the publish instances.
Find the bundle Id in Author for com.adobe.granite.crypto.file, for example, 36 by navigating to /system/console/bundles/com.adobe.granite.crypto.file to see the Id.
Navigate to /crx-quickstart/launchpad/felix/bundle<Id>/data in the Author file system.
Copy the two files: hmac and master from the Author instance to the publish instances.
Restart the com.adobe.granite.crypto bundle or the complete Publish instances.
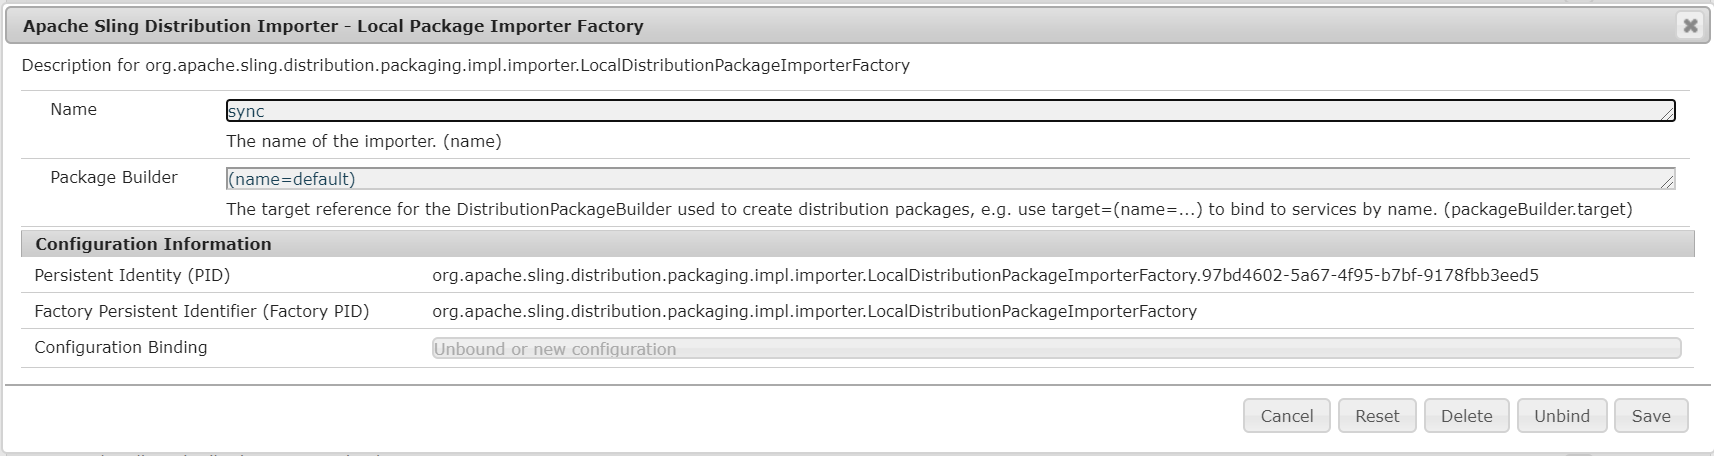
Configure importer, exporter and Queue agent on Publishers
Configure a queue agent that places the changes into the queues, an exporter that exports packages from the queue agent and importer that imports packages from the queue agent.
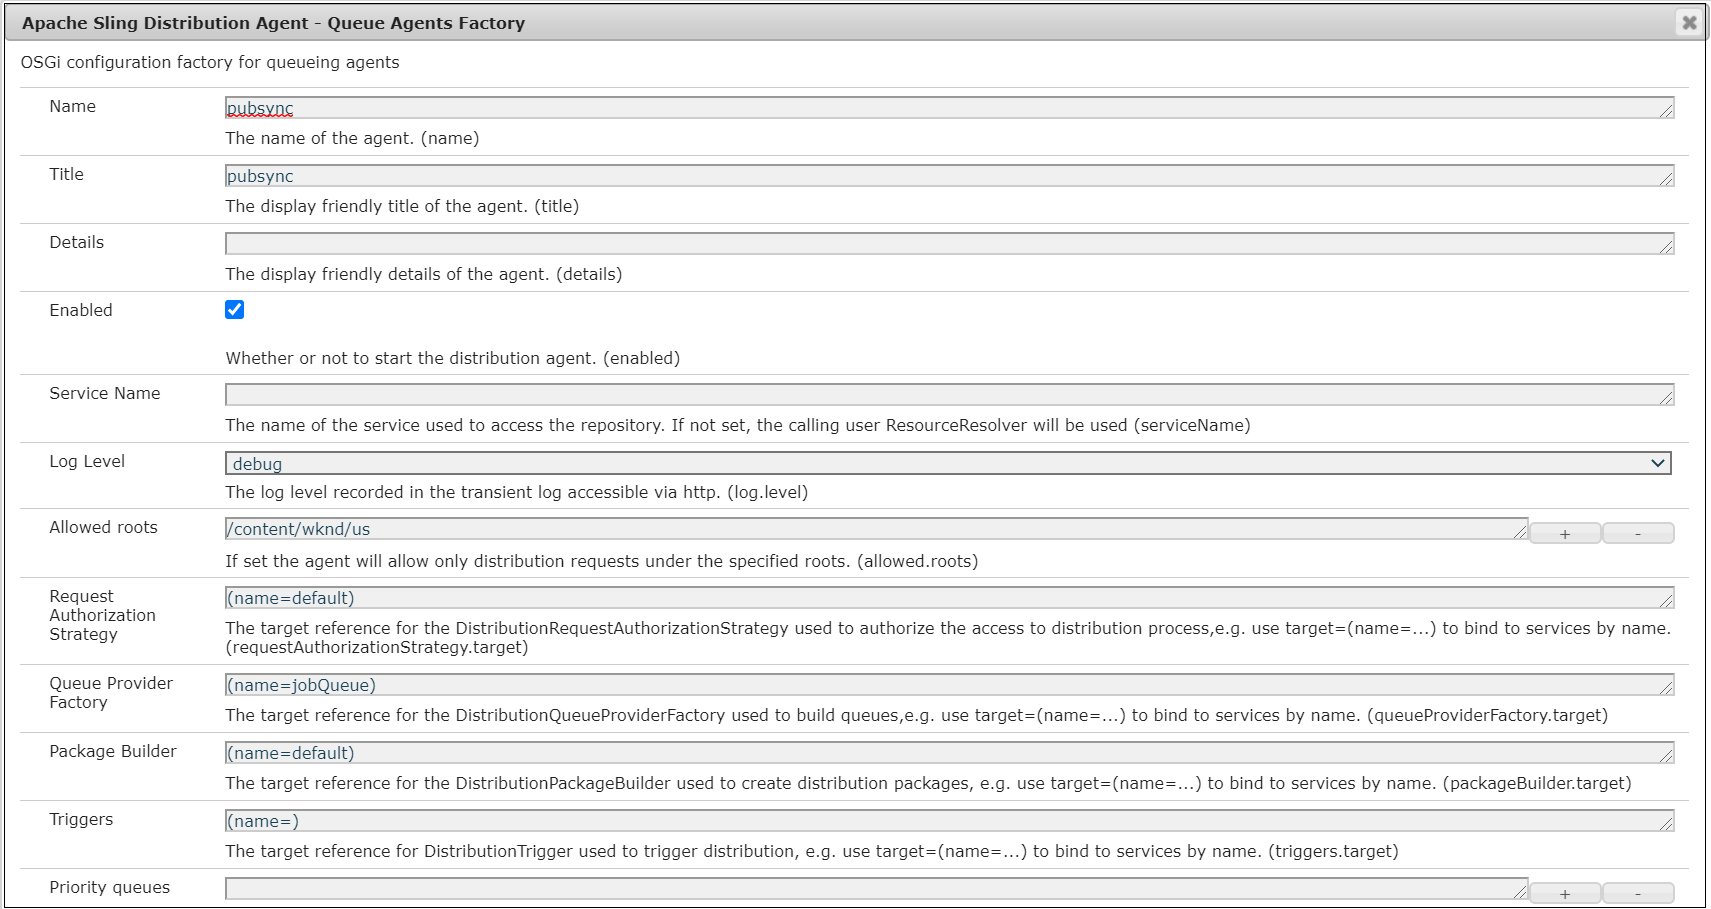
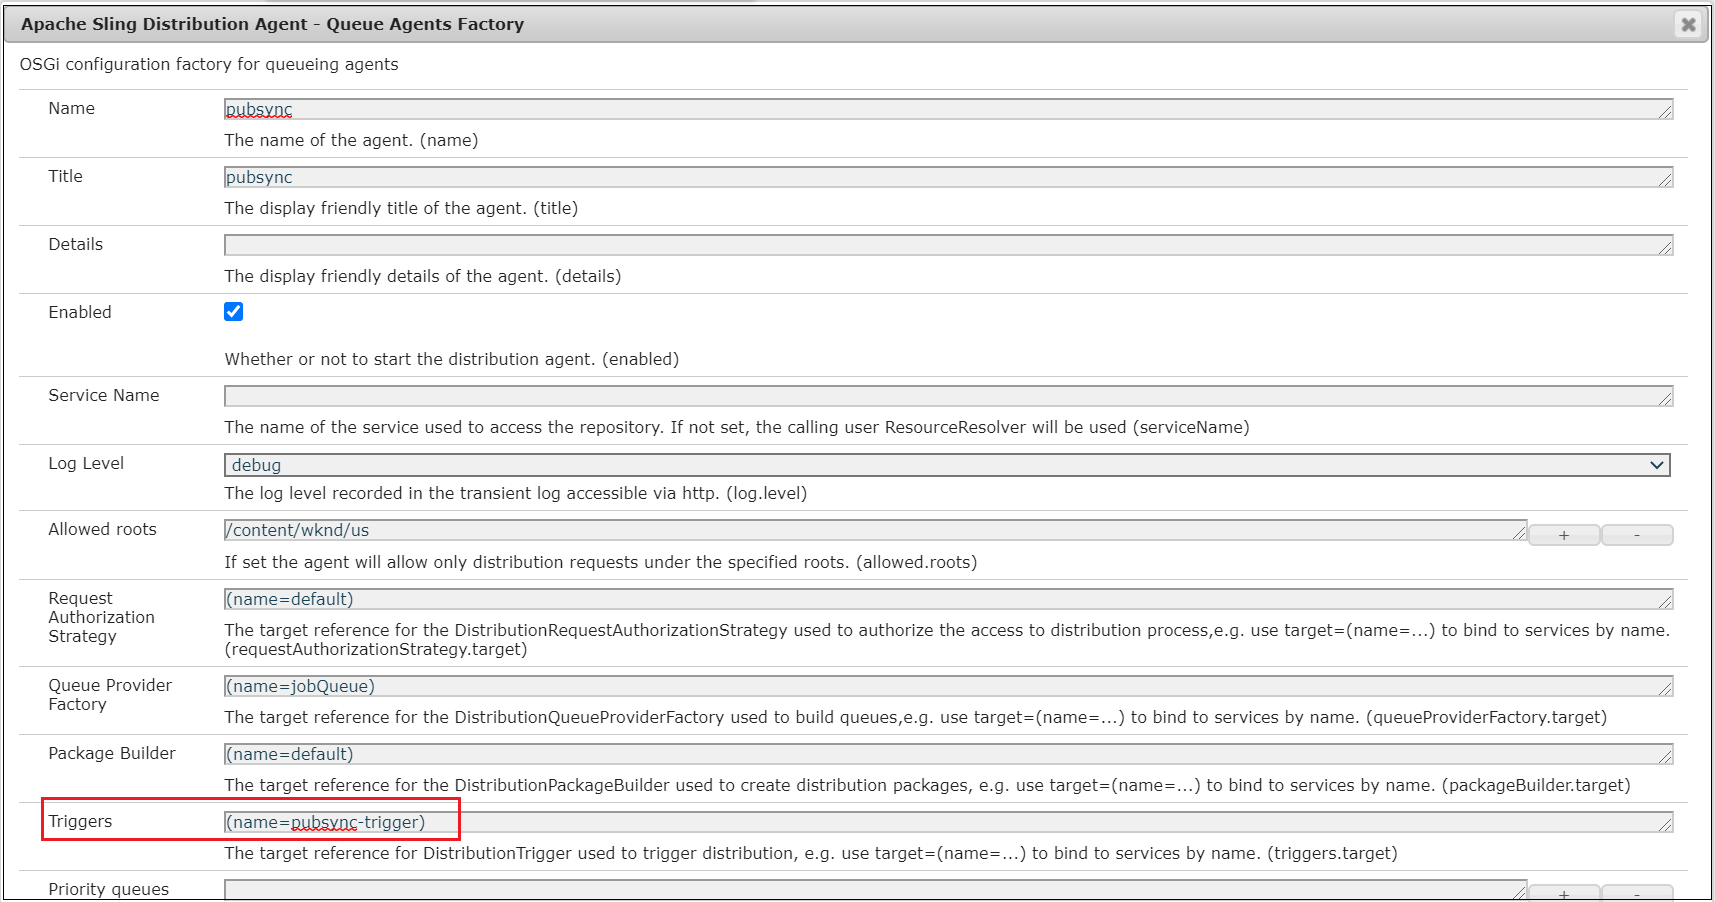
Create new configuration for factory “Apache Sling Distribution Agent — Queue Agents Factory”
Enter a name =“pubsync” Title=“pubsync” Check=“Enabled” Service Name=Service name is optional, if required create a service user with the required permission Change the log level if required Allowed Roots=Add the root paths the agent is responsible for distribution e.g required multiple root paths can be configured ) e.g. [/content/we-retail/us]
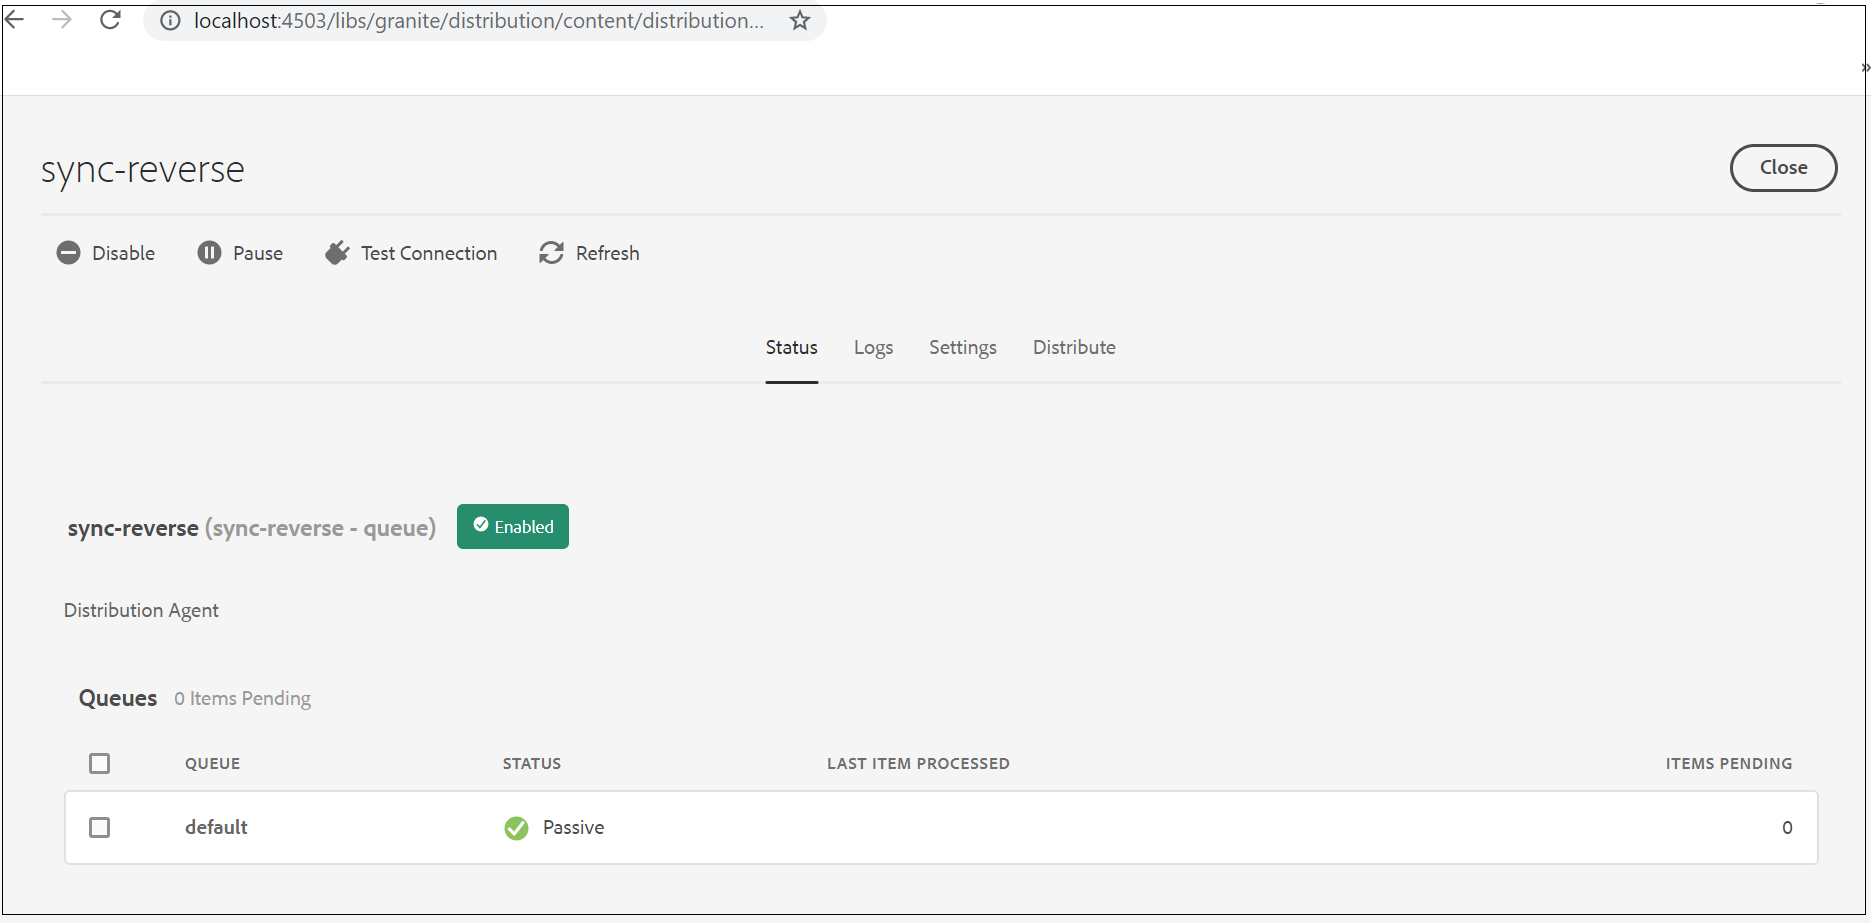
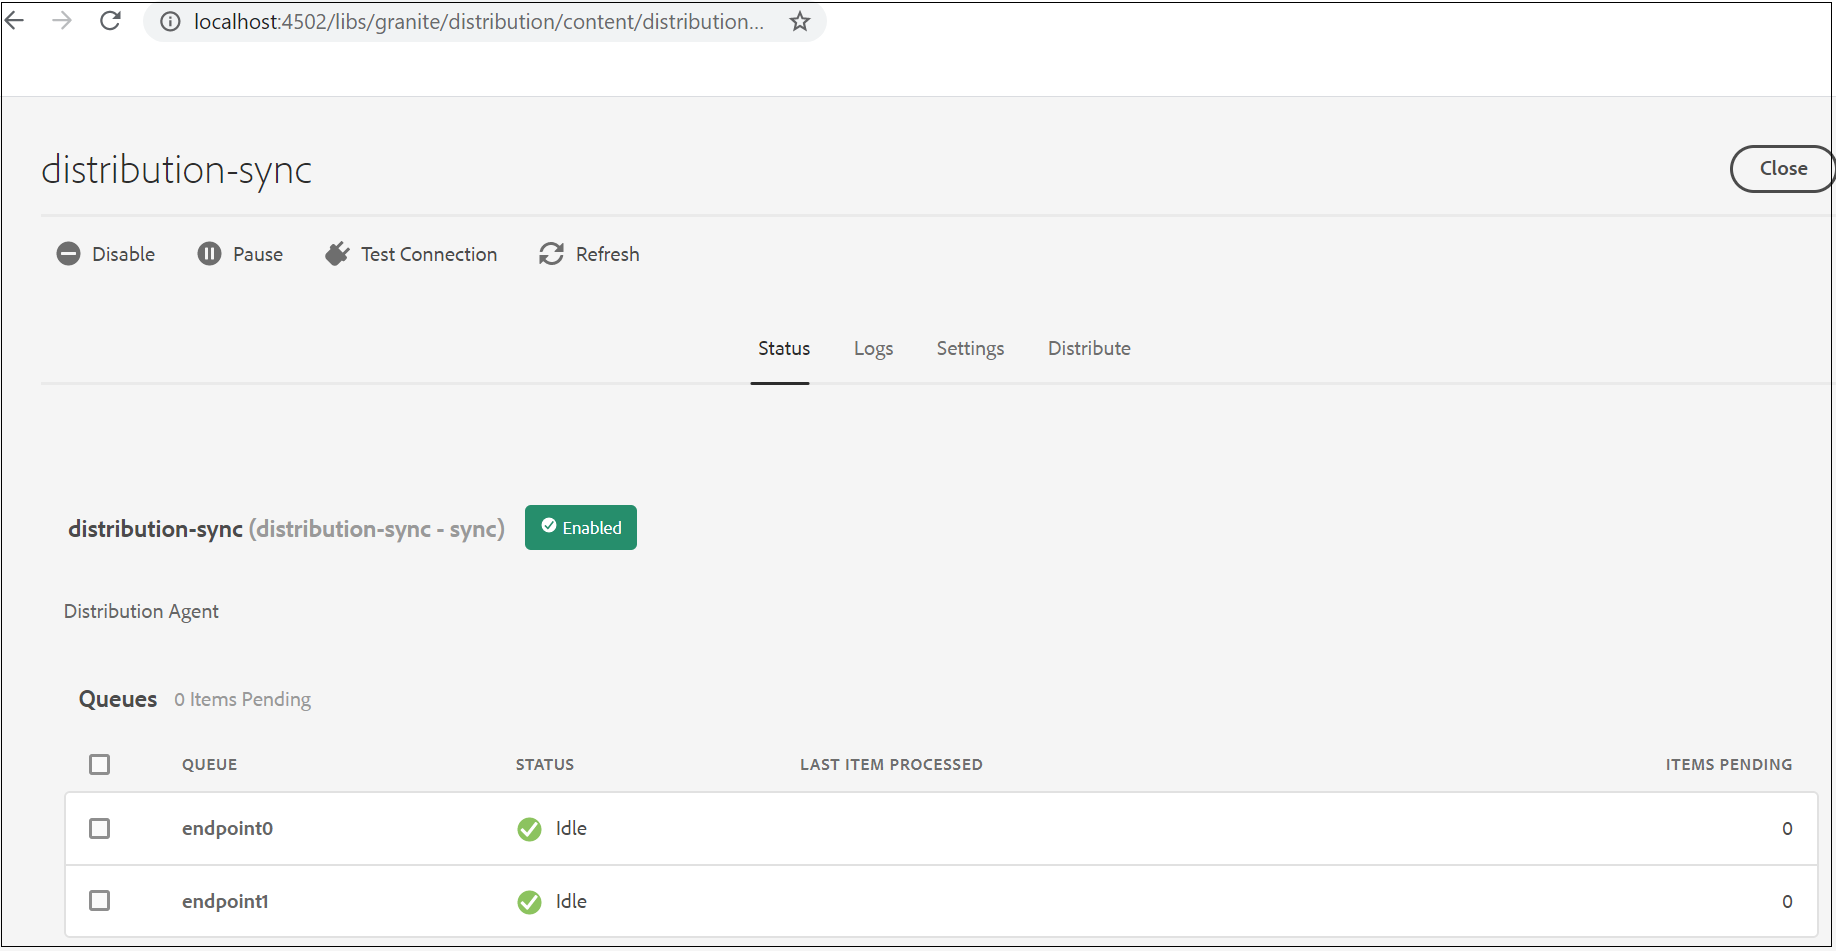
Now the Queue Agent factory is enabled, the agent can be managed through Tools — Deployments — Distribution
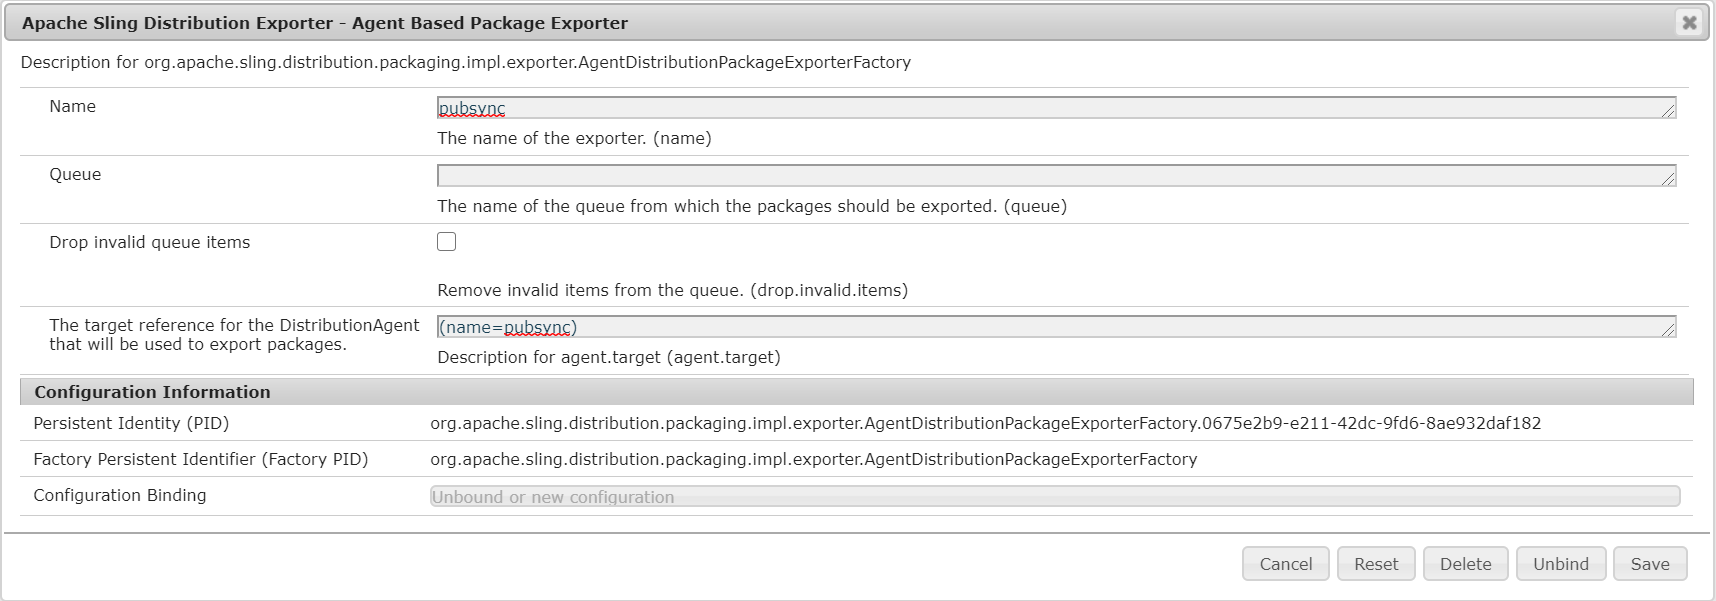
Create new configuration for factory “Apache Sling Distribution Exporter — Agent Based Package Exporter”
name=”pubsync” agent.target=”(name=pubsync)”
Repeat the above(configuring Queue agent, importer, and exporter)steps on other publishers in the farm
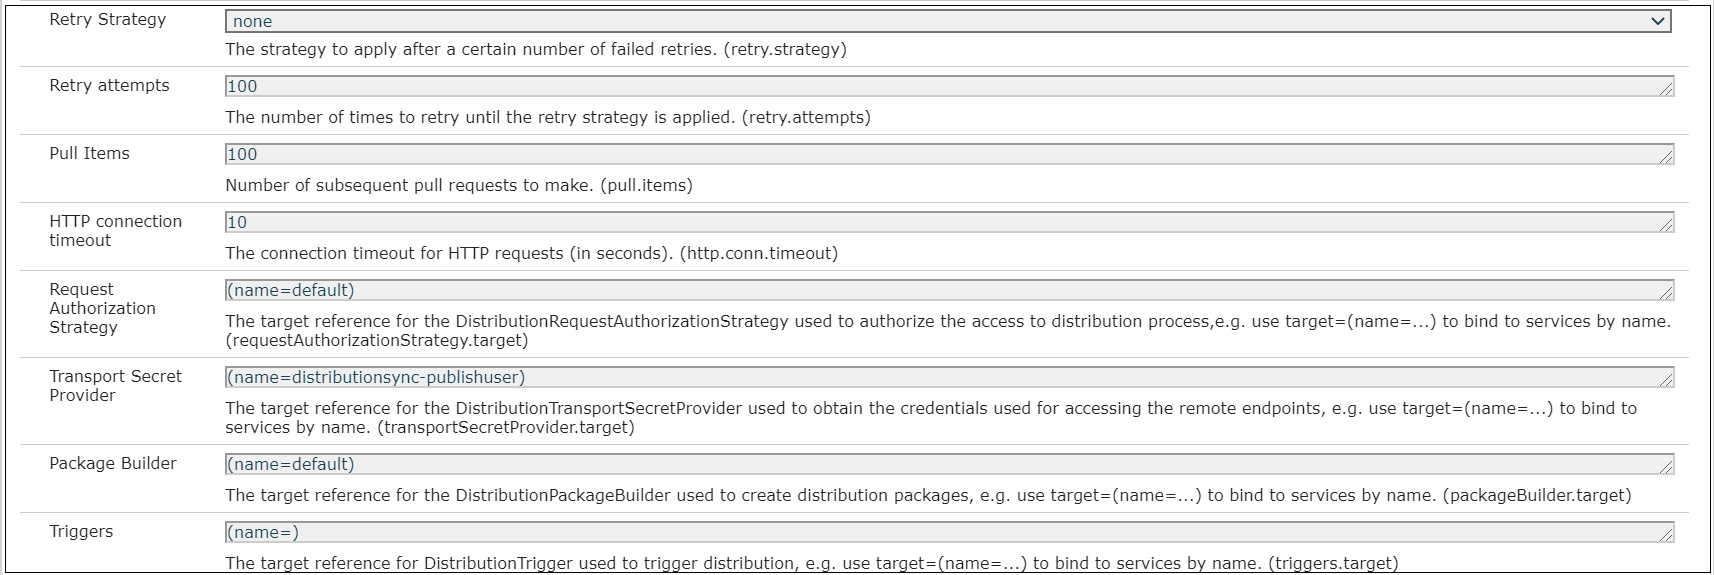
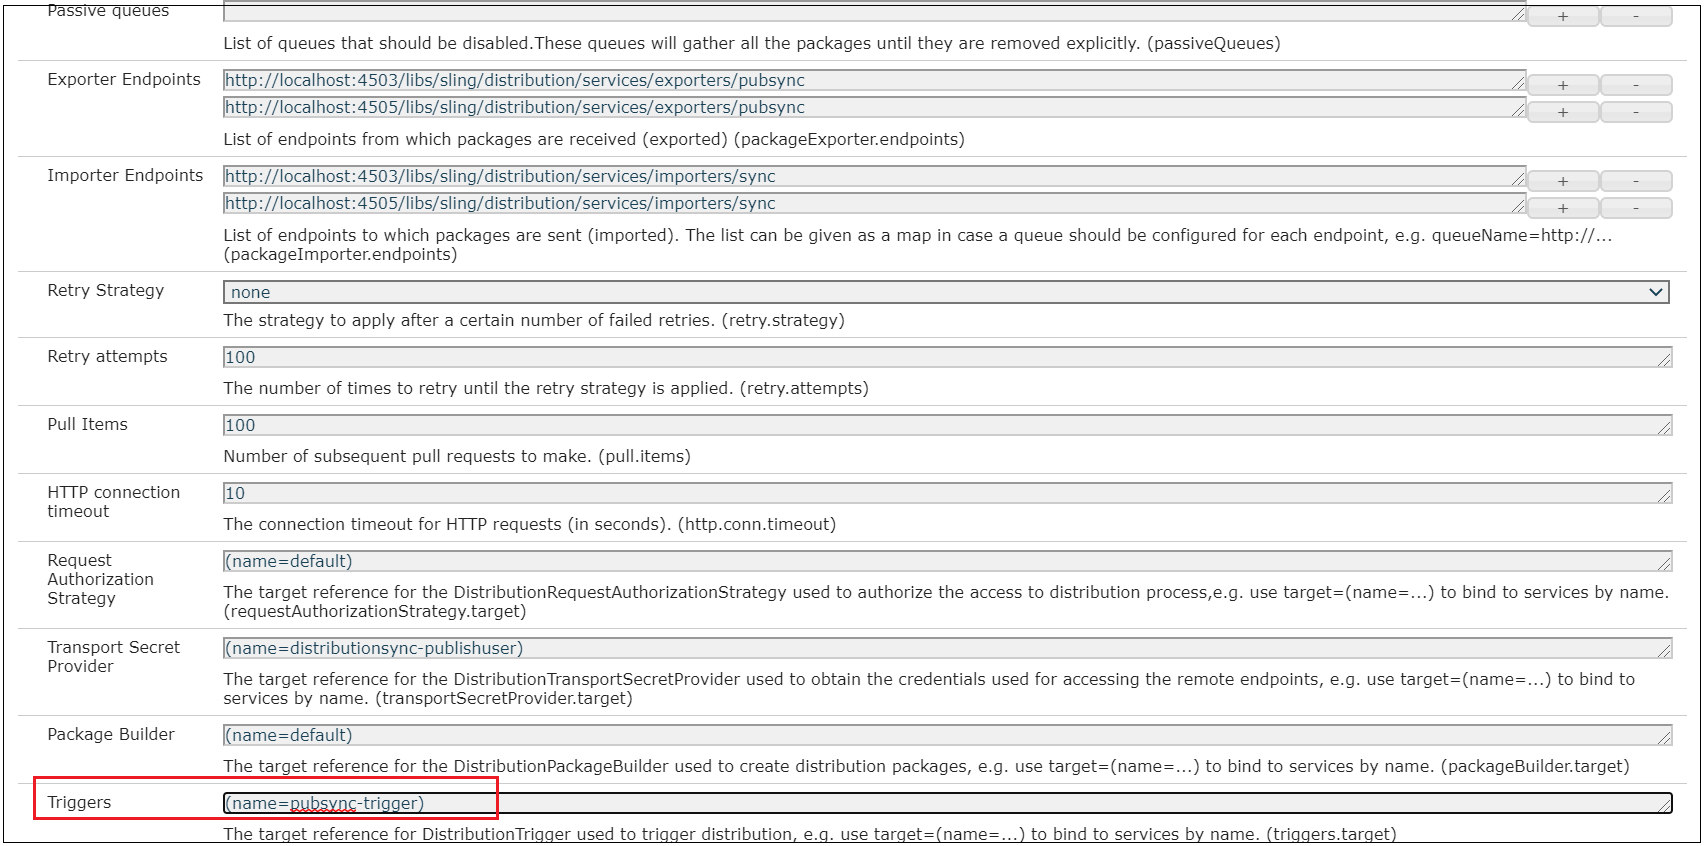
Configure Sync Distribution Agent on Author
Configure a Sync Distribution Agent in Author that will PULL the content from publishers(exporters) endpoints based on the configuration and distribute the content to the publishers other than the source.
Now the content is pulled by Author and distributed to the publishers other than source, the content modifications are not created in Author.
Let us now see how to automate the sync distribution through triggers
Configure a JCR Event Trigger in Publishers
Configure a JCR Event Trigger in Publishers — repeat the below steps to all the publishers, to add the JCR changes under the configured path to the Distribution queue
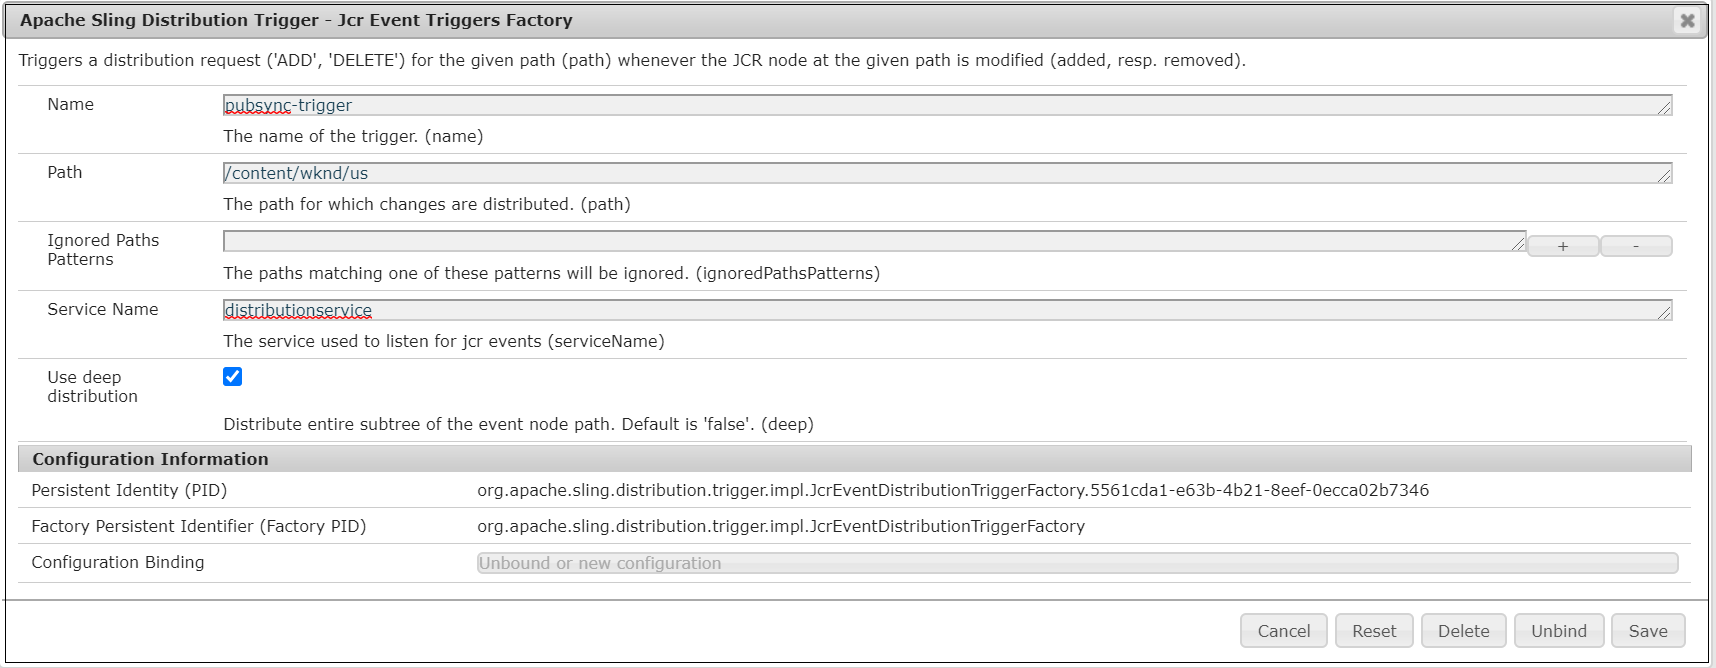
Create new configuration for factory “Apache Sling Distribution Trigger — Jcr Event Triggers Factory”
Enter name =“pubsync-trigger” The path for which the changes are distributed=“/content/wknd/us” serviceName=service name to access the content e.g distributionservice Use deep distribution =Enable this if want to distribute the subtree of the configured node on any events
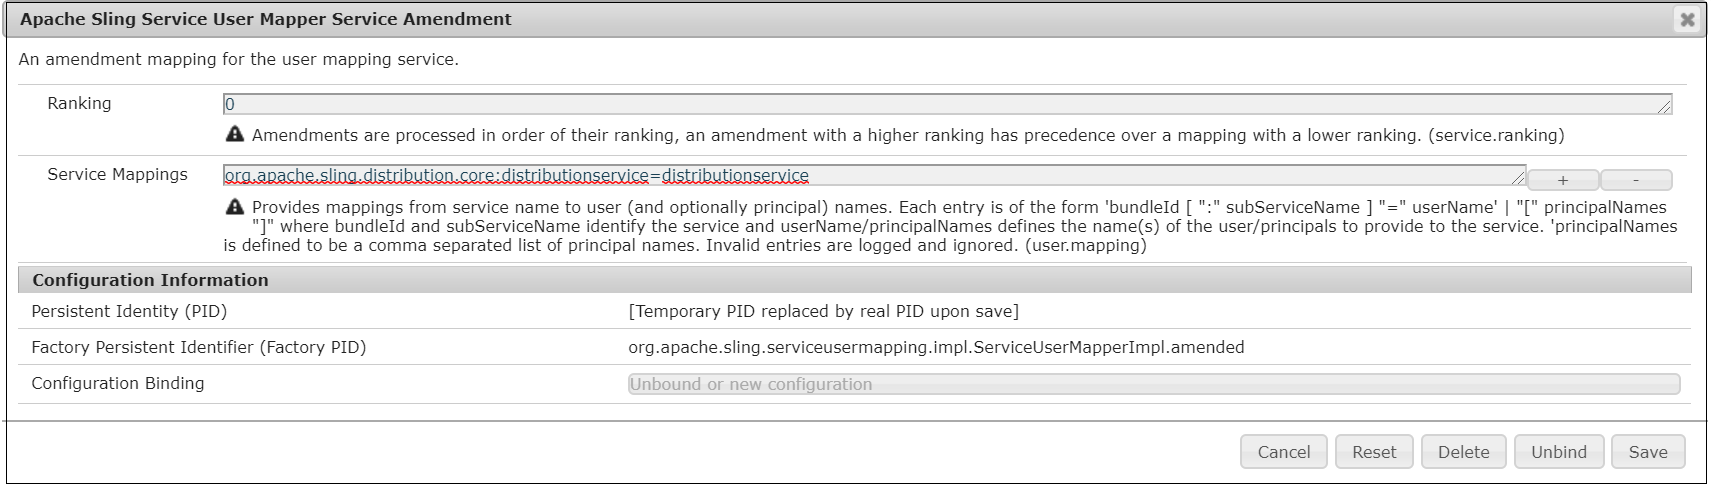
Create a system user with name distributionservice and provide the required privileges to access the content, I am providing full access for the demo
Register a Server User Mapping for “Apache Sling Service User Mapper Service Amendment”
Now link the trigger to the “Apache Sling Distribution Agent — Queue Agents Factory” configured with the name “pubsync” in the earlier step, Triggers — (name=pubsync-trigger)
Configure a Scheduled Event Trigger in Author
Configure a Scheduled Event Trigger in Author to pull the content from publishers Queue and distribute the content to the publishers other than the source.
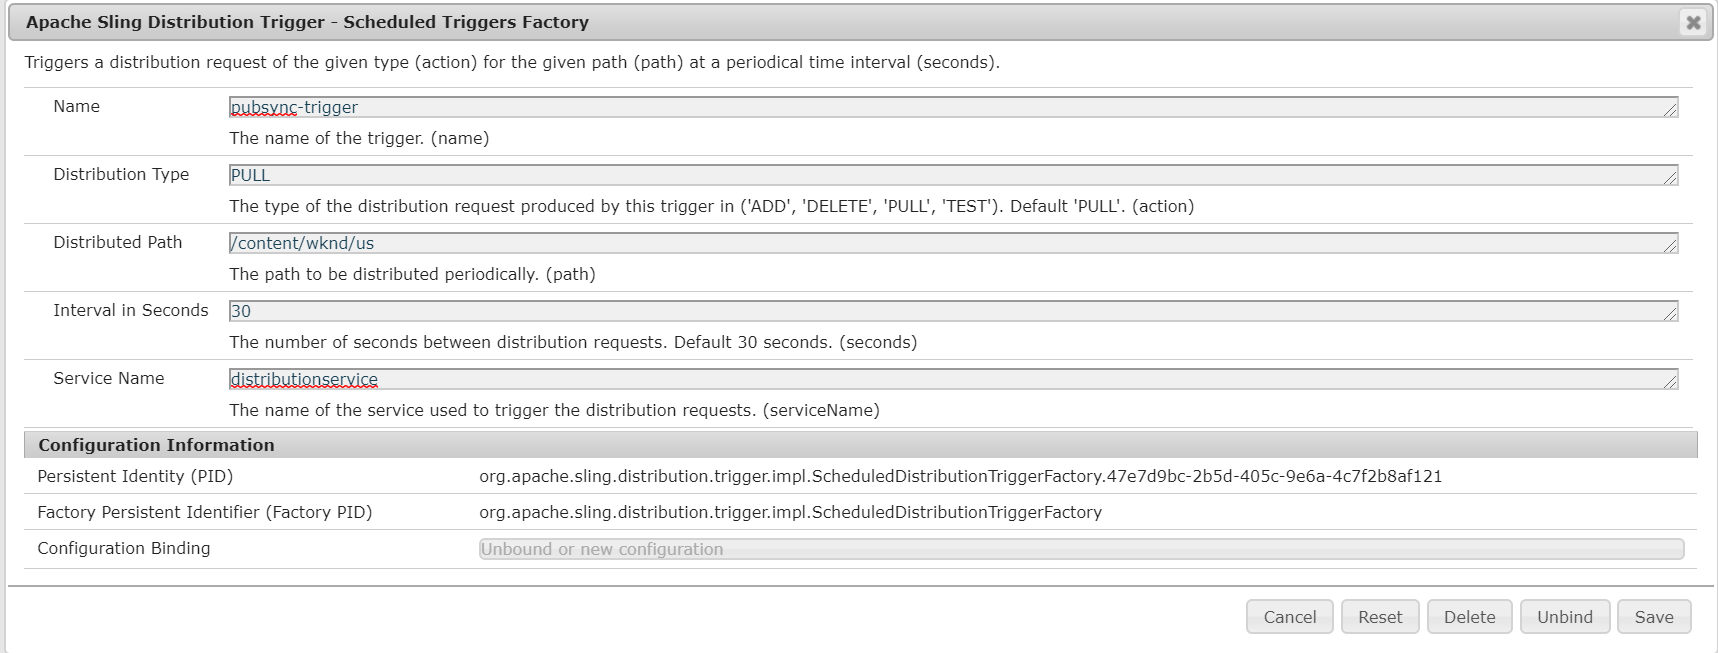
Create new configuration for factory “Apache Sling Distribution Trigger — Scheduled Triggers Factory”
Enter name =“pubsync-trigger” Distribution Type=“PULL” Distributed Path= the path to be distributed periodically e.g. “/content/wknd/us” serviceName = service name to access the content e.g distributionservice Interval in Seconds =the number of seconds between distribution requests. Default 30 seconds
Create a system user with name distributionservice and provide the required privileges to access the content, I am providing full access for the demo
Register a Server User Mapping for “Apache Sling Service User Mapper Service Amendment”
Now link the trigger to the “Apache Sling Distribution Agent — Sync Agents Factory” configured with the name “distribution-sync” in the earlier step, Triggers — (name=pubsync-trigger)
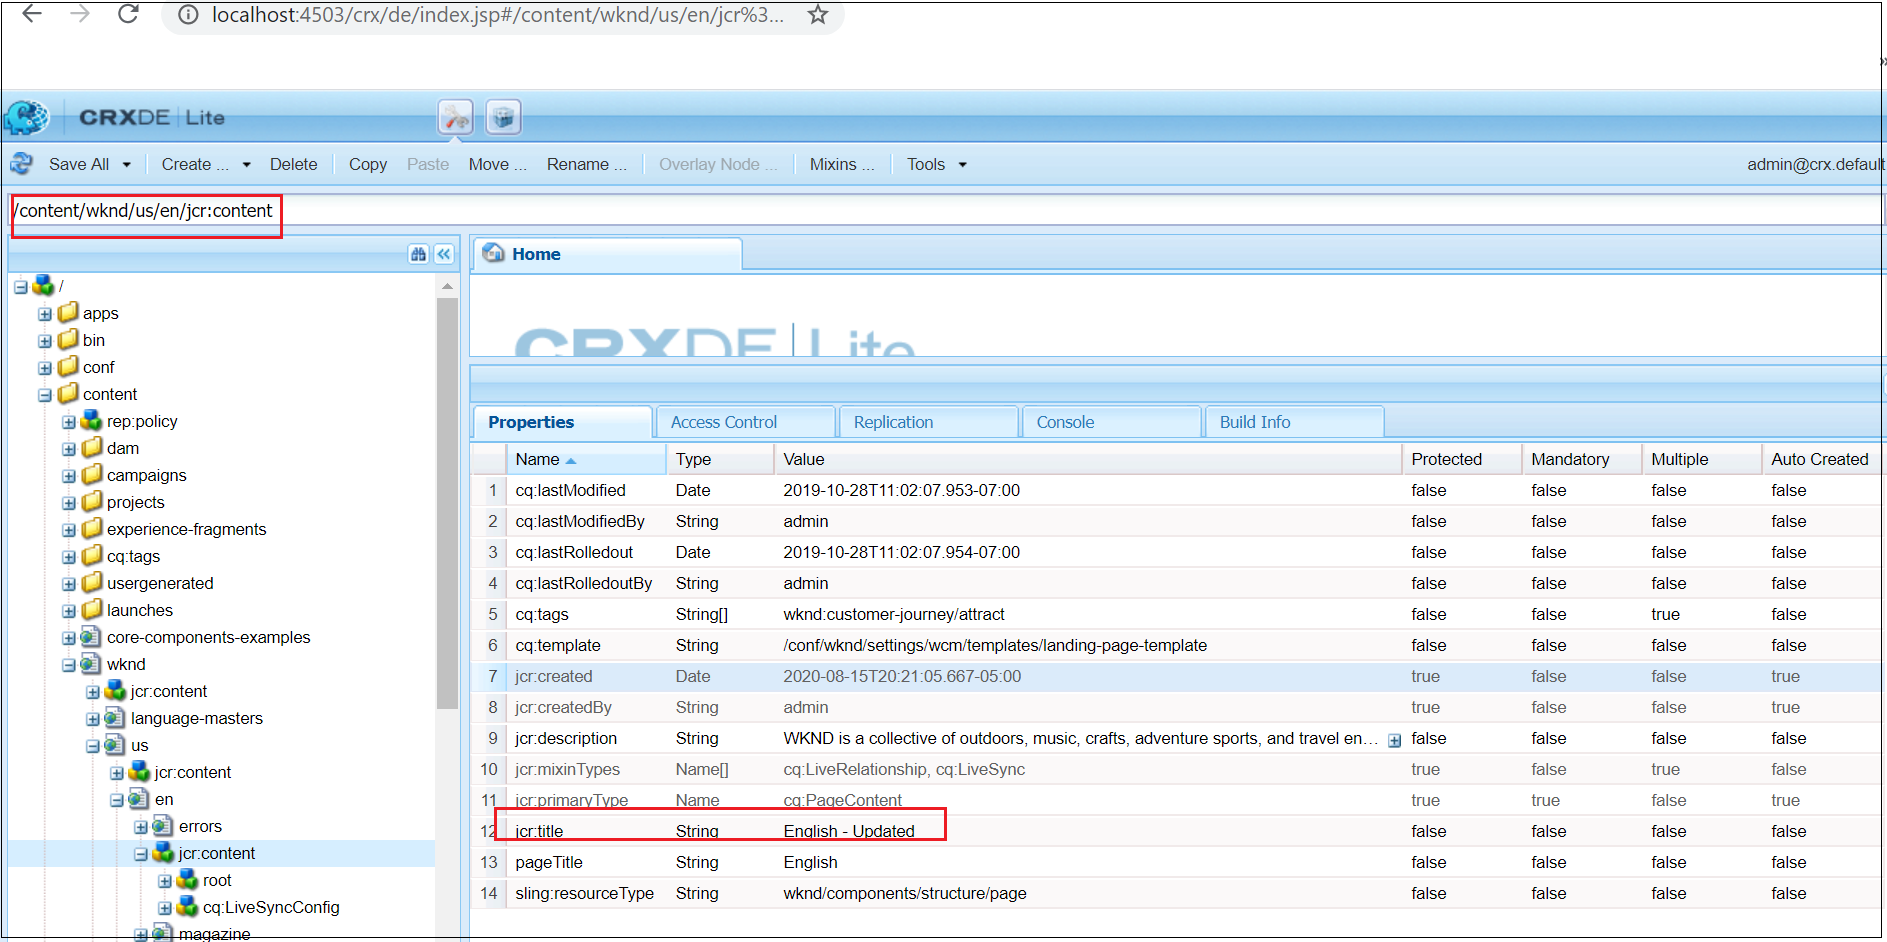
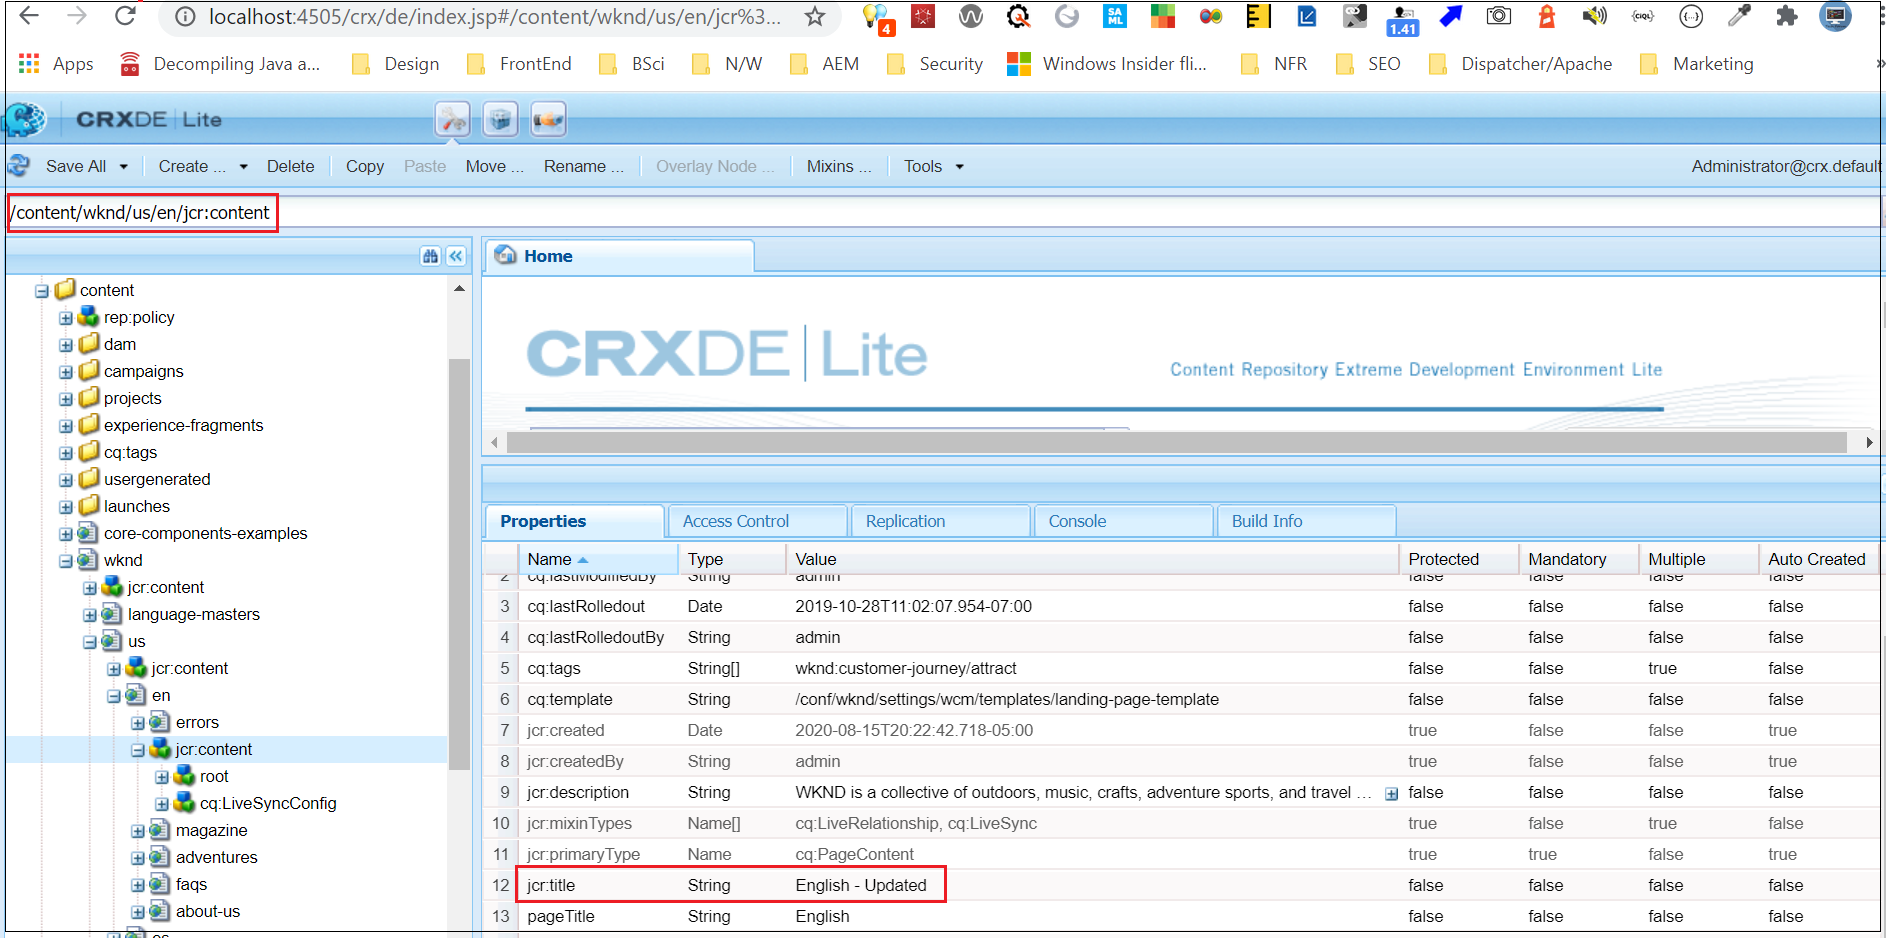
Now the content modification from the publisher1 under /content/wknd/us node will be synced to the publishers other than the source(publisher1)on every 30 second
This concludes the sync distribution configuration between publishers through the author instance as a coordinator, the content changes from the publishers are pulled by the author and distributed to all the publishers other than the source. We can configure multiple publisher endpoints in the Author sync agent to pull and distribute the content changes. The triggers can be configured in Author and Publishers to completely automate the sync distribution of the contents.