Tuesday, December 15, 2020
AEM Dispatcher Configurations — symlinks
This summary is not available. Please
click here to view the post.
Friday, December 11, 2020
Sync External Git Repository to Cloud Manager Repository
This summary is not available. Please
click here to view the post.
Saturday, December 5, 2020
Cloud Manager Notifications to Collaboration Channels — Microsoft Teams
Cloud Manager enables customers to manage their custom code deployments on their AEM-managed cloud environments with manageable pipeline automation and complete flexibility for the timing or frequency of their deployment.
The Cloud Manager CI/CD pipeline executes series of steps to build and deploy the code to AMS and AEM as Cloud AEM platforms, refer to the below video to understand the basics of Cloud Manager.
Cloud manager exposes APIs to interact with the CM settings and to manage the pipeline also emits different events on pipeline execution.
The Adobe I/O along with custom webhooks can be used to receive the appropriate events from Cloud Manager and take the required action. Also, the Cloud Manager APIs can be invoked through Adobe I/O to perform different operations on Cloud Manager.
One of the important requirements while working with Cloud Manager is notifying the developer on the status of pipeline execution, the individual developers can subscribe to the email notification as required but there is no default option to send the notifications to group email or another collaboration channel.
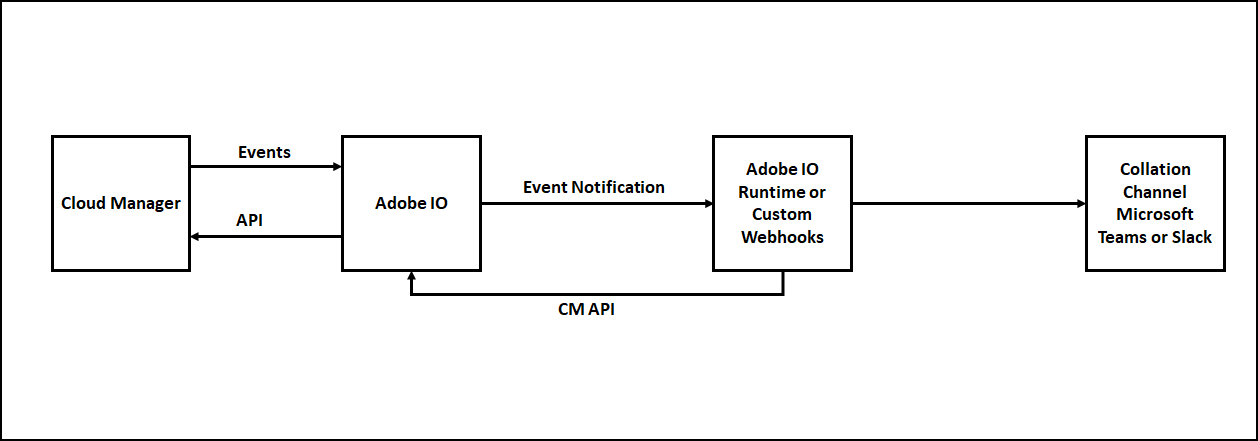
Most of the teams like the notification to the Collaboration Channels e.g Microsoft Teams, the Adobe I/O along with CM API, Events, and Microsoft Teams Webhook can be used to send the Cloud Manager Notification to the Microsoft Teams Channel.
The Microsoft teams or other Collobrarion Tools helps to enable the webhooks(POST with JSON data), the webhook can be used to send the notification to the specific channel.
The notification can be managed through a custom webhook or Adobe I/O runtime, Adobe I/O runtime expects two Webhook services to receive the events(due to this the Collaboration Channel Webhook can’t be directly used in Adobe I/O Notification)
The signature validation is performed as part of the POST service to ensure the request is posted only from Adobe I/O and to protect from security issues.
Some of the additional overheads we discussed e.g GET service to handle challenge and signature validation as part of the POST service can be avoided by using Adobe I/O runtime to communicate with the external webhooks.
We can use one of the below option to send the Cloud Manager notifications to the Collaboration Channels e.g. Microsoft Teams
Let us now see the details on how to enable the custom webhooks in AEM to send the Cloud Manager pipeline notifications to the Microsoft Teams channel, the same steps can be reused with minimal changes to send the notification to other tools e.g. Slack.
You can get all the required additional data by invoking the CM APIs’s, the Event JSON will have the URLs to get the execution details, execution details subsequently will have the URLs to get the program details, pipeline details, step details, logs, etc(Explore the input JSON’s to get the required details).
As a first step, let us register the webhooks for the Microsoft Teams channel.
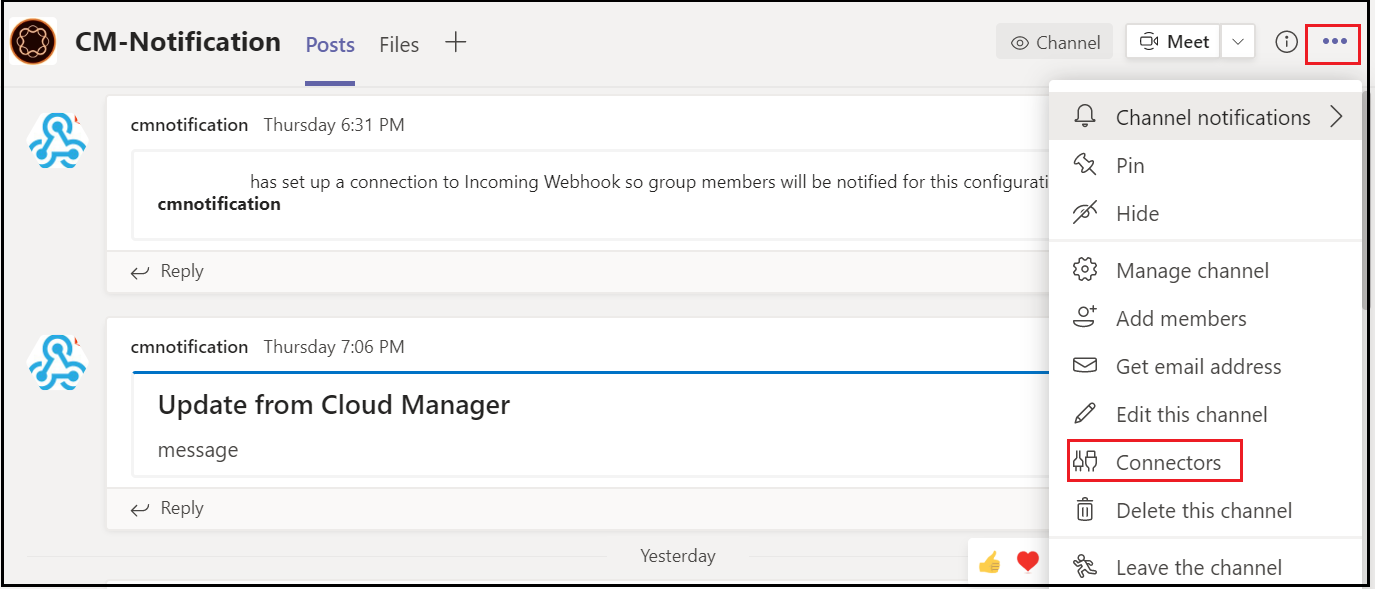
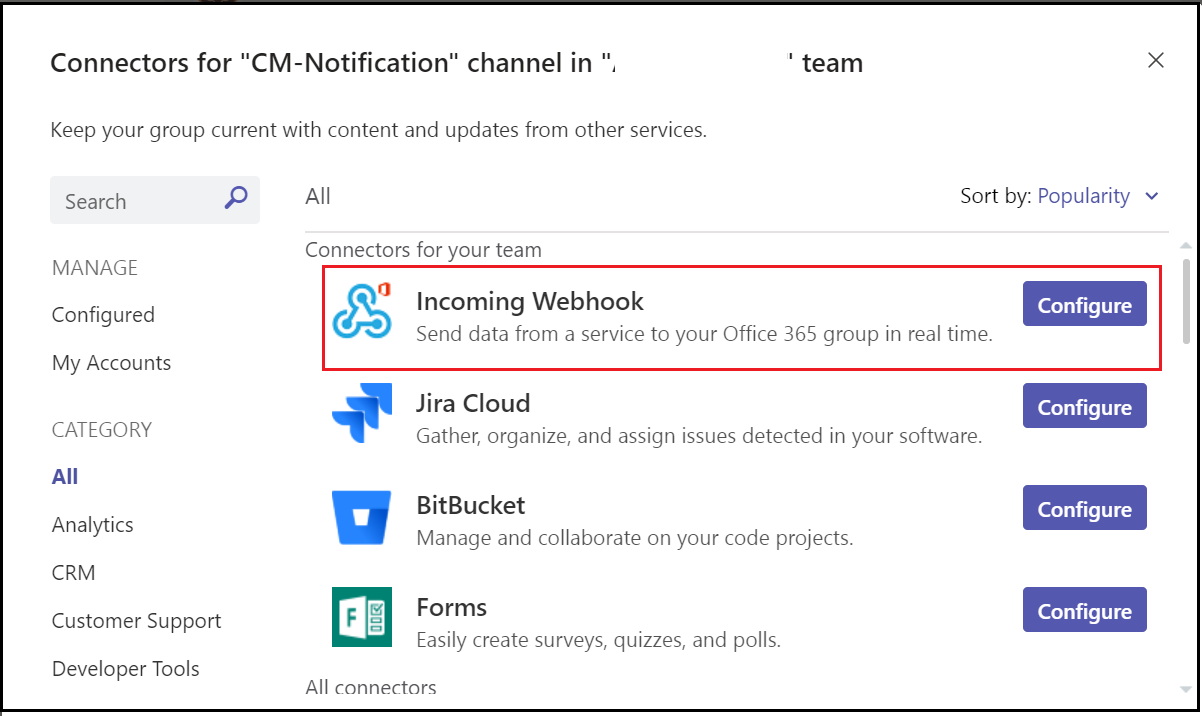
Define a Channel to receive the CM pipeline notifications, Go to the Teams Channel for which the Webhook should be enabled, and click on the three dots in the upper right corner then click on Connectors.
Configure an “Incoming Webhook”
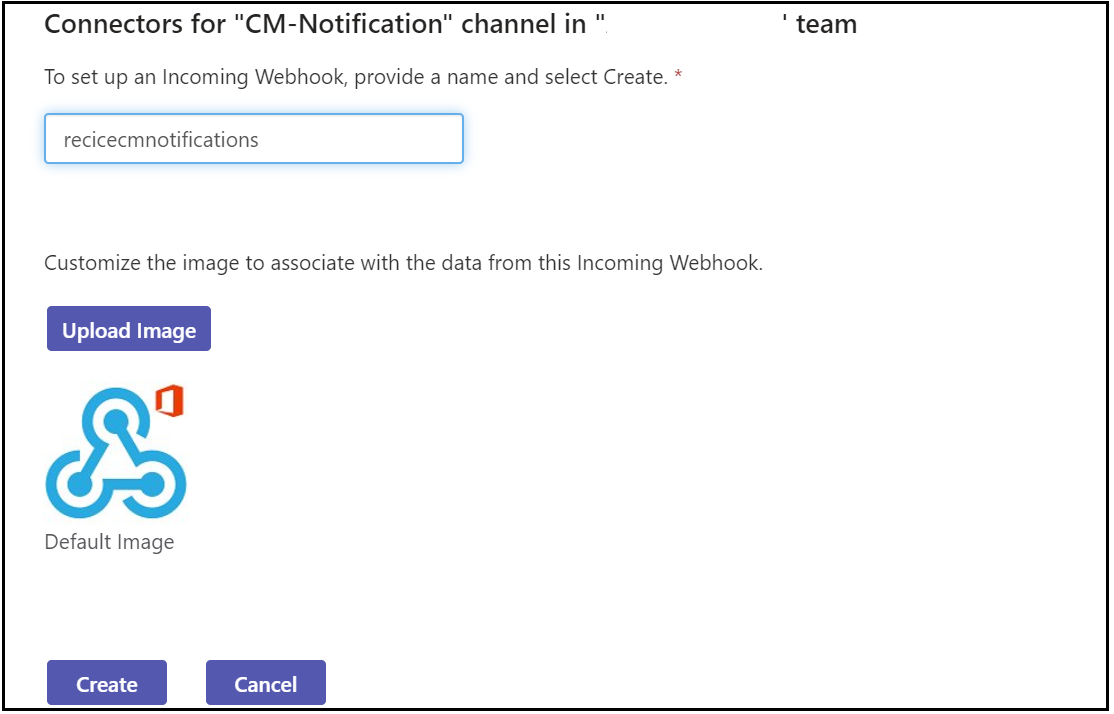
Enter a name and click on create, if required upload a custom image to display on incoming messages.
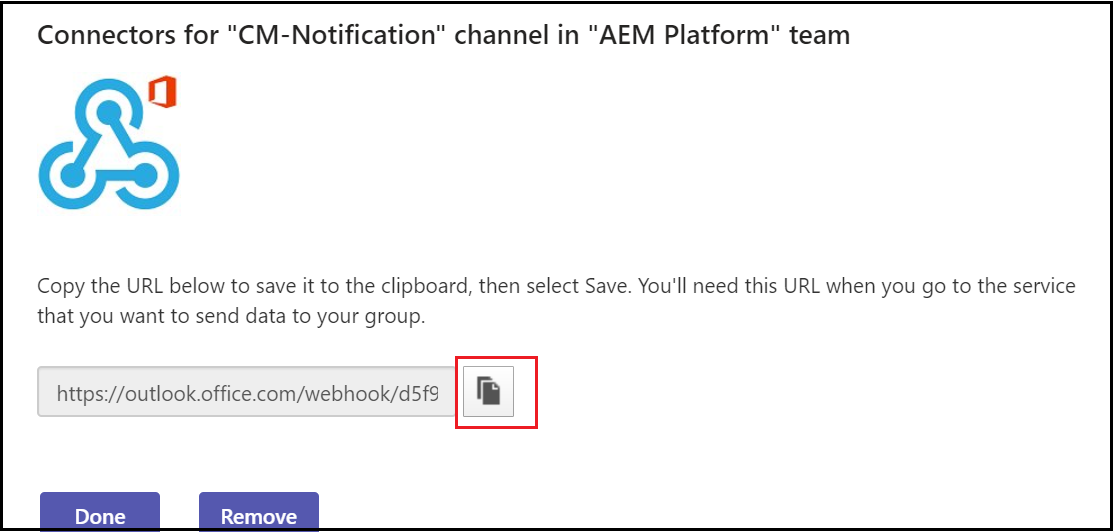
Copy the webhook URL and click on Done
Let us enable the required configurations in Adobe I/O, log in to console.adobe.io
Create a new project, edit the project and provide a custom name if required
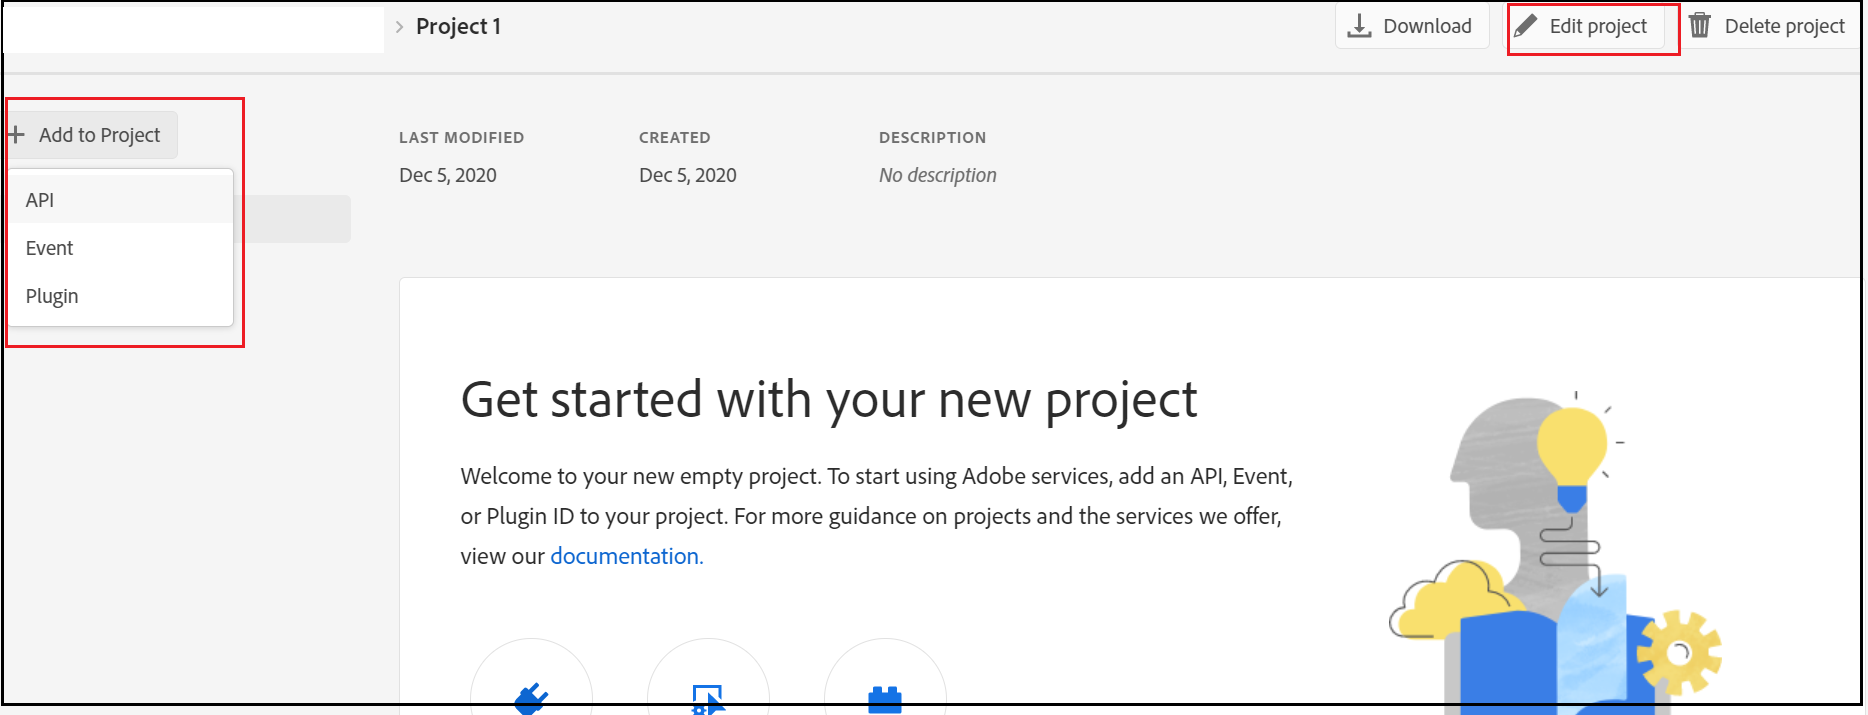
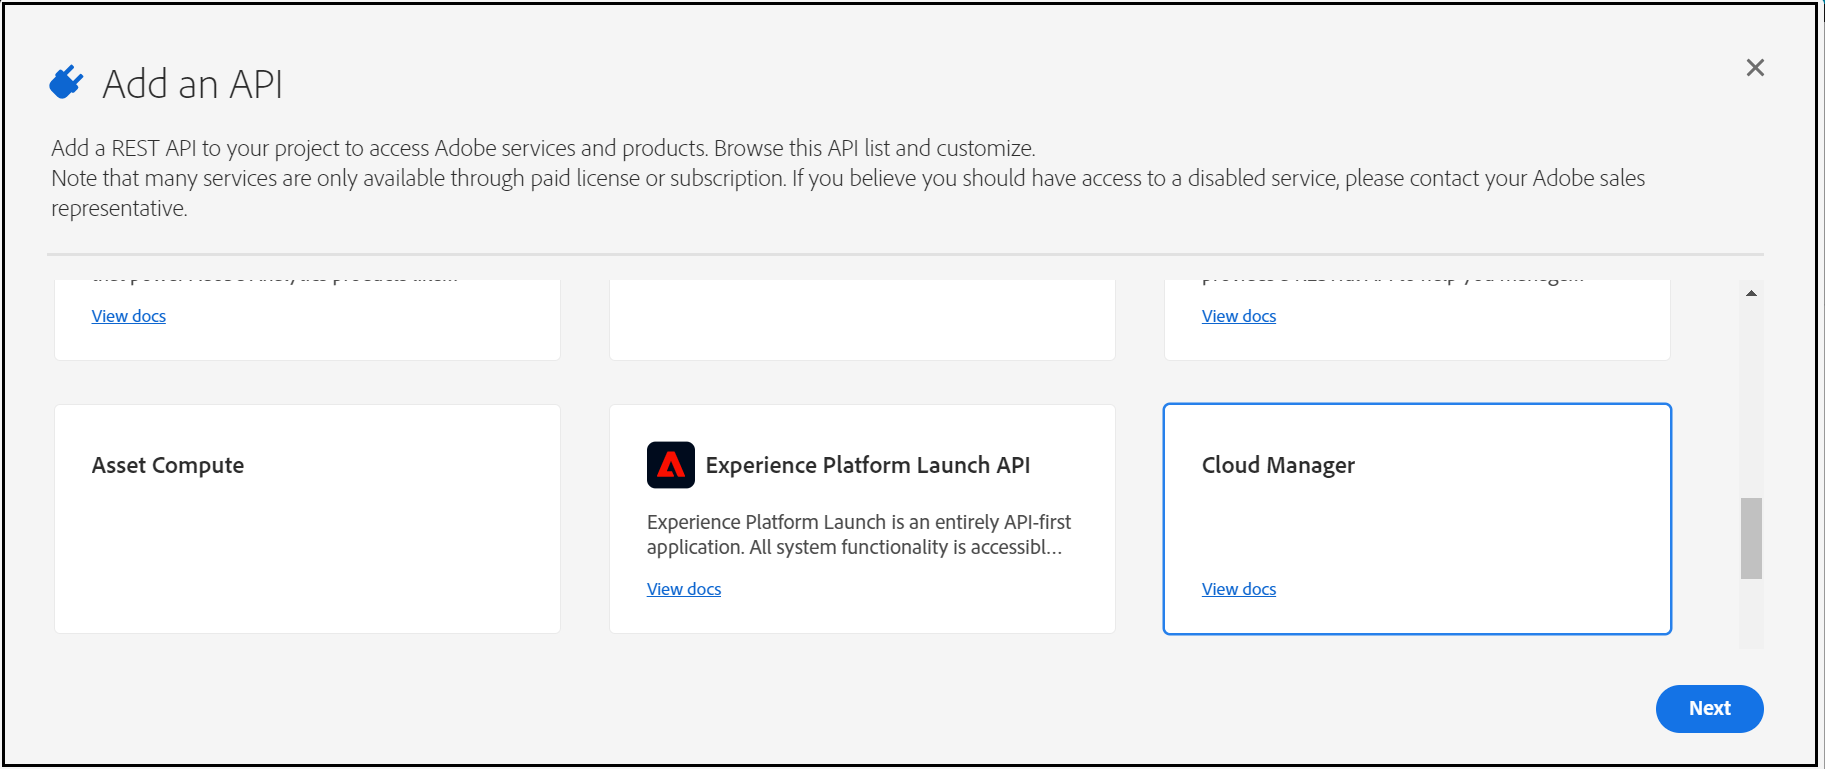
Add Cloud Manager API to the Project
Now “Generate a key pair”
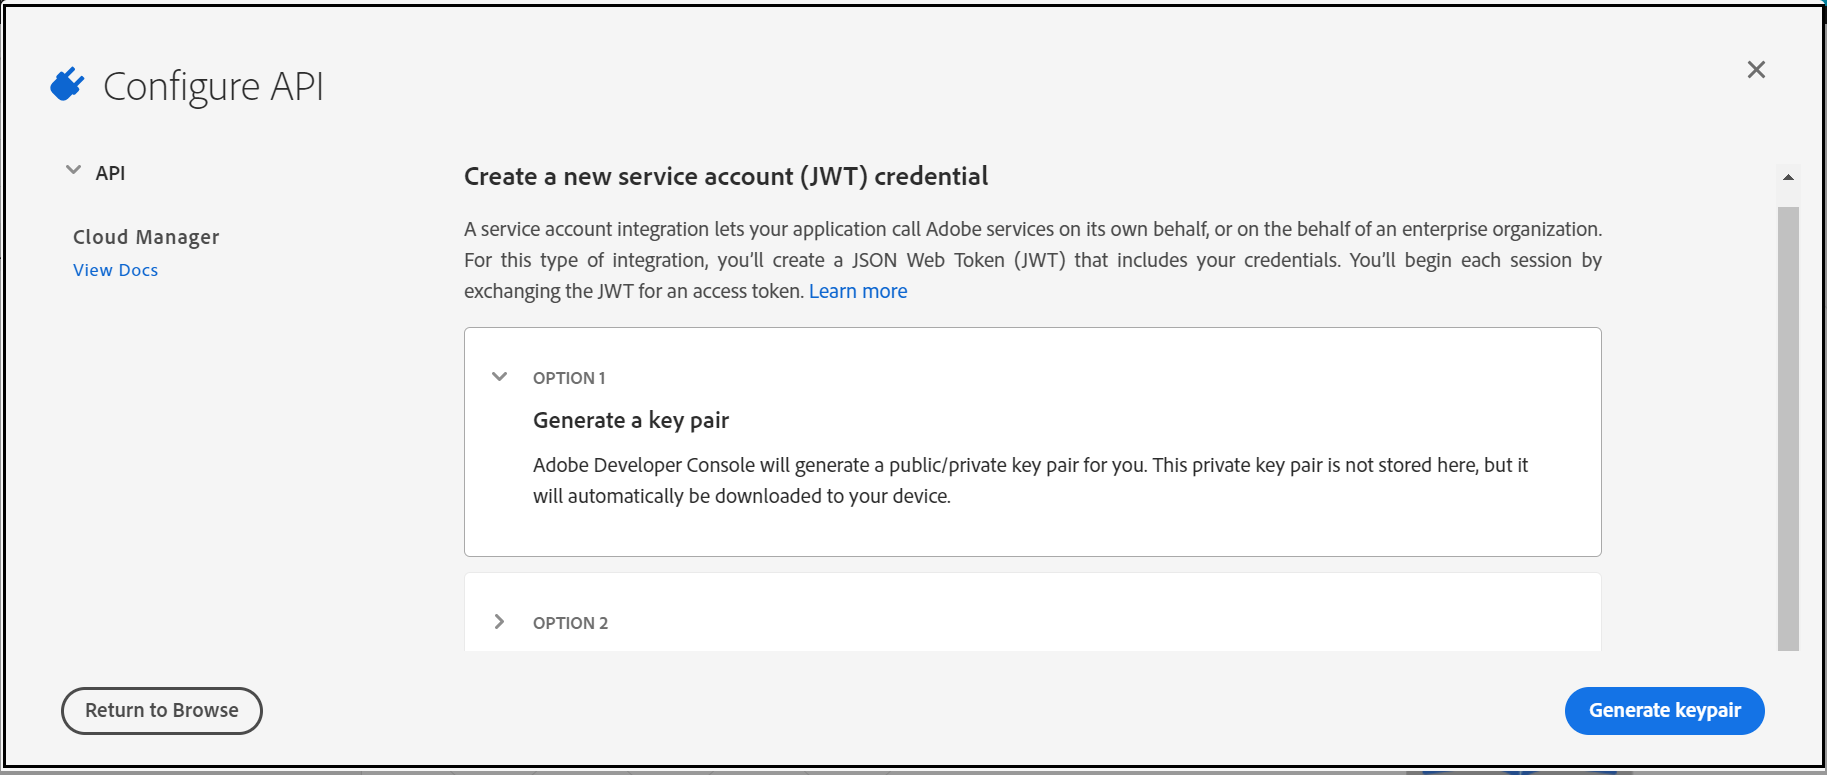
This will download a “config.zip” with a public certificate and private key(need to be configured in the AEM Service)
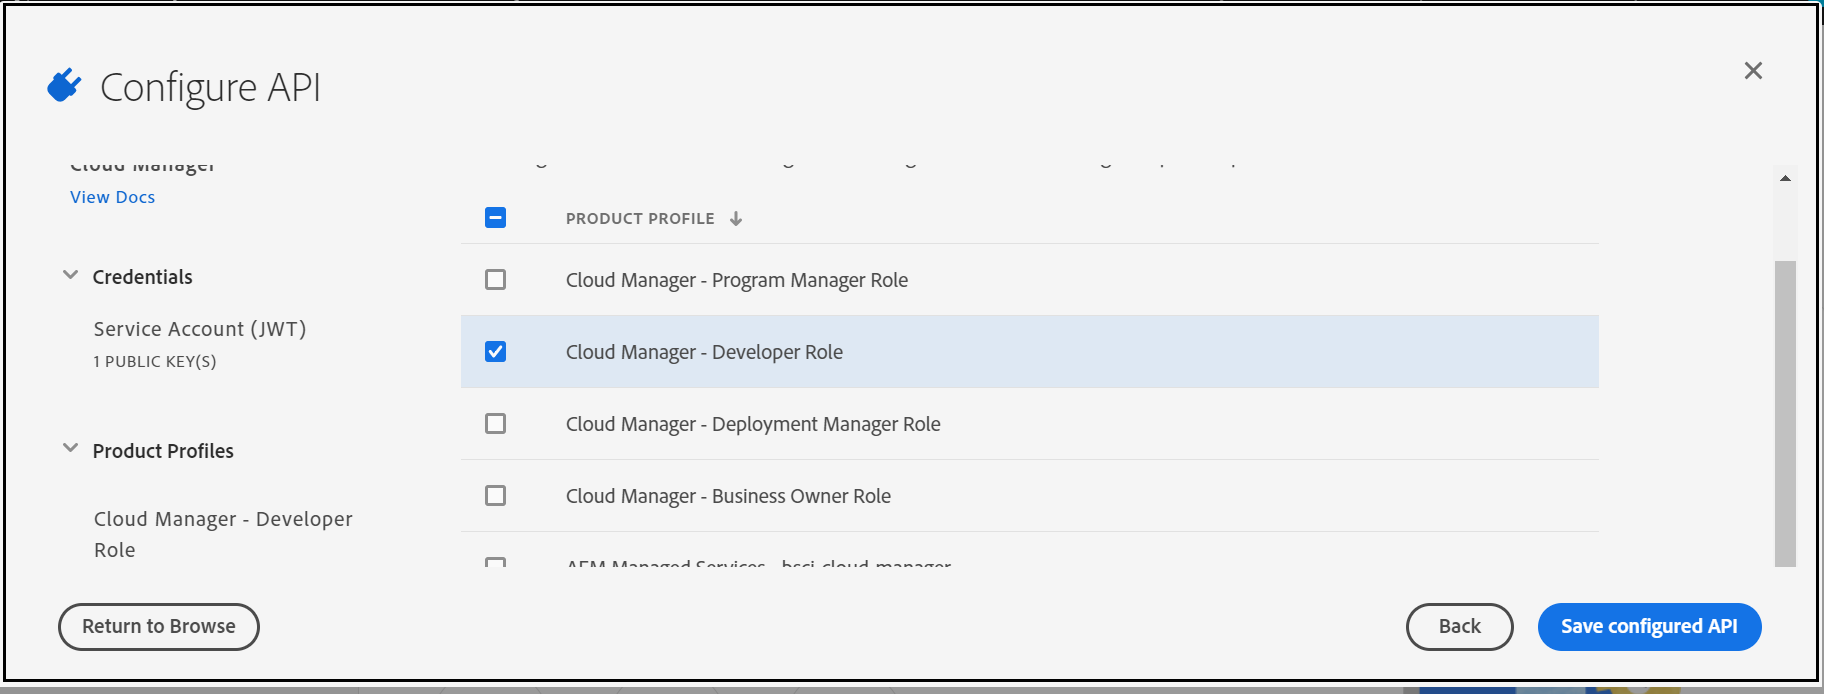
Assign the Cloud manager role to enable the required permissions to the API — “Cloud Manager-Developer Role” should be enough to perform the API operations.
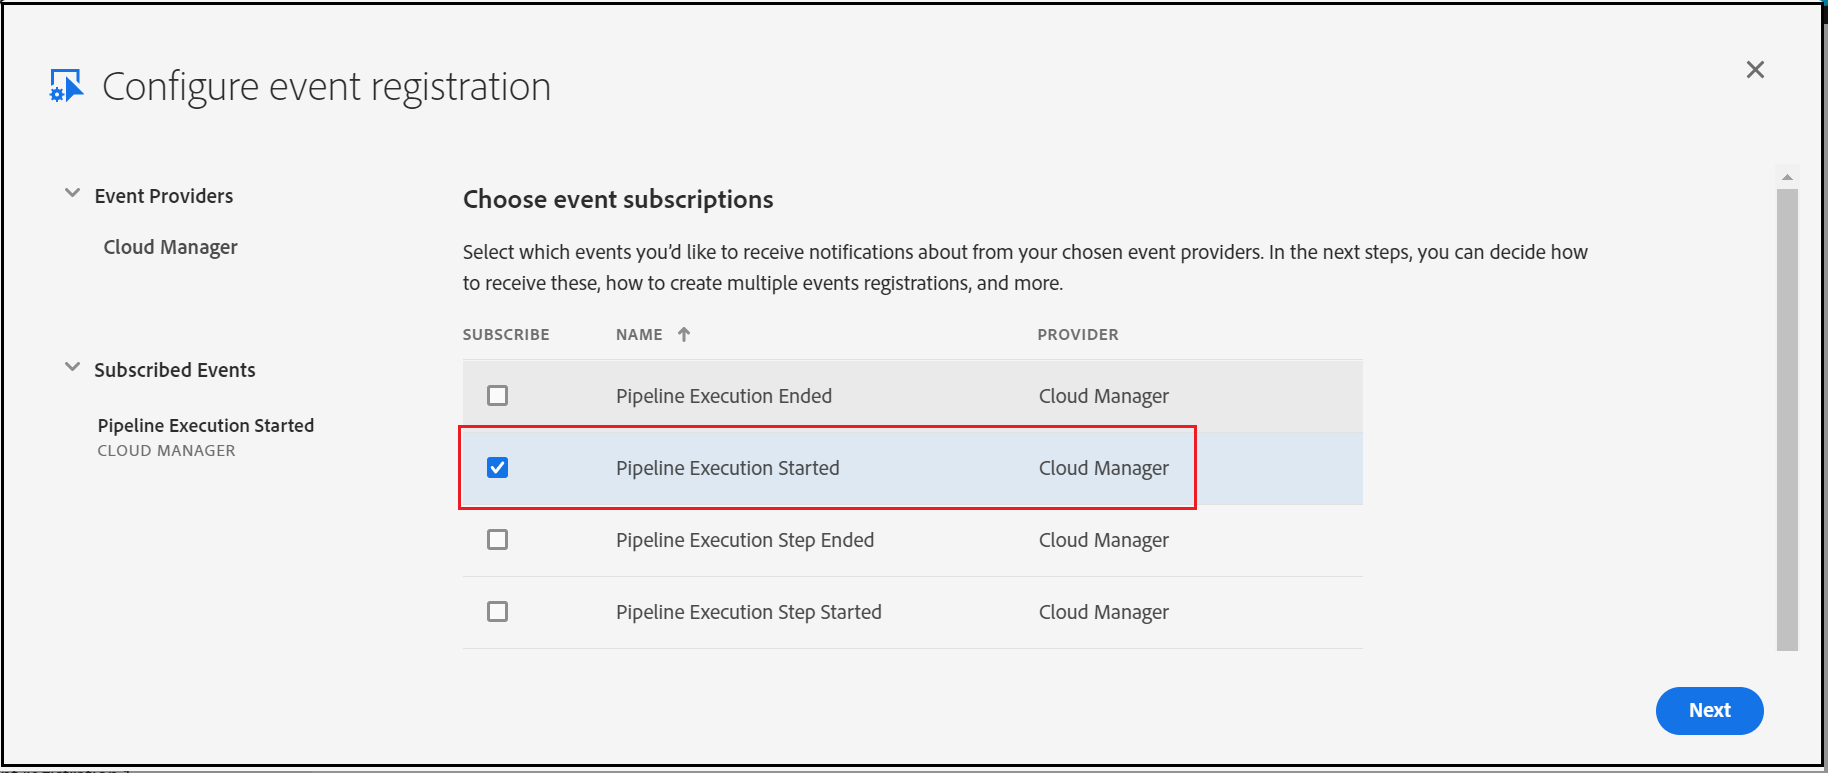
Add Cloud Manager Events to the project
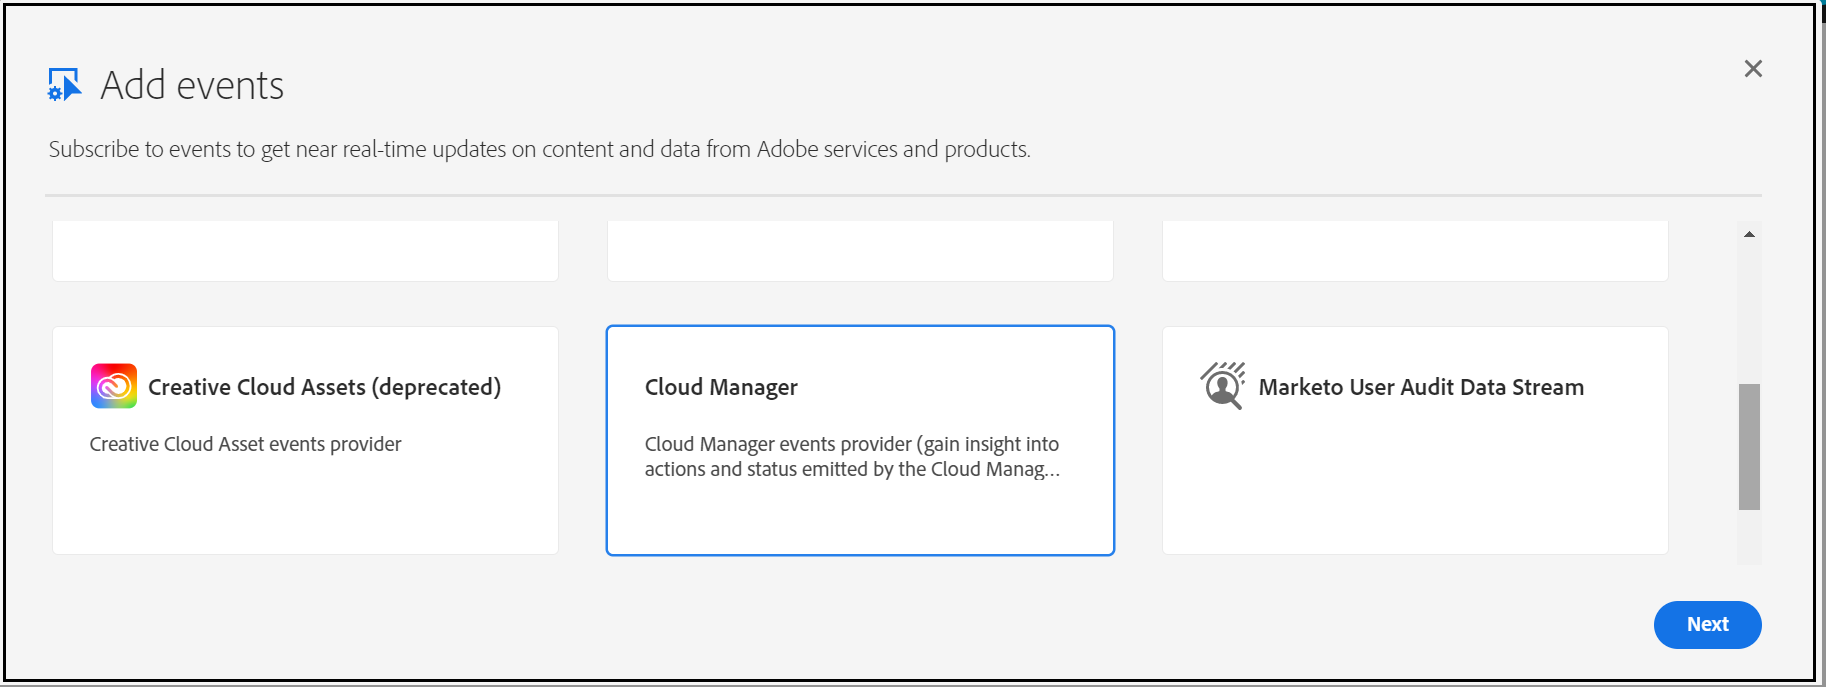
Subscribe to the required Events — I am subscribing only for “Pipeline Execution Started”, current AEM service is enabled to handle only this start event.
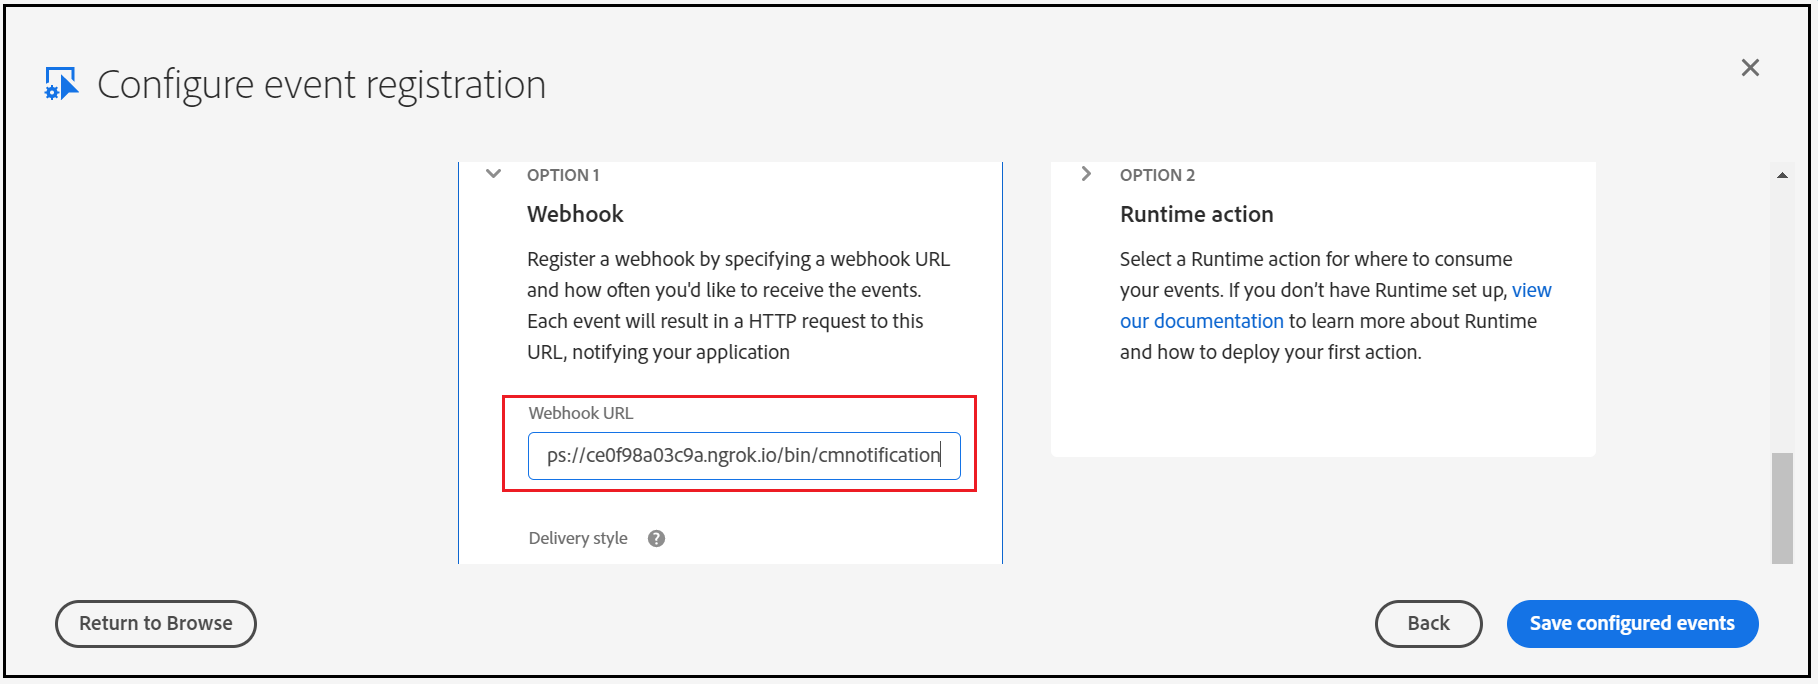
Enter the AEM service URL (/bin/cmnotification) — I am using ngrok to expose AEM URL externally for demo(use AEM external service URL)
Now the Adobe I/O configuration is ready, let us enable the service in AEM.
I am enabling the below servlet to accept the requests from Adobe I/O
Post Service:
Configure the below values into the servlet(the values can be modified through the OSGI console)
The required values can be retrieved from the Adobe I/O console
Currently, the notification will be sent only when the pipeline is started, extend the bundle to support different events and to fetch the additional details from different endpoints — the URL’s can be taken from the JSON response of the parent APIs. This will helps us to receive the notification into the team's channel on pipeline events. This approach may add some additional overhead to the AEM server but not required to maintain any additional platforms, Adobe I/O approach needs the license to the Adobe I/O platform.
Feel free to provide your comments.
The Cloud Manager CI/CD pipeline executes series of steps to build and deploy the code to AMS and AEM as Cloud AEM platforms, refer to the below video to understand the basics of Cloud Manager.
Cloud manager exposes APIs to interact with the CM settings and to manage the pipeline also emits different events on pipeline execution.
The Adobe I/O along with custom webhooks can be used to receive the appropriate events from Cloud Manager and take the required action. Also, the Cloud Manager APIs can be invoked through Adobe I/O to perform different operations on Cloud Manager.
One of the important requirements while working with Cloud Manager is notifying the developer on the status of pipeline execution, the individual developers can subscribe to the email notification as required but there is no default option to send the notifications to group email or another collaboration channel.
Most of the teams like the notification to the Collaboration Channels e.g Microsoft Teams, the Adobe I/O along with CM API, Events, and Microsoft Teams Webhook can be used to send the Cloud Manager Notification to the Microsoft Teams Channel.
The Microsoft teams or other Collobrarion Tools helps to enable the webhooks(POST with JSON data), the webhook can be used to send the notification to the specific channel.
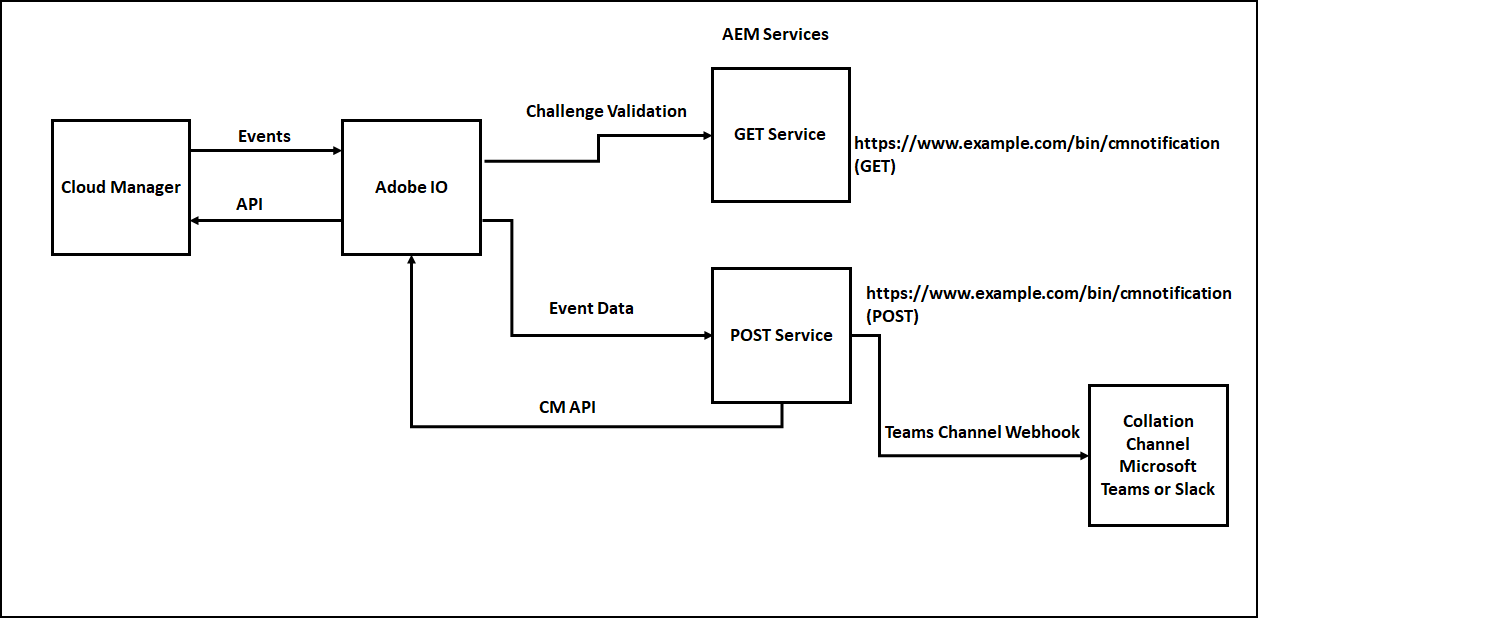
The notification can be managed through a custom webhook or Adobe I/O runtime, Adobe I/O runtime expects two Webhook services to receive the events(due to this the Collaboration Channel Webhook can’t be directly used in Adobe I/O Notification)
- GET service to receive the challenge request and respond to the challenge
- POST service to receive the different event details
The signature validation is performed as part of the POST service to ensure the request is posted only from Adobe I/O and to protect from security issues.
Some of the additional overheads we discussed e.g GET service to handle challenge and signature validation as part of the POST service can be avoided by using Adobe I/O runtime to communicate with the external webhooks.
We can use one of the below option to send the Cloud Manager notifications to the Collaboration Channels e.g. Microsoft Teams
- Enable the Notification through Custom Webhooks hosted on Node JS — Refer Cloud Manager API and Cloud Manager API Tutorial. Somehow the step7-teams.js was failing to create the JWT token with the RS256 algorithm, to fix the issue updated step7-teams.js to use “jsonwebtoken” instead of “jsrsasign” module.
- Enable the Notification through Adobe I/O Runtime — Refer Cloud Manager Meets Jenkins
- Enable the Notification through Custom Webhooks hosted on AEM
Let us now see the details on how to enable the custom webhooks in AEM to send the Cloud Manager pipeline notifications to the Microsoft Teams channel, the same steps can be reused with minimal changes to send the notification to other tools e.g. Slack.
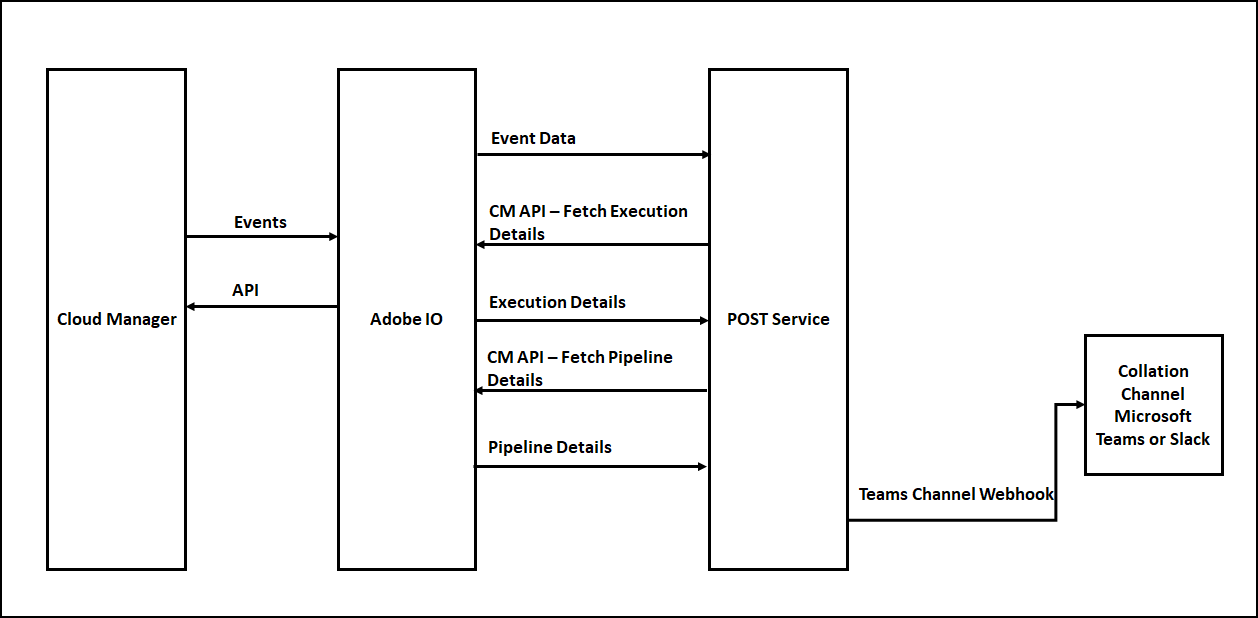
You can get all the required additional data by invoking the CM APIs’s, the Event JSON will have the URLs to get the execution details, execution details subsequently will have the URLs to get the program details, pipeline details, step details, logs, etc(Explore the input JSON’s to get the required details).
Enable Webhook for Teams Channel:
As a first step, let us register the webhooks for the Microsoft Teams channel.
Define a Channel to receive the CM pipeline notifications, Go to the Teams Channel for which the Webhook should be enabled, and click on the three dots in the upper right corner then click on Connectors.
Configure an “Incoming Webhook”
Enter a name and click on create, if required upload a custom image to display on incoming messages.
Copy the webhook URL and click on Done
Enable Adobe I/O Configurations:
Let us enable the required configurations in Adobe I/O, log in to console.adobe.io
Create a new project, edit the project and provide a custom name if required
Add Cloud Manager API to the Project
Now “Generate a key pair”
This will download a “config.zip” with a public certificate and private key(need to be configured in the AEM Service)
Assign the Cloud manager role to enable the required permissions to the API — “Cloud Manager-Developer Role” should be enough to perform the API operations.
Add Cloud Manager Events to the project
Subscribe to the required Events — I am subscribing only for “Pipeline Execution Started”, current AEM service is enabled to handle only this start event.
Enter the AEM service URL (/bin/cmnotification) — I am using ngrok to expose AEM URL externally for demo(use AEM external service URL)
Now the Adobe I/O configuration is ready, let us enable the service in AEM.
Enable Custom Webhook in AEM:
I am enabling the below servlet to accept the requests from Adobe I/O
- GET Service to support challenge service
- POST service to accept the Event details
Post Service:
- Validate the Signature of the incoming request
- Parse the Event Data
- Generate signed(private key) JWT bearer token
- Request for Accesses token with the JWT bearer token
- Invoke API to receive the execution details based on the execution URL in the Event Data
- Invoke the API to receive the pipeline details based on the pipeline URL in the Execution details(different URL's from the execution details can be used to fetch different data)
- Notify teams channel with Teams Channel Webhook
Configure the below values into the servlet(the values can be modified through the OSGI console)
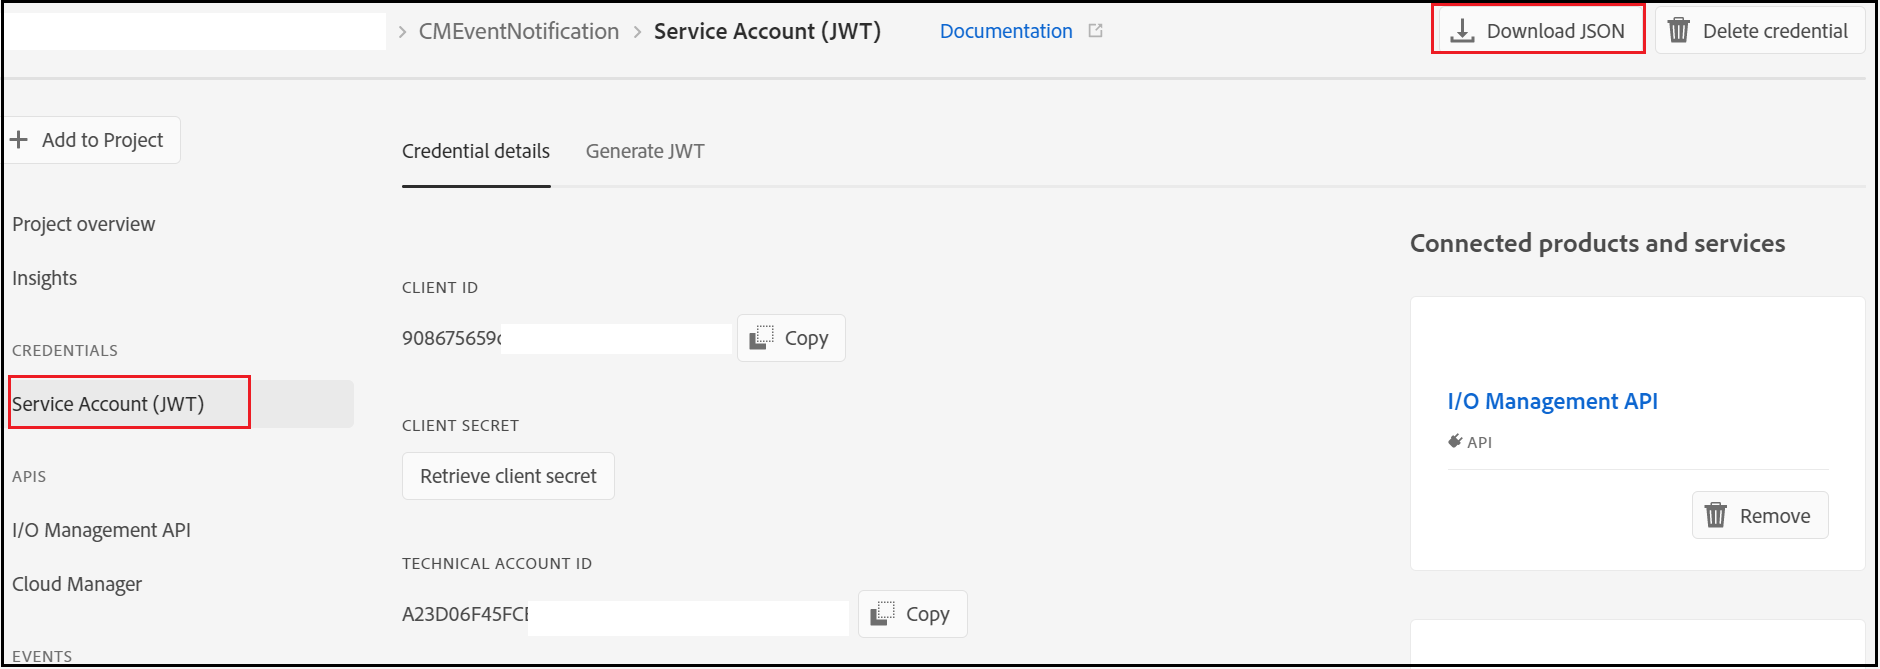
The required values can be retrieved from the Adobe I/O console
ORGANIZATION_ID
TECHNICAL_ACCOUNT_EMAIL
TECHNICAL_ACCOUNT_ID
API_KEY(CLIENT_ID)
CLIENT_SECRET
TEAMS_WEBHOOK — The Webhook URL enabled in Teams
The AEM bundle can be downloaded from here https://github.com/techforum-repo/bundles/tree/master/CMNotificationHandler
Copy the private.key file(from the config.zip file downloaded earlier) to the bundle under /META-INF/resources/keys.
Deploy the bundle to the AEM server (mvn clean install -PautoInstallBundle -Daem.port=4503)
Now the webhook service is ready
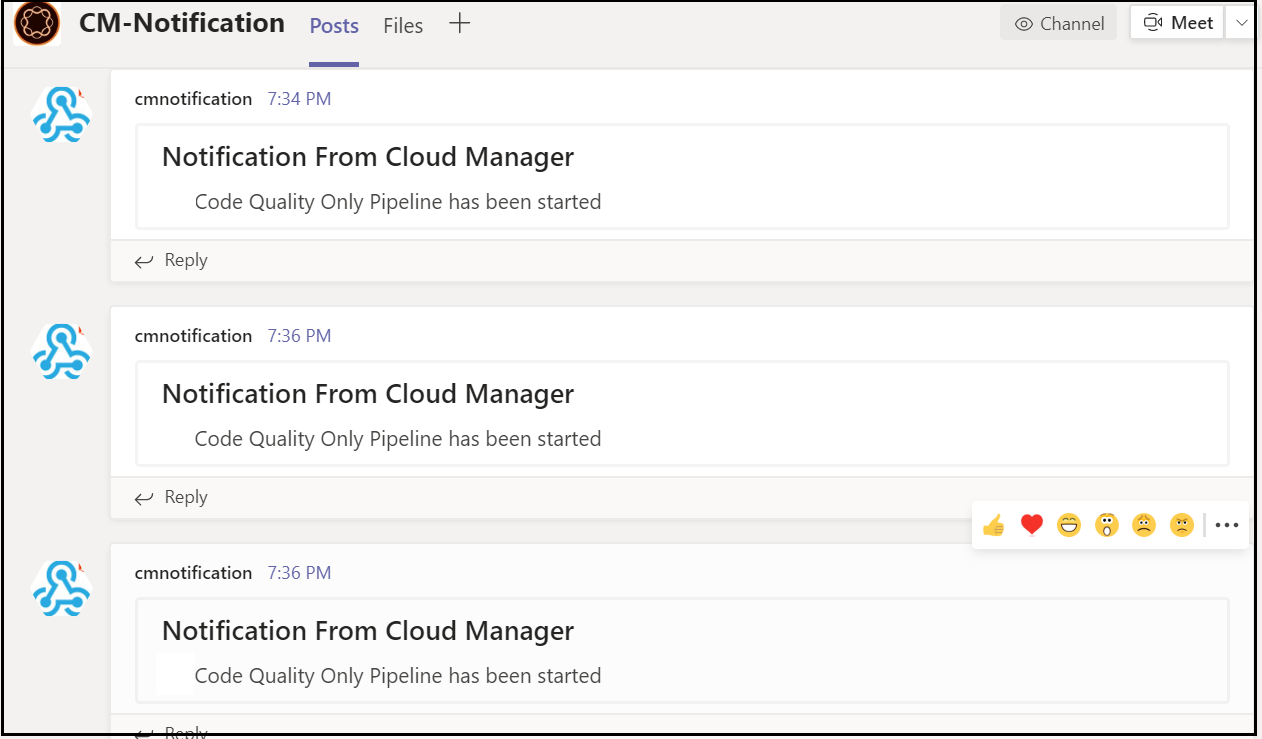
Initiate a pipeline from Cloud Manager Portal that will trigger the notification to the Teams Channel.
TECHNICAL_ACCOUNT_EMAIL
TECHNICAL_ACCOUNT_ID
API_KEY(CLIENT_ID)
CLIENT_SECRET
TEAMS_WEBHOOK — The Webhook URL enabled in Teams
The AEM bundle can be downloaded from here https://github.com/techforum-repo/bundles/tree/master/CMNotificationHandler
Copy the private.key file(from the config.zip file downloaded earlier) to the bundle under /META-INF/resources/keys.
Deploy the bundle to the AEM server (mvn clean install -PautoInstallBundle -Daem.port=4503)
Now the webhook service is ready
Initiate a pipeline from Cloud Manager Portal that will trigger the notification to the Teams Channel.
Currently, the notification will be sent only when the pipeline is started, extend the bundle to support different events and to fetch the additional details from different endpoints — the URL’s can be taken from the JSON response of the parent APIs. This will helps us to receive the notification into the team's channel on pipeline events. This approach may add some additional overhead to the AEM server but not required to maintain any additional platforms, Adobe I/O approach needs the license to the Adobe I/O platform.
Feel free to provide your comments.
Friday, December 4, 2020
init failed:Error: not supported argument while generating JWT token with jsrsasign - Node JS
I was getting "init failed:Error: not supported argument" error while trying to generate the JWT Token with RS256 algorithm through "jsrsasign" npm module.
const jsrsasign = require('jsrsasign')
const fs = require('fs');
const EXPIRATION = 60 * 60 // 1 hour
const header = {
'alg': 'RS256',
'typ': 'JWT'
}
const payload = {
'exp': Math.round(new Date().getTime() / 1000) + EXPIRATION,
'iss': 'test',
'sub': 'test',
'aud': 'test',
'custom-prop': 'test'
}
const privateKey = fs.readFileSync('privateKeyfile.key);
const jwtToken = jsrsasign.jws.JWS.sign('RS256', JSON.stringify(header), JSON.stringify(payload), JSON.stringify(privateKey))
But the JWT token generation was successful with the HS256 algorithm
const jsrsasign = require('jsrsasign')
const fs = require('fs');
const EXPIRATION = 60 * 60 // 1 hour
const header = {
'alg': 'HS256',
'typ': 'JWT'
}
const payload = {
'exp': Math.round(new Date().getTime() / 1000) + EXPIRATION,
'iss': 'test',
'sub': 'test',
'aud': 'test',
'custom-prop': 'test'
}
const privateKey = fs.readFileSync('privateKeyfile.key);
const jwtToken = jsrsasign.jws.JWS.sign('HS256', JSON.stringify(header), JSON.stringify(payload), JSON.stringify(privateKey))
To support the RS256 algorithm, changed the "jsrsasign" to "jsonwebtoken" module.
const jwt = require('jsonwebtoken');
const fs = require('fs');
const EXPIRATION = 60 * 60 // 1 hour
const header = {
'alg': 'HS256',
'typ': 'JWT'
}
const payload = {
'exp': Math.round(new Date().getTime() / 1000) + EXPIRATION,
'iss': 'test',
'sub': 'test',
'aud': 'test',
'custom_attr': 'test'
}
const privateKey = fs.readFileSync(process.env.PRIVATE_KEY);
const jwtToken=jwt.sign(JSON.stringify(payload), privateKey,{ 'algorithm': 'RS256' });
The JWT token generation with the RS256 algorithm was successful after switching to "jsonwebtoken" module
Subscribe to:
Posts (Atom)