Saturday, January 27, 2018

How to integrate Adobe Experience Manager(AEM) and SAP Hybris through OOB connector

How to integrate Adobe Experience Manager(AEM) and SAP Hybris through OOB connector


This post explains the detailed steps for AEM and Hybris integration through OOB connector. AEM comes with default Hybris connector and sample demo site(should be downloaded via package manager), the steps covered in the post is for integrating AEM 6.3 with Hybris 6.1 but the same steps works for other AEM and Hybris versions with minimal changes.

AEM Configuration:


Install JDK 8
Install AEM 6.3 server
Install cq-geometrixx-all-pkg-5.10.68.zip, cq-geometrixx-hybris-content-6.3.2.zip and cq-hybris-content-6.3.2.zip packages from package share (I am considering geo-metrixx for demo, we.retail should be the recommended one in AEM 6.3)

aem-hybris-integration-packages

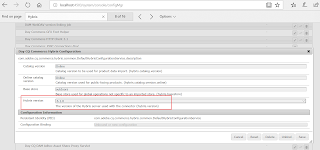
Change the Hybris server version in "Day CQ Commerce Hybris Configuration", ignore to default value if the specified version is not listed.

aem-hybris-integration-hybris-version

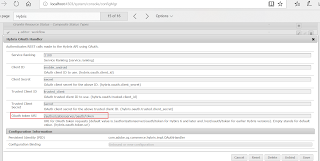
Change the Hybris OAuth endpoint in "Hybris OAuth Handler" based on the Hybris version, /authorizationserver/oauth/token for Hybirs 6 and later and /rest/oauth/token for earlier Hybris versions   - This step can be ignored for AEM 6.3 as the connectes defaults the values based on the Hybris version selected in the previous step.

aem-hybris-integration-OAuth-url

If the OAuth URL is not configured with correct value then the below exception will be displayed in error log

com.adobe.cq.commerce.hybris.impl.OAuthHandler Server did not respond with 2xx -> authentication failed.

Saturday, January 20, 2018

How to use Re-Fetching Flush Agent in Adobe Experience Manager(AEM)

This tutorial explains the details on AEM re-fetching flush agent and how to use to flush the content through re-fetching flush agent.

Re-Fetching Flush Agent


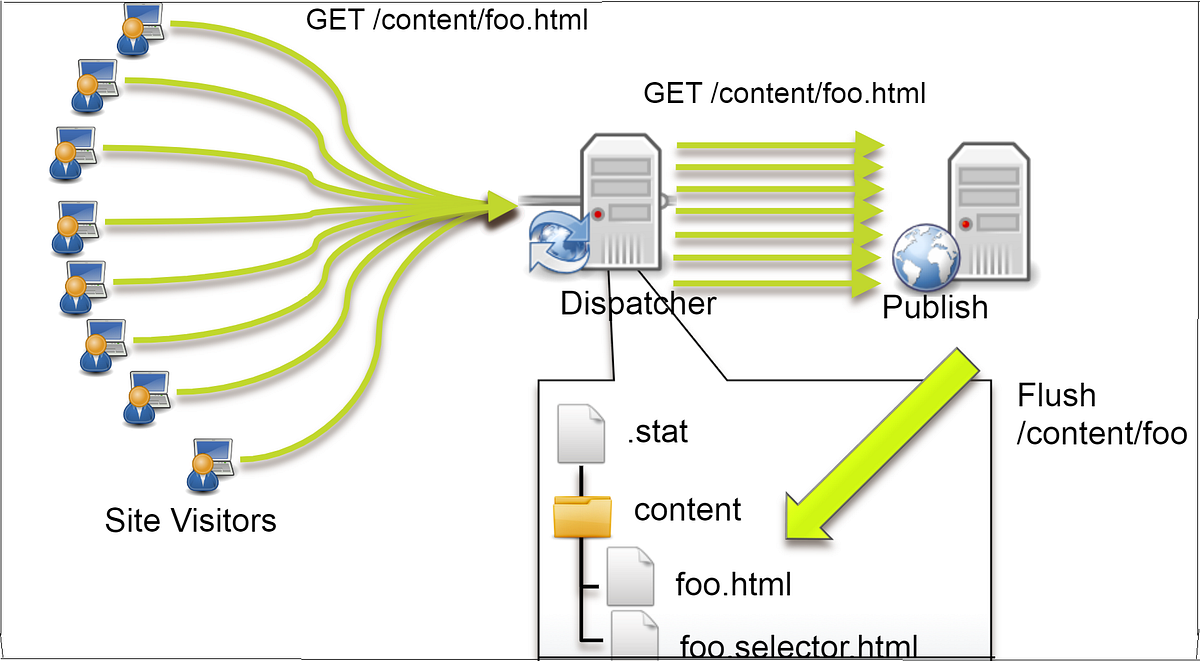
With regular flush agent, the agent flush the cache and the flushed content would only be retrieved from the publisher again after first time requested. This will create issue if the multiple parallel requests hit the dispatcher after flush as the new page is not yet cached in the dispatcher.


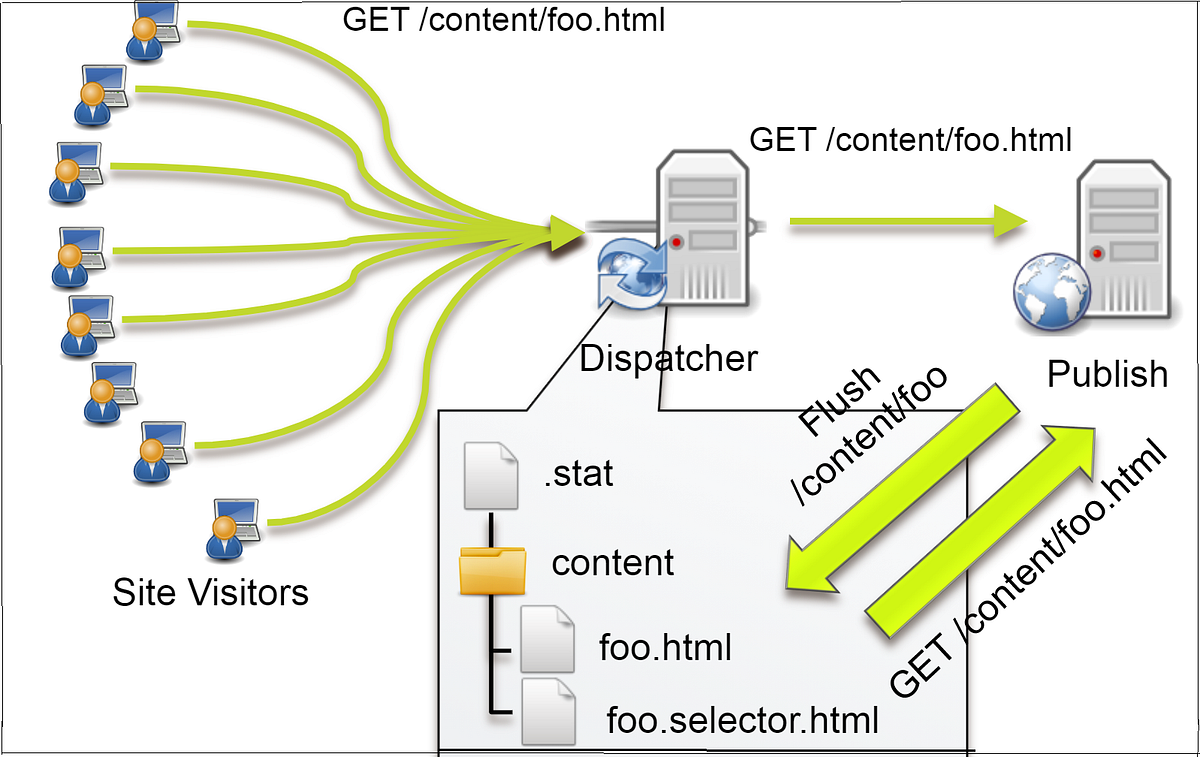
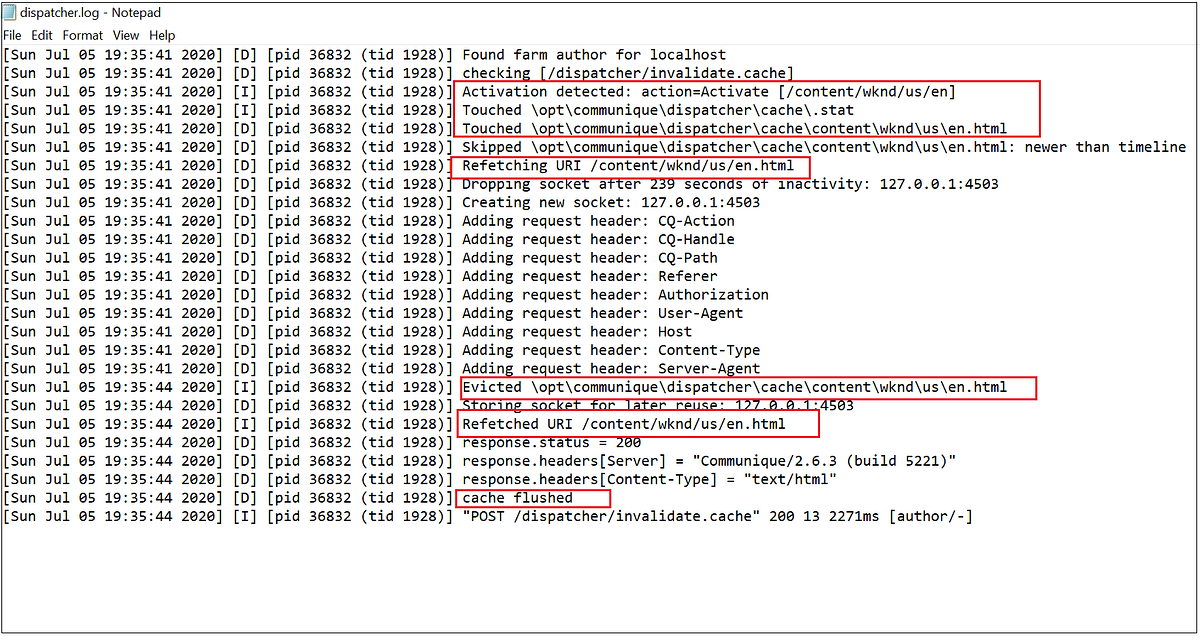
The re-fetching flush agent in AEM make sure the pages are requested and cached on the dispatcher immediately after replication.

Using a re-fetching flush agent allows to pre-populate the cache as it instructs the dispatcher to retrieve the pages from publish instance immediately after the flush occurs. Re-fetching flush agent works same as normal flush agent in dispatcher, additionally dispatcher sends a GET request for the content paths in the flush requests to fetch the content and update the cache.


Re-fetching flush is slow when activating lot of pages, enable the re-fetching only for specific content that is frequently accessed and activated.

The re-fetching feature is available in dispatcher since version 4.0.9

Configure Re-Fetching Flush agent


As a first step, develop a content builder that will send the flush URL’s into the flush request part of request body. The flush agent uses POST method to invoke dispatcher flush.

The sample content builder bundle can be downloaded from the below URL

https://github.com/techforum-repo/bundles/tree/master/refetching-flush-agent

The agent bundle is tested with AEM as Cloud Service Development Instance with aem-sdk-api dependency, the same can be modified to use uber-jar dependency.

Install the bundle to publisher as configuring the flush agent in the publish server is recommended— mvn clean install -PautoInstallBundle -Daem.port=4503

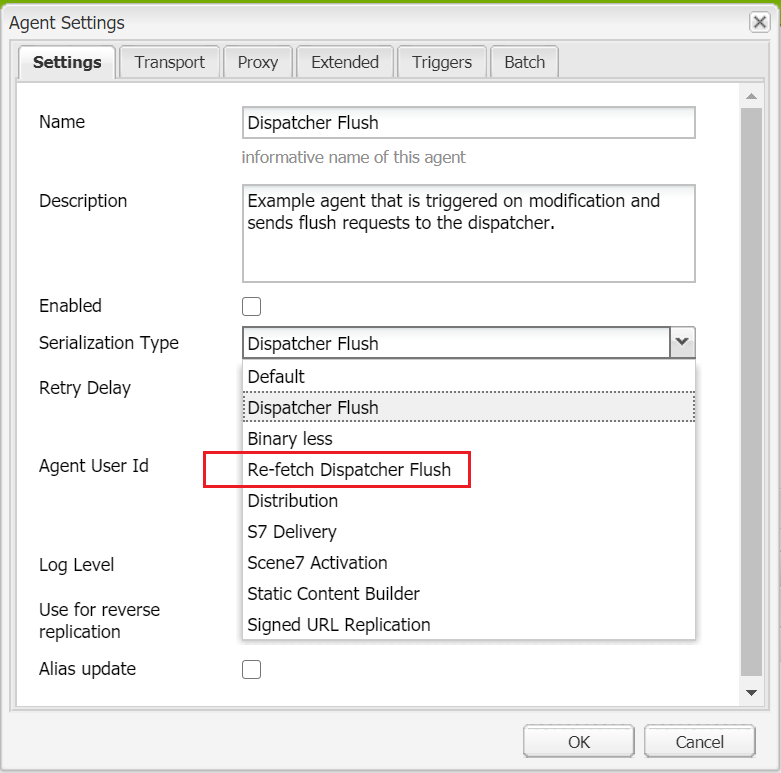
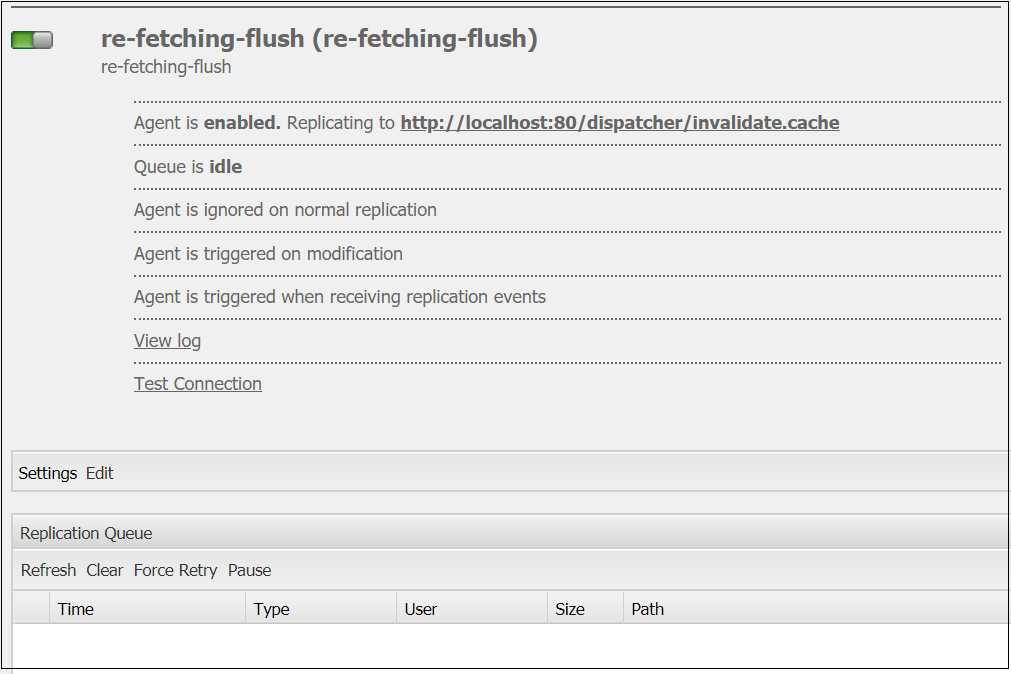
Now new serialization type “Re-fetch Dispatcher flush” is enabled while configuring the agents.


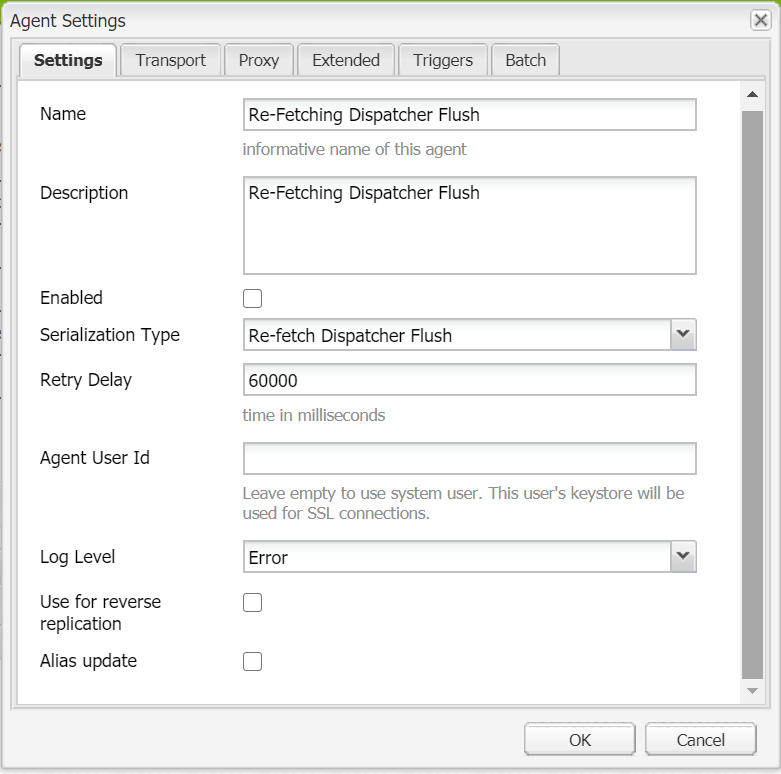
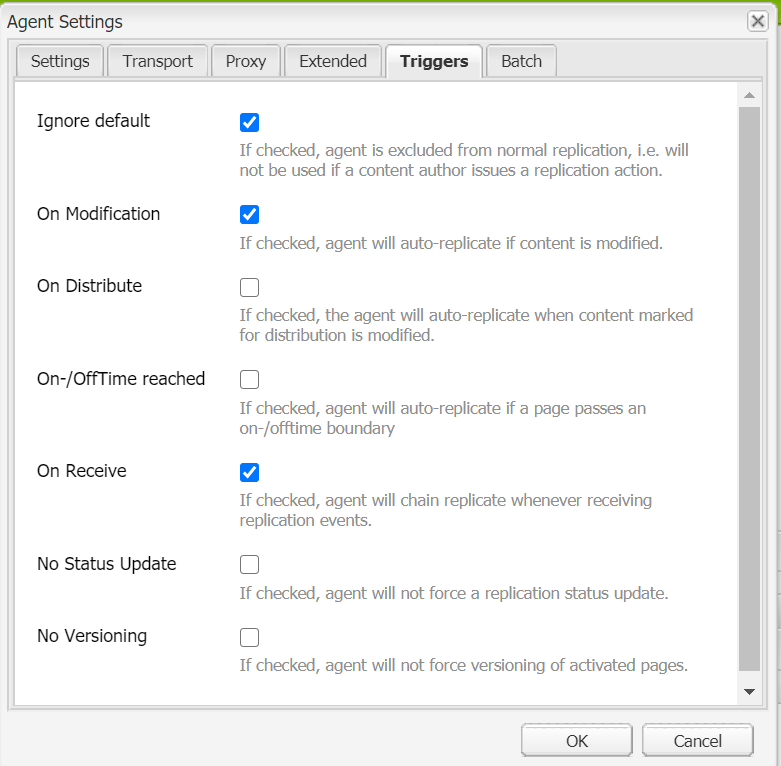
Define a re-fetching flush agent in publisher with required details, the process is same as normal flush agent with some additional configurations

In Settings tab select the “Serialization Type” as “Re-Fetch Dispatcher Flush”

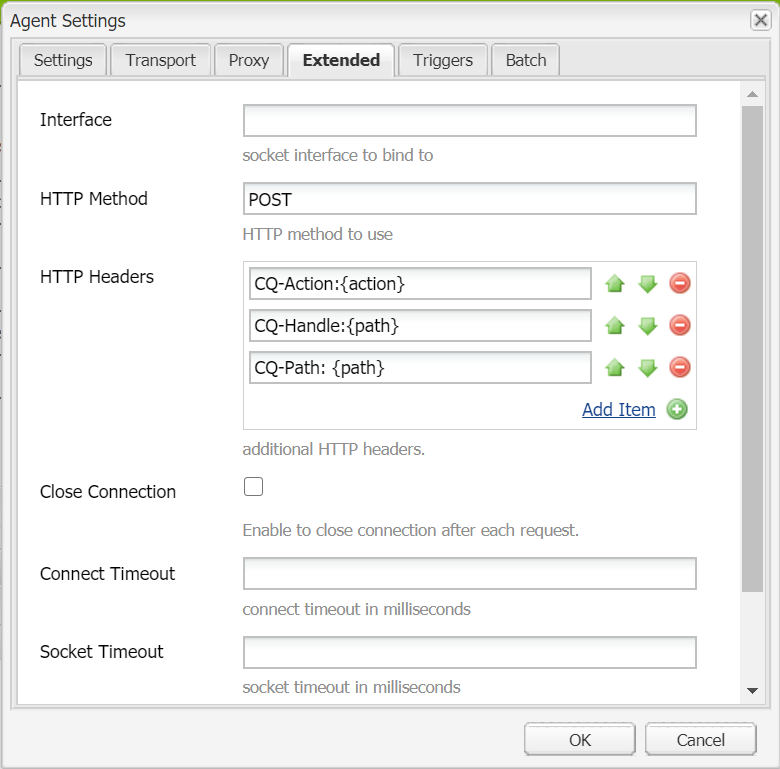
In Extended tab add POST as the HTTP Method for sending the request to Dispatcher


In AEM Cloud Service, content is published using Sling Content Distribution . The replication agents used in previous versions of AEM are no longer used or provided, configure the required forward agent configurations to distribute the changes.

Refer the below URL for details on configuring forward distribution

https://medium.com/@techforum/sling-content-distribution-in-aem-part-1-35158614dc53

Now distribute/activate a page and verify the Re-Fetching Flush Agent, the activated page is updated in dispatcher before first time requesting the page.


The re-fetching flush agent will helps to improve the performance of the frequently used critical pages, be cautious while using this feature as so many page activation will impact the AEM performance.

Friday, January 19, 2018

Serving the static resources through different domains(Cookie less Domains) - Adobe Experience Manager(AEM)

Serving the static resources through different domains(Cookie less Domains) - Adobe Experience Manager(AEM) 


This post will explain the approach to improve the page load time of the websites through serving static resources via multiple cookie less domain.

The page load time of the website directly related to the number of resources requested to render the page in browser, most of the cases the browser makes multiple calls to receive the related resources.

The browser is restricted with number of default simultaneous connections per server, if the number of resources requested in the same domain is more then that will delay the page load time - the resources are loaded sequentially(this restriction is more for HTTP 1.1 but HTTP 2 protocol support parallel downloading). This issue can be addressed by distributing the static resources across multiple domains that will intern increase the parallel download of resources.

The static resource to be on a cookie-less domain that makes the content load faster. The Cookies are uploaded with every request on a domain although they are only required on dynamic pages. This will add additional overhead while requesting the static resources through a cookie aware domain and increases the page load time - loading the cookie to request and download the cookie from the response.

To avoid this problem as discussed above define multiple domains and those are cookie less.

To define a cookie less domain, create a multiple domains e.g static1.example.com, static2.example.com etc and CNAME points to the parent domain - Make sure the cookie is set in the server only specific to the parent domain.

In Adobe Experience Manager(AEM) this can be achieved in the below two approaches

Component level:


Changing the static resource URL's in individual components with newly defined domains based on the resource type - may be separate domain for images, scripts, css etc. This will required more effort and also every component level changes to assign the specific URL's for the static resources. There is a possibly the developer will not implement this in all the components and the resources will be served from main domain.


Sling Rewriter to change the static resource URL's:


Define a Static Resource Transformer that will rewrite the resource URL's with static domains defined - multiple domains can be used

The ACS Static Reference Rewriter can be used to change the static resource URL's - https://adobe-consulting-services.github.io/acs-aem-commons/features/utils-and-apis/static-reference-rewriter/index.html

I have defined a Static Resource rewriter based on the above one to add some additional functionalities to match our requirements, thought of sharing as this may help someone with same requirement.

  • Exclude the rewrite based on attribute name and values
  • Exclude the rewrite for external resources
  • Exclude based on the complete path and URL prefix 
  • Rewrite the URL's for all srcset URL's 
  • The Rewriter is invoked only for specific content path.

StaticResourceTransformFactory.java

import java.io.IOException;
import java.util.Dictionary;
import java.util.HashMap;
import java.util.Map;

import org.apache.commons.lang3.ArrayUtils;
import org.apache.felix.scr.annotations.Activate;
import org.apache.felix.scr.annotations.Component;
import org.apache.felix.scr.annotations.Modified;
import org.apache.felix.scr.annotations.Properties;
import org.apache.felix.scr.annotations.Property;
import org.apache.felix.scr.annotations.PropertyUnbounded;
import org.apache.felix.scr.annotations.Service;
import org.apache.sling.commons.osgi.PropertiesUtil;
import org.apache.sling.rewriter.ProcessingComponentConfiguration;
import org.apache.sling.rewriter.ProcessingContext;
import org.apache.sling.rewriter.Transformer;
import org.apache.sling.rewriter.TransformerFactory;
import org.osgi.service.component.ComponentContext;
import org.slf4j.Logger;
import org.slf4j.LoggerFactory;
import org.xml.sax.Attributes;
import org.xml.sax.SAXException;
import org.xml.sax.helpers.AttributesImpl;
import org.apache.felix.scr.annotations.ConfigurationPolicy;

@Component(
label = "Static Resources Transformer Factory",
description = "Static Resources Transformer Factory",
        metatype = true,policy = ConfigurationPolicy.REQUIRE)
@Service
@Properties({
    @Property(
            name = "pipeline.type", label = "Static Resources Transformer Pipeline Type",description ="Static Resources Transformer Pipeline Type"),
    @Property(
            name = "webconsole.configurationFactory.nameHint",
            value = "Static Resources Transformer: {pipeline.type}")
})

public final class StaticResourceTransformFactory implements TransformerFactory {
    public final class StaticResourceTransformer extends org.apache.cocoon.xml.sax.AbstractSAXPipe
    implements org.apache.sling.rewriter.Transformer {

    @Override
    public void startElement(String uri, String localName, String qname, Attributes attr) throws SAXException {

      final String[] includeElementAttributesArray =includeElementAttributes.get(localName);
    AttributesImpl attrs = new AttributesImpl(attr);
   
    boolean excludeAttributeValue=false;
   
    for (int i = 0; i < attrs.getLength(); i++) {
    final String[] excludeAttributeValuesArray = excludeAttributeValues.get(attrs.getLocalName(i));
    excludeAttributeValue=ArrayUtils.contains(excludeAttributeValuesArray, attrs.getValue(i));
    LOG.info("excludeAttributeValue:"+excludeAttributeValue);

    if(excludeAttributeValue)
    {
    break;
    }
    }

    for (int i = 0; i < attrs.getLength(); i++) {
    String name = attrs.getLocalName(i);
    String value = attrs.getValue(i);
   
    if (ArrayUtils.contains(includeElementAttributesArray, name)
    && !ArrayUtils.contains(excludePath, value) && !isExcludedPrefix(excludePrefix,value)
    &&!(value.startsWith("https") || value.startsWith("http") || value.startsWith("//")) && !excludeAttributeValue) {
    {
    if(name.equals("srcset"))
    {
    String[] srcset=value.split(",");
    String srcsetValue="";
    for(int j=0;j<srcset.length;j++)
    {
    if(!(value.startsWith("https") || value.startsWith("http") || value.startsWith("//")))
    {
    srcsetValue=!srcsetValue.equals("")?srcsetValue+","+ prependHostName(srcset[j].trim()):srcsetValue+prependHostName(srcset[j].trim());
    }else
    {
    srcsetValue=srcsetValue+","+srcset[j];
    }
    }
    attrs.setValue(i, srcsetValue);
   
    }else
    {
    attrs.setValue(i, prependHostName(value));
    }
    }
    }
    }

    super.startElement(uri, localName, qname, attrs);

    }


Monday, January 15, 2018

Developing a caching service to cache third part elements to improve performance in Adobe Experience Manage(AEM)

Developing a caching service to cache third part elements to improve performance in Adobe Experience Manage(AEM) 


This post will explain the approach to cache third party elements to improve performance.
In AEM sometime we may have to load the third party data e.g. country list, state list to drop-down lists or other components from external service call, the response will be static and changes occasionally over time.

To improve the performance the data can be cached in AEM and enable a JMX bean to clear the cache whenever the data is modified in the external system. This approach can be modified according to the requirement, if the volume of the cache data is more then better to integrate with external caching system like ehcache.

Define the cache manager to put/get the cache objects
Define JMX bean to clear the cache objects

1. Define  CacheManager  to put/get objects into cache and methods to clear the cache through JMX bean

public class CacheManager {

  private static java.util.HashMap<String,Object> cacheHashMap = new java.util.HashMap<String,Object>();

  public static void putCache(Object object, String identifier)
  {
    cacheHashMap.put(identifier, object);
  }

  public static Object getCache(String identifier)
  {
  Object object = cacheHashMap.get(identifier);  
      return object;  
  }

   public static String removeCacheWithKey(String identifier)
  {
    if(!cacheHashMap.containsKey(identifier))
    {
    return "Invalid Key..";
    }
cacheHashMap.remove(identifier);  
return "Removed cache with key "+identifier;
 
  }

   public static String removeCacheAll()
  {
    cacheHashMap.clear();
    return "Removed cache";
 
  }

}


2. Sample client to get/put object into cache

public class CacheCleint {

public static void main(String[] args) {

String[] countrylist=new String[]{"USA","UK","AUS","IN"};

CacheManager.putCache(countrylist, "country-list");

String[] cachedCountrylist=(String[])CacheManager.getCache("country-list");

System.out.println(cachedCountrylist[1]);
}

}

3. Define JMX mbean to clear the cache

Define JMX mbean that will help to clear cache from OSGI JMX console or other JMX client.

import com.adobe.granite.jmx.annotation.Description;
import com.adobe.granite.jmx.annotation.Name;

@Description("Cache Manager JMX Bean")
public interface CacheManagerMBean {

    @Description("Remove the cache with cache id - country-list,state-list")
    String removeCacheWithKey(@Name("cacheKey") @Description("Valid cache key") String Cachekey);

    @Description("Remove All Cache")
    String removeCacheAll();
}

import javax.management.NotCompliantMBeanException;

import org.apache.felix.scr.annotations.Component;
import org.apache.felix.scr.annotations.Property;
import org.apache.felix.scr.annotations.Service;

import com.adobe.granite.jmx.annotation.AnnotatedStandardMBean;

@Component(immediate = true)
@Property(name = "jmx.objectname", value = "com.packagegenerator.core:type=CacheManager")
@Service
public class CacheManagerMBeanImpl extends AnnotatedStandardMBean implements CacheManagerMBean {

    public CacheManagerMBeanImpl() throws NotCompliantMBeanException {
        super(CacheManagerMBean.class);
    }

    @Override
    public String removeCacheWithKey(String cacheKey) {
    return CacheManager.removeCacheWithKey(cacheKey);
    }

    @Override
    public String removeCacheAll() {   
    return CacheManager.removeCacheAll();   
    }
 
}

The cache objects specified to a key or complete cache can be cleared through JMX client.

This will enable to cache the static data from a external system into AEM and improve the performance, the cache can be cleared through JMX console whenever required.

jmx-bean-cache-clear

jmx-bean-cache-clear

jmx-bean-cache-clear

jmx-bean-cache-clear

Sunday, January 14, 2018

How to upload and install the packages through Java API - Adobe Experience Manager(AEM)

How to upload and install the packages through Java API - Adobe Experience Manager(AEM)


This post will explain the approach to upload and install the packages through JAVA.

Refer the post for details on creating the package through Java - https://www.albinsblog.com/2018/01/sling-scheduler-to-auto-create-packages-JcrPackageManager-api-aem.html

Sample Servlet to upload and install the package - Convert the servlet to scheduler and import/replicate the package based on the scheduled time

import java.io.File;
import java.io.IOException;
import java.util.HashMap;
import java.util.Map;
import java.util.Set;

import javax.jcr.Session;
import javax.servlet.ServletException;

import org.apache.felix.scr.annotations.Reference;
import org.apache.felix.scr.annotations.sling.SlingServlet;
import org.apache.jackrabbit.vault.fs.io.ImportOptions;
import org.apache.jackrabbit.vault.packaging.JcrPackage;
import org.apache.jackrabbit.vault.packaging.JcrPackageManager;
import org.apache.jackrabbit.vault.packaging.Packaging;
import org.apache.sling.api.SlingHttpServletRequest;
import org.apache.sling.api.SlingHttpServletResponse;
import org.apache.sling.api.resource.ResourceResolver;
import org.apache.sling.api.resource.ResourceResolverFactory;
import org.apache.sling.api.servlets.SlingAllMethodsServlet;
import org.apache.sling.api.servlets.SlingSafeMethodsServlet;
import org.apache.sling.jcr.api.SlingRepository;
import org.apache.sling.settings.SlingSettingsService;

import com.day.cq.replication.ReplicationActionType;
import com.day.cq.replication.Replicator;

/**
 * Servlet that writes some sample content into the response. It is mounted for
 * all resources of a specific Sling resource type. The
 * {@link SlingSafeMethodsServlet} shall be used for HTTP methods that are
 * idempotent. For write operations use the {@link SlingAllMethodsServlet}.
 */
@SuppressWarnings("serial")
@SlingServlet(paths= "/services/packageupload")
public class PackageUploadServlet extends SlingSafeMethodsServlet {

@Reference
private Packaging packaging;

@Reference
private SlingRepository repository;

@Reference
private ResourceResolverFactory resolverFactory;

@Reference
private SlingSettingsService settingsService;

@Reference
Replicator replicator;

@Override
protected void doGet(final SlingHttpServletRequest req, final SlingHttpServletResponse resp)
throws ServletException, IOException {

Session session = null;
if (isRunMode("author") && isMasterRepository()) {//Only run in author - change the servlet to scheduler and import/replicate the package based on the scheduled time
try {

String packagePath = "C:\\Albin\\test12018-01-14-15-00-00-023-1.0.zip";
Map<String, Object> param = new HashMap<String, Object>();
param.put(ResourceResolverFactory.SUBSERVICE, "packageService");

ResourceResolver resolver;

resolver = resolverFactory.getServiceResourceResolver(param);

session = resolver.adaptTo(Session.class);
JcrPackageManager jcrPackageManager = packaging.getPackageManager(session);

JcrPackage inputPackage=jcrPackageManager.upload(new File(packagePath), false, true, "test12018-01-14-15-00-00-023-1.0");
ImportOptions importOption=new ImportOptions();//Specify the import configurations

inputPackage.install(importOption);

//Replicate the package to publishers
replicator.replicate(session, ReplicationActionType.ACTIVATE, inputPackage.getDefinition().getNode().getPath().split("/jcr:content")[0]);

resp.getOutputStream().println("This package successfully uploaded and installed to the server....");

} catch (Exception e) {
// TODO Auto-generated catch block
resp.getOutputStream().println("Excpetion while uploading/installing the package...."+e.getMessage());
e.printStackTrace();
}finally {
if(session!=null)
{
session.logout();
}
}
}
}

private Boolean isRunMode(String mode) {
Set<String> runModes = settingsService.getRunModes();
for (String runMode : runModes) {
if (runMode.equalsIgnoreCase(mode)) {
return true;
}
}
return false;
}

public boolean isMasterRepository() {
final String isMaster = repository.getDescriptor("crx.cluster.master");
return isMaster != null && !isMaster.equals("") && Boolean.parseBoolean(isMaster);
}
}

Sling scheduler to auto create the packages through JcrPackageManager API - Adobe Experience Manager(AEM)

Sling scheduler to auto create the packages through JcrPackageManager API - Adobe Experience Manager(AEM)


This post will explains the approach to define Sling scheduler to auto create the packages through JcrPackageManager API in Adobe Experience Manager(AEM).

Define a Service user:


Define a Service User with required access to create a  package.

Login to CRX explorer -  http://localhost:4502/crx/explorer/index.jsp
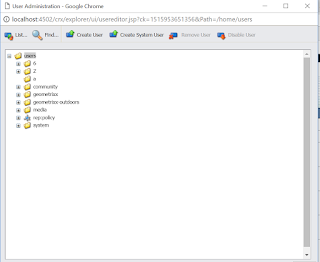
Click on User Administration

AEM-service-user

Click on Create System User

AEM-service-user

Enter the User Id - "packageassembler and the path - "system/packageassembler"

AEM-service-user

How to define factory of OSGI schedulers(Dynamic Schedulers) in Adobe Experience Manager(AEM)

Defining Factory of OSGI schedulers(Dynamic Schedulers) in Adobe Experience Manager(AEM)


This post explains the approach to define factory of OSGI schedulers(Dynamic Schedulers) in Adobe Experience Manager(AEM)

Define a factory class to capture the configurations:


Define a component and enable as configuration factory(configurationFactory=true)
Configure all the required properties run the scheduler job.

Retrieve the properties through activate method and assign the values to class variable, define the getters to retrieve the property values in Job Class.

Specify the label to identify the configuration in OSGI console.

@Component(configurationFactory = true, policy = ConfigurationPolicy.OPTIONAL, metatype = true, immediate = true, label = "Scheduled Package Generator")
@Service(value = GeneratePackageSchedulerRequest.class)
public class GeneratePackageSchedulerRequest {

final Logger logger = LoggerFactory.getLogger(this.getClass());

@Property(unbounded=PropertyUnbounded.DEFAULT, label="Scheduler Expression", description="Scheduler Expression", value="")
private static final String SCHEDULER_EXPRESSION = "sheduleExpression";
private String sheduleExpression;

@Property(unbounded = PropertyUnbounded.ARRAY, label = "Packages Filter String", cardinality = 50, description = "Packages Filter String")
public static final String PACKAGE_FILTERS = "packageFilters";
private String[] packageFilters;

@Property(unbounded=PropertyUnbounded.DEFAULT, label="Package Name", description="Package Name")
private static final String PACKAGE_NAME = "packgeName";
private String packageName;

@Property(unbounded=PropertyUnbounded.DEFAULT, label="Root Path to store the package", description="Root Path")
private static final String ROOT_PATH = "rootpath";
private String rootPath;


@Activate
protected void activate(final ComponentContext ctx) {

Dictionary<?, ?> props = ctx.getProperties();
sheduleExpression = PropertiesUtil.toString(props.get(SCHEDULER_EXPRESSION), "");
packageFilters = PropertiesUtil.toStringArray(props.get(PACKAGE_FILTERS), null);
packageName = PropertiesUtil.toString(props.get(PACKAGE_NAME), null);
rootPath=PropertiesUtil.toString(props.get(ROOT_PATH), null);
}

public String[] getPackageFilters() {
return packageFilters;
}

public String getJobname() {
return packageName;
}

public String getSheduleExpression() {
return sheduleExpression;
}

public String getRootPath() {
return rootPath;
}

}

Monday, January 1, 2018

How to receive Outbound Message notification from Salesfore through Salesforce Adapter in Oracle SOA Suite 12c

How to receive Outbound Message notification from Salesfore through Salesforce Adapter in Oracle SOA Suite 12c

Salesforce Outbound messaging allows you to specify that changes to fields within Salesforce can cause messages with field values to be sent to designated external servers.

Outbound messaging is part of the workflow rule functionality in Salesforce. Workflow rules watch for specific kinds of field changes and trigger automatic Salesforce actions, such as sending email alerts, creating task records, or sending an outbound message.

After you set up outbound messaging, when a triggering event occurs, a message is sent to the specified endpoint URL. The message contains the fields specified when you created the outbound message. Once the endpoint URL receives the message, it can take the information from the message and process it. To do that, you need to examine the outbound messaging WSDL.

The Salesforce Adapter in Oracle SOA Suite help to integrate with Salesforce cloud. This post will explain the steps to enable the Outbound messaging in Salesfore and receive the notifications in Oracle SOA Suite via Salesforce Adapter.

Define Outbound message in Salesforce:


Login to Salesforce
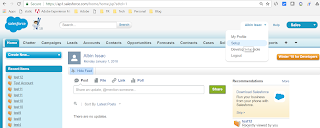
Click on Setup

salesforce_setup

Search for Outbound messages and click on Workflow & Approvals -  Outbound Messages

salesforce_outbound_messages

Click on Continue in the next screen
Click on New Outbound Message

salesforce_outbound_messages

Select the required Object and Click on Next