Sunday, November 29, 2020

How to Register Servlets Dynamically in AEM?


Most of the time while working on the project we will have scenarios to dynamically register the servlets with different resource types, selector and extension, etc — registering the same servlet with different resource types, selector, extensions, etc.

Let's assume we have a servlet that is registered with a specific resource type but later we have a requirement to enable the same servlet for a different resource type, one of the common options is modifying the source code to enable the additional resource types. The code change might not be the optimal solution in most cases.

In this tutorial, let us see the simple approach to register the servlets dynamically with different resource types, selectors, and extensions.

The OSGi Metatype Annotations(OSGi Declarative Services Annotations) can be used to register the dynamic servlets.

ObjectClassDefinition — Generate a Meta Type Resource using the annotated type

AttributeDefinition — AttributeDefinition information for the annotated method.

Designate — Generate a Designate element in the Meta Type Resource for an ObjectClassDefinition using the annotated Declarative Services component.

I am creating a servlet with the name DynamicResourceTypeServlet, Created a @ObjectClassDefinition inside the servlet with required AttributeDefinitons with servlet registration 
properties

  @ObjectClassDefinition(name = "DynamicResourceTypeServlet", description = "Resource Types to Enable this Servlet")
  public static @interface Config {
    @AttributeDefinition(name = "Selectors", description = "Standard Sling servlet property")
    String[] sling_servlet_selectors() default {"dynamic"};
    
    @AttributeDefinition(name = "Resource Types", description = "Standard Sling servlet property")
    String[] sling_servlet_resourceTypes() default {""};
    
    @AttributeDefinition(name = "Methods", description = "Standard Sling servlet property")
    String[] sling_servlet_methods() default {"GET"};
    
    @AttributeDefinition(name = "Extensions", description = "Standard Sling servlet property")
    String[] sling_servlet_extensions() default {"html"};
  }


Define a Designate to the servlet to the ObjectClassDefinition.

         @Designate(ocd = DynamicResourceTypeServlet.Config.class)


Deploy the bundle and configure the required resource types, selector, and extensions from ConfigMgr(http://localhost:4503/system/console/configMgr/com.sample.servlets.DynamicResourceTypeServlet)


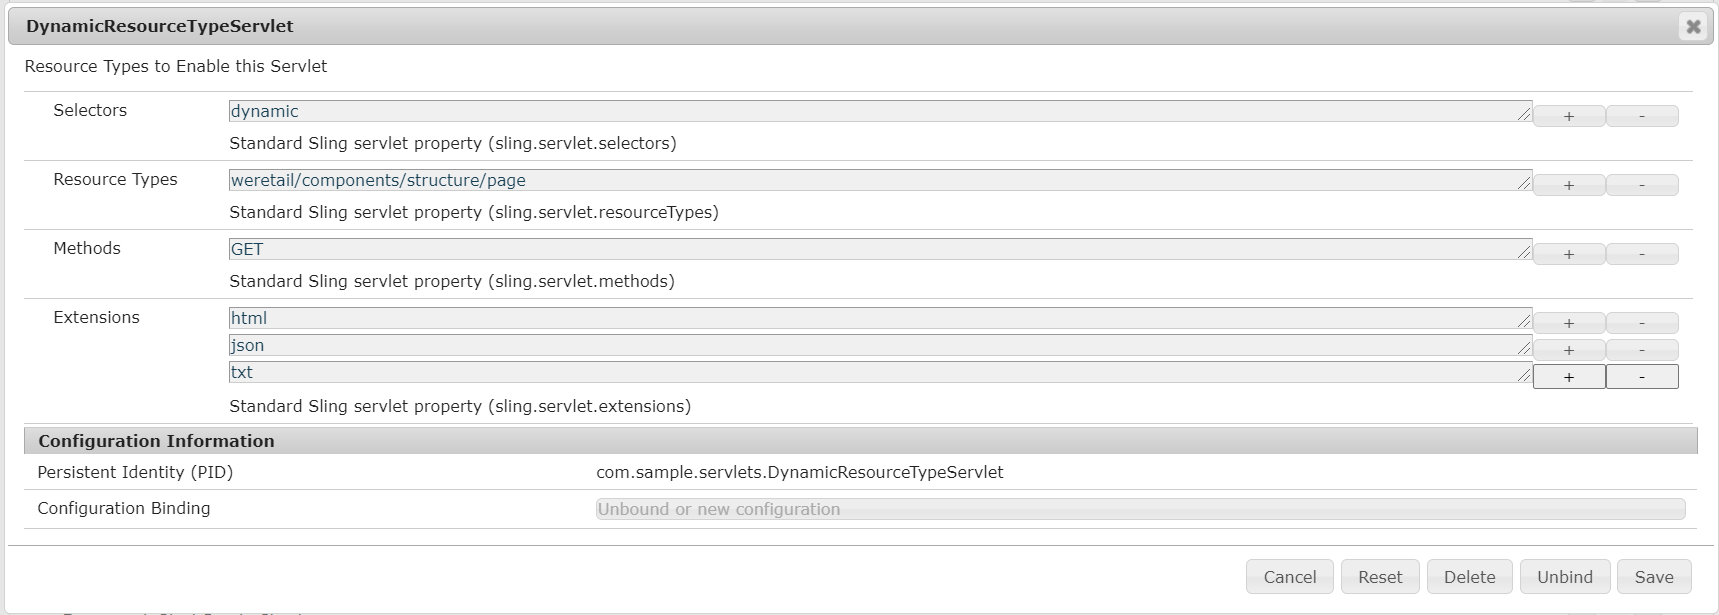
Now the servlet is registered with configured resource types, selectors, and extensions.

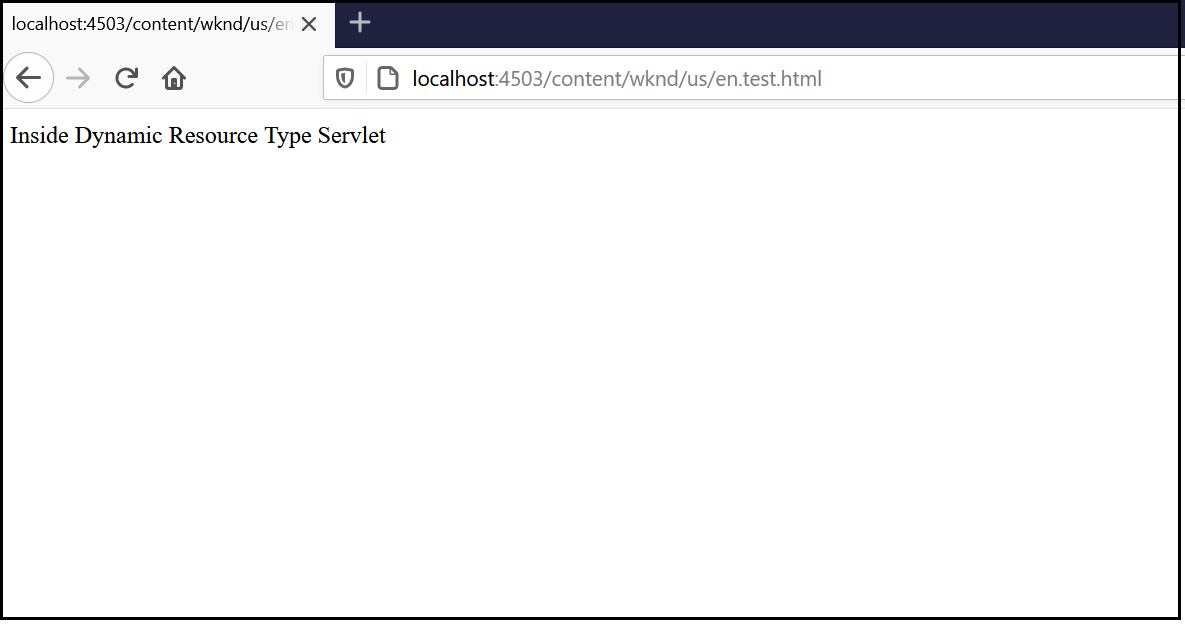
The servlet can be accessed through the below URL’s (the resource type for /content/wknd/us/en is wknd/components/page)

http://localhost:4503/content/wknd/us/en/_jcr_content.dynamic.json (JSON or txt extensions can be accessed only from jcr:content node)


Add the below dependency into the core module to enable the DS annotations

<dependency>
<groupId>org.osgi</groupId>
<artifactId>org.osgi.service.metatype.annotations</artifactId>
<version>1.4.0</version>
<scope>provided</scope>
</dependency>

The bnd-maven-plugin generate the required OSGi meta-type definitions for the annotations during compile time. The dynamic servlet registration is a useful feature that helps to register the servlets dynamically with different resource types, selectors, and extensions.

Feel free to provide your comments.


Monday, November 23, 2020

Beginners Tutorial: What is Cloud Manager for Adobe Experience Manager(AEM)?


What is Cloud Manager for AEM?

  • Cloud Manager is a Cloud service that allows customers to build, test, and deploy AEM applications hosted by Adobe Managed Services. 
  • Enables customers to manage their custom code deployments on their AEM-managed cloud environments with manageable pipeline automation and complete flexibility for their deployment timing or frequency.
  • Each customer gets its own Git Repository and their code is secure and not shared with any other Organizations.
  • Cloud Manager is only available to Adobe Managed Services customers using AEM 6.4 or above
  • Restructure the code with the latest arch type to support the Dispatcher deployment
  • Address the quality issues and adhere to the best practices for onboarding into Cloud Manager
  • Define application-specific Key Performance Indicators (KPIs)


Key Features

Self Service interface:

  • Enables customers to easily access and manage the cloud environment and CI/CD pipeline for their Experience Manager applications. 
  • Helps to define application-specific KPI's like peak page views per minute and expected response time for a page load,
  • Helps to define Roles and permissions for different team members.

CI/CD pipeline:

  • Setup optimized CI/CD pipeline to speed the delivery of custom code or updates such as adding new components on the website. 
  • Allows AEM project teams to quickly, safely, and consistently deploy code to all AEM environments hosted in AMS 
  • A thorough code scan is executed to ensure that only high-quality applications pass through to the production environment.
  • Quality checks include, code inspection, security testing, and performance testing are always performed as part of the CI/CD pipeline execution

Flexible Deployment Modes:

  • Cloud Manager offers customers flexible and configurable deployment modes so they can deliver experiences according to changing business demands
  • In automatic trigger mode, the code is automatically deployed to an environment based on specific events such as code commit. 
  • You can also schedule code deployments during specified time frames, even outside business hours.
  • Manual – trigger the deployment manually

Auto Scaling:

Cloud Manager detects the need for additional capacity when the production environment is subject to unusually high load and automatically brings additional capacity online via autoscaling feature.

The autoscaling feature will apply only to the Dispatcher/Publish tier, and will always be executed using a horizontal scaling method, with a minimum of one additional segment of a Dispatcher/Publish pair, and up to a maximum of ten segments.


Cloud Manager Benefits:

  • Enables organizations to self-manage Experience Manager in the cloud
  • Continuous Integration / Continuous Delivery of code to reduce time to market from months/weeks to days/hours
  • Cloud Manager provides continuous delivery and continuous integration for updates with zero downtime.
  • Code Inspection, performance testing, and security validation based on best practices before pushing to production to minimize production disruptions.
  • Automatic, scheduled or manual deployment even outside of business hours for maximum flexibility and control.
  • Autoscaling feature intelligently detects the need for increased capacity and automatically brings online additional Dispatcher/Publish segment(s).
  • Reduce the dependency with Adobe CSE for production deployment
  • Configure a set of content paths which will either be invalidated or flushed from the AEM Dispatcher cache for publish instances
  • Development on your local git repositories ate integrate with CM Git repository
  • API/Events/Webhooks for external tool integration through Adobe I/O


CI/CD Pipeline:

Define a set of deployment steps which are executed in sequence, the Cloud manager provides the below two major pipelines


  • Non-Prod Pipeline
  • Production Pipeline
Two types of Non-Prod pipeline
  • Code Quality Pipeline
  • Deployment Pipeline

Non-Prod - Code Quality Pipeline

  • Code Quality pipelines execute a series of steps on a code from a Git branch to build and be evaluated against Cloud Manager’s code quality scan
  • Helps to identify and fix the quality issues before planning for production deployment.
  • Code quality pipeline can be used before provisioning the environments
  • Quality report for review


Non-Prod - Deployment Pipeline


Deployment pipelines support the automated deployment of code from the Git repository to any Non-production environment, meaning any provisioned AEM environment that is not Stage or Production.


Production Pipeline


The CI/CD Production Pipeline is used to build and deploy code through Stage to the Production environment, decreasing time to value.


Build Triggers:
  • manually, 
  • with a Git commit 
  • based on a recurring schedule

The Production Deployment:
  • Application for Approval (if enabled)
  • Schedule Production Deployment (if enabled)
  • CSE Support (if enabled)


Cloud Manager Quality:

Quality checks including code inspection, performance testing, and security validation are conducted as part of the pipeline.

Code quality testing:


Cloud Manager uses SonarQube and OakPAL Content Rules to statically analyze the code and the content. It tests security, reliability, maintainability, coverage, skipped unit tests, open issues, and duplicated lines of code. Unfortunately, there is no way to add your custom rule, but you can mark some of the detected issues as false-positives.

Security testing:


Cloud Manager runs the existing AEM Security Heath Checks on stage following the deployment and reports the status through the UI. The results are aggregated from all AEM instances in the environment. If any of the Instances report a failure for a given health check, the entire Environment fails that health check.

Performance testing:


It tests both: page rendering and asset performance. After 30 minutes, it provides a report outlining i.e., CPU utilization, Disk IO Wait Time, and Page Error Rate. 

For each of the above mentioned Quality Gates, Adobe introduced the concept of the three-tier result:

Critical – these are issues identified by the gate which cause an immediate failure of the pipeline
Important – these are issues identified by the gate which cause the pipeline to enter a paused state. A deployment manager, project manager, or business owner can either override the issues, in which case the pipeline proceeds or they can accept the issues, in which case the pipeline stops with a failure
Info – these are issues identified by the gate which are provided purely for informational purposes and have no impact on the pipeline execution.

The performance and security testing are minimal you should execute some external performance and security tests if required.

Cloud Manager Roles

Business Owner - Primary user who completes the initial Cloud Manager setup. Responsible for defining KPIs, approving production deployments, and overriding important 3-tier failures.

Program Manager - Uses Cloud Manager to perform team setup, review status, and view KPIs. May approve important 3-tier failures.

Deployment Manager - Manages the deployment operations. Uses Cloud Manager to execute stage and production deployments. May approve important 3-tier failures. Has access to Git repository.


Cloud Manager API


  • The Cloud Manager API enables Cloud Manager customers to interact with the same underlying capabilities exposed through the web UI in a fully programmatic fashion
  • This allows for the integration of the Cloud Manager Continuous Integration / Continuous Delivery pipeline with other systems.
  • The API’s are managed through Adobe I/O 
  • By using Adobe I/O Events, Cloud Manager can send external applications notifications when key events occur

Sample Use Cases

  • Starting the Cloud Manager CI/CD pipeline from an external system.
  • Executing additional tests between the standard Cloud Manager performance tests and the ultimate production deployment.
  • Triggering additional activities after the pipeline execution is complete or a specific step has been completed, for example
  • CDN cache invalidation once the production deployment is finished.
  • Deploying related applications to non-managed Services systems.
  • Notifying on other channels (e.g. Slack, Microsoft Teams).
  • Creating issue reports in bug tracking systems (e.g. Atlassian JIRA) on pipeline failures

Reference - https://www.adobe.io/apis/experiencecloud/cloud-manager/api-reference.html#!AdobeDocs/cloudmanager-api-docs/master/swagger-specs/api.yaml

Cloud Manager Notifications

Cloud Manager allows the user to receive notifications when the production pipeline starts and completes (successfully or unsuccessfully), at the start of a production deployment, as well as when the Go-Live Approval and Scheduled steps are reached.

The notifications appear in a sidebar in Cloud Manager UI

Email Notifications:

By default, notifications are available in the web user interface across Adobe Experience Cloud solutions. Individual users can also opt for these notifications to be sent through email, either on an immediate or digest basis.

External Tool Notification:

Notifying on other channels (e.g. Slack, Microsoft Teams) though CM API and Events

Cloud Manager Environment Flow


Environment specific Cloud Manager Git branches for non-stage and prod environments i.e. Dev and UAT

Non-Prod Deployment pipeline for  non-stage and prod environments i.e. Dev and UAT

Production pipeline for stage and Prod deployment through master branch

The development will happen in the customer-specific git repository and merged with the Cloud Manager git repository whenever required.

Cloud Manager now supports building customer projects with both Java 8 and Java 11. By default, projects are built using Java 8. Customers who intend to use Java 11 in their projects can do so using the Apache Maven Toolchains plugin.

You can build the End to End CI/CD pipeline with your local git repository and if required external Ci?CD tools e.g. Jenkins and the CM APIs.


Thursday, November 12, 2020

Aspect-Oriented Programming (AOP) with Adobe Experience Manager(AEM)

What is AOP?


Aspect-oriented programming (AOP) is a programming paradigm that aims to increase modularity by allowing the separation of cross-cutting concerns. It does so by adding additional behavior to the existing code (an advice) without modifying the code itself, instead separately specifying which code is modified via a “pointcut” specification, such as “log all function calls when the function’s name begins with ‘set’”. This allows behaviors that are not central to the business logic (such as logging) to be added to a program without cluttering the code, core to the functionality.

Aspect-Oriented Programming provides a solution to implement Cross-Cutting Concerns.
Implement the cross-cutting concern as an aspect.
Define pointcuts to indicate where the aspect has to be applied.

This ensures that the cross-cutting concerns are defined in a centralized component and can be applied as needed.

This enables some of the below benefits
  • Reusable code
  • Cleaner code
  • Write less code
  • Less boilerplate code
  • Easy to maintain

Let us quickly see some of the definitions

  • Advice — Define what needs to be applied and when
  • Jointpoint — Where the Advice is applied
  • Pointcut — a combination of different Jointpoints where the advice needs to be applied.
  • Aspect — applying the advice at the pointcuts

Types of Advice:


  • Before Advice — the advice runs before the method execution
  • After Advice — the advice runs after the method execution
  • After Returning Advice — the advice runs after the method executes successfully
  • Around Advice — the advice can run before and after the method execution
  • Throws Advice — ensures the advice runs if the method throws an exception

AspectJ


AspectJ is an aspect-oriented extension to the Java programming language. AspectJ AOP implementation provides many annotations to support AOP programming in Java.

  • @Aspect — declares the class as an aspect.
  • @Pointcut — declares the pointcut expression.

The annotations used to create advices are given below:
  • @Before declares the before advice. It is applied before calling the actual method.
  • @After declares the after advice.
  • @AfterReturning declares the after returning advice.
  • @Around declares the around advice.
  • @AfterThrowing declares the throws advice.

AspectJ offers different required dependencies in the Maven Central repository under group org.aspectj.

AspectJ with AEM


Let us now see how to enable the AspectJ with AEM

As a first step enables the below plugin in core module pom.xml(the plugins and dependency versions are added based on Java 1.8, change based on your Java version )

<plugin>
   <groupId>org.codehaus.mojo</groupId>
   <artifactId>aspectj-maven-plugin</artifactId>
   <version>1.11</version>
   <configuration>
      <complianceLevel>1.8</complianceLevel>
      <source>1.8</source>
      <target>1.8</target>
      <encoding>UTF-8</encoding>
   </configuration>
   <executions>
      <execution>
         <goals>
            <goal>compile</goal>
         </goals>
      </execution>
   </executions>
</plugin>


Enable the AspectJ dependencies to the Core module Pom.xml

<!-- https://mvnrepository.com/artifact/org.aspectj/aspectjrt -->

<dependency>
<groupId>org.aspectj</groupId>
<artifactId>aspectjrt</artifactId>
<version>1.8.13</version>
</dependency>

<!-- https://mvnrepository.com/artifact/org.aspectj/aspectjtools -->

<dependency>
<groupId>org.aspectj</groupId>
<artifactId>aspectjtools</artifactId>
<version>1.8.13</version>
</dependency>


Embed the AspectJ runtime dependency to Core bundle — enable the below configuration changes to core module pom.xml

<plugin>
<groupId>biz.aQute.bnd</groupId>
<artifactId>bnd-maven-plugin</artifactId>
<executions>
<execution>
<id>bnd-process</id>
<goals>
<goal>bnd-process</goal>
</goals>
<configuration>
<bnd><![CDATA[
Import-Package: javax.annotation;version=0.0.0,*
-includeresource: aspectjrt-1.8.13.jar;lib:=true
]]></bnd>
</configuration>
</execution>
</executions>
</plugin>


Now define the Aspect — the aspect is going to execute After, Before, and Around advice.


execution(* com.aspectj.core.servlets.*.doGet(..)) — Defines the PointCut, the advice will be run for the doGet method on the servlets under com.aspectj.core.servlets package

  • The first wildcard — matches any return value
  • com.aspectj.core.servlets.*.doGet — doGet method on the servlets under com.aspectj.core.servlets package
  • (…) — any number of parameters (zero or more)

logExecutionTime — Around advice, log the method execution time for all Servlet “GET” requests

logRequestHeader — Before advice, log the HTTP request headers for all Servlet “GET ”requests. Mapping the input variable req(the variable should be defined in the same order as the actual method signature) for using inside the Advice , args(req,…) — req as a first parameter followed by zero or more parameter

addCustomHeader — Before advice, add custom HTTP headers for all Servlet “GET ”responses. Mapping the input variable resp(the variable should be defined in the same order as the actual method signature) for using inside the Advice, args(…,resp) — resp as the last parameter

Now while invoking the servlets under com.aspectj.core.servlets through the “GET” method, the logExecutionTime, logRequestHeader and addCustomHeader Advice run and perform the appropriate operations.

The AOP will help us to address the cross-cut concerns in Java e.g. logging in all methods, this helps us to write clean code with better maintainability. The common concerns across the project can be maintained separately as an Advice and executed runtime based on the PointCut configuration.

Demo Project —https://github.com/techforum-repo/youttubedata/tree/master/aspectj


Thanks for reading, feel free to add your comments