This post will delve into the specifics of egress IP support for Adobe Experience Manager (AEM) as a Cloud Service. We’ll cover the essential steps to enable and configure the egress IP and the port forwarding rules. While Adobe provides several comprehensive documents on this subject, this post is crafted from my experience and understanding gained while implementing egress IPs and port forwarding rules.
Egress IP:
An “egress IP” refers to an IP address used for outgoing traffic from a network. In the context of network and internet communications, traffic is typically classified as either “ingress” or “egress”:
- Ingress Traffic is incoming traffic, meaning data packets entering a network. For instance, when you access a website, the data packets sent from the website’s server to your device are considered ingress from your network’s perspective.
- Egress Traffic: Conversely, egress traffic is outgoing traffic from a network to another destination. For example, when you upload a file to a cloud server or send an email, the data packets leaving your device and moving through your network to the internet are egress traffic.
Monitoring and controlling egress traffic is crucial for security and bandwidth management in many network setups, particularly in corporate or cloud-based environments. Egress IP addresses are often used in various scenarios:
- Security and Filtering: Egress IPs can be allowlisted in external systems to ensure that only traffic from known, trusted sources is allowed. This is common in business-to-business (B2B) interactions or cloud services.
- Traffic Identification: Organizations can quickly identify and monitor the traffic leaving their network using specific egress IPs. This aids in managing network performance and detecting potential security threats.
- Compliance and Auditing: For compliance reasons, companies may need to log and audit all egress traffic, ensuring that sensitive data isn’t being sent to unauthorized destinations.
In cloud environments, such as Adobe Experience Manager (AEM) as a Cloud Service, an egress IP might define a specific route for outgoing traffic from the AEM service to other systems, like third-party APIs or integrations. This can help configure security rules and ensure seamless connectivity between different services.
In many scenarios, there’s a need to restrict access to critical services exclusively to known IP addresses, a process typically achieved through IP allowlisting. This becomes a challenge in auto-scalable cloud environments like AEM as a Cloud, where the IP addresses of servers can change dynamically. A dedicated egress IP addresses this issue by providing a consistent, identifiable IP address for all outgoing traffic. This means the dedicated egress IP can be allowed at the service level, ensuring uninterrupted access and enhanced security for the necessary services.
AEM as a Cloud currently supports the below Advanced networking options
Flexible port egress: Enable port forwarding rules to support non-HTTP/HTTPS integrations with external services like SQL and Email. When opting out of a dedicated egress IP, most configuration details are akin to those used in a Dedicated Egress IP address setup, including the ability to define port forwarding for integration with non-HTTP/HTTPS services. The primary difference lies in eliminating the nonProxyHosts configuration, as all traffic in this scenario is directed through a shared IP.
The dedicated egress IP address enables AEM as a Cloud Service to use a specific IP, allowing external services to filter incoming requests by this IP. It also supports port forwarding for non-HTTP/HTTPS service integration and lets you configure noProxyHosts to route traffic through default shared IPs instead of the dedicated egress IP.
Virtual Private Network (VPN):
A Virtual Private Network (VPN) enables AEM as a Cloud Service customer to connect their AEM environments within a Cloud Manager Program to an existing, supported VPN. This facilitates secure and controlled connections between AEM as a Cloud Service and services within the customer’s network.
Before proceeding with the configuration, decide the networking type your project requires. Remember that the network configuration type cannot be changed once created, though it can be deleted and recreated with a new kind. This post focuses on the Dedicated Egress IP Address type, but the Flexible Port Egress follows a similar process with some minor differences.
As a first step, create a new project (although an existing project can also be used) in the Developer Console with the Cloud Manager API, and ensure the necessary access rights (Deployment Manager and Business Owner) are granted to enable the network configurations.
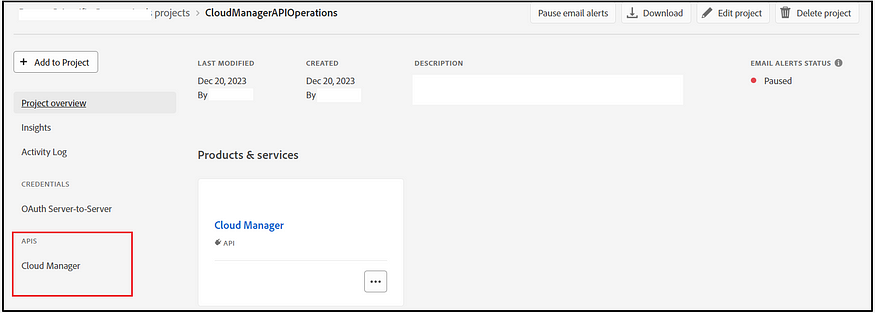
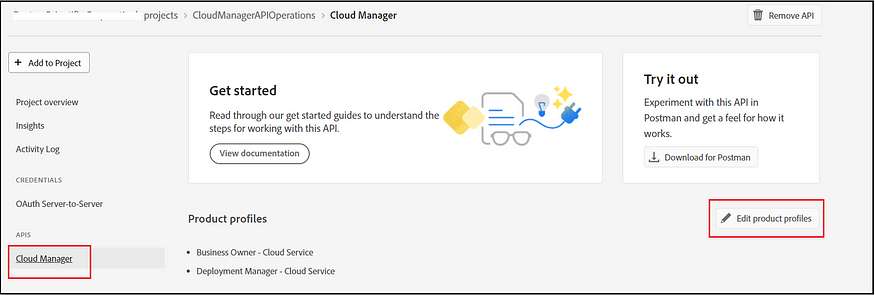
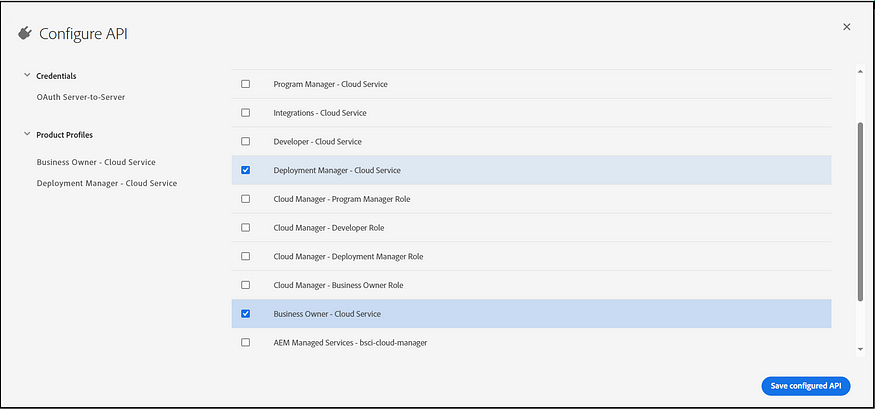
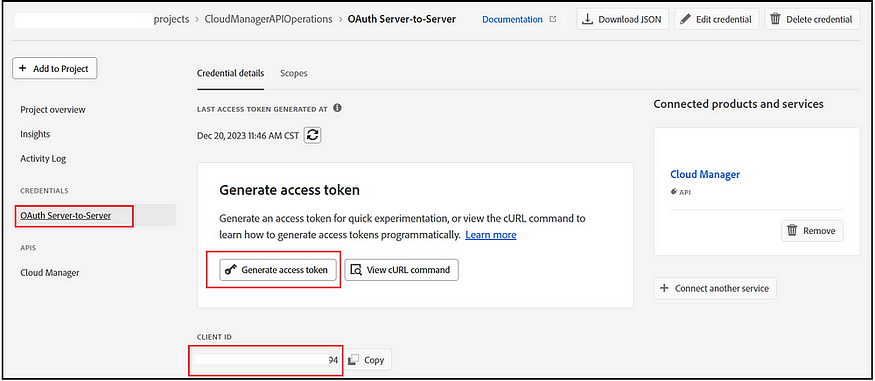
Now, you can copy the client ID and generate the access token through the project.
Identify Region:
The AEM as a Cloud enables different regions to host the services; you must identify the region code to execute the API.
To identify the region, click on one of the environments in the cloud manager that will display the hosted region.
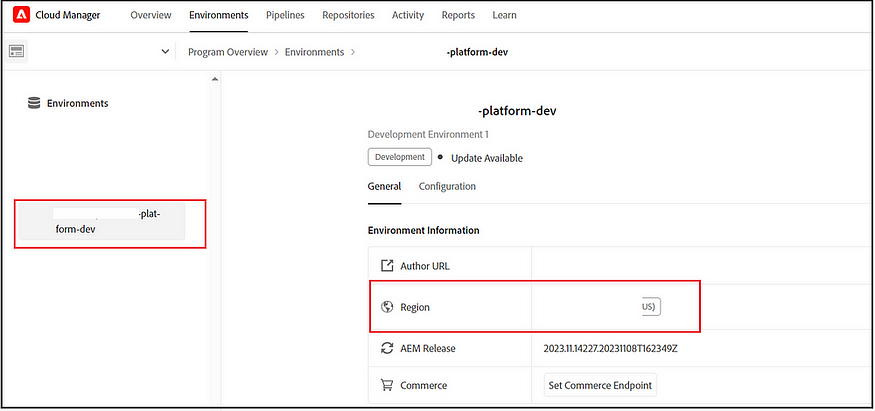
Region-to-region code mapping can be looked at here — Creating Programs and Environments — Cloud Manager API (adobe.com)(if you use multi-region, the network configuration needs to be enabled for all the domains)
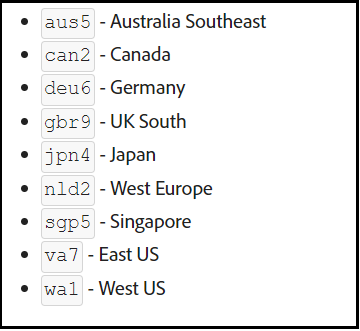
Step1 — CreateNetworkInfrastructure
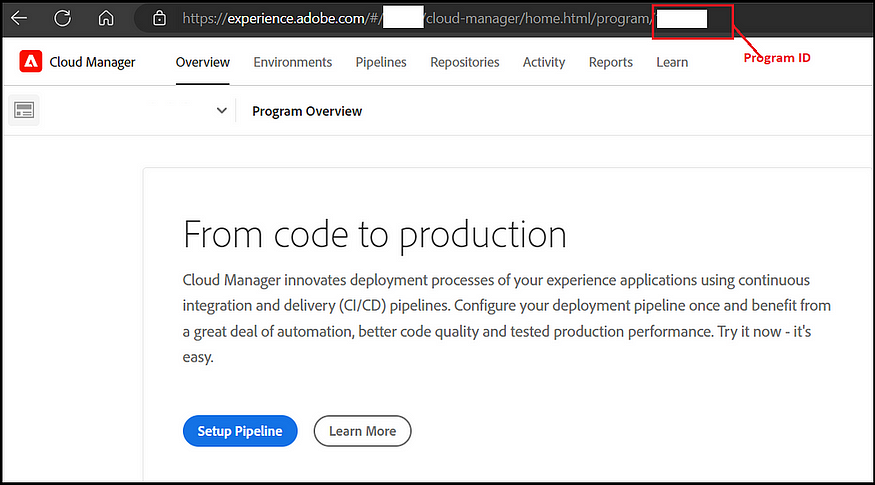
Execute the below curl command; the program ID can be identified through the cloud manager. Open the cloud program.
The organization ID can be copied from the admin console and logged into the admin console through your organization.

curl -X POST https://cloudmanager.adobe.io/api/program/{programId}/networkInfrastructures \
    -H 'x-gw-ims-org-id: <ORGANIZATION_ID>' \
    -H 'x-api-key: <CLIENT_ID>' \
    -H 'Authorization: Bearer <ACCESS_TOKEN>' \
    -H 'Content-Type: application/json' \
    -d '{ "kind": "flexiblePortEgress", "region": "va7" }'
Note the network infrastructure id (“id”:”12345") returned.
This activity may take 15 minutes. Use the curl command below to check the status.
curl -X GET https://cloudmanager.adobe.io/api/program/{programId}/networkInfrastructure/{networkInfrastructureId} \
    -H 'x-gw-ims-org-id: <ORGANIZATION_ID>' \
    -H 'x-api-key: <CLIENT_ID>' \
    -H 'Authorization: Bearer <ACCESS_TOKEN>' \
    -H 'Content-Type: application/json'
Look for status “status”:” ready.” the network infrastructure configuration is enabled now.
Traffic Routing:
Once the flexiblePortEgress is enabled at a high level, the traffic is routed by the rules below.
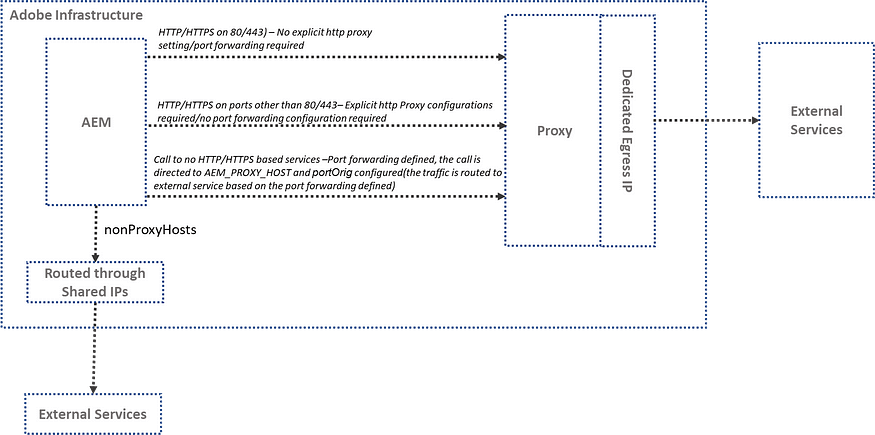
HTTP/HTTPS on Standard Ports (80/443)
HTTP/HTTPS connections on standard ports (80/443) are automatically proxied out of AEM using the dedicated egress IP address. No additional code or configuration is required to support HTTP/HTTPS connections.
HTTP/HTTPS on Non-Standard Ports (e.g., 8443)
For http or https traffic going to ports other than 80 or 443, a proxy should be configured in the code using the following host and port environment variables to
- for HTTP:
AEM_PROXY_HOST/AEM_HTTP_PROXY_PORT - for HTTPS:
AEM_PROXY_HOST/AEM_HTTPS_PROXY_PORT
By default, the above proxy-related variables are enabled by the cloud manager. The same can be used across OSGI, Java Code, and Dispatcher configurations. The traffic is routed through a dedicated egress IP address.
String url = "www.example.com:8443"
String proxyHost = System.getenv().getOrDefault("AEM_PROXY_HOST", "proxy.tunnel");
int proxyPort = Integer.parseInt(System.getenv().getOrDefault("AEM_HTTPS_PROXY_PORT", "3128"));
HttpClient client = HttpClient.newBuilder()
      .proxy(ProxySelector.of(new InetSocketAddress(proxyHost, proxyPort)))
      .build();

HttpRequest request = HttpRequest.newBuilder().uri(URI.create(url)).build();
HttpResponse<String> response = client.send(request, BodyHandlers.ofString());
Non-HTTP/HTTPS connections to external services
When establishing non-HTTP/HTTPS connections (e.g., SQL, SMTP, etc.) from AEM, the connection should be made via a PROXY hostname provided by AEM, and through the port forward mapping (portOrig) configured in the network settings. The traffic is routed through a dedicated egress IP address in these instances.
e.g.
portForwards": [
{
    "name": "mysql.example.com",
    "portDest": 3306,
    "portOrig": 30001
}
....
]DriverManager.getConnection("jdbc:mysql://" + System.getenv("AEM_PROXY_HOST") + ":30001/test");The email service should also utilize the PROXY host and the port forwarding configuration(portOrig) for sending emails. Refer to Email service | Adobe Experience Manager for more details.
No Proxy Hots:
Domains included in the nonProxyHosts will be integrated directly through shared IPs, bypassing the dedicated egress IP for routing traffic. The Adobe shared IP is designed to optimize traffic routing.
Configure flexible port egress proxies per environment:
Configure the port forwarding rules and no-proxy settings for each AEM environment. Create a JSON file containing the necessary port forwarding (to support no http/https integrations) and no-proxy configurations (refer to the sample file below).
flexible-port-egress.json
{
    "nonProxyHosts": [
        "example.net",
        "*.example.org",
    ],
    "portForwards": [
        {
            "name": "mysql.example.com",
            "portDest": 3306,
            "portOrig": 30001
        },
        {
            "name": "smtp.sendgrid.net",
            "portDest": 465,
            "portOrig": 30002
        }
    ]
}
Execute the following command to create or update the forwarding rules:
$ curl -X PUT https://cloudmanager.adobe.io/api/program/{programId}/environment/{environmentId}/advancedNetworking \
    -H 'x-gw-ims-org-id: <ORGANIZATION_ID>' \
    -H 'x-api-key: <CLIENT_ID>' \
    -H 'Authorization: Bearer <ACCESS_TOKEN>' \
    -H 'Content-Type: application/json' \
    -d @./flexible-port-egress.json
Choose the specific environment from Cloud Manager to determine its environment ID.
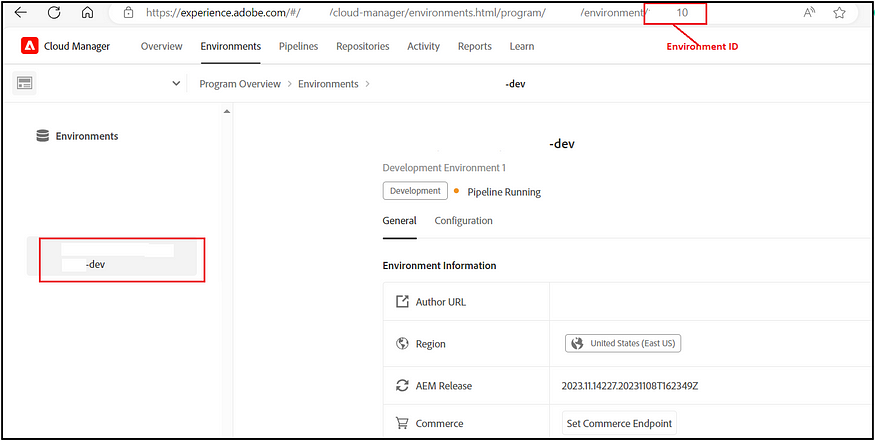
Execute the following curl command to verify the configurations:
curl -X GET https://cloudmanager.adobe.io/api/program/{programId}/environment/{environmentId}/advancedNetworking \
    -H 'x-gw-ims-org-id: <ORGANIZATION_ID>' \
    -H 'Authorization: Bearer <ACCESS_TOKEN>' \
    -H 'x-api-key: <CLIENT_ID>' \
    -H 'Content-Type: application/json'
Acquire the dedicated egress IP address using a DNS Resolver, like DNSChecker.org, on the host: p{programId}.external.adobeaemcloud.com. Alternatively, you can obtain it by running the ‘dig’ command.
$ dig +short p{programId}.external.adobeaemcloud.comNow that the network configuration using Dedicated Egress IP is complete, you can add the IP address to the allowlist to enable access to restricted services and test your integrations. It’s important to note that AEM as a Cloud Service also supports various other network connectivity options for connecting with external or custom services, such as VPNs.
Note: Some operations conducted via Cloud Manager, such as identifying the environment ID, can also be performed through the Cloud Manager API.
References:
Advanced networking | Adobe Experience Manager
Configuring Advanced Networking for AEM as a Cloud Service | Adobe Experience Manager

