Thursday, September 30, 2021

How to enable Basic Authentication for Non-Prod AEM websites? | Support Authenticated Performance Testing with Cloud Manager

How to enable Basic Authentication for Non-Prod AEM websites? | Support Authenticated Performance Testing with Cloud Manager

Enable Basic Authentication:

Most of the time we will have the use case to enable basic authentication for non-prod AEM websites to avoid non authenticated users accessing the content(another option is through IP whitelisting) also avoiding the non-prod contents getting indexed through google search(another approach to avoid the indexing is through Robots meta tag)

Easy to use generic user name/password for every website so that only the users know those credentials can access the password(if you need more security go with site-specific users or individual users)

In AEM the basic authentication can be enabled quickly through Dispatcher(Apache)

Create a common configuration file for authentication - /conf.d/htaccess/authentication.conf

   ## unsets authorization header when sending request to AEM

   RequestHeader unset Authorization

   AuthType Basic

   AuthBasicProvider file

   AuthUserFile /etc/httpd/conf.d/htaccess/credential.htpasswd 

   AuthName "Authentication Required"

   Require valid-user

Include this file into the individual Virtual Hosts

<Location />

    <If "'${ENV_TYPE}' =~ m#(dev|uat|stage)#">

Include /etc/httpd/conf.d/htaccess/authentication.conf

    </If>

</Location>

The ENV_TYPE can be set as an Environment variable e.g /etc/sysconfig/httpd (for AMS environment the required environment variables will be enabled by default)

ENV_TYPE='dev'

Create the credential file, execute the below command, you will be prompted to enter the password

htpasswd -c /etc/httpd/conf.d/htaccess/credential.htpasswd testuser

Execute the below command, to add additional users if required

htpasswd /etc/httpd/conf.d/htaccess/credential.htpasswd testuser1

Restart the Apache server, now basic authentication is enabled for the websites.

Authenticated Performance Testing with Cloud Manager:


Cloud Manager is a Cloud service that allows customers to build, test, and deploy AEM applications hosted by Adobe Managed Services. Refer to the below URL for more details

https://www.albinsblog.com/2020/11/beginners-tutorial-what-is-cloud-manager-in-aem.html

The Cloud Manager enables the Performance Testing on Stage environment after every successful deployment. 

The list of Stage domains enabled for performance testing can be configured - this configuration is not supported through UI but needs to be enabled through the backend(Adobe team should be helping here)

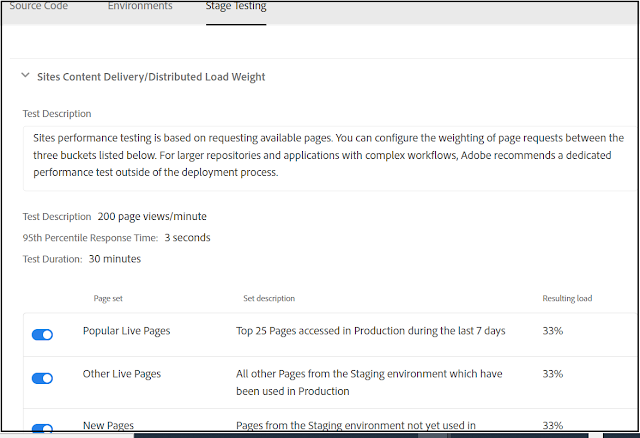
Also, the required performance KPI's can be configured through Cloud Manager UI

AEM Cloud Manager

Refer to the following URL for more details on performance testing - https://experienceleague.adobe.com/docs/experience-manager-cloud-manager/using/how-to-use/understand-your-test-results.html?lang=en#performance-testing

The performance testing will fail now due to the basic authentication enabled for the Stage websites, to overcome this the basic authentication credential should be configured in the Cloud Manager prod pipeline - the configuration cant be enabled through Cloud Manager UI but through Cloud Manager Plugin for the Adobe I/O CLI

This CLI supports two modes of authentication: Browser-based and Service Account. I am going to use browser-based authentication to enable the required configurations

As a prerequisite, ensure Node.js and NPM is installed in your machine, refer to the following URL for more details - https://www.npmjs.com/package/@adobe/aio-cli-plugin-cloudmanager

Identify the program ID and the production pipeline id by login to the Cloud Manager UI

AEM Cloud Manager

Execute the below commands in your machine(ensure you have the required permissions)

npm install -g @adobe/aio-cli

aio plugins:install @adobe/aio-cli-plugin-cloudmanager 

aio auth:login - login through browser with your Cloud Manager credentials

aio cloudmanager:org:select - select your organization where your program and the pipeline is configured(most of the case signle org)

aio config:set cloudmanager_programid PROGRAMID - Add your program ID

aio cloudmanager:set-pipeline-variables PIPELINEID--variable CM_PERF_TEST_BASIC_USERNAME testuser--secret CM_PERF_TEST_BASIC_PASSWORD pwdtestuser- Add your pipeline ID and the basic credentials

AEM Cloud Manager

Now the basic authentication is enabled and the basic authentication credential are set while performing the performance testing.


Tuesday, September 28, 2021

AEM as a Cloud Service - Sandbox Setup

 AEM as a Cloud Service - Sandbox Setup

"A Sandbox program is one of the two types of programs available in AEM Cloud Service, the other being a Production program.

A Sandbox is typically created to serve the purposes of training, running demos, enablement, or Proof of Concept (POC)s. They are not meant to carry live traffic."

Refer to the following URL to get the details on AEM as a Cloud Service Sandbox program - https://experienceleague.adobe.com/docs/experience-manager-cloud-service/implementing/using-cloud-manager/sandbox-programs/introduction-sandbox-programs.html?lang=en#

Enable Sandbox Program:


To start using the AEM as a Cloud Service Sandbox, the minimal required Adobe Enterprise Term License Agreement (ETLA) should be signed, you can reach out to Adobe Account/Support team for more details on this.

Once the ETLA is in place you should be able to add the sandbox program through Cloud Manager(one of your primary contacts will be added as an administrator, if you are already part of Cloud Manager through AMS then that will continue)

You will see an "Add Program" link after completing the ETLA and enabling the program from the backend -  https://experience.adobe.com/#/@xxxx/cloud-manager

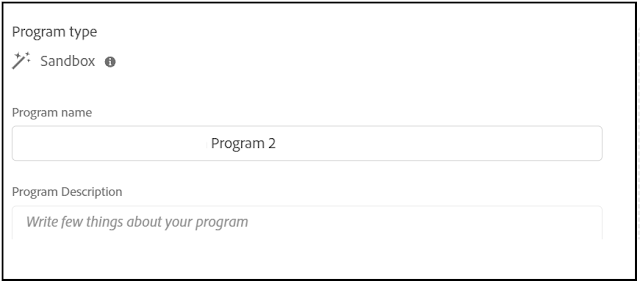
Add a new program - Enter Program name and Program Type as Sandbox

AEM as a Cloud Service Sandbox

Now the new program will be listed - https://experience.adobe.com/#/@xxxx/cloud-manager

AEM as a Cloud Service Sandbox


Setup Sandbox:


Let us now set up the Sandbox environment, Click on the Sandbox program created in the previous step

Click on "Setup", this will take some time to configure the program

AEM as a Cloud Service Sandbox

Once the setup is completed you should be able to access the AEM servers and also deploy the code through the Cloud Manager pipeline.

AEM as a Cloud Service Sandbox


While accessing the Author server you will be taken to the below screen with the option to log in with Adobe ID

AEM as a Cloud Service Sandbox

The Administrator can enable the required access for the AEM users through Admin Console(https://adminconsole.adobe.com/)

AEM as a Cloud Service Sandbox


Select the Author Instance

AEM as Cloud Service Sandbox

Select the Profile the user should be added (AEM administrator or AEM user) - Create new profiles based on the need

AEM as a Cloud Service Sandbox


AEM as a Cloud Service Sandbox


Now you should be able to access the author server

AEM as a Cloud Service Sandbox

Sandbox program also enables Publish and Preview servers - You can view those details by going into the environment

AEM as a Cloud Service Sandbox


AEM as a Cloud Service Sandbox


Now you can push the changes to the git repository

AEM as a Cloud Service Sandbox


AEM as a Cloud Service Sandbox


By default the "main" branch is enabled for deployment, if required you can create the additional branch e.g dev, and enable the deployment through the new branch.

Now start the pipeline to deploy the changes

AEM as a Cloud Service Sandbox


AEM as a Cloud Service Sandbox


Even if you required the deployment can be initiated on repository change

AEM as a Cloud Service Sandbox

AEM as a Cloud Service Sandbox

The Sandbox setup is completed now,  enable the content and code based on your use cases.


Friday, September 3, 2021

Error while syncing the local git repository to remote repository | error: unpack failed: error Shallow object update failed | Shallow vs Full Cloning

Error while syncing the local git repository to remote repository | error: unpack failed: error Shallow object update failed | Shallow vs Full Cloning

I was using the BitBucket Pipeline to sync the local repository(specified branches) to the remote git repository, the sync was working without any issue and stooped working recently with the below exception.

bitbucket-pipelines.yml:


image: atlassian/default-image:2

pipelines:
    branches:
      dev:
        - step:
           script:
             - git remote add sync https://testuser:[email protected]/test/test.git
             - git checkout dev
             - git pull    
             - git push sync dev

      uat:
        - step:
           script:
             - git remote add sync https://testuser:[email protected]/test/test.git
             - git checkout uat
             - git pull    
             - git push sync uat 

Error:
 
"git push sync dev
error: unpack failed: error Shallow object update failed: The object xxxxxxxxxxxxxxx is being referenced but does not exist.
To https://testuser:[email protected]/test/test.git
 ! [remote rejected] dev -> dev (Shallow object update failed: The object xxxxxxxxxxxxx is being referenced but does not exist.)
error: failed to push some refs to 'https://testuser:[email protected]/test/test.git'"


After analysis, the root cause for the issue is the BitBucket pipeline doing a Shallow clone(with specific depth)

A shallow clone is a repository created by limiting the depth of the history that is cloned from an original repository. A shallow clone is created using the --depth option when calling the clone command, followed by the number of commits that you want to retrieve from the remote repository.

--depth <depth> - Create a shallow clone with a history truncated to the specified number of commits. Implies --single-branch unless --no-single-branch is given to fetch the histories near the tips of all branches. If you want to clone submodules shallowly, also pass --shallow-submodules.

A shallow clone helps to improve the performance of the clone by pulling down just the latest commits, not the entire repo history

In full clone, by default git download the history of all branches, sometimes this will create performance issues but useful for some cases like repository synching.

git clone --branch="dev" --depth 50 https://x-token-auth:[email protected]/$BITBUCKET_REPO_FULL_NAME.git $BUILD_DIR
Cloning into '/opt/atlassian/pipelines/agent/build


The issue can be resolved by enabling the full clone instead of a shallow clone in the pipeline configuration

bitbucket-pipelines.yml:

image: atlassian/default-image:2

clone:
  depth: 'full'

pipelines:
    branches:
      dev:
        - step:
           script:
             - git remote add sync https://testuser:[email protected]/test/test.git
             - git checkout dev
             - git pull    
             - git push sync dev
     uat:
        - step:
           script:
             - git remote add sync https://testuser:[email protected]/test/test.git
             - git checkout uat
             - git pull    
             - git push sync uat 

Now the depth is not added during the clone and the pipeline is successfully completed - the local branch synced with the remote repository.


Blank screen displayed in edit mode | Adobe Experience Manager(AEM)

Blank screen displayed in edit mode | Adobe Experience Manager(AEM)


I was getting the blank screen while accessing the pages through Edit mode in AEM


The below exception was displayed

java.lang.NullPointerException
at org.apache.jsp.libs.cq.gui.components.authoring.workflow.startworkflow.startworkflow_jsp._jspService(startworkflow_jsp.java:217)
at org.apache.sling.scripting.jsp.jasper.runtime.HttpJspBase.service(HttpJspBase.java:70)
at javax.servlet.http.HttpServlet.service(HttpServlet.java:725)
at org.apache.sling.scripting.jsp.jasper.servlet.JspServletWrapper.service(JspServletWrapper.java:502)
at org.apache.sling.scripting.jsp.jasper.servlet.JspServletWrapper.service(JspServletWrapper.java:449)
at org.apache.sling.scripting.jsp.JspScriptEngineFactory.callJsp(JspScriptEngineFactory.java:339)
at org.apache.sling.scripting.jsp.JspScriptEngineFactory.access$100(JspScriptEngineFactory.java:97)
at org.apache.sling.scripting.jsp.JspScriptEngineFactory$JspScriptEngine.eval(JspScriptEngineFactory.java:600)
Also, the workflow model page was blank with the below exception


java.lang.NullPointerException
at org.apache.jsp.libs.cq.workflow.admin.console.components.datasource.modelsdatasource.modelsdatasource_jsp._jspService(modelsdatasource_jsp.java:410)
at org.apache.sling.scripting.jsp.jasper.runtime.HttpJspBase.service(HttpJspBase.java:70)
at javax.servlet.http.HttpServlet.service(HttpServlet.java:725)
at org.apache.sling.scripting.jsp.jasper.servlet.JspServletWrapper.service(JspServletWrapper.java:502)
at org.apache.sling.scripting.jsp.jasper.servlet.JspServletWrapper.service(JspServletWrapper.java:449)
at org.apache.sling.scripting.jsp.JspScriptEngineFactory.callJsp(JspScriptEngineFactory.java:339)
at org.apache.sling.scripting.jsp.JspScriptEngineFactory.access$100(JspScriptEngineFactory.java:97)

The workflow Instances/Archives/Failures pages were failing with the below exceptions

java.lang.NullPointerException
at org.apache.jsp.libs.cq.workflow.admin.console.components.datasource.workflowinstancedatasource.workflowinstancedatasource_jsp._jspService(workflowinstancedatasource_jsp.java:176)
at org.apache.sling.scripting.jsp.jasper.runtime.HttpJspBase.service(HttpJspBase.java:70)
at javax.servlet.http.HttpServlet.service(HttpServlet.java:725)
at org.apache.sling.scripting.jsp.jasper.servlet.JspServletWrapper.service(JspServletWrapper.java:502)
at org.apache.sling.scripting.jsp.jasper.servlet.JspServletWrapper.service(JspServletWrapper.java:449)
at org.apache.sling.scripting.jsp.JspScriptEngineFactory.callJsp(JspScriptEngineFactory.java:339)
at org.apache.sling.scripting.jsp.JspScriptEngineFactory.access$100(JspScriptEngineFactory.java:97)


java.lang.NullPointerException
at org.apache.jsp.libs.cq.workflow.admin.console.components.datasource.failureinstancedatasource.failureinstancedatasource_jsp._jspService(failureinstancedatasource_jsp.java:167)
at org.apache.sling.scripting.jsp.jasper.runtime.HttpJspBase.service(HttpJspBase.java:70)
at javax.servlet.http.HttpServlet.service(HttpServlet.java:725)
at org.apache.sling.scripting.jsp.jasper.servlet.JspServletWrapper.service(JspServletWrapper.java:502)
at org.apache.sling.scripting.jsp.jasper.servlet.JspServletWrapper.service(JspServletWrapper.java:449)
at org.apache.sling.scripting.jsp.JspScriptEngineFactory.callJsp(JspScriptEngineFactory.java:339)
at org.apache.sling.scripting.jsp.JspScriptEngineFactory.access$100(JspScriptEngineFactory.java:97)

There can be multiple reasons the pages can be blank in author mode, in this case, the pages were blanked due to the Adobe Granite Workflow Corecom.adobe.granite.workflow.core bundle was in Installed State


Somehow the restart of the AEM server has not helped to resolve the issue(not sure how this bundle has been to an Installed state, suspecting this is happened as part of Cloud Manager deployment). The issue got resolved after manually starting the bundle through the console