Friday, June 28, 2024

Implementing Cross-Domain Cookie Handling for Seamless API Integration

 When working with an application that integrates with external applications and APIs on different domains, maintaining a shared state, such as authentication, can be challenging due to browser restrictions on cross-domain cookies. While data can be shared using browser local/session storage and cookies can be set client-side, these approaches increase the risk of XSS attacks. Using Secure and HttpOnly cookies provides more security, as these cookies can only be managed through the backend and are seamlessly sent on every same-origin request. This post discusses the approach to making cookies set by an API running on a different domain available to the application’s domain in the browser.

Scenario:

The application runs on https://test.mydomain.com:8080 invokes an API at https://test.api.com:8081 from the client side. The API sets a cookie that should be available for test.mydomain.com. Additionally, all subsequent requests to https://test.mydomain.com or any subdomains on mydomain.com should include the cookie to maintain the state.

Problem:

In a cross-domain context, the request to the https://test.api.com:8081 API service cannot set the cookie for test.mydomain.com or the root domain.mydomain.com due to browser cross-domain restrictions. The browser rejects the cookie in this scenario.

Solution:

To solve this problem, proxy the API calls through the same domain. This approach ensures that the cookies are correctly handled and included in all requests. Here are the steps to achieve this:

Proxy API Calls Through the Same Domain:

  • Use a CDN: If a CDN is used, configure it to send the /api calls to the API servers.
  • Use Proxy Servers: Use proxy servers like Apache or Nginx to handle API requests.
  • Server Handling: The server handling https://test.mydomain.com requests can proxy the API requests to https://test.api.com.

Setting the Cookie Domain:

  • The API can avoid setting the cookie domain explicitly, allowing the browser to use the current domain (test.mydomain.com).
  • Alternatively, the API can set the cookie directly on test.mydomain.com or .mydomain.com. This ensures the cookie is available for test.mydomain.com and all subdomains under mydomain.com.

Dynamic Cookie Setting:

  • If the cookie needs to be set dynamically based on the requesting domain, use the Referer header to determine the domain and set the cookie accordingly.

Proxy Rewriting:

  • If you do not have control over the API to set the cookies on your original domain, configure the proxy to rewrite the cookie domain of the API response to the actual domain before sending the response to the client.

Forwarding Cookies:

  • In a forward flow, forward the cookie to the API domain. Most proxies support this.

Implementation Example:

Here’s a demonstration using two Express servers. The server.js handles all requests on https://test.mydomain.com:8080 and proxies API requests to api-server.js running on https://test.api.com:8081.

server.js:

const express = require("express");
const path = require("path");
const https = require("https");
const fs = require("fs");
const { createProxyMiddleware } = require("http-proxy-middleware");
const app = express();
const port = 8080;

// Load SSL key and certificate
const key = fs.readFileSync("SSL/server.key");
const cert = fs.readFileSync("SSL/server.crt");
const options = { key, cert };

// Serve static files from the "public" directory
app.use(express.static(path.join(__dirname, "public")));

// Ignore self-signed certificate errors (development only)
process.env.NODE_TLS_REJECT_UNAUTHORIZED = "0";

//https://test.mydomain.com:8080/api
// Proxy setup to forward API requests to the API server
app.use(
"/api",
createProxyMiddleware({
//target: "https://test.api.com:8081",
target: "https://test.synvie.de:8081",
changeOrigin: true,
pathRewrite: { "^/api": "" },
secure: false, // Allow self-signed certificates
/** on:{
proxyRes: (proxyRes, req, res) => {

console.log('Inside onProxyRes...'); // Log original cookies

const cookies = proxyRes.headers['set-cookie'];
if (cookies) {
console.log('Original cookies:', cookies); // Log original cookies
proxyRes.headers['Set-Cookie'] = cookies.map(cookie => {
const newCookie = cookie.replace(/Domain=[^;]+;/i, 'Domain=test.mydomain.com;');
console.log('Modified cookie:', newCookie); // Log modified cookie
return newCookie;
});
}
}
},**/
// if the target service can not set domain in appropriate client side root domain, the cookie need to be rewritten to the clinet side root domain from backend API domain using CDN(if supported) or another proxy server like Apache
onError: (err, req, res) => {
console.error("Proxy error:", err);
res.status(500).send("Proxy error occurred");
},
})
);

// Endpoint to check for cookies
//https://test.mydomain.com:8080/check
app.get("/check", (req, res) => {
const cookie = req.headers.cookie || "No cookies found";
console.log("Cookies received:", cookie); // Add logging
res.send(`Cookies received: ${cookie}`);
});

// Add error handling middleware
app.use((err, req, res, next) => {
console.error(err.stack);
res.status(500).send("Something broke!");
});

// Create HTTPS server
https.createServer(options, app).listen(port, () => {
console.log(`Client server running at https://test.mydomain.com:${port}`);
});

api-server.js:

const express = require("express");
const cors = require("cors");
const https = require("https");
const fs = require("fs");
const app = express();
const port = 8081;

// Load SSL key and certificate
const key = fs.readFileSync("SSL/server.key");
const cert = fs.readFileSync("SSL/server.crt");
const options = { key, cert };

// CORS configuration to allow requests from your client domain
app.use(
cors({
origin: "https://test.mydomain.com:8080",
credentials: true,
})
);

//https://test.api.com:8081

app.get("/", (req, res) => {
console.log("Server Name:" + req.hostname);
console.log("Referrer:" + req.get("Referer"));
// Get the referer header
const referer = req.get("Referer");
if (referer) {
// Extract the root domain from the referer
const url = new URL(referer);
const domain = url.hostname.split(".").slice(-2).join("."); // Get the root domain (e.g., mydomain.com)

console.log("Cookie Domain:" + domain);

// Set the cookie with the dynamic domain
res.cookie("testCookie", "cookieValue", {
httpOnly: true,
secure: true, // Set to true for HTTPS
sameSite: "Strict", // Required for cross-site cookies
domain: `.${domain}`, // Set the domain dynamically
});
res.send(`HttpOnly cookie has been set for domain: .${domain}`);
} else {
res.status(400).send("Referer header not found");
}
});

// Add error handling middleware
app.use((err, req, res, next) => {
console.error(err.stack);
res.status(500).send("Something broke!");
});

// Create HTTPS server
https.createServer(options, app).listen(port, () => {
console.log(`API server running at https://test.api.com:${port}`);
});

Index.html

<!DOCTYPE html>
<html lang="en">
<head>
<meta charset="UTF-8">
<meta name="viewport" content="width=device-width, initial-scale=1.0">
<title>Cross-Domain Cookie Test</title>
</head>
<body>
<h1>Cross-Domain Cookie Test</h1>
<button id="invoke-button">Invoke API</button>
<button id="check-cookie-button">Check Cookie</button>
<p id="result"></p>

<script>
document.getElementById('invoke-button').addEventListener('click', async () => {
try {
const response = await fetch('/api/', {
method: 'GET',
credentials: 'include' // Important to include credentials
});

const data = await response.text();
console.log('Fetch Cookie response:', data); // Add logging
document.getElementById('result').innerText = `Response: ${data}`;
} catch (error) {
console.error('Fetch Cookie error:', error);
document.getElementById('result').innerText = `Error: ${error.message}`;
}
});

document.getElementById('check-cookie-button').addEventListener('click', async () => {
try {
const response = await fetch('/check', {
method: 'GET',
credentials: 'include' // Important to include credentials
});

const data = await response.text();
console.log('Check Cookie response:', data); // Add logging
document.getElementById('result').innerText = `Response: ${data}`;
} catch (error) {
console.error('Check Cookie error:', error);
document.getElementById('result').innerText = `Error: ${error.message}`;
}
});
</script>
</body>
</html>

Setup Instructions:

Install dependencies and start the servers:

cd Cross-Domain-Cookies
npm install
node server.js
node api-server.js

Access the application:

Navigate to https://test.mydomain.com:8080. The cookie from the API will be set on .mydomain.com. For your local testing g put host entry in your host file for test.mydomain.com and test.api.com pointing 127.0.0.1.

For local testing, add the following entries to your hosts file to point test.mydomain.com and test.api.com to 127.0.0.1:

127.0.0.1 test.mydomain.com
127.0.0.1 test.api.com

Conclusion:

By following these steps, you can effectively manage cookies across different domains, ensuring a consistent state across your web applications. This approach is useful when integrating with various applications and ensuring that users always see the same domain and have access to the same cookies. For sample code, refer to Cross-Domain Cookies.
Monday, June 17, 2024

AEM Universal Visual Editor: Easily Author AEM Content Anywhere with In-Context Editing (Part 1)

 The Universal Editor is the next generation of AEM in-context page editors, designed to overcome the current limitations of the AEM Page Editor and SPA Editor. It offers a truly universal editing experience by being independent of frameworks, rendering engines, and data sources. This flexibility provides developers with the freedom they seek, as the only requirement is a rendered HTML with the necessary instrumentation. Additionally, the Universal Editor streamlines the content creation process, enhancing productivity and efficiency for content creators and editors. The Universal Editor supports both headless and headful (traditional pages and EDS content) content authoring. In this post, let us explore the high-level details of the Universal Editor.

What is the Universal Editor?

The Universal Editor is a versatile visual editor that is part of Adobe Experience Manager (AEM) Sites. It enables authors to perform what-you-see-is-what-you-get (WYSIWYG) editing for any headless or headful experience.

AEM currently uses various editors for content authoring:

  • Page Editor: Enables in-context editing for the pages.
  • SPA Editor: Enables in-context editing for Single Page Applications (SPAs).
  • Content Fragment Editor: Provides editing capabilities for content fragments; in-context editing is not applicable.
  • Documents Editing: Allows direct management and editing of content through familiar documents (Word/Google Docs) from EDS websites.
  • Universal Editor: Enables in-context editing for various scenarios, including AEM pages(HTL-based), AEM headless content, AEM content for SPA applications, and AEM content for EDS.

The Universal Editor enables powerful in-context editing for both headless and headful content, including editing AEM content for EDS.

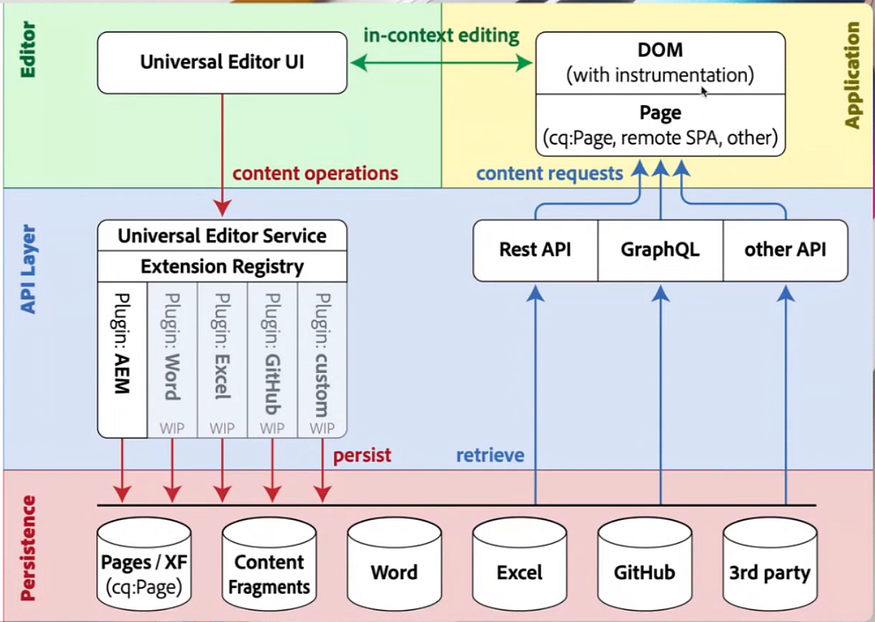
The Universal Editor supports Editing AEM Content for

  • Any Architecture — Server-side rendering, edge-side rendering, client-side rendering, and so on.
  • Any Framework — Vanilla AEM, or any third-party framework like React, Next.js, Angular, etc.
  • Any Hosting — Can be hosted locally to AEM, or on a remote domain
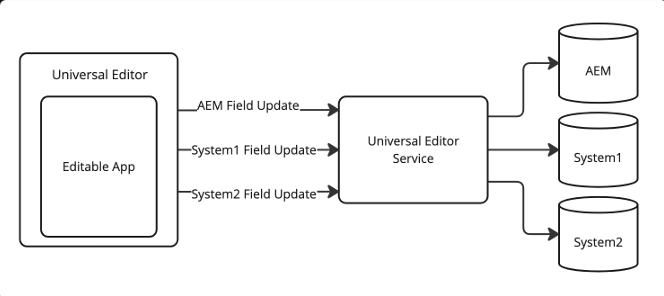
Image by Adobe — Universal Visual Editor

Key Features

  1. Responsive Design: Edit content seamlessly across different devices and screen sizes.
  2. Drag-and-Drop Interface: Easily create and arrange content elements within AEM pages.
  3. Inline Editing: Edit content directly on the page without switching views.
  4. Rich Text Editing: Robust text editing with formatting, spell check, and multimedia insertion.
  5. Versioning and Undo/Redo: Track changes and revert to previous versions as needed.
  6. Integration with AEM Components: Seamlessly edit and manage dynamic content like forms and widgets.

Benefits

  1. Increased Efficiency: Quickly and easily edit content without extensive training.
  2. Consistent User Experience: Maintain a uniform experience across different AEM projects.
  3. Improved Collaboration: Facilitate teamwork with a centralized platform for content management.
  4. Enhanced Content Quality: Ensure high-quality content with powerful editing tools and real-time previews

Universal Editor Access:

Universal Editor is a cloud-based service that allows authoring any AEM content. To access Universal Editor, you first need to request access. Follow these steps:

  • Sign in with your organization’s Adobe ID.
  • Contact your Adobe representative if the Universal Editor is not enabled for your organization.

Currently, Universal Editor is supported on AEM as a Cloud Service. It may be supported for AMS and on-premises AEM versions in the future. For local development and testing, you can follow the steps outlined in this document: Local AEM Development with the Universal Editor | Adobe Experience Manager.

Universal Editor Content Authoring:

The Universal Editor enables editing of websites hosted on any platform, including those hosted locally. For local websites to be edited via the Universal Editor, the local URL must be configured with HTTPS and support Self-Signed SSL certificates.

To enable Universal Editing for any websites

Include Universal Editor Core Library:

To enable CORS communication between the Universal Editor and your website, you need to include the Core library. You can do this in one of two ways:

Using npm package:

Install the package:

npm install @adobe/universal-editor-cors

Import it in your index.js:

import "@adobe/universal-editor-cors";

Using the CDN version:

Add the following script tag to your HTML:

<script src="https://universal-editor-service.experiencecloud.live/corslib/LATEST" async></script>

If needed, you can specify a particular version of the library by replacing LATEST with the desired version number.

Instrumentation:

The Universal Editor service requires a Uniform Resource Name (URN) to identify and utilize the correct backend system for the content in the app being edited. Therefore, a URN schema is required to map content back to content resources.

To define this, include the following meta tag in the <head> section of your web page:

<meta name="urn:adobe:aue:<category>:<referenceName>" content="<protocol>:<url>">

You can define multiple backend connections, for example, if the data needs to be persisted and retrieved from different AEM systems. The connection URL should be defined as a page meta tag in the <head> section of the web page.

For an AEM connection, use:

<meta name="urn:adobe:aue:system:<connection name>" content="aem:<AEM Author URL>"/>

For Example

<meta name="urn:adobe:aue:system:aemconnection" content="aem:https://author-p124345-e12345.adobeaemcloud.com"/>

Now instrument the elements with the required attributes. Below are some of the important attributes. Refer to Attributes and Item Types | Adobe Experience Manager for more details.

data-aue-resource: URN to the resource, location of the content on AEM or other backends.

data-aue-prop: Attribute of the resource.

data-aue-type: Type of the editable element. Various types available include:

  • text
  • richtext
  • media
  • component (makes part of the DOM movable/deletable)
  • container (acts as a container for other components)
  • reference (e.g., reference to a content fragment)

The Universal Editor supports in-context editing of both headless and full-featured AEM content.

Headless Authoring:

AEM content consumed on external applications, including content fragments or other page content, can be edited in context using the Universal Editor.

Content Fragment:

External websites can consume content fragments from AEM as headless content through GraphQL. Refer to How to deliver headless content through GraphQL API and Content Fragments? | AEM(Adobe Experience Manager) | by Albin Issac | Tech Learnings | Medium for more details on consuming Content Fragments through GraphQL.

I am using a persistent query to fetch the content fragments that capture the location details.

{
"data": {
"locationmodelList": {
"items": [
{
"_path": "/content/dam/sample/Location2",
"name": "Test Name2",
"number": 1234.0,
"street": "Test Street2",
"city": "Test City2",
"state": "Test State2",
"country": "USA",
"zipCode": "12345"
},
{
"_path": "/content/dam/sample/location1",
"name": "Test Name1",
"number": 123.0,
"street": "Test Street1",
"city": "Test City1",
"state": "Test State1",
"country": "USA",
"zipCode": "1234"
}
]
}
}
}

The content is consumed on a React app, with the following instrumentation enabled:

  • Adding data-aue-resource with the path to the content fragment to the parent div; the aemconnection is defined as metadata, with _path coming from the GraphQL query.
  • Setting data-aue-type as reference and data-aue-filter as cf.
  • Mapping the child elements to the corresponding content fragment fields using data-aue-prop and specifying the data-aue-type.
  • The custom label to the editable fields can be added using data-aue-label
const Location = ({ location }) => {
let itemId =
"urn:aemconnection:" + location._path + "/jcr:content/data/master";
return (
<div
data-aue-resource={itemId}
data-aue-type="reference"
data-aue-filter="cf"
data-aue-label={`Content Fragment ${location._path}`}
>

<h2>Location</h2>
Name:{" "}
<p data-aue-prop="name" data-aue-type="text" data-aue-label="Name">
{location.name}
</p>
Number:{" "}
<p data-aue-prop="number" data-aue-type="text" data-aue-label="Number">
{location.number}
</p>
Street:{" "}
<p data-aue-prop="street" data-aue-type="text" data-aue-label="Street">
{location.street}
</p>
City:{" "}
<p data-aue-prop="city" data-aue-type="text" data-aue-label="City">
{location.city}
</p>
State:{" "}
<p data-aue-prop="state" data-aue-type="text" data-aue-label="State">
{location.state}
</p>
Country:{" "}
<p data-aue-prop="country" data-aue-type="text" data-aue-label="Country">
{location.country}
</p>
Zip Code:{" "}
<p data-aue-prop="zipcode" data-aue-type="text" data-aue-label="Zipcode">
{location.zipCode}
</p>
</div>

);
};

/**
* Main component to render all locations.
*/

const LocationList = ({ locations }) => {
return (
<div>
{locations.map((location, index) => (
<Location key={index} location={location} />
))}
</div>

);
};

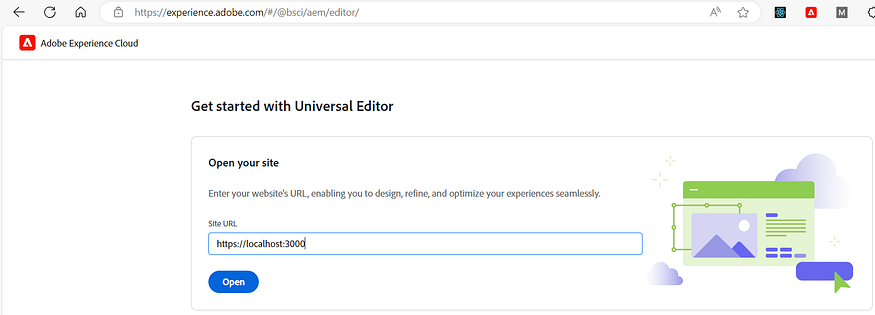
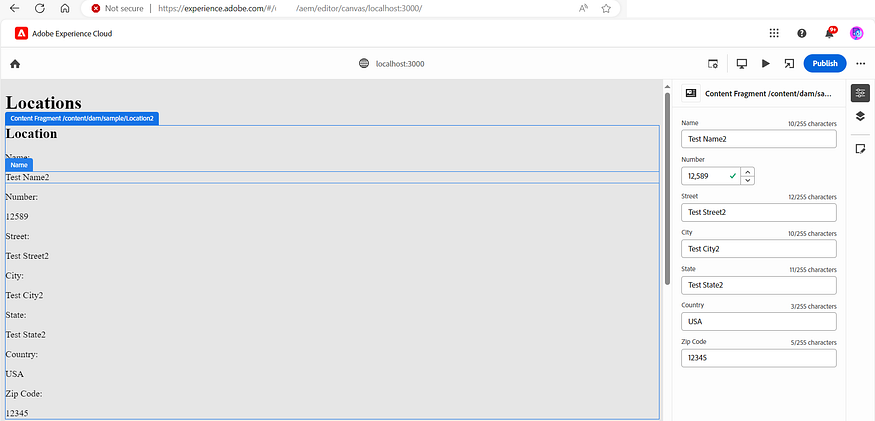
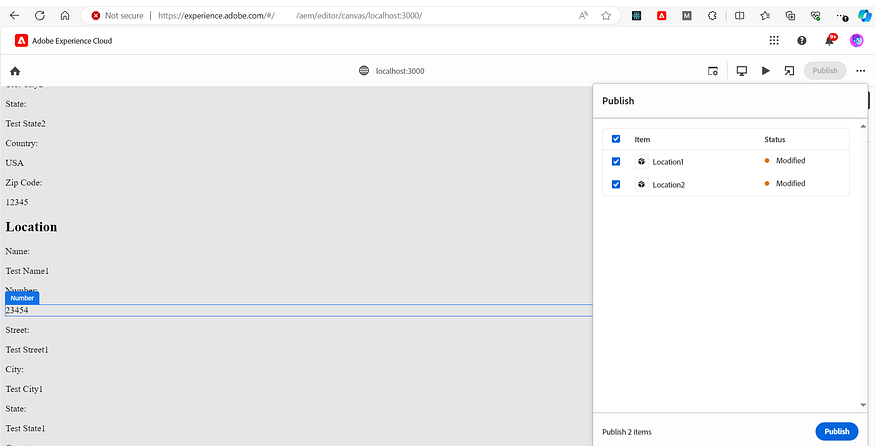
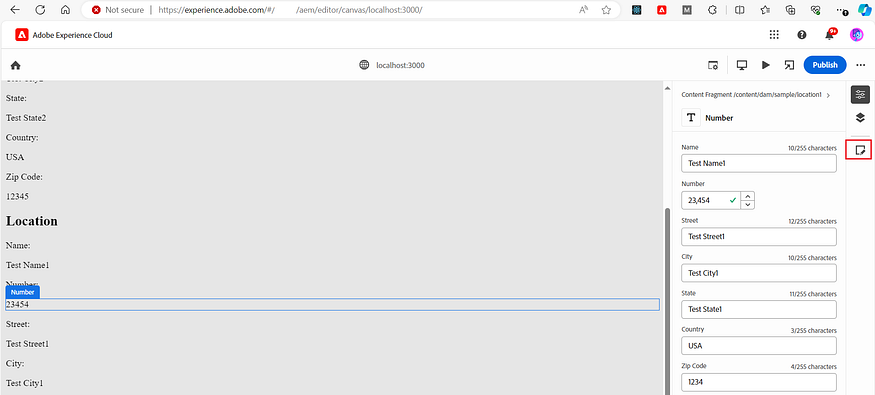
Now, when we open the website (in my case, https://localhost:3000) through the Universal Editor, the Universal Editor will make the parent DIV selectable and also mark individual fields as editable. Selecting the parent DIV or an individual field will display the Content Fragment (CF) editor on the right side. The CF values can be edited, modified CF values will be stored in the AEM CF, and the corresponding DOM elements updated. Additionally, we should be able to preview the page, perform device testing, and publish/unpublish the changes.

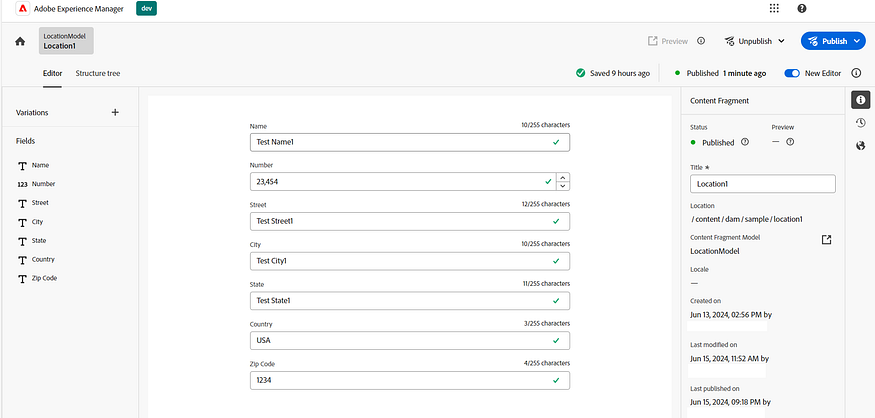
Additionally, the CF editor for the corresponding Content Fragment can be opened from the Universal Editor for a more detailed review and editing.

Using the Universal Editor, content fragments consumed by headless applications can be edited in context. This means that content displayed within a headless application can be directly modified within the application’s interface. The Universal Editor lets users see how changes will appear in real-time, ensuring that edits are seamlessly integrated into the live application. This capability enhances the efficiency of content updates, providing a more intuitive and streamlined editing experience.

Page Content:

Suppose you are sharing regular AEM page content with a headless application. In that case, the Universal Editor can assist in editing the content in context and ensure that the content changes persist to AEM. For example, if you have text content in AEM located at /content/sites/test/jcr: content/root/container/container/text, this content can be consumed by the headless application through model.json, accessed via /content/sites/test/jcr:content/root/container/container/text.model.json

/root/container/container/text.model.json.

The text content is consumed on an external app with the following instrumentation enabled:

  • Adding data-aue-resource with the path to the content, where the aemconnection is defined as metadata.
  • Setting data-aue-type as richtext and data-aue-prop as text.
  • Setting a custom label with data-aue-label as 'Text Data'."
 return (
<div
dangerouslySetInnerHTML={{ __html: textData.text }}
data-aue-resource={`urn:aemconnection:/content/sites/test/jcr:content/root/container/container/text`}
data-aue-type="richtext"
data-aue-prop="text"
data-aue-label="Text Data"
/>

);
};

// Main App component
const App = () => {
return (
<div>
<h1>Text Field</h1>
<TextField />
</div>

);
};

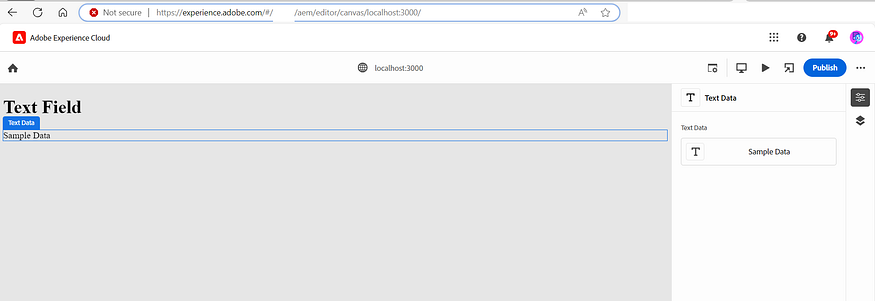
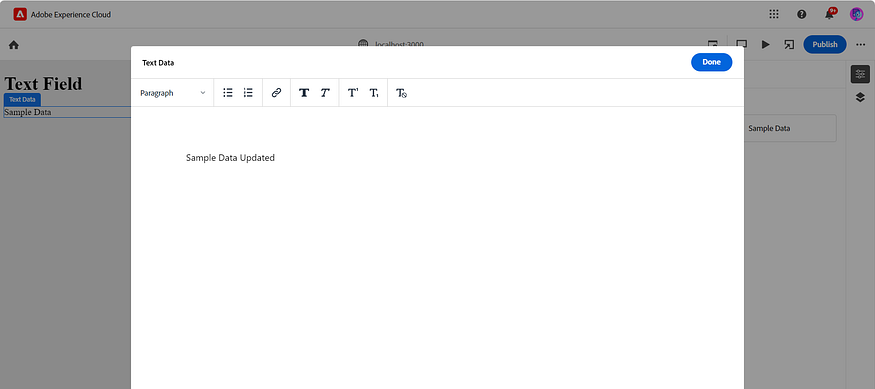
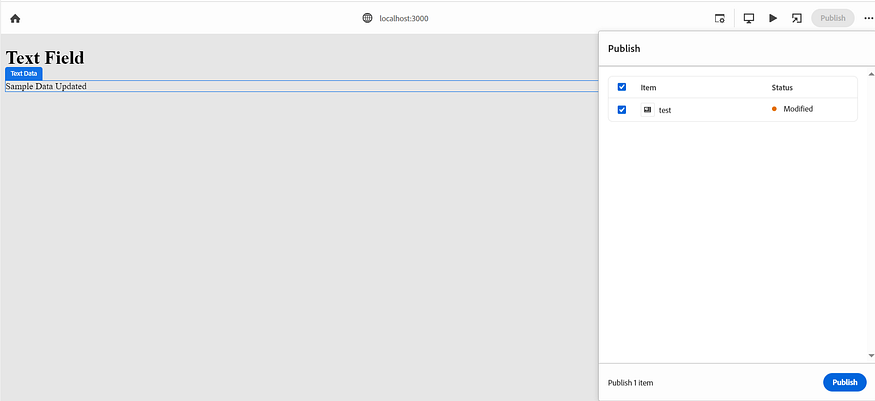
Now, when we open the website (in my case, https://localhost:3000) through the Universal Editor, it will make the DIV selectable and editable. The text values can be edited, and the modified text values will be stored in AEM with the corresponding DOM elements updated. Additionally, we will be able to preview the page, perform device testing, and publish/unpublish the changes.

Using the Universal Editor, AEM page content consumed by headless applications can be edited in context. This means that content displayed within a headless application can be directly modified within the application’s interface. The Universal Editor lets users see how changes will appear in real-time, ensuring that edits are seamlessly integrated into the live application. This capability enhances the efficiency of content updates, providing a more intuitive and streamlined editing experience.

Head Full Authoring:

The Universal Editor not only facilitates editing AEM content in a headless manner but also supports headful editing, allowing for a more traditional, full-page editing experience. It enables users to edit both AEM pages and AEM content intended for Edge Delivery Services(EDS). This dual capability ensures that content creators can efficiently manage and update content across various formats and platforms, maintaining consistency and ease of use.

AEM Pages:

AEM pages are traditionally edited through the AEM Page Editor. However, they can now be edited through the new Universal Editor. This applies to pages with AEM core components as well as custom components and templates. Currently, Core Components are not pre-configured for the Universal Editor, so manual configuration is necessary. You need to open the Universal Editor externally to edit any AEM pages configured with it. In the future, AEM Core Components might support these configurations out-of-the-box, and the Universal Editor may become the default, replacing the traditional Page Editor.

Steps to Enable AEM Page Editing through Universal Editor:

Add URN Connection: Add the URN connection to the page core component (e.g., /apps/test/components/page) in customheaderlibs.html:

<meta name="urn:adobe:aue:system:<connection name>" content="aem:<AEM Author URL>"/>

Example:

<meta name="urn:adobe:aue:system:aemconnection" content="aem:https://author-p12345-e12345.adobeaemcloud.com">

Add Universal Editor Cors Library: Add the Universal Editor Cors Library to the page core component in customheaderlibs.html:

<script src="https://universal-editor-service.experiencecloud.live/corslib/LATEST" async></script>

Configure AEM SlingMainServlet: By default, AEM’s SlingMainServlet sets X-FRAME-OPTIONS: SAMEORIGIN to block iframing of AEM pages from external domains. Adjust this configuration to allow the Universal Editor to iframe the pages for editing:

  • Enable the OSGI configuration org.apache.sling.engine.impl.SlingMainServlet.cfg.json with:
{
"sling.additional.response.headers": [
"X-Content-Type-Options=nosniff"
]
}

Configure Token Authentication Handler: The Universal Editor requires authentication tokens to be sent (via cookies) when accessing the page within an iframe. By default, AEM cookies are set with samesite as LAX, which blocks cookies in third-party contexts. Set the samesite attribute to None by enabling the OSGI configuration com.day.crx.security.token.impl.impl.TokenAuthenticationHandler.cfg.json with:

{
"token.samesite.cookie.attr": "None"
}

Instrument Components: Instrument the required components and elements for editing through the Universal Editor. For example, for a core text component (/apps/test/components/text), overlay text.html from the core library component (/libs/core/wcm/components/title/v2/title) to your custom proxy component (/apps/test/components/text) and add the required instrumentation configurations (e.g., data-aue-resourcedata-aue-typedata-aue-propdata-aue-label):

<div
data-sly-use.textModel="com.adobe.cq.wcm.core.components.models.Text"
data-sly-use.component="com.adobe.cq.wcm.core.components.models.Component"
data-sly-use.templates="core/wcm/components/commons/v1/templates.html"
data-sly-test.text="${textModel.text}"
data-cmp-data-layer="${textModel.data.json}"
id="${component.id}"
data-aue-resource="urn:aemconnection:${resource.path}"
data-aue-type="richtext"
data-aue-prop="text"
data-aue-label="Text Data"
class="cmp-text"
>
<p
class="cmp-text__paragraph"
data-sly-unwrap="${textModel.isRichText}"
>
${text @ context = textModel.isRichText ? 'html' : 'text'}
</p>
</div>
<sly
data-sly-call="${templates.placeholder @ isEmpty = !text, classAppend='cmp-text'}"
></sly>

Testing the Configuration:

Once the configurations are ready, you can open the AEM page with the instrumented component (e.g., text) through the Universal Editor by appending ?wcmmode=disabled to the URL. For example: https://author-p12345-e12345.adobeaemcloud.com/content/ewp/microsite/preventice/test.html?wcmmode=disabled

When opened through the Universal Editor, the DIV will be selectable and editable. Text values can be edited and stored in AEM, and the corresponding DOM elements will be updated. Additionally, you can preview the page, perform device testing, and publish/unpublish changes.

Edge Delivery Services Content on AEM:

The Universal Editor also supports authoring AEM content rendered through the EDS website. This approach uses EDS blocks directly in AEM through the Universal Editor. Using xwalk EDS AEM templates allows for a quick start with editing AEM content for EDS through the Universal Editor. Editing EDS content on AEM through the Universal Editor is seamless, as the pages can be directly opened through the page Edit option. Refer to the article AEM Edge Delivery Services — AEM Authored Content | by Albin Issac | Tech Learnings | Jun, 2024 | Medium for more details.

Conclusion:

The Universal Editor is a new approach for in-context editing of AEM content for any website — headless or headful. AEM is enabled with multiple editors, and in the future, some current editors (e.g., traditional Page Editor) may be replaced with the Universal Editor once it includes all required features. This post explored the Universal Editor and its use for in-context editing of headless and headful content. In our next blog, we’ll discuss how to use component/container approaches for authoring and how to enable component drag-and-drop from the property rail.

References:

Universal Editor Introduction | Adobe Experience Manager