Welcome to Tech Mastery, your expert source for insights into technology and digital strategy. Explore topics like Adobe Experience Manager, AWS, Azure, generative AI, and advanced marketing strategies. Delve into MACH architecture, Jamstack, modern software practices, DevOps, and SEO. Our blog is ideal for tech professionals and enthusiasts eager to stay ahead in digital innovations, from Content Management to Digital Asset Management and beyond.
Developer Console and Adobe I/O CLI for Cloud Manager to Debug AEM as a Cloud Service (AEMaaCS)
AEM as a Cloud Service provides a Developer Console for each environment that exposes various details of the running AEM service that are helpful in debugging. Each AEM as a Cloud Service environment has its own Developer Console.
Adobe I/O CLI for Cloud Manager provides commands to download/tail the logs from AEM as a Cloud Service environment.
Some of the below Adobe documents provides the required details on this topic, thought of sharing my learning for reference
The Developer console can be accessed through Cloud Manager or Adobe I/O CLI for Cloud Manager
Log in to CM, select the appropriate Program(Select the Program enabled for AEM as a Cloud - the AMS customers participating in AEM as a Cloud will have two different programs)
Click on the three dots for the specific environment, and select “Developer Console”, the same can be accessed through the Environment tab. You will be able to see the Developer Console with the environment details.
Change the value in the pod dropdown list to view the different server details on the environment.
To access and use the Developer Consol, the developer must be a member of the Cloud Manager Product’s Developer - Cloud Service Product Profile. Also, the developer must be a member of the AEM Users or AEM Administrators Product Profile on AEM Author and/or Publish. The exception being for Sandbox Programs, where any user with access to the Cloud Manager Sandbox Program will have access to Developer Console.
The Developer Console provides similar information as the AEM SDK’s local quickstart’s OSGi Web console, with the marked difference that the Developer Console is read-only.
As illustrated above, available statuses information includes the state of bundles, components, OSGI configurations, oak indexes, OSGI services, and Sling jobs.
Also, the Query Performance tool can be accessed from the Queries tab - /libs/granite/operations/content/diagnosistools/queryPerformance.html.
Sandbox Program environments enter a hibernation mode if no activity is detected for a certain period of time. Hibernation is unique to Sandbox Program environments. Production program environments do not hibernate.
Hibernation is categorized as:
Automatic Sandbox Program environments are automatically hibernated after eight hours of inactivity, meaning that neither the author nor preview or publish services receive requests.
Manual: As a user, you may manually hibernate a Sandbox Program environment, although there is no requirement to do so since hibernation will occur automatically after a certain period (eight hours) of inactivity.
You will see the below screen if the Sandbox environment is Hibernated while accessing the instances
The Environment can be De-Hibernated through Developer Console
The Developer Console can be also accessed through Adobe I/O CLI for Cloud Manager
The CRXDE Lite is only accessible on Local SDK instances and AEM as a Cloud Service Development environments but not available on Stage or Production environments.
Deployed OSGi configurations cannot be reviewed via CRXDE Lite. OSGi configurations are maintained in the AEM Project’s ui.apps code package at /apps/example/config.xxx, however upon deployment to AEM as a Cloud Service environments, the OSGi configurations resources are not persisted to the JCR, therefore not visible via CRXDE Lite. The OSGI configurations can be reviewed through the Developer console.
Oservervation while using the Adobe I/O CLI - I was getting 401 Unautorized exception while executing the CLI command, even aio auth:login not helped, the issue is resolved first by clearing the configurations(aio config:clear) then execute the aio auth:login and other commands
AEM(Adobe Experience Manager): Extend Experience Fragment model to support localized header/footer with custom site structure
One of my earlier blogs talked about how to reuse the same editable templates with multiple sites, how to use the XF localization feature to enable different headers and footers for the websites build on the same template - there are multiple approaches to achieve this e.g. dedicated template for sites, enabling the header at page level rather in template level but we enabled the header in template level and used the localization feature to support the header variants.
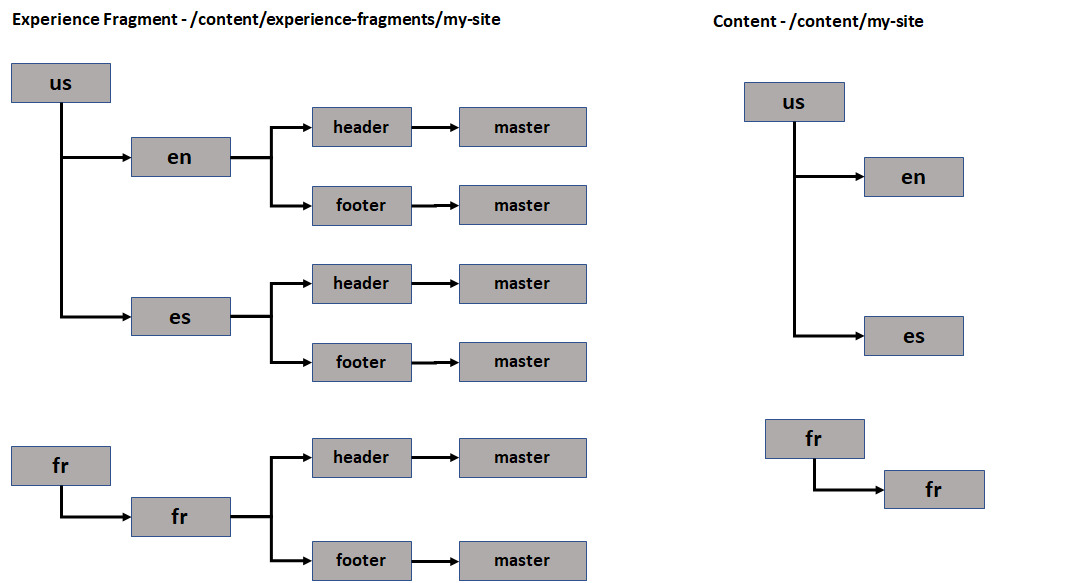
The XF localization feature works well if the content(/content/mysite1/us/en) and experience fragment(/content/experience-fragments/mysite1/us/en) structures follows the same pattern.
Recently we had a use case to reuse the pages created with editable template under the legacy content path with localized headers/footers(independent websites) - as I said earlier this can be achieved in multiple ways e.g. create a dedicated template but we decided to extend the Experience Fragment localization logic with delegation pattern.
The global header XF is enabled under - /content/experience-fragments/mysite1/us/en/site/header/master and the content is under /content/mysite1/us/en - the header XF is embeded in the template structure, this supports localization by just enabling the copy of header XF and the content(e.g. XF - /content/experience-fragments/mysite1/fr/fr/site/header/master, Site - /content/mysite1/fr/fr). The need is to reuse the same content under(with same template) the legacy content path(e.g /content/mysite2/en-US), the default XF localization feature will not help here to enable the localized header for the pages under /content/mysite2/en-US as the the legacy content path structure is not matching with the global header embeded in the template.
The localization logic is enabled in the getLocalizedFragmentVariationPath() method of the XF core component model(com.adobe.cq.wcm.core.components.internal.models.v1.ExperienceFragmentImpl) , the Delegation pattern helps us to override the required methods(getLocalizedFragmentVariationPath()) from Core Component Models(ExperienceFragment) to enable the custom logic.
In a normal delegation process, all the public methods from the original interface are added into the custom class and override or delegate the calls to the original class, this approach may create challenges while the existing methods are changed or new methods are introduced. The Lombok Java package helps here - inject all the public interface methods into the custom class and override only the required methods(this will help to avoid the challenges related to the version upgrade)
Let us now see how to use the Delegate pattern to override the Experience Fragment Model to support our use case.
The assumption is the legacy content is under three-level e.g. /content/mysite2/en-US - the logic can be changed based on your content hierarchy and the header will be placed under /content/experience-fragments/mysite2/en-US/site/header/master
As a first step, Create a custom XF Model in your core module - CustomExperienceFragmentImpl and associate it with the custom(proxy) XF component resource type.
public class CustomExperienceFragmentImpl implements ExperienceFragment {
public static final String RESOURCE_TYPE = "mysite/components/experiencefragment"; // Specify the resourceType of the custom(Proxy) XF component
//used to embed the headers and footers in to the template
Now create the delegate for the parent resource type model through @Self and @Via annotations
The @Delegate is the Lombok java library annotation to inject the delegated methods at compile-time, the exclusion can be defined- the methods that will be overridden by the custom class, in our case only the getLocalizedFragmentVariationPath method is overridden and the remaining methods are delegated.
@Self
@Via(type = ResourceSuperType.class)
@Delegate(excludes = DelegationExclusion.class) // Define the the methods that should be exclude from the delegation
private ExperienceFragment delegate;
private interface DelegationExclusion {
String getLocalizedFragmentVariationPath();
}
In the compile-time Lombok injects all the public methods into the custom class and delegate those calls to the parent class
public String getAppliedCssClasses() { return this.delegate.getAppliedCssClasses(); } public ComponentData getData() { return this.delegate.getData(); } etc.
Override getLocalizedFragmentVariationPath() with custom logic, the logic will check if there is any valid header/footer XF available in the defined location for the content path, if so the header/footer XF fragment path is returned. If there is no matching header the call will be delegated to the parent ExperienceFragment implementation. If required the call can be directly delegated to the parent class for the specific content path(the content path in which the new content structure is followed).
Add the latest Lombok library maven dependency to your core module
<dependency>
<groupId>org.projectlombok</groupId>
<artifactId>lombok</artifactId>
<version>1.18.20</version>
<scope>provided</scope>
</dependency>
Deploy the updated core module to the AEM server
Now, when the user accesses the content under /content/mysite2/en-US or /content/mysite2/fr-FR, the custom logic looks for the site-specific header XF under /content/experience-fragments/mysite2/en-US/site/header/master or /content/experience-fragments/mysite2/fr-FR/US/site/header/master and returns the XF path if available, if not delegate the calls to the parent XF Model that applies the default logic(the XF path configured in the template will be displayed).
Refer to the below gist for the complete model(modify the model based on your use cases)
Additionally, if required enable page-level authoring fields(XF browsers) so that the authors can override the XF path configured in the template level for a specific websites.
Change the model logic to send back the overridden XF path
if (fragmentVariationPath.contains(XF_HEADER_VARIATION)) {
InheritanceValueMap ivm = new HierarchyNodeInheritanceValueMap(currentPage.getContentResource());
The delegation pattern helps us to override the sling models to enable custom functionalities based on your use cases, using the Lombok java library helps us to simplify the generation of delegation methods - the Lombok library injects the delegation methods during compilation.
I want to highlight an issue faced while implementing this - delegate for all the public methods were not injected by Lombok library, the actual issue was an old version of Core Component dependency was added through aem-sdk-api but the latest Core Component version was enabled in the server(6.5), the issue got resolved after fixing the dependency issue(the XF was displaying blank data due to this issue).
How to enable Basic Authentication for Non-Prod AEM websites? | Support Authenticated Performance Testing with Cloud Manager
Enable Basic Authentication:
Most of the time we will have the use case to enable basic authentication for non-prod AEM websites to avoid non authenticated users accessing the content(another option is through IP whitelisting) also avoiding the non-prod contents getting indexed through google search(another approach to avoid the indexing is through Robots meta tag)
Easy to use generic user name/password for every website so that only the users know those credentials can access the password(if you need more security go with site-specific users or individual users)
In AEM the basic authentication can be enabled quickly through Dispatcher(Apache)
Create a common configuration file for authentication - /conf.d/htaccess/authentication.conf
## unsets authorization header when sending request to AEM
Include this file into the individual Virtual Hosts
<Location />
<If "'${ENV_TYPE}' =~ m#(dev|uat|stage)#">
Include /etc/httpd/conf.d/htaccess/authentication.conf
</If>
</Location>
The ENV_TYPE can be set as an Environment variable e.g /etc/sysconfig/httpd (for AMS environment the required environment variables will be enabled by default)
ENV_TYPE='dev'
Create the credential file, execute the below command, you will be prompted to enter the password
Restart the Apache server, now basic authentication is enabled for the websites.
Authenticated Performance Testing with Cloud Manager:
Cloud Manager is a Cloud service that allows customers to build, test, and deploy AEM applications hosted by Adobe Managed Services. Refer to the below URL for more details
The Cloud Manager enables the Performance Testing on Stage environment after every successful deployment.
The list of Stage domains enabled for performance testing can be configured - this configuration is not supported through UI but needs to be enabled through the backend(Adobe team should be helping here)
Also, the required performance KPI's can be configured through Cloud Manager UI
The performance testing will fail now due to the basic authentication enabled for the Stage websites, to overcome this the basic authentication credential should be configured in the Cloud Manager prod pipeline - the configuration cant be enabled through Cloud Manager UI but through Cloud Manager Plugin for the Adobe I/O CLI
This CLI supports two modes of authentication: Browser-based and Service Account. I am going to use browser-based authentication to enable the required configurations
aio auth:login - login through browser with your Cloud Manager credentials
aio cloudmanager:org:select - select your organization where your program and the pipeline is configured(most of the case signle org)
aio config:set cloudmanager_programid PROGRAMID - Add your program ID
aio cloudmanager:set-pipeline-variables PIPELINEID--variable CM_PERF_TEST_BASIC_USERNAME testuser--secret CM_PERF_TEST_BASIC_PASSWORD pwdtestuser- Add your pipeline ID and the basic credentials
Now the basic authentication is enabled and the basic authentication credential are set while performing the performance testing.
"A Sandbox program is one of the two types of programs available in AEM Cloud Service, the other being a Production program.
A Sandbox is typically created to serve the purposes of training, running demos, enablement, or Proof of Concept (POC)s. They are not meant to carry live traffic."
Refer to the following URL to get the details on AEM as a Cloud Service Sandbox program - https://experienceleague.adobe.com/docs/experience-manager-cloud-service/implementing/using-cloud-manager/sandbox-programs/introduction-sandbox-programs.html?lang=en#
Enable Sandbox Program:
To start using the AEM as a Cloud Service Sandbox, the minimal required Adobe Enterprise Term License Agreement (ETLA) should be signed, you can reach out to Adobe Account/Support team for more details on this.
Once the ETLA is in place you should be able to add the sandbox program through Cloud Manager(one of your primary contacts will be added as an administrator, if you are already part of Cloud Manager through AMS then that will continue)
Select the Profile the user should be added (AEM administrator or AEM user) - Create new profiles based on the need
Now you should be able to access the author server
Sandbox program also enables Publish and Preview servers - You can view those details by going into the environment
Now you can push the changes to the git repository
By default the "main" branch is enabled for deployment, if required you can create the additional branch e.g dev, and enable the deployment through the new branch.
Now start the pipeline to deploy the changes
Even if you required the deployment can be initiated on repository change
The Sandbox setup is completed now, enable the content and code based on your use cases.
Blank screen displayed in edit mode | Adobe Experience Manager(AEM)
I was getting the blank screen while accessing the pages through Edit mode in AEM
The below exception was displayed
java.lang.NullPointerException
at org.apache.jsp.libs.cq.gui.components.authoring.workflow.startworkflow.startworkflow_jsp._jspService(startworkflow_jsp.java:217)
at org.apache.sling.scripting.jsp.jasper.runtime.HttpJspBase.service(HttpJspBase.java:70)
at javax.servlet.http.HttpServlet.service(HttpServlet.java:725)
at org.apache.sling.scripting.jsp.jasper.servlet.JspServletWrapper.service(JspServletWrapper.java:502)
at org.apache.sling.scripting.jsp.jasper.servlet.JspServletWrapper.service(JspServletWrapper.java:449)
at org.apache.sling.scripting.jsp.JspScriptEngineFactory.callJsp(JspScriptEngineFactory.java:339)
at org.apache.sling.scripting.jsp.JspScriptEngineFactory.access$100(JspScriptEngineFactory.java:97)
at org.apache.sling.scripting.jsp.JspScriptEngineFactory$JspScriptEngine.eval(JspScriptEngineFactory.java:600)
Also, the workflow model page was blank with the below exception
java.lang.NullPointerException
at org.apache.jsp.libs.cq.workflow.admin.console.components.datasource.modelsdatasource.modelsdatasource_jsp._jspService(modelsdatasource_jsp.java:410)
at org.apache.sling.scripting.jsp.jasper.runtime.HttpJspBase.service(HttpJspBase.java:70)
at javax.servlet.http.HttpServlet.service(HttpServlet.java:725)
at org.apache.sling.scripting.jsp.jasper.servlet.JspServletWrapper.service(JspServletWrapper.java:502)
at org.apache.sling.scripting.jsp.jasper.servlet.JspServletWrapper.service(JspServletWrapper.java:449)
at org.apache.sling.scripting.jsp.JspScriptEngineFactory.callJsp(JspScriptEngineFactory.java:339)
at org.apache.sling.scripting.jsp.JspScriptEngineFactory.access$100(JspScriptEngineFactory.java:97)
The workflow Instances/Archives/Failures pages were failing with the below exceptions
java.lang.NullPointerException
at org.apache.jsp.libs.cq.workflow.admin.console.components.datasource.workflowinstancedatasource.workflowinstancedatasource_jsp._jspService(workflowinstancedatasource_jsp.java:176)
at org.apache.sling.scripting.jsp.jasper.runtime.HttpJspBase.service(HttpJspBase.java:70)
at javax.servlet.http.HttpServlet.service(HttpServlet.java:725)
at org.apache.sling.scripting.jsp.jasper.servlet.JspServletWrapper.service(JspServletWrapper.java:502)
at org.apache.sling.scripting.jsp.jasper.servlet.JspServletWrapper.service(JspServletWrapper.java:449)
at org.apache.sling.scripting.jsp.JspScriptEngineFactory.callJsp(JspScriptEngineFactory.java:339)
at org.apache.sling.scripting.jsp.JspScriptEngineFactory.access$100(JspScriptEngineFactory.java:97)
java.lang.NullPointerException
at org.apache.jsp.libs.cq.workflow.admin.console.components.datasource.failureinstancedatasource.failureinstancedatasource_jsp._jspService(failureinstancedatasource_jsp.java:167)
at org.apache.sling.scripting.jsp.jasper.runtime.HttpJspBase.service(HttpJspBase.java:70)
at javax.servlet.http.HttpServlet.service(HttpServlet.java:725)
at org.apache.sling.scripting.jsp.jasper.servlet.JspServletWrapper.service(JspServletWrapper.java:502)
at org.apache.sling.scripting.jsp.jasper.servlet.JspServletWrapper.service(JspServletWrapper.java:449)
at org.apache.sling.scripting.jsp.JspScriptEngineFactory.callJsp(JspScriptEngineFactory.java:339)
at org.apache.sling.scripting.jsp.JspScriptEngineFactory.access$100(JspScriptEngineFactory.java:97)
Somehow the restart of the AEM server has not helped to resolve the issue(not sure how this bundle has been to an Installed state, suspecting this is happened as part of Cloud Manager deployment). The issue got resolved after manually starting the bundle through the console
Editable templates have been introduced in AEM 6.2, which allows the authors to create and edit templates. Template authors can create and configure templates from the Templates console in the AEM without the help of the development team. Template authors can define the policies, structure, and initial content for the templates that will be shared by all the pages created based on this template.
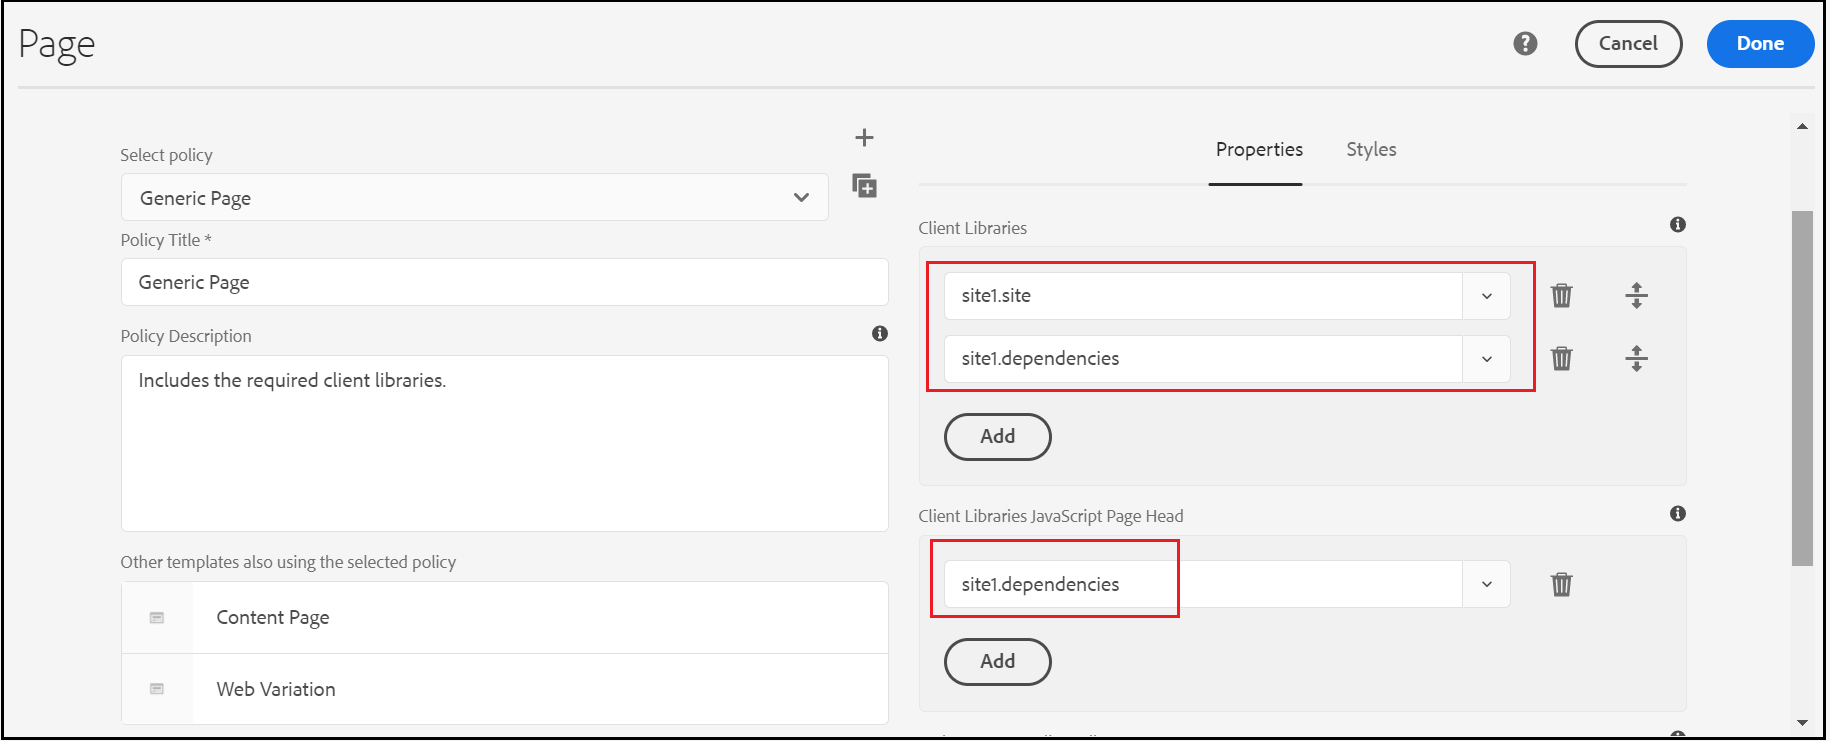
Editable Templates allow the template-authors to configure the client libraries required to style the websites created based on this template — base/common client libraries are included through page rendering component but site-specific client libraries through template policy configuration.
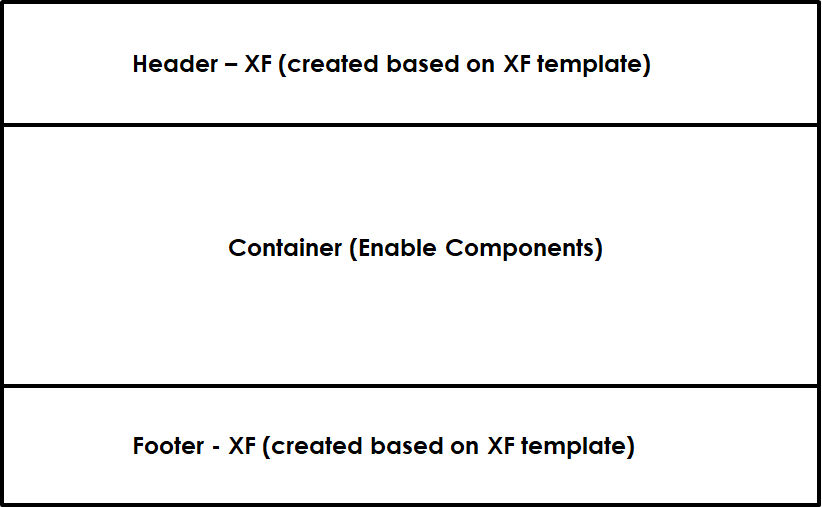
Most of the time we will have a generic template enabled with headers and footers through experience fragment and the container with allowed components that can be managed by Authors while creating the pages, e.g.
This will have some constraint while reusing the template with multiple sites
site-specific header and footer — customize the header/footer for individual website
site-specific style/theme — enable different styles/themes for individual sites.
In this tutorial let us see how to enable the editable template with multiple sites that have the different header/footer and styling requirements.
site-specific header/footer:
Most of the time the header and footer are enabled through experience fragment and configured in template level by using experience fragment component so that all pages created based on this template will have the consistent header/footer experience. The issue is while reusing the template with sites that require a localized header and footer, the Experience Fragment core component saves us here, the Experience Fragment core component enables the support for localized fragment content
"Supports references for localized content: if the component is defined in a template and if the fragment is part of a localized structure below /content/experience-fragments that follows the same patterns as the site below /content, the fragment with the same localization (language, blueprint or live copy) as the current page will be rendered".
If the experience fragments and the sites follow the same localized structure, the experience fragment core component uses the localized fragment content based on the site language.
The experience fragment components in the template are enabled with default experiment fragment — /content/experience-fragments/my-site/us/en/header/master and /content/experience-fragments/my-site/us/en/footer/master, while accessing the different localized sites the experience fragment core component derives the localized fragment path based on the site structure and applies that to the pages.
e.g while accessing the content from /us/es the following fragments are applied —/content/experience-fragments/my-site/us/es/header/master and /content/experience-fragments/my-site/us/es/footer/master , the same case for other localized sites.
This experience fragment localization feature helps us to reuse the template across different websites that have localized header and footer needs without creating site-specific templates.
site-specific style/theme
Most of the time we may have the need to enable site-specific style/theme for the websites that are built on the same templates. By default Editable template and core components won't support different styles for the websites built on the same template — the client libraries are enabled either in the page rendering component or in the template. The cq:designPath value configured in the site property will not be honored by editable templates and core components, the cq:designPath is more used by the static template.
Let us see a custom approach that will help us to enable site-specific style/themes(client library).
The front end module should generate the site-specific client library that can be configured for individual websites, refer to the link below for the details on enabling site-specific client libraries through the UI frontend module.
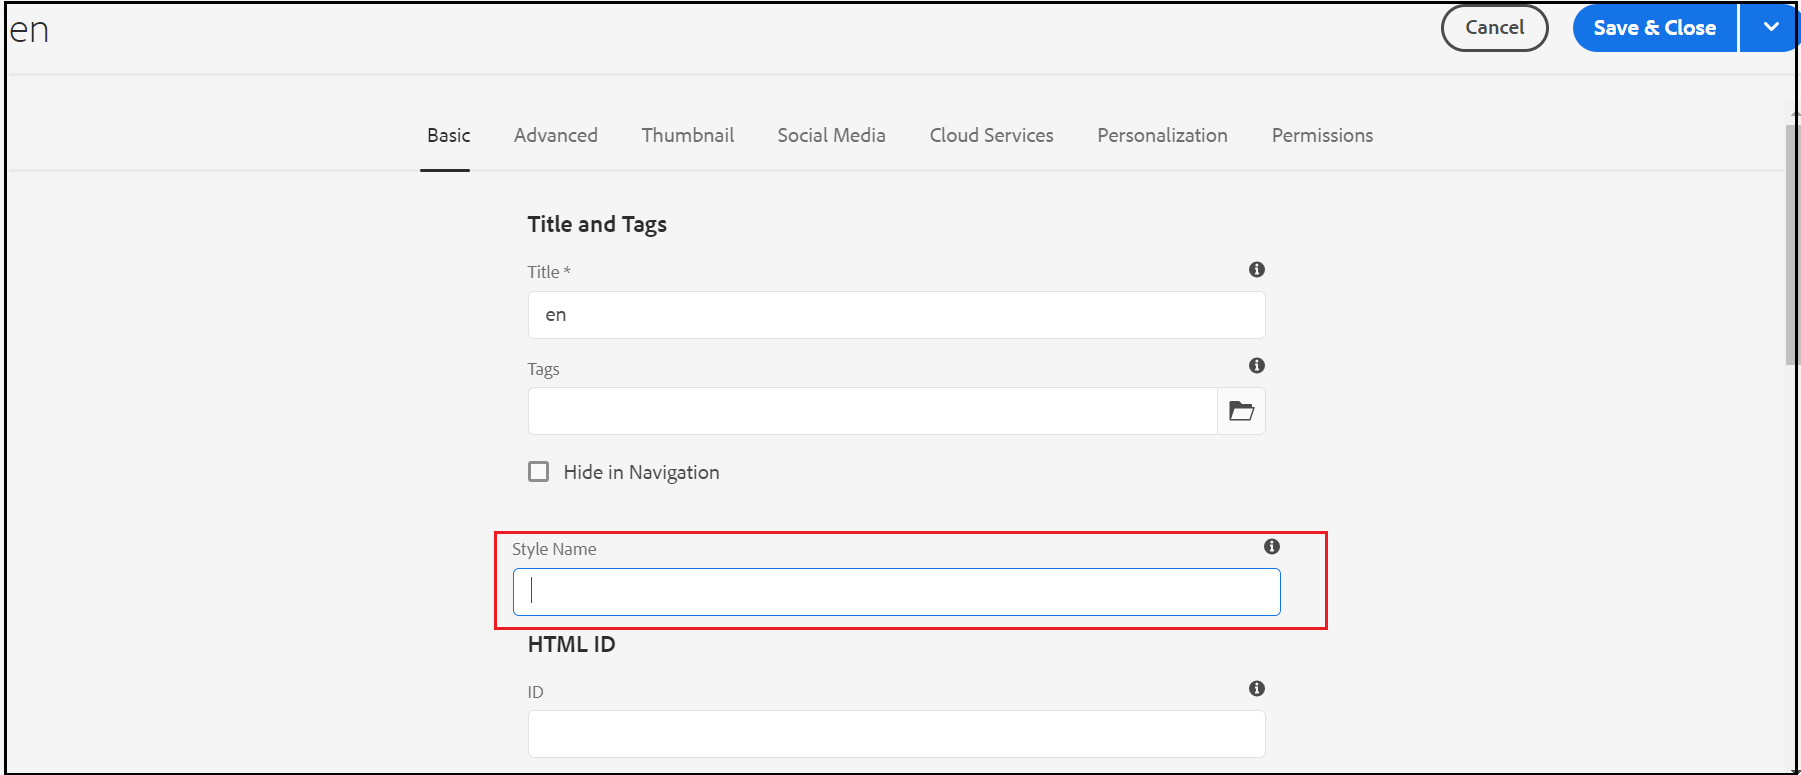
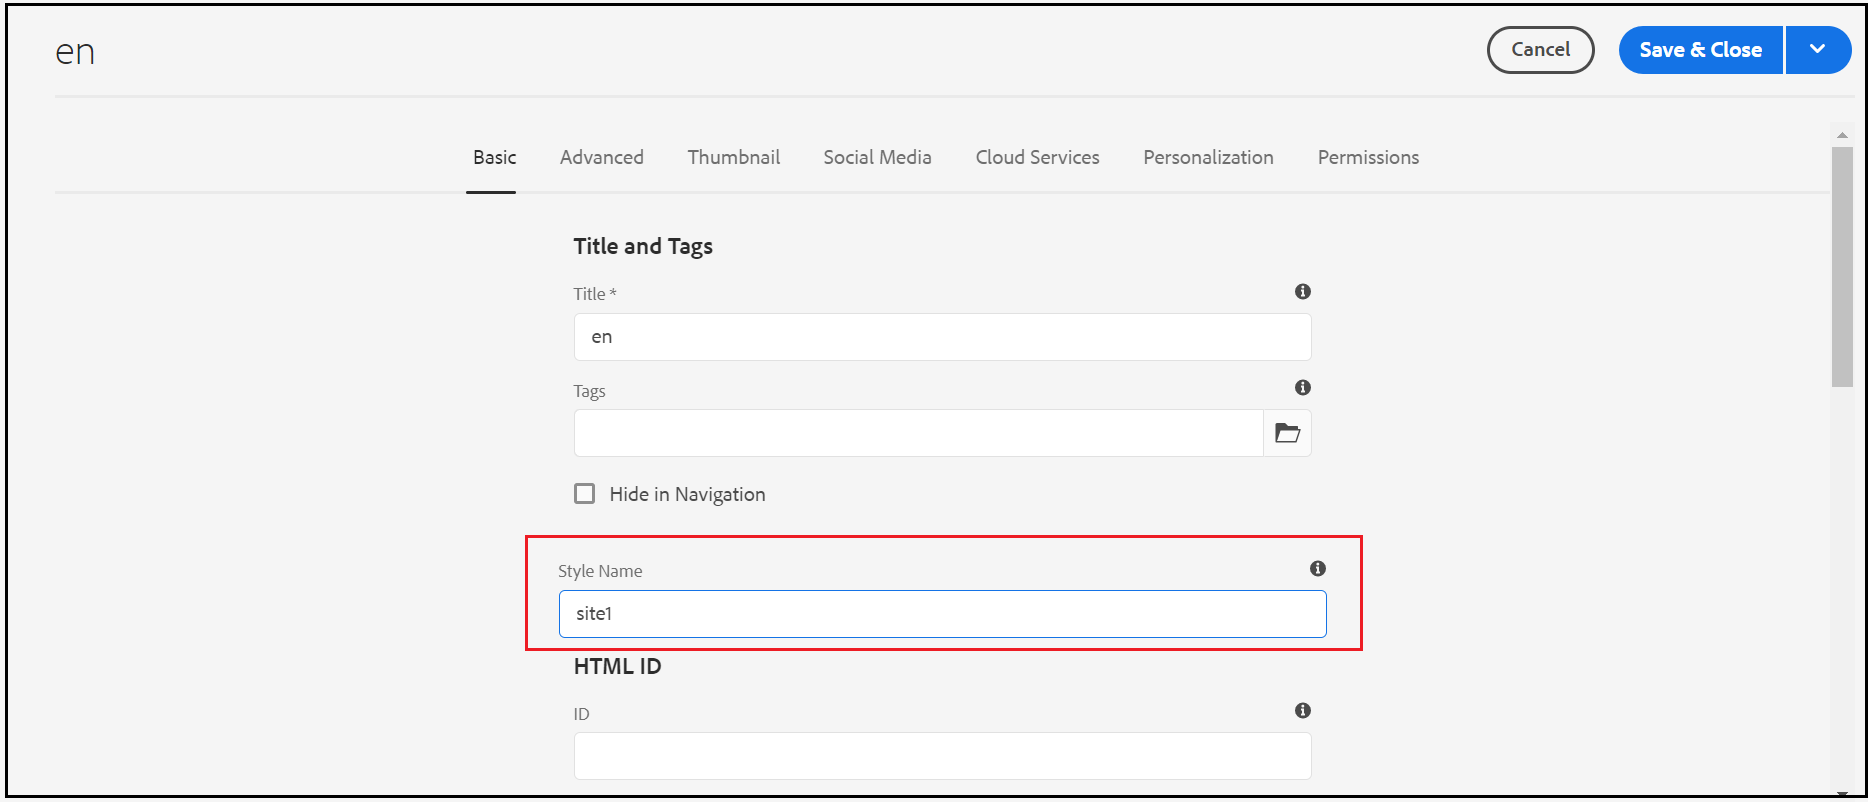
As a first step enable the additional property- styleName to the page dialog (if required enable dropdown list with predefined style values, also the property can be enabled in all level to apply different site and page level styles) — the styleName value is equal to the site names used by ui frontend module e.g site1, site2 (use context-aware configuration instead of page properties if required)
Enable sling model to to return the site specific client library names based on the inherited styleName property passed from customheaderlibs.html and customfooterlibs.html files of the page rendering component.
Enable the client library categories into the page rendering component(e.g /apps/multisitefrontenddemo/components/page) — customheaderlibs.html and customfooterlibs.html, the inherited style name property is injected to StyleNameModel — the property form current page if not available then from the parent hierarchy