How to configure Navigation Facet in Adobe Search and Promote?
The Facets can be used to customize your presentation layer and provide your users with a Guided Search that lets them drill down into their search results.
This tutorial explains the approach to configure the facets in Adobe Search & Promote.
The website users can narrow down their search results with enabled facets, there are two types of facets in Search and Promote — Static and Dynamic, we are going to use Static facets for this tutorial.
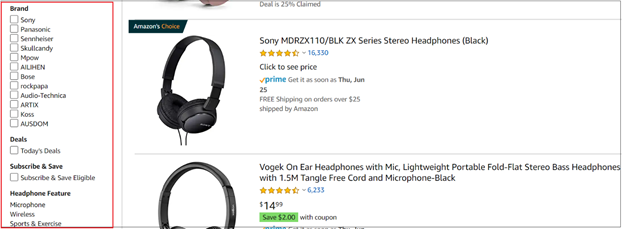
Refer the below screen shot for example on the facets, the users can narrow down the search based on the brands they interested.

Facet Configuration
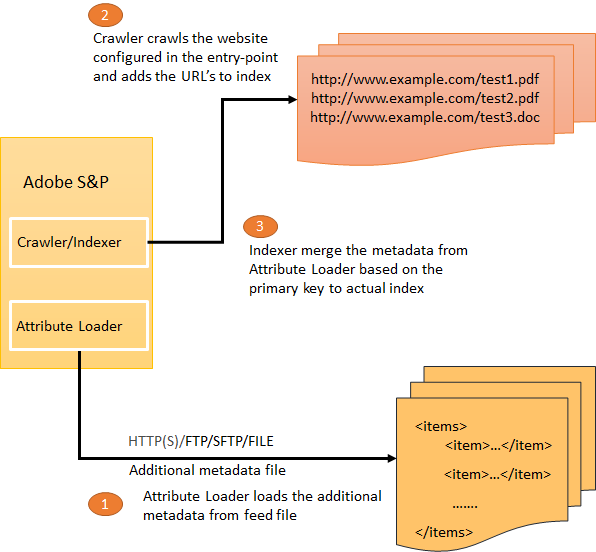
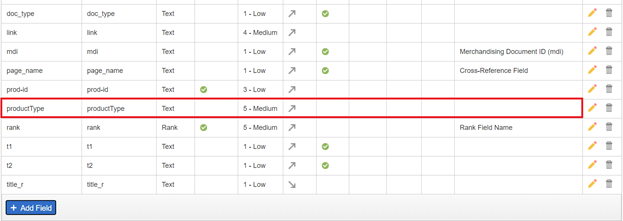
The facet is defined based on the metadata, as a first step, define a metadata e.g productType
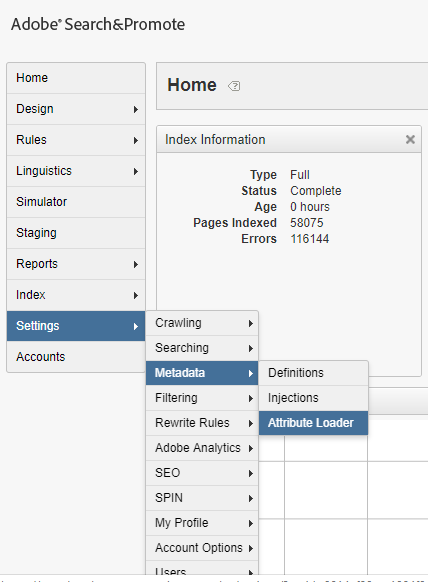
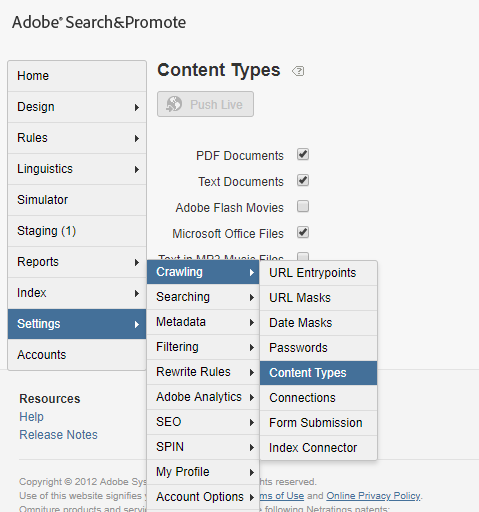
The meta data’s can be managed from Settings →Metadata →Definitions


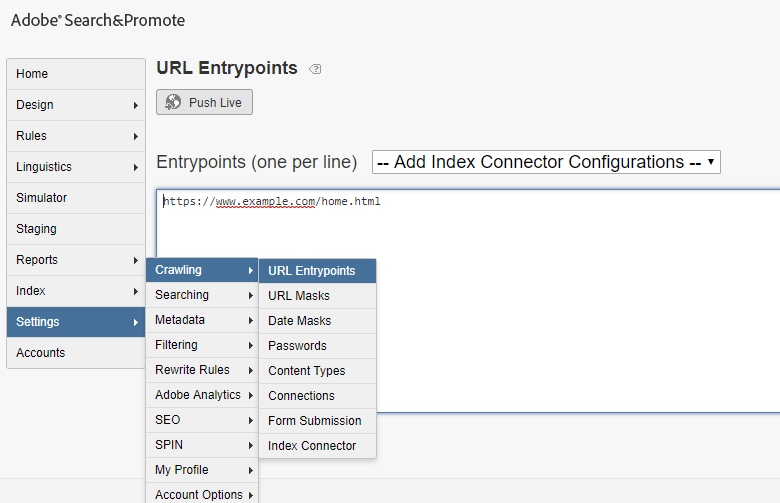
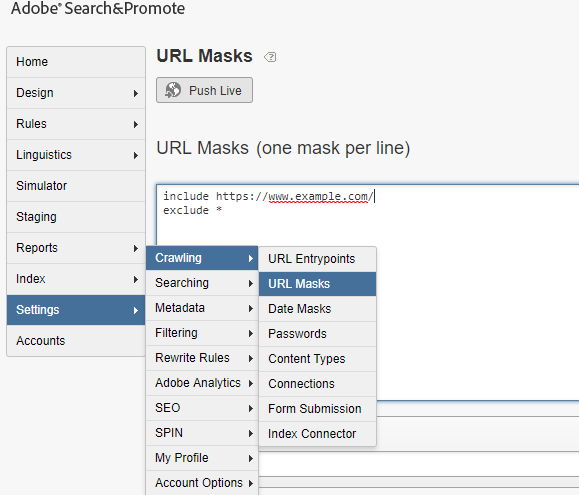
The metadata crawled and indexed through URL entry points — URL entry point can be a website URL or feed data through Index Connector, using Index Connector for this tutorial.
Refer https://www.albinsblog.com/2018/12/searchandpromote-crawlingindexconnector.html#.XvI2CGhKg2w for more details on configuring Index Connector.
The met data is ready now let us configure a facet based on the meta data defined “productType”
Navigate to Design →Navigation →Facets
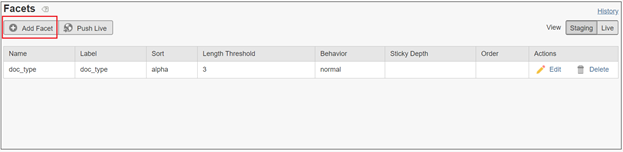
Add a new Facet

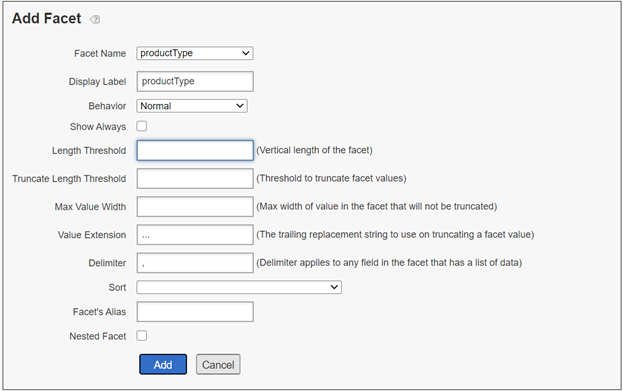
Facet Name — Select the meta data filed based on which the facet should be defined.
Display Label — Enter display label
Behavior — there are different behaviors like Normal, Category, Category Multi-Select, Sticky and Multi-Select, I am going with Normal behavior for this tutorial
Normal — When a customer clicks a facet, whose behavior is set to Normal, it drills into the search results for that item. From there, the customer can further refine and narrow the number of search results.
Category — Category facets act like navigational elements. These facets are top-level facets that customers typically drill through before revealing facets with attribute options. Category facets do not narrow when other facets are selected and remain open. Clicking a different value within a category facet deselects all other facets on the page except for that category facet’s parents.
Category Multi-Select — facets are category facets that support the selection of multiple items from the facet where the items are “ORed” together.
Sticky — When a customer clicks a facet, whose behavior is set to Sticky, the facet with the selected option remains open during the drill-down. This option is useful when you want to let a customer changes a previous choice.
Multi-Select — Allows the selection of multiple items from a facet, where the items within the facet are “ORed” together. This option is useful for a facet that may show a minor attribute such as colors and you want to let the customer have the ability to build a query that lets them “show shoes in my size that are red or black”.
Show Always — For a normal or sticky facet, sets the facet to remain visible to the customer at all times. This option is only available if you selected Normal, Category, or Sticky from the Behavior drop-down list.
Refer the UI for details on other fields, I am only configuring the Facet Name and Facet Label for this tutorial, enable other fields as required.
Click Add, now the facet is enabled based on the meta data field “Product Type”


JSON Transport Template
Transport templates can be either XML or JSON templates that pass data from the back-end search to the Guided Search presentation layer. By default, your account is configured to use XML transport templates. However, JSON Transport template can be enabled if required.
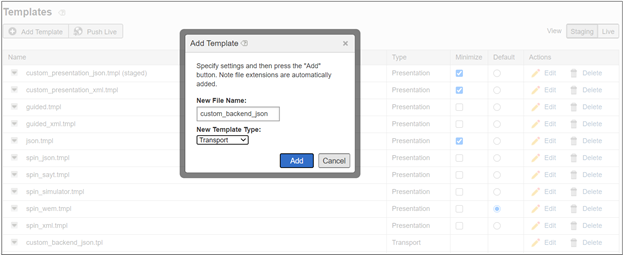
Created a JSON template(custom_backend_json.tpl) with minimal data to support the search data
The new template can be added by navigating to Designs à Templates à Add Template
Select Template Type as Transport

Sample Template Content with minimal configuration– modify based on your requirement, even you can use the existing Transport Template with required customization
<search-content-type-header charset="UTF-8">
{
"general": {
"query" : "<search-query />",
"total" : "<search-total />",
"lower" : "<search-lower />",
"upper" : "<search-upper />"
},
"facets" : [
{
"name" : "productType",
"values" : [<search-field-value-list name="productType" quotes="yes" data="values" sortby="values" encoding="json" />],
"counts" : [<search-field-value-list name="productType" quotes="no" data="results" sortby="values" />]
}
],
"results" : [
<search-results>
{
"fields" :
[
{
"name" : "mdi",
"value" : "<search-display-field name="mdi" length="500" encoding="json" />"
},
{
"name" : "title",
"value" : "<search-display-field name="title" encoding="json" />"
},
{
"name" : "productType",
"value" : "<search-display-field name="productType" encoding="json" />"
}
]
}
<search-if-not-last>,</search-if-not-last>
</search-results>
]
}
Enabled with a single facet — update the template with additional required facets, also add the additional meta data’s and other configurations e.g. breadcrumbs, menus etc
e.g
"facets" : [
        {
            "name" : "productType",
            "values" : [<search-field-value-list name="productType" quotes="yes"  data="values" sortby="values" encoding="json" />],
            "counts" : [<search-field-value-list name="productType" quotes="no"  data="results" sortby="values" />]
        },{"name" : "facet2",
            "values" : [<search-field-value-list name=" facet2" quotes="yes"  data="values" sortby="values" encoding="json" />],
            "counts" : [<search-field-value-list name=" facet2" quotes="no"  data="results" sortby="values" />]
        }
    ],
JSON Presentation Template
Presentation template present the search data to the user, the data can be presented in different format like HTML, JSON and XML
Created a JSON template(custom_presentaion_json.tmpl) with minimal data to present the search data to JSON
<guided-content-type-header content="application/json" />
<guided-if-query-param-defined gsname="callback" /><guided-query-param gsname="callback" />(</guided-if-query-param-defined>
 {"general" :{
            "query" : "<guided-query-param gsname='q' />",
            "total" : "<guided-results-total />",
            "page_lower" : "<guided-results-lower>",
            "page_upper" : "<guided-results-upper>",
            "page_total": "<guided-page-total/>"
        },
        "facets" :
        [<guided-zone gsname="Facets_Default"><guided-facet  gsname="productType" >{
                        "label" : "<guided-facet-display-name gsname="productType" />",
                        "long" : <guided-if-facet-long>true<guided-else-facet-long>false</guided-if-facet-long>,
                        <guided-if-facet-selected>
                        "selected" : true,
                        "undolink" : "<guided-facet-undo-path gsname="productType" />",
                        </guided-if-facet-selected>
                        "values" :
                        [
                            <guided-facet-values>
                            {
                                "value" : "<guided-facet-value  escape="ijson">",
                                "selected" : "<guided-if-facet-value-selected>true<guided-else-facet-value-selected>false</guided-if-facet-value-selected>",
                                "count" : "<guided-facet-count>",
                                "link" : "<guided-facet-value-path>",
                                "undolink" : "<guided-facet-value-undo-path>",
                                "threshold" : <guided-if-facet-value-equals-length-threshold>true<guided-else-facet-value-equals-length-threshold>false</guided-if-facet-value-equals-length-threshold>
                            }<guided-if-not-last>,</guided-if-not-last>
                            </guided-facet-values>
                        ]
                    }
                    </guided-facet>
            </guided-zone>
        ],
        "results" :
        [
            <guided-results gsname="default">
            {
                "index" : "<guided-result-index />",
                "title" : "<guided-result-field gsname="title" escape="ijson" />",
                "productType" : "<guided-result-field gsname="productType" escape="ijson" />"
            }<guided-if-not-last>,</guided-if-not-last>
            </guided-results>
        ]
    }
<guided-if-query-param-defined gsname="callback">)</guided-if-query-param-defined>
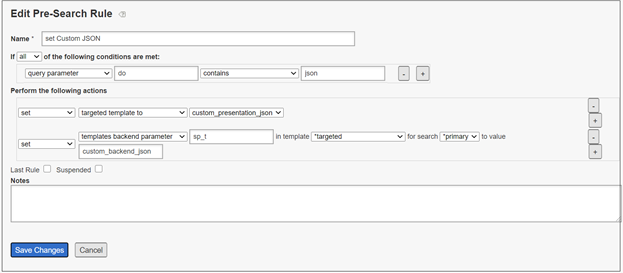
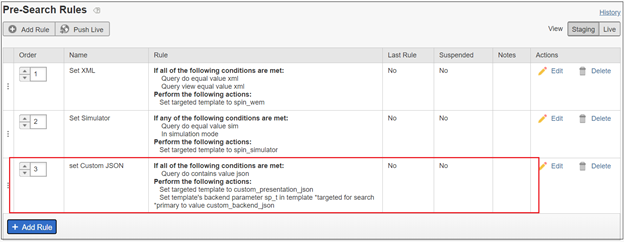
Pre-Search Rule
Pre-Search Rules are typically used to select which presentation template displays the results based on the incoming query. More advanced features can be used to alter the query that is used for a search that is being done for a presentation template. The backend CGI parameter can be set from pre-search rules e.g the backend parameter sp_t to select the appropriate backend template can be configured
Define a pre-search rule to configure the presentation and Transport template for the search, the rule is execute when the search request has a parameter “do=json”(the rule can be fired for every search request also)


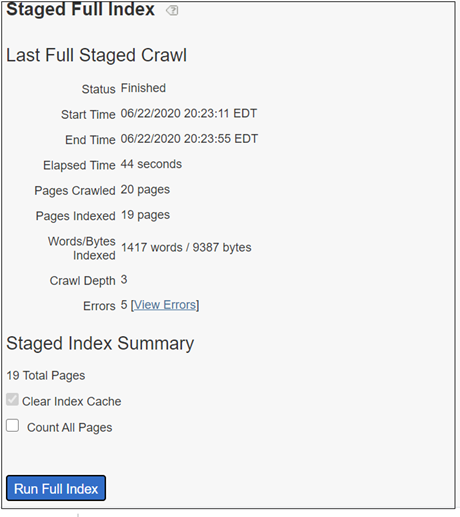
The configurations are ready, let us now run a Stage indexing (note the configuration are not pushed to live yet)
Index →Full Index →Staged Index →Run Full Index

Access http://stage-xxxxxxxxxxx.guided.ss-omtrdc.net/do=json&sp_staged=1&sp_q=*
xxxxxxxxxxx — Search and Promote account number
This will respond with JSON data which contains the required facet and meta data details.
{
   "general": {
      "query": "",
      "total": "3",
      "page_lower": "1",
      "page_upper": "3",
      "page_total": "1"
   },
   "facets": [
      {
         "label": "productType",
         "long": false,
         "values": [
            {
               "value": "Sample1",
               "selected": "false",
               "count": "1",
               "link": "?do=json;i=1;q1=Sample1;sp_q=*;sp_staged=1;x1=productType",
               "undolink": "",
               "threshold": false
            },
            {
               "value": "Sample2",
               "selected": "false",
               "count": "1",
               "link": "?do=json;i=1;q1=Sample2;sp_q=*;sp_staged=1;x1=productType",
               "undolink": "",
               "threshold": false
            },
            {
               "value": "Sample3",
               "selected": "false",
               "count": "1",
               "link": "?do=json;i=1;q1=Sample3;sp_q=*;sp_staged=1;x1=productType",
               "undolink": "",
               "threshold": false
            }
         ]
      }
   ],
   "results": [
      {
         "index": "",
         "title": "product-title",
         "productType": "Sample1"
      },
      {
         "index": "",
         "title": "product-title",
         "productType": "Sample2"
      },
      {
         "index": "",
         "title": "product-title",
         "productType": "Sample3"
      }
   ]
}
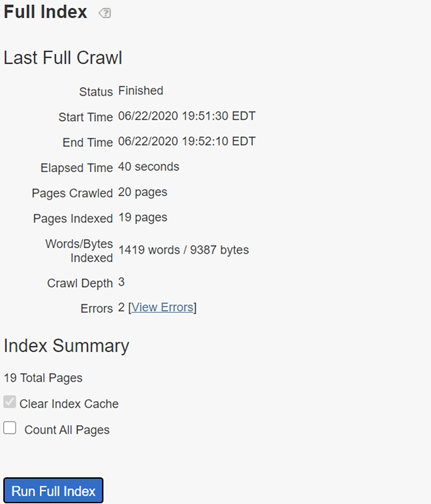
The configuration can be pushed live after successful validation and run a live index →Full Index →Live Index →Run Full Index

The URL to access live data http://xxxxxxxxxxx.guided.ss-omtrdc.net/do=json&sp_q=*
The facet data in the response can be used to present the filtering options to users to narrow down the website search.