Sunday, February 7, 2021

Multi Tenancy Theme Support For UI Frontend Module - Adobe Experience Manager(AEM)

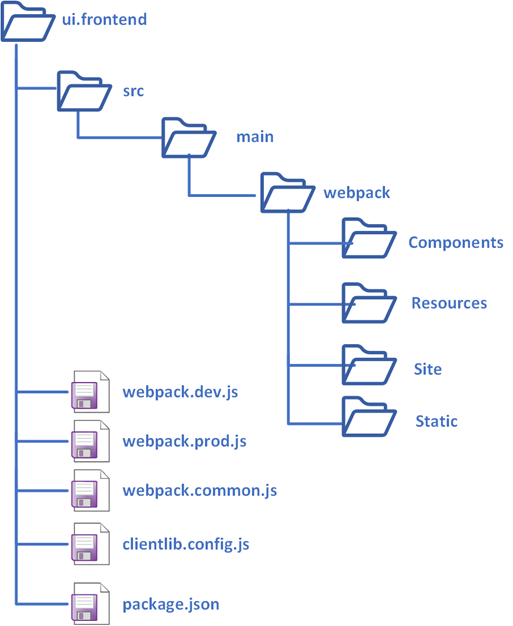
The AEM Project Archetype includes an optional, dedicated front-end build mechanism based on Webpack. The ui.frontend module is the central location for all of the project’s front-end resources including JavaScript and CSS files. The client library is generated through aem-clientlib-generator npm module and placed under ui.apps module during the build process.

Image for post

The current module structure shown below supports the front-end components for single-tenant/theme, the module can be duplicated to support multiple tenants but that will create constraints to manage also impact the overall deployment timeline.

Image for post

In this tutorial let us see how to enable the front end module to support multiple tenants/themes. The new module structure is as below.

Image for post

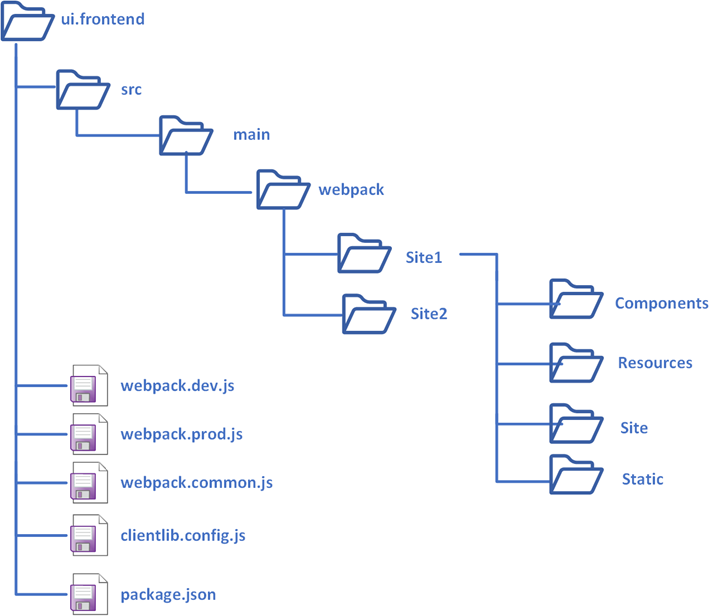
The final client libraries are generated in the below structure

Create the theme/tenant specific folders under (copy the default content under webpack to the site-specific folders)

/ui.frontend/src/main/webpack/site1, /ui.frontend/src/main/webpack/site2 etc

The default webpack.common.js is enabled to support a single entry(tenant), enable the required configurations to support additional tenants(e.g site1, site2, etc)

Enable the static HTML for testing different sites through webpack server by default the configurations are enabled to support a single tenant.

Enable the required configurations to generate the client library for different websites — site1.site, site1.dependencies, site2.site, site2.dependencies, etc

The default client library path can be overridden using outputPath e.g. outputPath: CLIENTLIB_DIR+’/clientlib-site2'

Now the style for different sites can be tested through a static index.html file

The site-specific static files can be accessed through

The browser tabs will be reloaded on style/script changes.

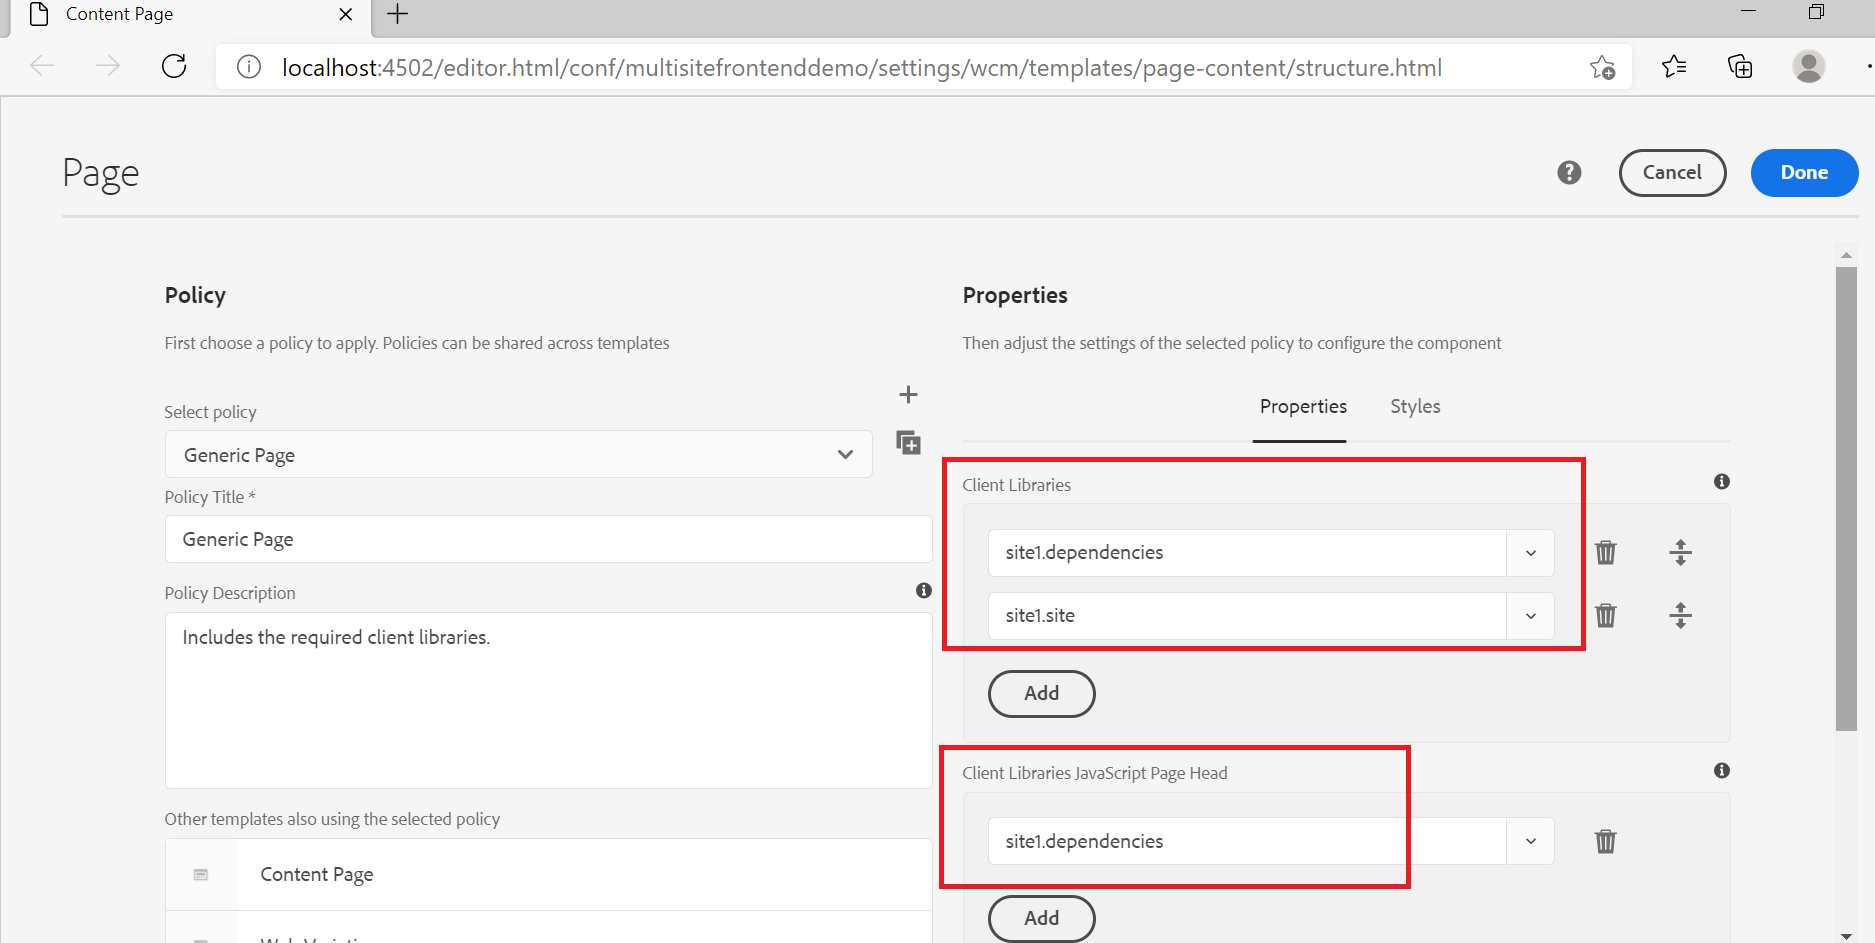
The site-specific client libraries can be enabled through editable template policy or through page rendering components.

Image for post

The sample project is also enabled with webpack watch and aemfed to deploy/test the style/script changes quickly.

Now the AEM pages can be accessed through the proxy — the changes will be synced to AEM and the browser tab reloads, the webpack proxy inject the local CSS and js files to the AEM pages.

http://localhost:3000/content/multisitefrontenddemo/us/en.html

To deploy the final changes to AEM, navigate to project root folder and execute mvn -PautoInstallSinglePackage clean install — compile the front end module and generate the client libraries to ui-apps and deploy the complete package to AEM

The style/scripts specific to multiple tenants can be managed through a single front-end module, the site specific client libraries are generated and deployed through Maven build to the AEM server. The Webpack server, watch, aemsync, browsersync, aemfed tools can be used for testing the frontend changes quickly from the local machine.

Refer to https://github.com/techforum-repo/youttubedata/blob/master/aem/multisitefrontenddemo for sample front end module enabled with multi-site support( demo is built based on archetype 24 and AEM as cloud service SDK).


References:

https://experienceleague.adobe.com/docs/experience-manager-core-components/using/developing/archetype/uifrontend.html?lang=en#clientlibs

Tuesday, January 12, 2021

Different Approaches to Block Non-Prod URL’s from search indexing

One of the major SEO concerns while working on the website is blocking the non-production URLs appearing from search engines result(index), the search engines can index the non-prod URL if those URL’s are by mistake linked from live URL’s or exposed through any other external links. The indexing of non-prod URL can cause duplicate content issues that also impact the ranking of live URL’s, the end-user may access the non-production URL instead of the Live URL. This can sometimes lead to a compliance issue if the content bound to compliance and non-live content is exposed to the end-user.

In this tutorial let us discuss the details on how to block the non-prod URLs appearing from search engines.

You can search for site:<domainname> e.g site:www.albinsblog.com to identify whether the specific domain is indexed by the search engine, also you can use some of the third party SEO tools to identify the URL’s indexed in search engines.

Image for post

Let us now see some of the options to block search engines from indexing non-production URL.

HTTP Basic Authentication:

Server-side HTTP Basic Authentication for domains block the search engines from crawling and indexing the domain content. Enable HTTP basic authentication in the web server for the non-prod domains so that the non-prod domains will be blocked for search engines but the live content will be indexed as expected.

Basic Authentication for Apache 2.4 Virtualhost

<Location />
AuthType Basic
AuthBasicProvider file
AuthUserFile /etc/httpd/conf.d/.htpasswd
#create the user through htpasswd, htpasswd -c /etc/httpd/conf.d/.htpasswd testuser
AuthName "Authentication Required"
Require valid-user
</Location>

If the same configuration is shared for different environments, enable the authentication based on the condition(e.g based on an ENV_TYPE environment variable or based on the incoming domain value)

<Location />  <If "'${ENV_TYPE}' =~ m#(dev|uat|stage)#">  
AuthType Basic
AuthBasicProvider file
AuthUserFile /etc/httpd/conf.d/.htpasswd
AuthName "Authentication Required"
Require valid-user
</If>
<Else>
Require all granted
</Else>
</Location>

The basic authentication will create challenge while performance testing the websites in stage or other environments(part of a pipeline or outside ) mainly on the caching behavior — the basic authentications enabled websites are skipped from caching, the workaround is disabling the basic authentication whenever the performance testing is executed in the environment(or execute the testing with basic authentication but the test result will not reflect the live behavior).

IP Restriction:

IP restriction helps you to allow only the known IPs to access the non-production URLs, whitelist the known IP ranges so that the external search engines will not have access to crawl/index the non-production websites but the intended users will be able to access the non-prod websites for testing.

The IP restriction can be enabled in load balancer or web server, the webserver will give more control and flexibility to modify the restrictions whenever required by the development team.

IP restriction configuration for Apache 2.4 Virtualhost

<Location />
<RequireAny>
Require ip xxx.xx.0.0/24
</RequireAny>
</Location>

If the same configuration is shared for different environments, enable the IP restriction based on the condition(e.g based on an ENV_TYPE environment variable or based on the incoming domain value)

<Location />
<If "'${ENV_TYPE}' =~ m#(dev|uat|stage)#">
<RequireAny>
Require ip xxx.xx.0.0/24
Require ip xxx.18.0.0/24
</RequireAny>
</If>
</Location>

The main challenge of IP whitelisting is enabling the Whitelist rules while working with distributed teams and the dynamic IP’s involved to access the servers.

Robots Meta Tag:

The robots metatag in the page source can help to keep the non-production URL’s out of the search engine index, enable the required robots meta tag in the page source, you need to apply the required custom logic to enable the meta tag only for non-prod environments.

<meta name="robots" content="noindex, nofollow, noarchive, nosnippet, nocache" />

noindex — Do not show this page in search results.

nofollow — Do not follow the links on this page.

noarchive — Do not show a cached link in search results.

nosnippet — Do not show a text snippet or video preview in the search results for this page

nocache — Same as noarchive, but only used by MSN/Live.

The challenge with this approach is the robots metatag can be applied only for HTML resources, not for different assets — pdf, png, jpg and etc also compare to the above two approaches the search engines should crawl all the individual pages to identify the pages are not enabled for indexing.

Robots Meta Tag HTTP header:

The X-Robots-Tag in the HTTP response header can help to keep the non-production URL’s out of the search engine index, the response header can be enabled for both HTML documents and other assets. Better to add this header to the response of all non-prod resources through webserver e.g Apache.

Configuration for Apache Virtualhost

Header set X-Robots-Tag “noindex, nofollow, noarchive, nosnippet, nocache”

If the same configuration is shared for different environments, enable the header based on the condition(e.g based on an ENV_TYPE environment variable or based on the incoming domain value)

<Location />
<If "'${ENV_TYPE}' =~ m#(dev|uat|stage)#">
Header set X-Robots-Tag "noindex, nofollow, noarchive, nosnippet, nocache"
</if>
</Location>

This approach is very easy to manage compared to enabling the metatag in the page source, the search engines should crawl all the individual pages to identify the pages that are not enabled for indexing.

Robots TXT:

Robots.txt file gives the instruction to search engines not to crawl the websites through Disallow tags but this will not ensure the pages are excluded from the index. The pages blocked by robots.txt can still appear in the index if the page is linked from external sources.

Enable a simple robots.txt in the root of every non-prod websites to block the search engines crawling the non-production URL’s(ensure the same Disallow rules are not enabled for live sites by mistake otherwise it will impact the live site indexing)

User-agent: *
Disallow: /

This approach can be used along with Robots metatag or HTTP header to block the search engines crawling the website content after removing them from the index — if the page is already in the index that should be removed first from the index before blocking the crawling through robots.txt otherwise search engine will not able to crawl and see the metatag or header enabled to the pages.

URL Removal:

The Search engine URL Removal tool can be used to remove the already indexed URL from the search engine(also from cache) if something indexed that shouldn't be indexing e.g non-prod URL.

The Removals tool enables you to temporarily block pages from Google Search results on sites that you own. When a page’s URL is requested for removal, the request is temporary and persists for at least 90 days, meanwhile, anyone of the approach discussed above should be enabled to block the search engines completely from crawling and re-indexing the pages again.

Either specific URL, specific section, or the complete site can be removed from the indexing(the site property should be owner can only perform this activity), for google, this can be performed through google search console

Image for post

The authentication and IP restriction will be the most promising approach to keep non-production URLs safer from search engines, in case these two approaches do not work for your case try enabling Robots Meta Tag HTTP header (use robots metatag if required) from webserver for non-prod domains along with robots.txt blocking the crawling.

Tuesday, December 15, 2020

Friday, December 11, 2020

Saturday, December 5, 2020

Cloud Manager Notifications to Collaboration Channels — Microsoft Teams

Cloud Manager enables customers to manage their custom code deployments on their AEM-managed cloud environments with manageable pipeline automation and complete flexibility for the timing or frequency of their deployment.

The Cloud Manager CI/CD pipeline executes series of steps to build and deploy the code to AMS and AEM as Cloud AEM platforms, refer to the below video to understand the basics of Cloud Manager.


Cloud manager exposes APIs to interact with the CM settings and to manage the pipeline also emits different events on pipeline execution.

The Adobe I/O along with custom webhooks can be used to receive the appropriate events from Cloud Manager and take the required action. Also, the Cloud Manager APIs can be invoked through Adobe I/O to perform different operations on Cloud Manager.

One of the important requirements while working with Cloud Manager is notifying the developer on the status of pipeline execution, the individual developers can subscribe to the email notification as required but there is no default option to send the notifications to group email or another collaboration channel.

Most of the teams like the notification to the Collaboration Channels e.g Microsoft Teams, the Adobe I/O along with CM API, Events, and Microsoft Teams Webhook can be used to send the Cloud Manager Notification to the Microsoft Teams Channel.

The Microsoft teams or other Collobrarion Tools helps to enable the webhooks(POST with JSON data), the webhook can be used to send the notification to the specific channel.

The notification can be managed through a custom webhook or Adobe I/O runtime, Adobe I/O runtime expects two Webhook services to receive the events(due to this the Collaboration Channel Webhook can’t be directly used in Adobe I/O Notification)
  • GET service to receive the challenge request and respond to the challenge
  • POST service to receive the different event details

The signature validation is performed as part of the POST service to ensure the request is posted only from Adobe I/O and to protect from security issues.


Some of the additional overheads we discussed e.g GET service to handle challenge and signature validation as part of the POST service can be avoided by using Adobe I/O runtime to communicate with the external webhooks.

We can use one of the below option to send the Cloud Manager notifications to the Collaboration Channels e.g. Microsoft Teams
  • Enable the Notification through Custom Webhooks hosted on Node JS — Refer Cloud Manager API and Cloud Manager API Tutorial. Somehow the step7-teams.js was failing to create the JWT token with the RS256 algorithm, to fix the issue updated step7-teams.js to use “jsonwebtoken” instead of “jsrsasign” module.
  • Enable the Notification through Adobe I/O Runtime — Refer Cloud Manager Meets Jenkins
  • Enable the Notification through Custom Webhooks hosted on AEM

Let us now see the details on how to enable the custom webhooks in AEM to send the Cloud Manager pipeline notifications to the Microsoft Teams channel, the same steps can be reused with minimal changes to send the notification to other tools e.g. Slack.


You can get all the required additional data by invoking the CM APIs’s, the Event JSON will have the URLs to get the execution details, execution details subsequently will have the URLs to get the program details, pipeline details, step details, logs, etc(Explore the input JSON’s to get the required details).


Enable Webhook for Teams Channel:


As a first step, let us register the webhooks for the Microsoft Teams channel.
Define a Channel to receive the CM pipeline notifications, Go to the Teams Channel for which the Webhook should be enabled, and click on the three dots in the upper right corner then click on Connectors.


Configure an “Incoming Webhook”


Enter a name and click on create, if required upload a custom image to display on incoming messages.


Copy the webhook URL and click on Done


Enable Adobe I/O Configurations:


Let us enable the required configurations in Adobe I/O, log in to console.adobe.io

Create a new project, edit the project and provide a custom name if required


Add Cloud Manager API to the Project


Now “Generate a key pair”


This will download a “config.zip” with a public certificate and private key(need to be configured in the AEM Service)

Assign the Cloud manager role to enable the required permissions to the API — “Cloud Manager-Developer Role” should be enough to perform the API operations.


Add Cloud Manager Events to the project


Subscribe to the required Events — I am subscribing only for “Pipeline Execution Started”, current AEM service is enabled to handle only this start event.


Enter the AEM service URL (/bin/cmnotification) — I am using ngrok to expose AEM URL externally for demo(use AEM external service URL)


Now the Adobe I/O configuration is ready, let us enable the service in AEM.

Enable Custom Webhook in AEM:


I am enabling the below servlet to accept the requests from Adobe I/O
  • GET Service to support challenge service
  • POST service to accept the Event details

Post Service:
  • Validate the Signature of the incoming request
  • Parse the Event Data
  • Generate signed(private key) JWT bearer token
  • Request for Accesses token with the JWT bearer token
  • Invoke API to receive the execution details based on the execution URL in the Event Data
  • Invoke the API to receive the pipeline details based on the pipeline URL in the Execution details(different URL's from the execution details can be used to fetch different data)
  • Notify teams channel with Teams Channel Webhook


Configure the below values into the servlet(the values can be modified through the OSGI console)

The required values can be retrieved from the Adobe I/O console


ORGANIZATION_ID
TECHNICAL_ACCOUNT_EMAIL
TECHNICAL_ACCOUNT_ID
API_KEY(CLIENT_ID)
CLIENT_SECRET
TEAMS_WEBHOOK — The Webhook URL enabled in Teams


The AEM bundle can be downloaded from here https://github.com/techforum-repo/bundles/tree/master/CMNotificationHandler

Copy the private.key file(from the config.zip file downloaded earlier) to the bundle under /META-INF/resources/keys.

Deploy the bundle to the AEM server (mvn clean install -PautoInstallBundle -Daem.port=4503)

Now the webhook service is ready

Initiate a pipeline from Cloud Manager Portal that will trigger the notification to the Teams Channel.


Currently, the notification will be sent only when the pipeline is started, extend the bundle to support different events and to fetch the additional details from different endpoints — the URL’s can be taken from the JSON response of the parent APIs. This will helps us to receive the notification into the team's channel on pipeline events. This approach may add some additional overhead to the AEM server but not required to maintain any additional platforms, Adobe I/O approach needs the license to the Adobe I/O platform.

Feel free to provide your comments.

Friday, December 4, 2020

init failed:Error: not supported argument while generating JWT token with jsrsasign - Node JS

I was getting "init failed:Error: not supported argument" error while trying to generate the JWT Token with RS256 algorithm through "jsrsasign" npm module.


const jsrsasign = require('jsrsasign')

const fs = require('fs');

const EXPIRATION = 60 * 60 // 1 hour

  const header = {

    'alg': 'RS256',

    'typ': 'JWT'

  }

  const payload = {

    'exp': Math.round(new Date().getTime() / 1000) + EXPIRATION,

    'iss': 'test',

    'sub': 'test',

    'aud': 'test',

    'custom-prop': 'test'

  }  

  const privateKey = fs.readFileSync('privateKeyfile.key); 

  const jwtToken = jsrsasign.jws.JWS.sign('RS256', JSON.stringify(header), JSON.stringify(payload), JSON.stringify(privateKey))


But the JWT token generation was successful with the HS256 algorithm


const jsrsasign = require('jsrsasign')

const fs = require('fs');

const EXPIRATION = 60 * 60 // 1 hour

  const header = {

    'alg': 'HS256',

    'typ': 'JWT'

  }

  const payload = {

    'exp': Math.round(new Date().getTime() / 1000) + EXPIRATION,

    'iss': 'test',

    'sub': 'test',

    'aud': 'test',

    'custom-prop': 'test'

  }  

  const privateKey = fs.readFileSync('privateKeyfile.key); 

  const jwtToken = jsrsasign.jws.JWS.sign('HS256', JSON.stringify(header), JSON.stringify(payload), JSON.stringify(privateKey))


To support the RS256 algorithm, changed the "jsrsasign" to  "jsonwebtoken" module.


const jwt = require('jsonwebtoken');

const fs = require('fs');

const EXPIRATION = 60 * 60 // 1 hour

const header = {

    'alg': 'HS256',

    'typ': 'JWT'

 }

  const payload = {

    'exp': Math.round(new Date().getTime() / 1000) + EXPIRATION,

    'iss': 'test',

    'sub': 'test',

    'aud': 'test',

    'custom_attr': 'test'

  }  

const privateKey = fs.readFileSync(process.env.PRIVATE_KEY); 

const jwtToken=jwt.sign(JSON.stringify(payload), privateKey,{ 'algorithm': 'RS256' });


The JWT token generation with the RS256 algorithm was successful after switching to "jsonwebtoken" module

Sunday, November 29, 2020

How to Register Servlets Dynamically in AEM?


Most of the time while working on the project we will have scenarios to dynamically register the servlets with different resource types, selector and extension, etc — registering the same servlet with different resource types, selector, extensions, etc.

Let's assume we have a servlet that is registered with a specific resource type but later we have a requirement to enable the same servlet for a different resource type, one of the common options is modifying the source code to enable the additional resource types. The code change might not be the optimal solution in most cases.

In this tutorial, let us see the simple approach to register the servlets dynamically with different resource types, selectors, and extensions.

The OSGi Metatype Annotations(OSGi Declarative Services Annotations) can be used to register the dynamic servlets.

ObjectClassDefinition — Generate a Meta Type Resource using the annotated type

AttributeDefinition — AttributeDefinition information for the annotated method.

Designate — Generate a Designate element in the Meta Type Resource for an ObjectClassDefinition using the annotated Declarative Services component.

I am creating a servlet with the name DynamicResourceTypeServlet, Created a @ObjectClassDefinition inside the servlet with required AttributeDefinitons with servlet registration 
properties

  @ObjectClassDefinition(name = "DynamicResourceTypeServlet", description = "Resource Types to Enable this Servlet")
  public static @interface Config {
    @AttributeDefinition(name = "Selectors", description = "Standard Sling servlet property")
    String[] sling_servlet_selectors() default {"dynamic"};
    
    @AttributeDefinition(name = "Resource Types", description = "Standard Sling servlet property")
    String[] sling_servlet_resourceTypes() default {""};
    
    @AttributeDefinition(name = "Methods", description = "Standard Sling servlet property")
    String[] sling_servlet_methods() default {"GET"};
    
    @AttributeDefinition(name = "Extensions", description = "Standard Sling servlet property")
    String[] sling_servlet_extensions() default {"html"};
  }


Define a Designate to the servlet to the ObjectClassDefinition.

         @Designate(ocd = DynamicResourceTypeServlet.Config.class)


Deploy the bundle and configure the required resource types, selector, and extensions from ConfigMgr(http://localhost:4503/system/console/configMgr/com.sample.servlets.DynamicResourceTypeServlet)


Now the servlet is registered with configured resource types, selectors, and extensions.

The servlet can be accessed through the below URL’s (the resource type for /content/wknd/us/en is wknd/components/page)

http://localhost:4503/content/wknd/us/en/_jcr_content.dynamic.json (JSON or txt extensions can be accessed only from jcr:content node)


Add the below dependency into the core module to enable the DS annotations

<dependency>
<groupId>org.osgi</groupId>
<artifactId>org.osgi.service.metatype.annotations</artifactId>
<version>1.4.0</version>
<scope>provided</scope>
</dependency>

The bnd-maven-plugin generate the required OSGi meta-type definitions for the annotations during compile time. The dynamic servlet registration is a useful feature that helps to register the servlets dynamically with different resource types, selectors, and extensions.

Feel free to provide your comments.

Monday, November 23, 2020

Beginners Tutorial: What is Cloud Manager for Adobe Experience Manager(AEM)?


What is Cloud Manager for AEM?

  • Cloud Manager is a Cloud service that allows customers to build, test, and deploy AEM applications hosted by Adobe Managed Services. 
  • Enables customers to manage their custom code deployments on their AEM-managed cloud environments with manageable pipeline automation and complete flexibility for their deployment timing or frequency.
  • Each customer gets its own Git Repository and their code is secure and not shared with any other Organizations.
  • Cloud Manager is only available to Adobe Managed Services customers using AEM 6.4 or above
  • Restructure the code with the latest arch type to support the Dispatcher deployment
  • Address the quality issues and adhere to the best practices for onboarding into Cloud Manager
  • Define application-specific Key Performance Indicators (KPIs)


Key Features

Self Service interface:

  • Enables customers to easily access and manage the cloud environment and CI/CD pipeline for their Experience Manager applications. 
  • Helps to define application-specific KPI's like peak page views per minute and expected response time for a page load,
  • Helps to define Roles and permissions for different team members.

CI/CD pipeline:

  • Setup optimized CI/CD pipeline to speed the delivery of custom code or updates such as adding new components on the website. 
  • Allows AEM project teams to quickly, safely, and consistently deploy code to all AEM environments hosted in AMS 
  • A thorough code scan is executed to ensure that only high-quality applications pass through to the production environment.
  • Quality checks include, code inspection, security testing, and performance testing are always performed as part of the CI/CD pipeline execution

Flexible Deployment Modes:

  • Cloud Manager offers customers flexible and configurable deployment modes so they can deliver experiences according to changing business demands
  • In automatic trigger mode, the code is automatically deployed to an environment based on specific events such as code commit. 
  • You can also schedule code deployments during specified time frames, even outside business hours.
  • Manual – trigger the deployment manually

Auto Scaling:

Cloud Manager detects the need for additional capacity when the production environment is subject to unusually high load and automatically brings additional capacity online via autoscaling feature.

The autoscaling feature will apply only to the Dispatcher/Publish tier, and will always be executed using a horizontal scaling method, with a minimum of one additional segment of a Dispatcher/Publish pair, and up to a maximum of ten segments.


Cloud Manager Benefits:

  • Enables organizations to self-manage Experience Manager in the cloud
  • Continuous Integration / Continuous Delivery of code to reduce time to market from months/weeks to days/hours
  • Cloud Manager provides continuous delivery and continuous integration for updates with zero downtime.
  • Code Inspection, performance testing, and security validation based on best practices before pushing to production to minimize production disruptions.
  • Automatic, scheduled or manual deployment even outside of business hours for maximum flexibility and control.
  • Autoscaling feature intelligently detects the need for increased capacity and automatically brings online additional Dispatcher/Publish segment(s).
  • Reduce the dependency with Adobe CSE for production deployment
  • Configure a set of content paths which will either be invalidated or flushed from the AEM Dispatcher cache for publish instances
  • Development on your local git repositories ate integrate with CM Git repository
  • API/Events/Webhooks for external tool integration through Adobe I/O


CI/CD Pipeline:

Define a set of deployment steps which are executed in sequence, the Cloud manager provides the below two major pipelines


  • Non-Prod Pipeline
  • Production Pipeline
Two types of Non-Prod pipeline
  • Code Quality Pipeline
  • Deployment Pipeline

Non-Prod - Code Quality Pipeline

  • Code Quality pipelines execute a series of steps on a code from a Git branch to build and be evaluated against Cloud Manager’s code quality scan
  • Helps to identify and fix the quality issues before planning for production deployment.
  • Code quality pipeline can be used before provisioning the environments
  • Quality report for review


Non-Prod - Deployment Pipeline


Deployment pipelines support the automated deployment of code from the Git repository to any Non-production environment, meaning any provisioned AEM environment that is not Stage or Production.


Production Pipeline


The CI/CD Production Pipeline is used to build and deploy code through Stage to the Production environment, decreasing time to value.


Build Triggers:
  • manually, 
  • with a Git commit 
  • based on a recurring schedule

The Production Deployment:
  • Application for Approval (if enabled)
  • Schedule Production Deployment (if enabled)
  • CSE Support (if enabled)


Cloud Manager Quality:

Quality checks including code inspection, performance testing, and security validation are conducted as part of the pipeline.

Code quality testing:


Cloud Manager uses SonarQube and OakPAL Content Rules to statically analyze the code and the content. It tests security, reliability, maintainability, coverage, skipped unit tests, open issues, and duplicated lines of code. Unfortunately, there is no way to add your custom rule, but you can mark some of the detected issues as false-positives.

Security testing:


Cloud Manager runs the existing AEM Security Heath Checks on stage following the deployment and reports the status through the UI. The results are aggregated from all AEM instances in the environment. If any of the Instances report a failure for a given health check, the entire Environment fails that health check.

Performance testing:


It tests both: page rendering and asset performance. After 30 minutes, it provides a report outlining i.e., CPU utilization, Disk IO Wait Time, and Page Error Rate. 

For each of the above mentioned Quality Gates, Adobe introduced the concept of the three-tier result:

Critical – these are issues identified by the gate which cause an immediate failure of the pipeline
Important – these are issues identified by the gate which cause the pipeline to enter a paused state. A deployment manager, project manager, or business owner can either override the issues, in which case the pipeline proceeds or they can accept the issues, in which case the pipeline stops with a failure
Info – these are issues identified by the gate which are provided purely for informational purposes and have no impact on the pipeline execution.

The performance and security testing are minimal you should execute some external performance and security tests if required.

Cloud Manager Roles

Business Owner - Primary user who completes the initial Cloud Manager setup. Responsible for defining KPIs, approving production deployments, and overriding important 3-tier failures.

Program Manager - Uses Cloud Manager to perform team setup, review status, and view KPIs. May approve important 3-tier failures.

Deployment Manager - Manages the deployment operations. Uses Cloud Manager to execute stage and production deployments. May approve important 3-tier failures. Has access to Git repository.


Cloud Manager API


  • The Cloud Manager API enables Cloud Manager customers to interact with the same underlying capabilities exposed through the web UI in a fully programmatic fashion
  • This allows for the integration of the Cloud Manager Continuous Integration / Continuous Delivery pipeline with other systems.
  • The API’s are managed through Adobe I/O 
  • By using Adobe I/O Events, Cloud Manager can send external applications notifications when key events occur

Sample Use Cases

  • Starting the Cloud Manager CI/CD pipeline from an external system.
  • Executing additional tests between the standard Cloud Manager performance tests and the ultimate production deployment.
  • Triggering additional activities after the pipeline execution is complete or a specific step has been completed, for example
  • CDN cache invalidation once the production deployment is finished.
  • Deploying related applications to non-managed Services systems.
  • Notifying on other channels (e.g. Slack, Microsoft Teams).
  • Creating issue reports in bug tracking systems (e.g. Atlassian JIRA) on pipeline failures

Reference - https://www.adobe.io/apis/experiencecloud/cloud-manager/api-reference.html#!AdobeDocs/cloudmanager-api-docs/master/swagger-specs/api.yaml

Cloud Manager Notifications

Cloud Manager allows the user to receive notifications when the production pipeline starts and completes (successfully or unsuccessfully), at the start of a production deployment, as well as when the Go-Live Approval and Scheduled steps are reached.

The notifications appear in a sidebar in Cloud Manager UI

Email Notifications:

By default, notifications are available in the web user interface across Adobe Experience Cloud solutions. Individual users can also opt for these notifications to be sent through email, either on an immediate or digest basis.

External Tool Notification:

Notifying on other channels (e.g. Slack, Microsoft Teams) though CM API and Events

Cloud Manager Environment Flow


Environment specific Cloud Manager Git branches for non-stage and prod environments i.e. Dev and UAT

Non-Prod Deployment pipeline for  non-stage and prod environments i.e. Dev and UAT

Production pipeline for stage and Prod deployment through master branch

The development will happen in the customer-specific git repository and merged with the Cloud Manager git repository whenever required.

Cloud Manager now supports building customer projects with both Java 8 and Java 11. By default, projects are built using Java 8. Customers who intend to use Java 11 in their projects can do so using the Apache Maven Toolchains plugin.

You can build the End to End CI/CD pipeline with your local git repository and if required external Ci?CD tools e.g. Jenkins and the CM APIs.