This tutorial explains how to use Adobe Granite OAuth 2.0 Server functionalities to grant resource access to external clients in AEM(Adobe Experience Manager).
The OAuth 2.0 protocol allows the users to grant a third-party web site or application access to the user's protected resources without necessarily revealing their long term credentials or even their identity.
OAuth 2.0 allows clients to access user’s (resource owner’s) resources on resource servers via authorization servers in a secure, reliable, and efficient manner.
Adobe granite OAuth 2.0 server implementation(com.adobe.granite.oauth.server) provides the support for OAuth 2.0 server functionalities in AEM.
Access tokens are the thing that applications use to make API requests on behalf of a user. The access token represents the authorization of a specific application to access specific parts of a user’s data. The external application should receive the access token to access the protected user resources from AEM.
Grants
The OAuth 2.0 specification describes a number of grants (“methods”) for a client application to acquire an access token (which represents a user’s permission for the client to access their data) which can be used to authenticate a request to a protected resource.
The Granite OAuth Server supports the below grant types
- Authorization Code
- Refresh Token
- JWT Bearer Token
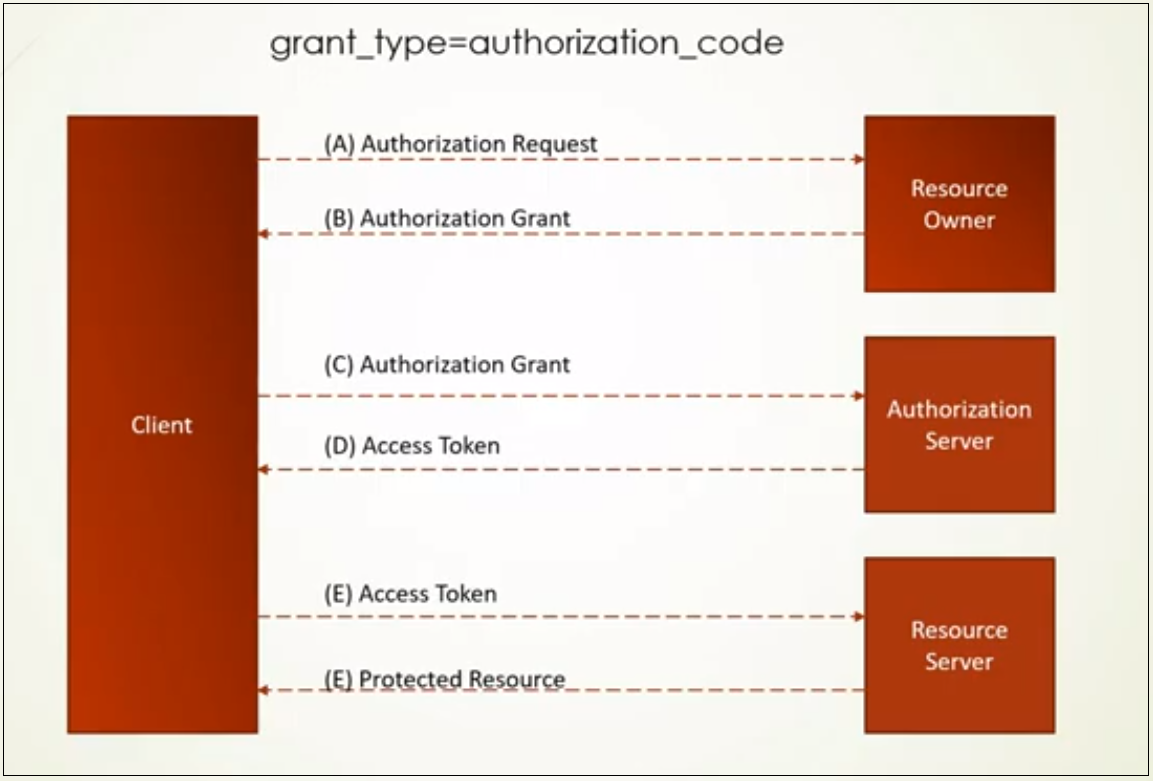
Authorization Code:
The authorization code is a temporary code that the client will exchange for an access token. The code itself is obtained from the authorization server where the user gets a chance to see what the information the client is requesting, and approve or deny the request.
When the user authorizes the application, they are redirected back to the application with a temporary code in the URL. The application exchanges that code for the access token. When the application makes the request for the access token. The application retrieves the required resources through the access token, the access token is short-lived e.g 1 hr.

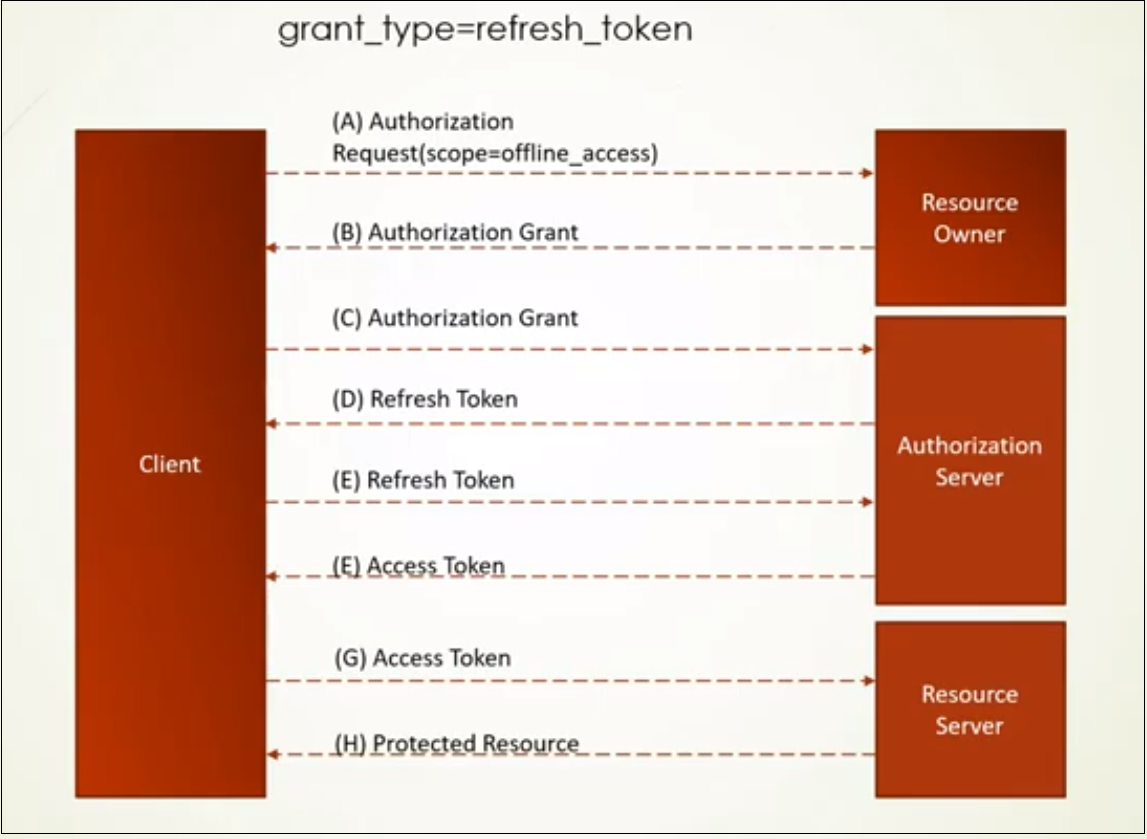
Refresh Token
The Refresh Token grant type is used by clients to exchange a refresh token for an access token when the access token has expired.
This allows clients to continue to have a valid access token without further interaction with the user.
The user grants the approval once to get the refresh token, subsequently, the application request the access token whenever required and access the required resources without the user's online interaction.

JWT Bearer Token
JWT Bearer Token is mainly used for server to server integration, this will helps us to enable the server to server integration without the resource owner interaction e.g retrieve or upload files without user interactions.
The client forms the JWT Token with specific configuration data, the token should be signed by the AEM OAuth Client private key, and exchanges the token to the server to get the access token, the access token can be used to retrieve the protected resources.


Scopes
The scope is a mechanism in OAuth 2.0 to limit an application’s access to a user’s account. An application can request one or more scopes, this information is then presented to the user in the consent screen, and the access token issued to the application will be limited to the scopes granted.
The default scopes supported in AEM
- Profile — Get the basic profile details on user authorization.
- Offline Access — Access the resources offline without resource owner interaction, the offline Access scope should be used with other scopes to receive the offline refresh token.
- Replicate — Replicate the resources.
Custom Scopes
AEM supports to define custom scopes to provide additional access to the external applications, the extensible OAuth scopes allow access control the resources from a client application that is authorized by an end-user.
To define the custom scopes
- Define a class implements com.adobe.granite.oauth.server.Scope or com.adobe.granite.oauth.server.ScopeWithPrivileges, extended Scope interface for scopes that defined required privileges on their content paths. The privileges defined in the scope will be created by the OAuth Server using the oauthservice user. It is the responsibility of the scope developer to ensure that oauthservice has the necessary privileges to do this.
- Implement the getName and provide the name for the scope e.g “dam_read”
- Implement the getDescription and provide the name for the scope e.g “Read DAM Assets”
- Implement the getResourcePath and provide the parent resource path that is enabled for the custom scope e.g /content/dam/digital, the scope enables the access to the child resources under /content/dam/digital based on the privileges defined in the scope.
- Implement the getPrivileges and provide the required privileges to execute this scope e.g jcr:read, rep:write, etc
OAuth End Points
OAuth Client Registration — http://localhost:4502/libs/granite/oauth/content/clients.html
Resource Owner Authorization Page — http://localhost:4502/oauth/authorize?response_type=code&client_id=<ClientId>&scope=<scope>&redirect_uri=<Redirect URI>
Token End Point — http://localhost:4502/oauth/token
Profile Data — http://localhost:4502/libs/oauth/profile
Revoke Token — http://localhost:8080/libs/granite/oauth/revoke
Let us now enable the required configurations to enable different scenarios.
Enable OAuth Server Authentication Handler
As a first step enable the OAuth Server Authentication Handler, by default AEM won't enable the OAuth Server Authentication handler.
System Console →Main →JASS

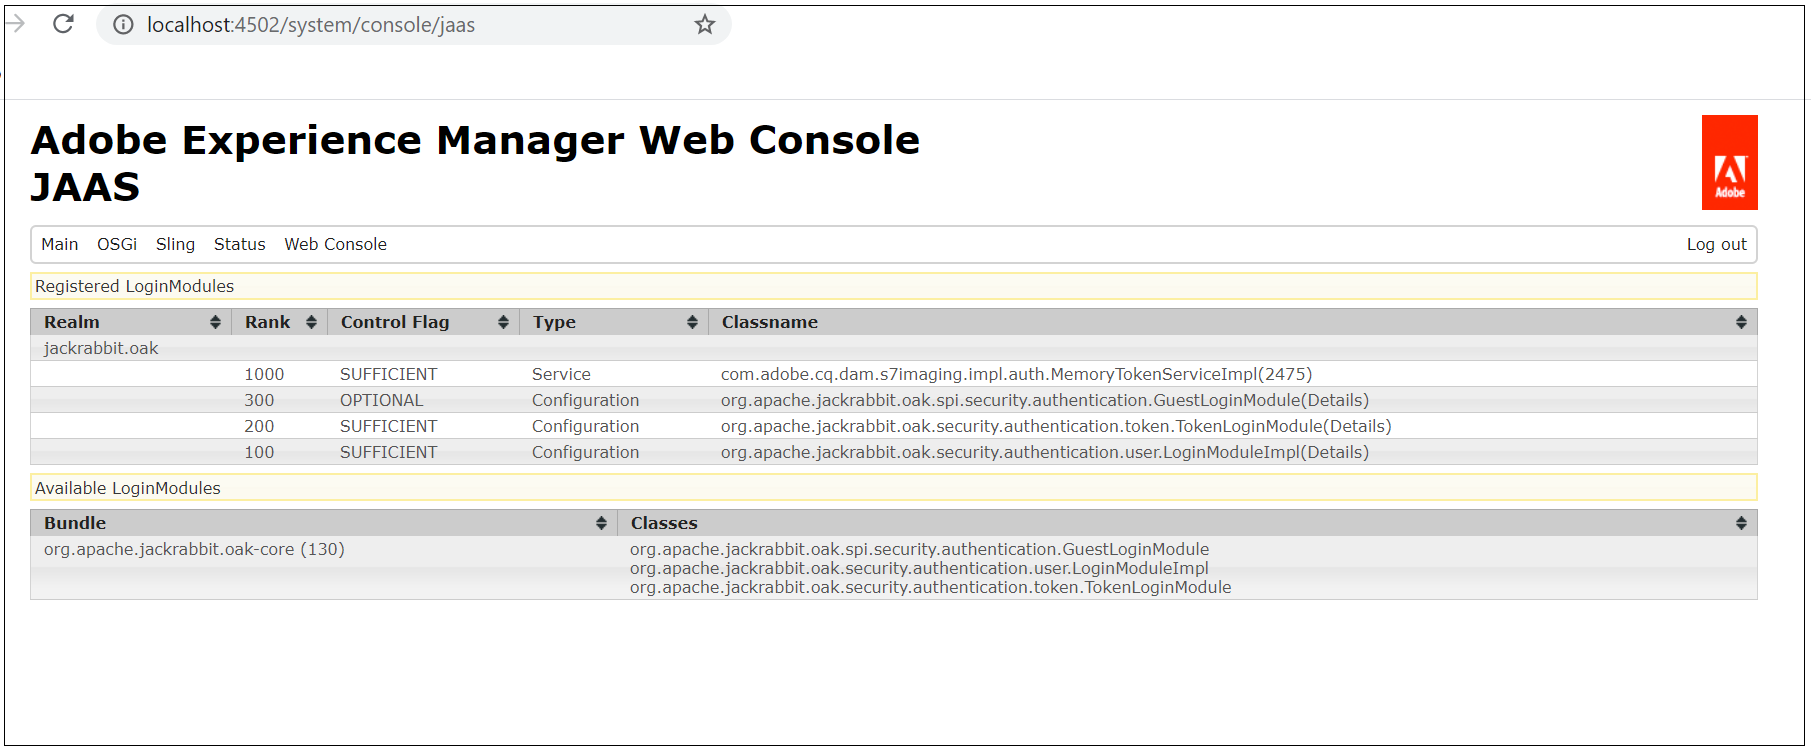
To enable the OAuth Server Authentication Handler, change the “jaas.ranking.name” value to 1100 in “Adobe Granite OAuth Server Authentication Handler” and save the configuration — http://localhost:4502/system/console/configMgr/com.adobe.granite.oauth.server.auth.impl.OAuth2ServerAuthenticationHandler


OAuth Server Authentication Handler is enabled now.


Register OAuth Client
Register a new OAuth client through http://localhost:4502/libs/granite/oauth/content/clients.html — every external application requires OAuth authentication should be registered as a OAuth client in AEM.
Enter a name and redirect URI — After a user successfully authorizes an application, the OAuth server will redirect the user back to the application with an authorization code to the configured redirect URL.

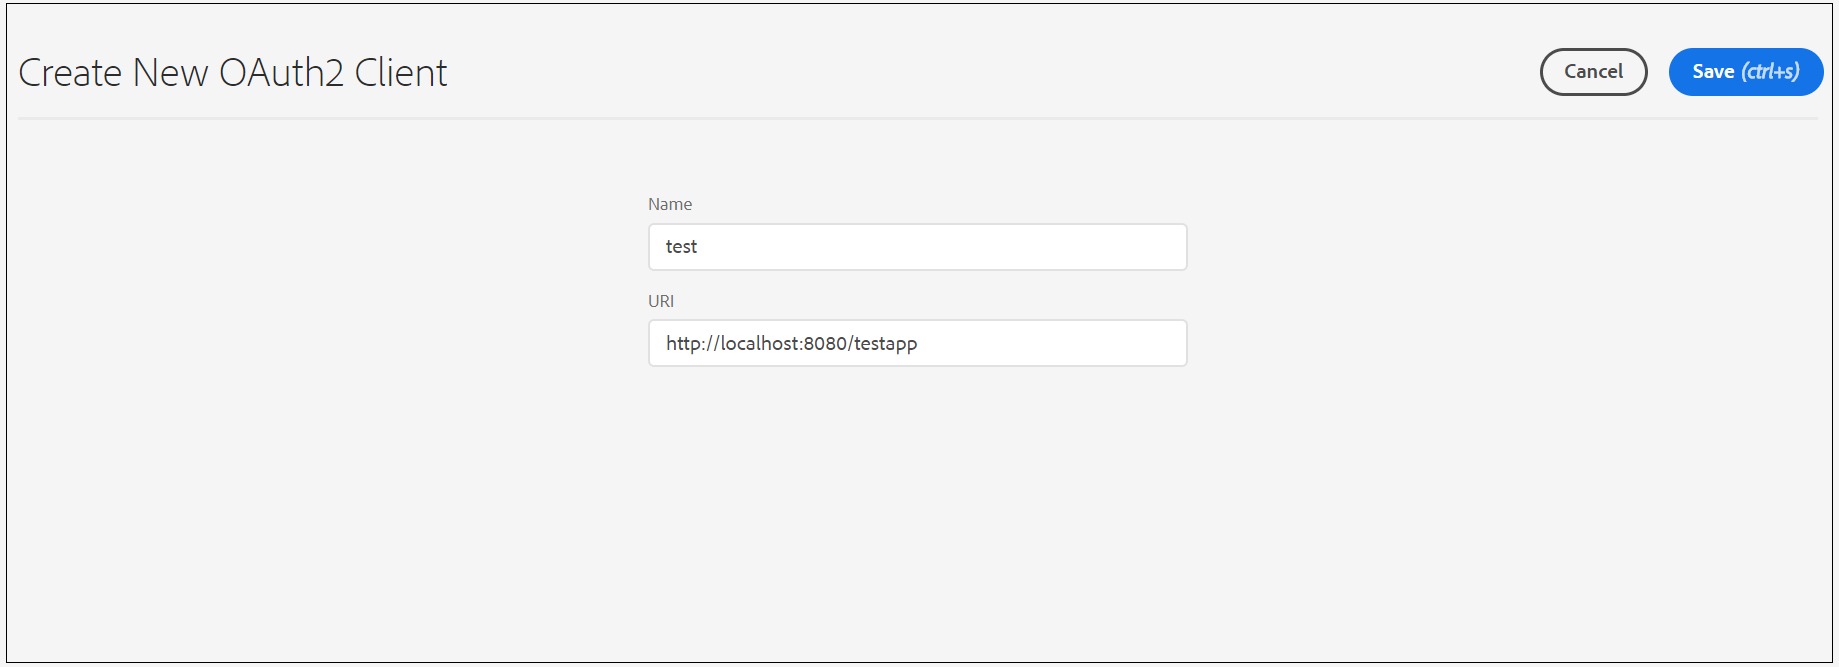
Copy the client id and client secret and keep them safe.


Setup Demo User
Setup up a demo user with all possible profile data and required permissions — complete read-only access and full access for “/content/dam/digital”


Profile Data
Let us now see how to retrieve the profile data of the user.
As a first step, access the authorization URL(in real scenario redirect the user to authorization URL when the user clicks on a link in the application) — http://localhost:4502/oauth/authorize?response_type=code&client_id=jgqd0beimj5q4ofi281cc56i6a-_d-xzn-e&scope=profile&redirect_uri=http://localhost:8080/testapp
If required, pass an additional parameter with name state with any random value e.g state=AlbinTest, the same state value will be returned in the response. This will helps us to verify the integrity of the data.
Login with the demo user created in the earlier step, this will display the authorization screen with permissions granted to the external application.

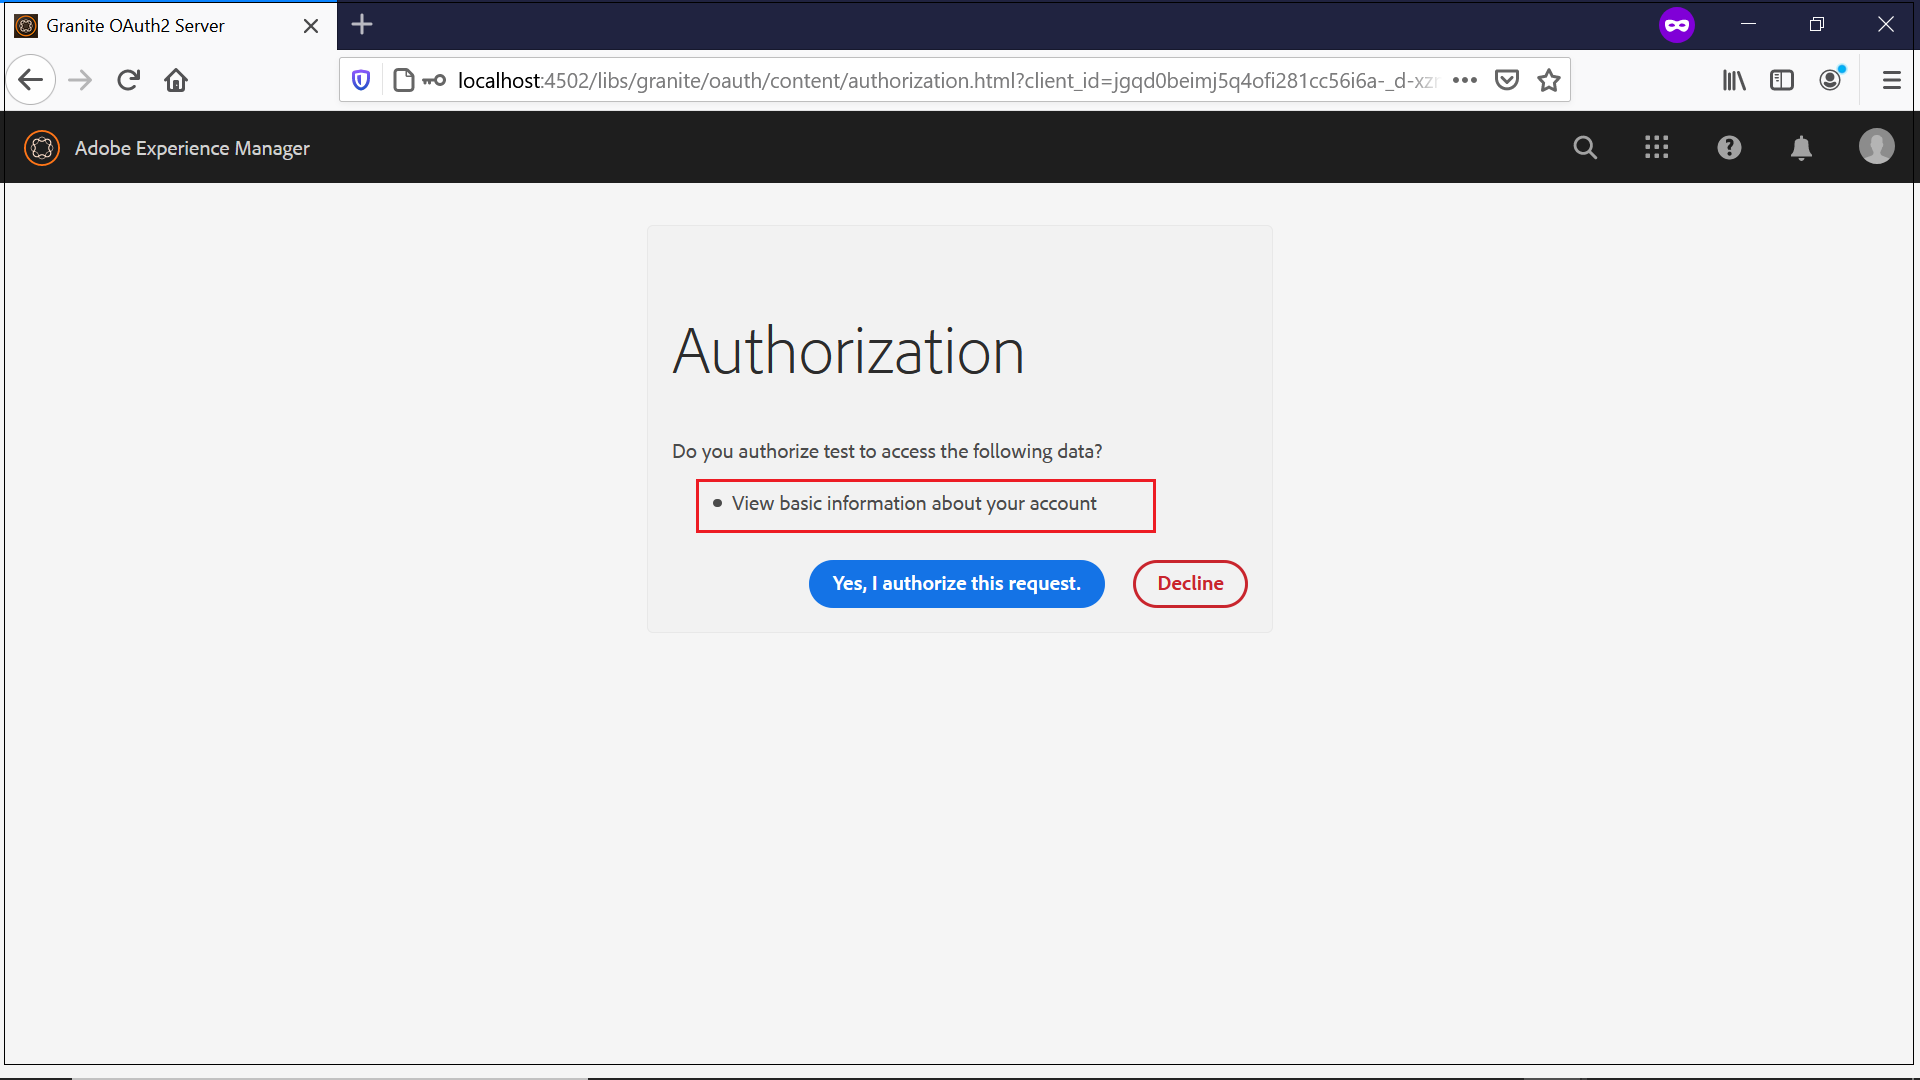
Now the user authorize the request, the user will be returned to the client application with authorization code as the parameter.
Now get the access token through the authorization code, I am using curl command for demo
curl -H “Content-Type:application/x-www-form-urlencoded” -d “code=eyJhbGciOiJIUzI1NiIsInR5cCI6IkpXVCJ9.eyJhdWQiOiJqZ3FkMGJlaW1qNXE0b2ZpMjgxY2M1Nmk2YS1fZC14em4tZSIsInN1YiI6ImFsYmluIiwiZXhwIjoxNTk3MTEzMTI4LCJpYXQiOjE1OTcxMTI1MjgsInNjb3BlIjoicHJvZmlsZSIsImN0eSI6ImNvZGUifQ.TbsP8xptOPwcYpJKK-STkVJ2E6_62MbhRf0_2otV21o&grant_type=authorization_code&redirect_uri=http://localhost:8080/testapp&client_id=jgqd0beimj5q4ofi281cc56i6a-_d-xzn-e&client_secret=mpuprfm0rob20ed5cv87bhfoe4" http://localhost:4502/oauth/token
{   "access_token":"eyJhbGciOiJIUzI1NiIsInR5cCI6IkpXVCJ9.eyJhdWQiOiJqZ3FkMGJlaW1qNXE0b2ZpMjgxY2M1Nmk2YS1fZC14em4tZSIsImlzcyI6IkFkb2JlIEdyYW5pdGUiLCJzdWIiOiJhbGJpbiIsImV4cCI6MTU5NzExNzE4MywiaWF0IjoxNTk3MTEzNTgzLCJzY29wZSI6InByb2ZpbGUiLCJjdHkiOiJhdCJ9.PKBvXeFU3UDKHPFh23Nq2D6qSMa4GkMkPBYaXPoVFlM","expires_in":3600
}
Now get the profile data through the access token
curl -H “Authorization: Bearer eyJhbGciOiJIUzI1NiIsInR5cCI6IkpXVCJ9.eyJhdWQiOiJqZ3FkMGJlaW1qNXE0b2ZpMjgxY2M1Nmk2YS1fZC14em4tZSIsImlzcyI6IkFkb2JlIEdyYW5pdGUiLCJzdWIiOiJhbGJpbiIsImV4cCI6MTU5NzExNjUwMywiaWF0IjoxNTk3MTEyOTAzLCJzY29wZSI6InByb2ZpbGUiLCJjdHkiOiJhdCJ9.c-A9wVja2JGfdDURPirLQPlZSisa8lAIlcTvBduhaFQ” http://localhost:4502/libs/oauth/profile
{
   "gender_xss":"male",
   "gender":"male",
   "aboutMe_xss":"test",
   "aboutMe":"test",
   "phoneNumber_xss":"123456",
   "phoneNumber":"123456",
   "street_xss":"test",
   "street":"test",
   "city_xss":"test",
   "city":"test",
   "email_xss":"[email protected]",
   "email":"[email protected]",
   "title_xss":"Mr.",
   "title":"Mr.",
   "familyName_xss":"Issac",
   "familyName":"Issac",
   "country_xss":"United States",
   "country":"United States",
   "givenName_xss":"Albin",
   "givenName":"Albin",
   "postalCode_xss":"123456",
   "postalCode":"123456"
}
DAM Read & Write — Custom Scopes
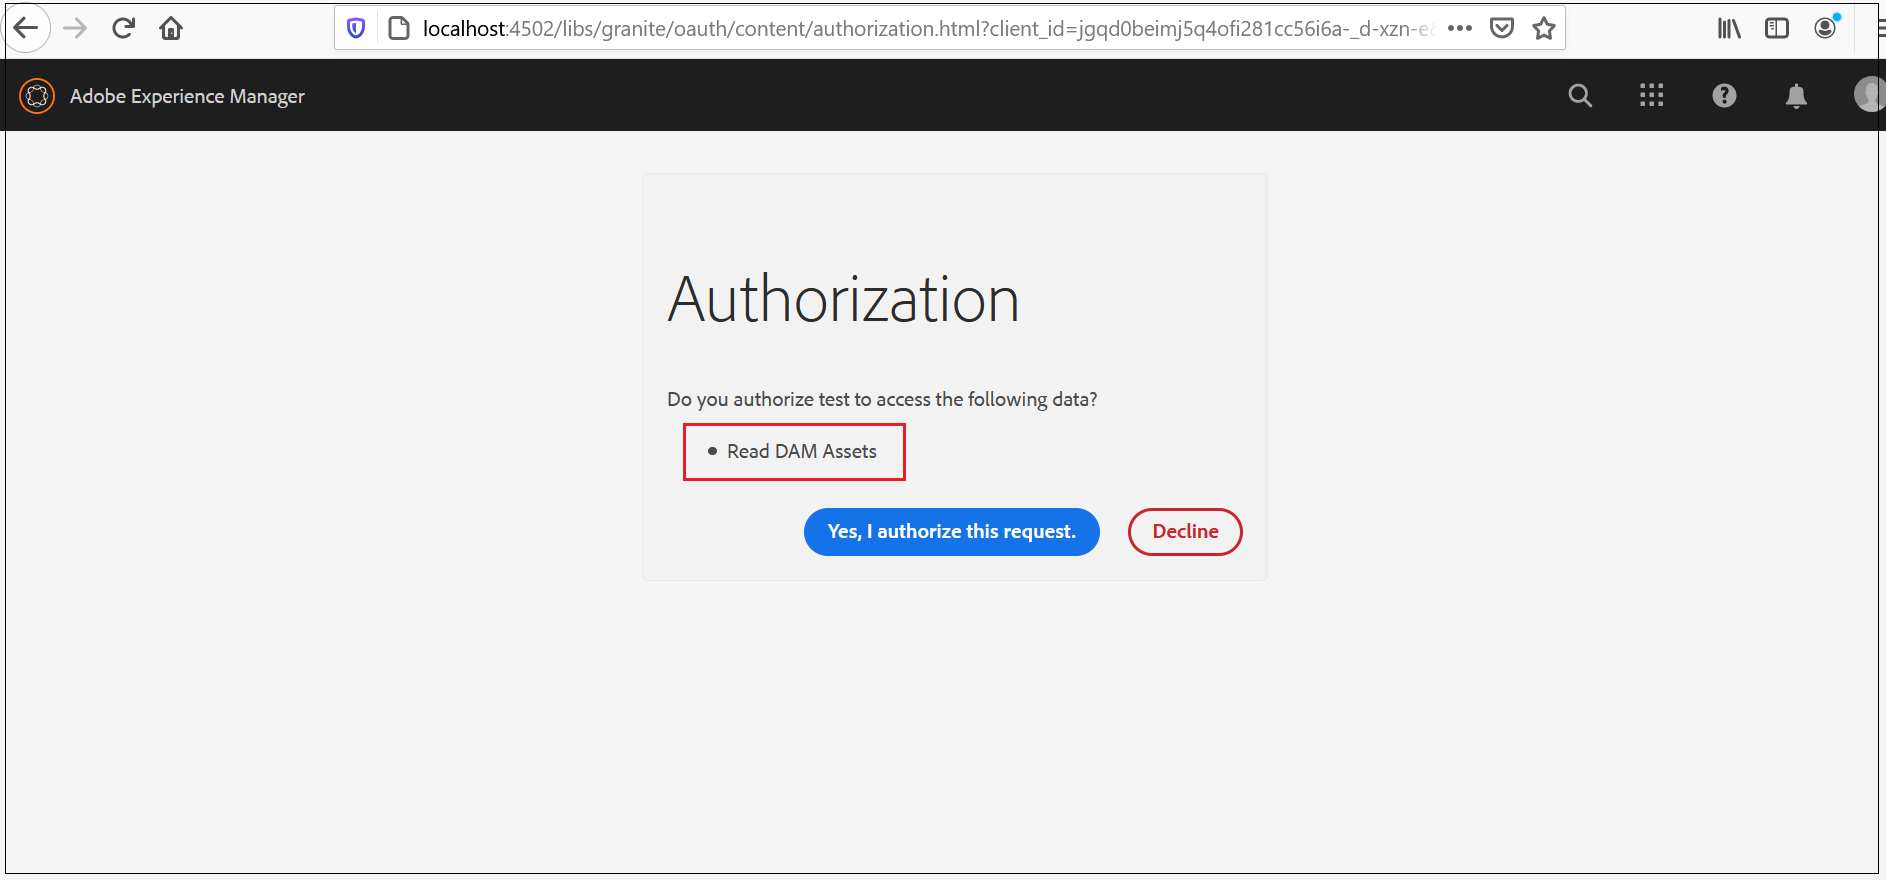
Let us now enable a custom scope to read the DAM data, configure as required and deploy the scope
import javax.servlet.http.HttpServletRequest;import org.apache.jackrabbit.api.security.user.User;
import org.osgi.service.component.annotations.Component;
import com.adobe.granite.oauth.server.Scope;
import com.adobe.granite.oauth.server.ScopeWithPrivileges;@Component(service=Scope.class)
public class DAMReadScope implements ScopeWithPrivileges{

 private static final String DAM_RESOURCE_URI="/content/dam/digital";
 private static final String DAM_RESOURCE_READ_SCOPE_NAME="dam_read";

 public DAMReadScope()
 {

 }@Override
 public String getDescription(HttpServletRequest arg0) {
  return "Read DAM Assets";
 }@Override
 public String getEndpoint() {
  return null;
 }@Override
 public String getName() {
  return DAM_RESOURCE_READ_SCOPE_NAME;
 }@Override
 public String getResourcePath(User user) {
  return DAM_RESOURCE_URI;
 }@Override
 public String[] getPrivileges() {
   return new String[] {"jcr:read"};
 }}
Enable the required access to “oauthservice” service user, I am enabling the read access for root folder “/”, and full access for /content/dam/digital folder(ReadACL is mandatory for the folder configured in the Scope).


As a first step, access the authorization URL and receive the authorization code(refer the profile data section for more details)

Receive the Access Token with the authorization code
curl -H “Content-Type:application/x-www-form-urlencoded” -d “code=eyJhbGciOiJIUzI1NiIsInR5cCI6IkpXVCJ9.eyJhdWQiOiJqZ3FkMGJlaW1qNXE0b2ZpMjgxY2M1Nmk2YS1fZC14em4tZSIsInN1YiI6ImFsYmluIiwiZXhwIjoxNTk3MTE4NjU2LCJpYXQiOjE1OTcxMTgwNTYsInNjb3BlIjoiZGFtX3JlYWQiLCJjdHkiOiJjb2RlIn0.K6e3wfk1Kz0BWBPm85-nUf2TbOuqtNOBr2ZlHtGr5iI&grant_type=authorization_code&redirect_uri=http://localhost:8080/testapp&client_id=jgqd0beimj5q4ofi281cc56i6a-_d-xzn-e&client_secret=mpuprfm0rob20ed5cv87bhfoe4" http://localhost:4502/oauth/token
Now retrieve the asset data through the access token
curl -H “Authorization: Bearer eyJhbGciOiJIUzI1NiIsInR5cCI6IkpXVCJ9.eyJhdWQiOiJnNmIzajl2aTk4bDM5ZmFvNzFpdmc0aDlraC1xM2dydGdoaCIsImlzcyI6IkFkb2JlIEdyYW5pdGUiLCJzdWIiOiJhbGJpbm9hdXRoIiwiZXhwIjoxNTk3MjA5MTM5LCJpYXQiOjE1OTcyMDU1MzksInNjb3BlIjoiZGFtX3JlYWQiLCJjdHkiOiJhdCJ9.kVtKYwG_d-CyQNTCF1D1PaeBoUEZ_JCQAj8AqOk9D74” http://localhost:4502/content/dam/digital/en/asset.jpg > asset.jpg
The specified asset is now downloaded to local machine.
Let us now enable a custom scope to upload the DAM data, configure as required and deploy the scope
import javax.servlet.http.HttpServletRequest;import org.apache.jackrabbit.api.security.user.User;
import org.osgi.service.component.annotations.Component;
import com.adobe.granite.oauth.server.Scope;
import com.adobe.granite.oauth.server.ScopeWithPrivileges;@Component(service=Scope.class)
public class DAMWriteScope implements ScopeWithPrivileges{

 private static final String DAM_RESOURCE_URI="/content/dam/digital";
 private static final String DAM_RESOURCE_WRITE_SCOPE_NAME="dam_write";

 public DAMWriteScope()
 {

 }@Override
 public String getDescription(HttpServletRequest arg0) {
  return "Upload DAM Assets";
 }@Override
 public String getEndpoint() {
  return null;
 }@Override
 public String getName() {
  return DAM_RESOURCE_WRITE_SCOPE_NAME;
 }@Override
 public String getResourcePath(User user) {
  return DAM_RESOURCE_URI;
 }@Override
 public String[] getPrivileges() {
   return new String[] {"rep:write","jcr:read"};
 }}
The required access to the service user — “oauthservice” is already enabled.
As a first step, access the authorization URL and receive the authorization code(refer the profile data section for more details)

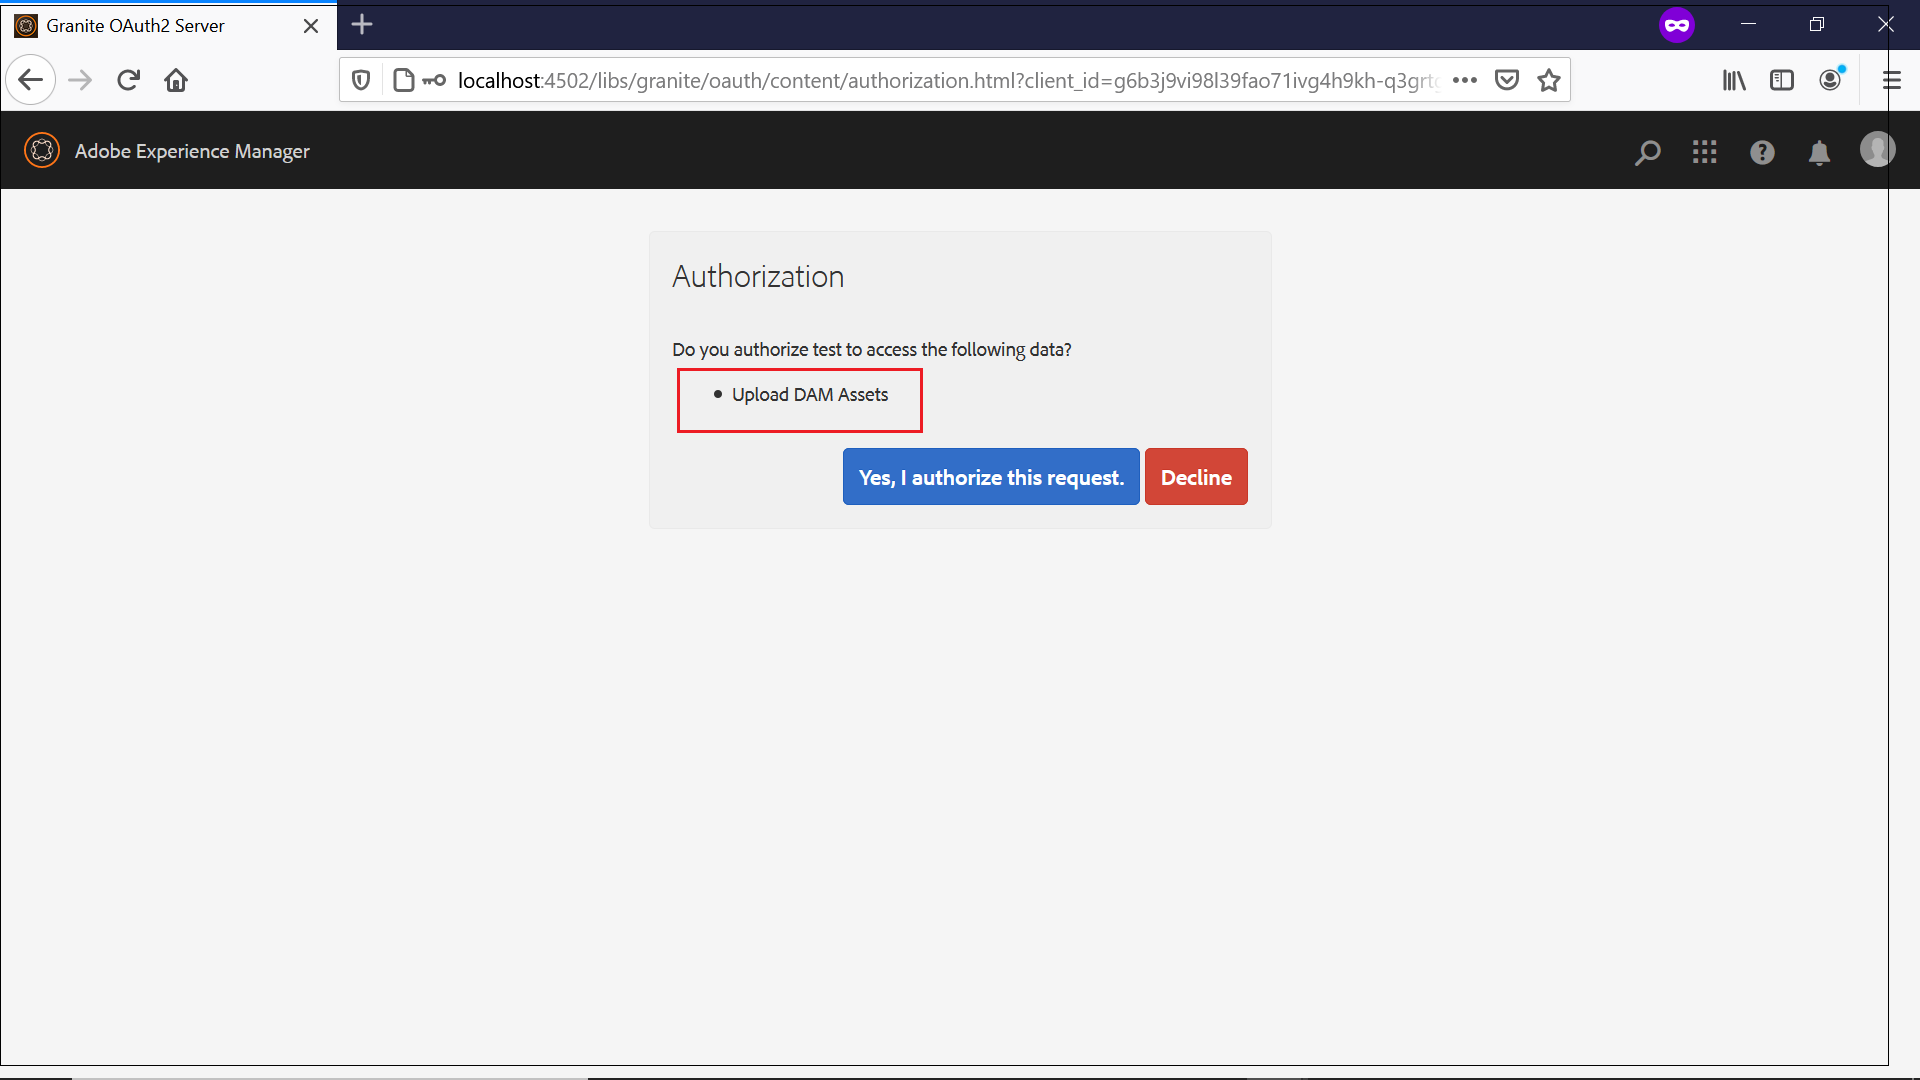
Receive the Access Token with the authorization code
curl -H “Content-Type:application/x-www-form-urlencoded” -d “code=eyJhbGciOiJIUzI1NiIsInR5cCI6IkpXVCJ9.eyJhdWQiOiJnNmIzajl2aTk4bDM5ZmFvNzFpdmc0aDlraC1xM2dydGdoaCIsInN1YiI6ImFsYmlub2F1dGgiLCJleHAiOjE1OTcyNjEyNTUsImlhdCI6MTU5NzI2MDY1NSwic2NvcGUiOiJkYW1fd3JpdGUiLCJjdHkiOiJjb2RlIn0.L-8AU3lLDvwG5rR9U6G4XynEbeb3ktICzaG_mC2NfIE&grant_type=authorization_code&redirect_uri=http://localhost:8080/testapp&client_id=g6b3j9vi98l39fao71ivg4h9kh-q3grtghh&client_secret=83lsvr0glu3opumdthijrnudl8" http://localhost:4502/oauth/token
Now upload the asset data to /content/dam/digital folder through the access token
curl -H “Authorization: Bearer eyJhbGciOiJIUzI1NiIsInR5cCI6IkpXVCJ9.eyJhdWQiOiJnNmIzajl2aTk4bDM5ZmFvNzFpdmc0aDlraC1xM2dydGdoaCIsImlzcyI6IkFkb2JlIEdyYW5pdGUiLCJzdWIiOiJhbGJpbm9hdXRoIiwiZXhwIjoxNTk3MjY0NjA4LCJpYXQiOjE1OTcyNjEwMDgsInNjb3BlIjoiZGFtX3dyaXRlIiwiY3R5IjoiYXQifQ.G2C7KLuy7nQ8PlCHfEotxga_p10U_w_acazAe9y0MJo” -X POST -F file=@C:\Users\albin\Desktop\salesforce-cms-connect-to-aem http://localhost:4502/content/dam/digital.createasset.html
The asset is successfully uploaded now.


Offline Access
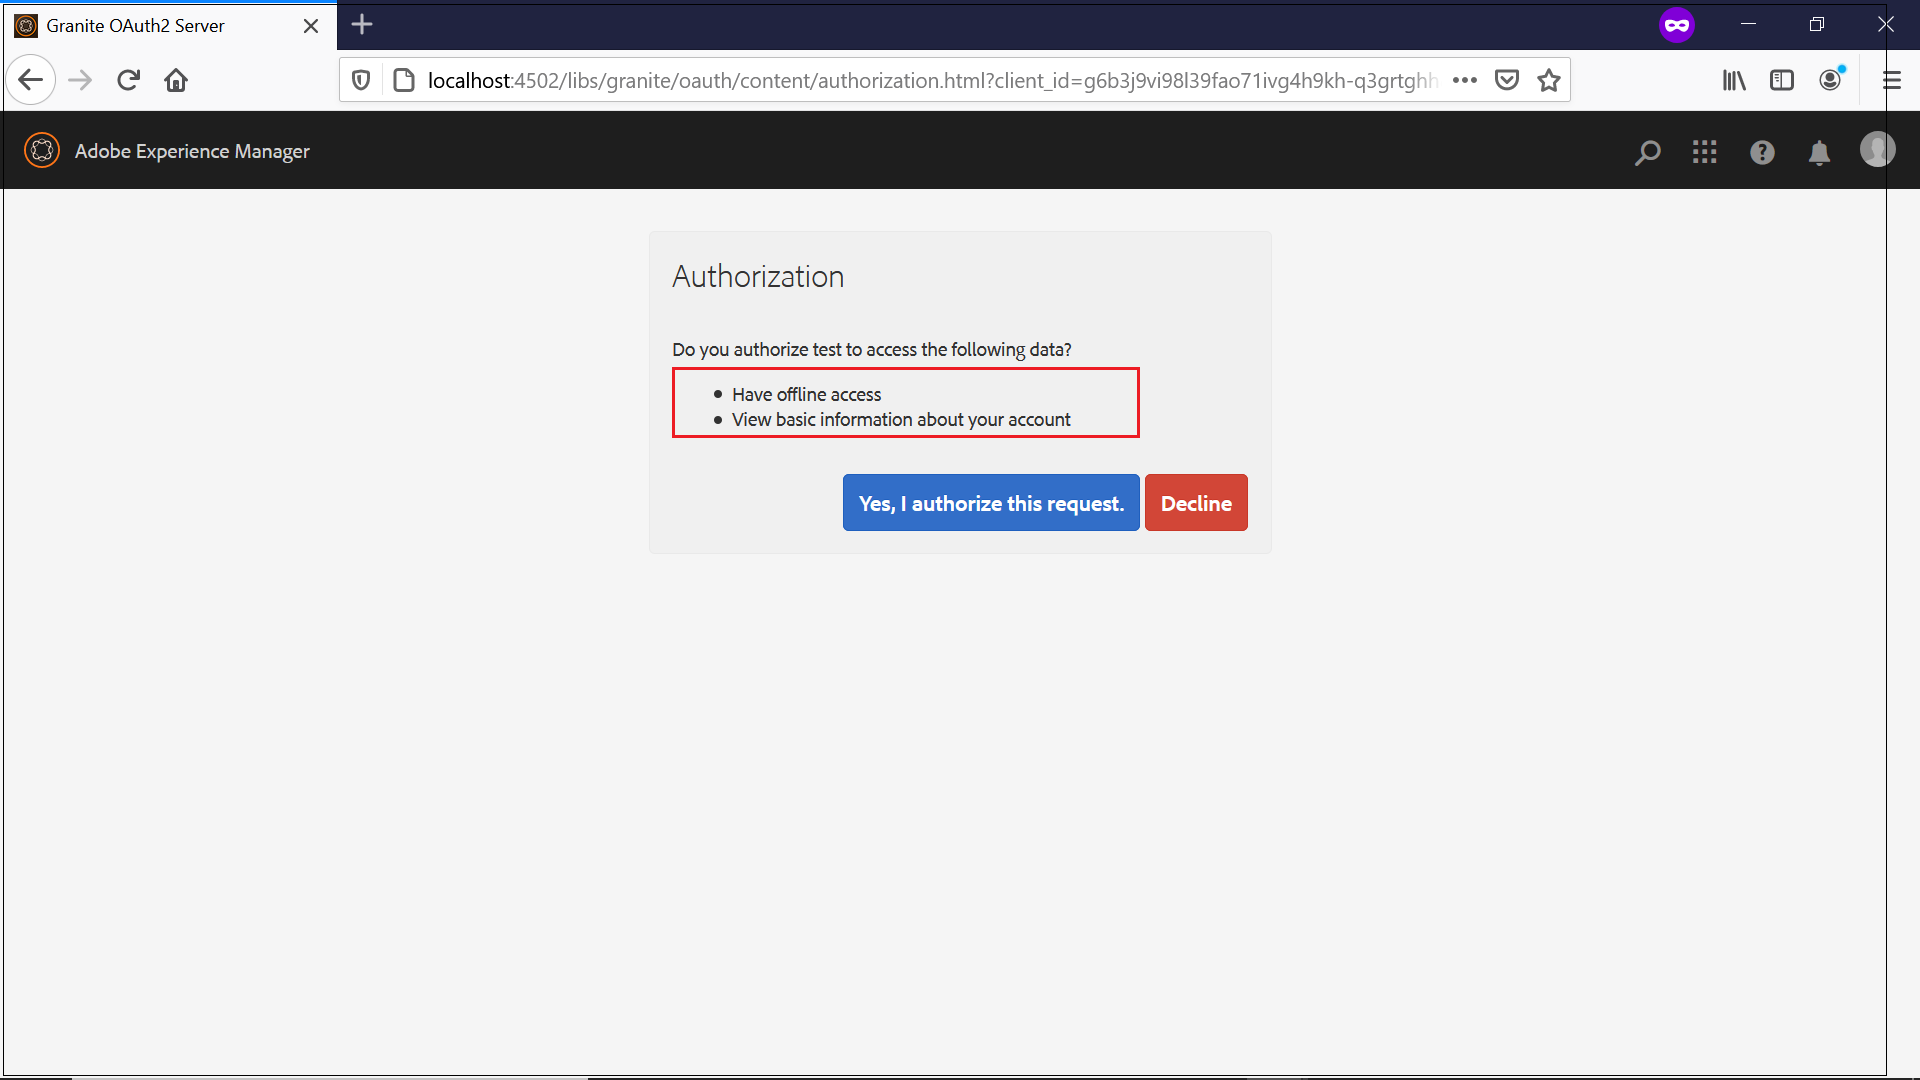
Let us now retrieve the offline token to access the resources without resource owner interaction every time. I am going to receive the offline access token to fetch the user’s profile data whenever required. The offline_access scope should be combined with other scopes e.g profile to fetch the offline token that can be used whenever required to fetch authorized scope data offline e.g profile
As a first step, access the authorization URL and receive the authorization code to fetch the basic user profile data offline(refer the profile data section for more details)

Receive the Access Token/refresh token(offline access token)with the authorization code
curl -H “Content-Type:application/x-www-form-urlencoded” -d “code=eyJhbGciOiJIUzI1NiIsInR5cCI6IkpXVCJ9.eyJhdWQiOiJnNmIzajl2aTk4bDM5ZmFvNzFpdmc0aDlraC1xM2dydGdoaCIsInN1YiI6ImFsYmlub2F1dGgiLCJleHAiOjE1OTcyNjQ0MDksImlhdCI6MTU5NzI2MzgwOSwic2NvcGUiOiJvZmZsaW5lX2FjY2Vzcyxwcm9maWxlIiwiY3R5IjoiY29kZSJ9.ktynif6GQOlldITxizCioLntyj5SiI8QCOW_KcyODWI&grant_type=authorization_code&redirect_uri=http://localhost:8080/testapp&client_id=g6b3j9vi98l39fao71ivg4h9kh-q3grtghh&client_secret=83lsvr0glu3opumdthijrnudl8" http://localhost:4502/oauth/token
{"access_token":"eyJhbGciOiJIUzI1NiIsInR5cCI6IkpXVCJ9.eyJhdWQiOiJnNmIzajl2aTk4bDM5ZmFvNzFpdmc0aDlraC1xM2dydGdoaCIsImlzcyI6IkFkb2JlIEdyYW5pdGUiLCJzdWIiOiJhbGJpbm9hdXRoIiwiZXhwIjoxNTk3MjY3NDk4LCJpYXQiOjE1OTcyNjM4OTgsInNjb3BlIjoib2ZmbGluZV9hY2Nlc3MscHJvZmlsZSIsImN0eSI6ImF0In0.3qu1Qi7zk931senoXVdwmvlnWSxabks0Xfdnm0Y95LM","refresh_token":"eyJhbGciOiJIUzI1NiIsInR5cCI6IkpXVCJ9.eyJhdWQiOiJnNmIzajl2aTk4bDM5ZmFvNzFpdmc0aDlraC1xM2dydGdoaCIsImlzcyI6IkFkb2JlIEdyYW5pdGUiLCJzdWIiOiJhbGJpbm9hdXRoIiwiZXhwIjoxNjI4Nzk5ODk4LCJpYXQiOjE1OTcyNjM4OTgsInNjb3BlIjoib2ZmbGluZV9hY2Nlc3MscHJvZmlsZSIsImN0eSI6InJ0In0.ePDaFSO19PAIZdhKXCkmnv0i4kzf1g49yNYM6cUrsfM","expires_in":3600}The access token is valid for 3600 sec and can be used to receive the profile data within that time limit, the refresh_token can be used to receive the access_token whenever required to fetch the user’s profile data without the interaction from user.
curl -H “Content-Type:application/x-www-form-urlencoded” -d “refresh_token=eyJhbGciOiJIUzI1NiIsInR5cCI6IkpXVCJ9.eyJhdWQiOiJnNmIzajl2aTk4bDM5ZmFvNzFpdmc0aDlraC1xM2dydGdoaCIsImlzcyI6IkFkb2JlIEdyYW5pdGUiLCJzdWIiOiJhbGJpbm9hdXRoIiwiZXhwIjoxNjI4Nzk5ODk4LCJpYXQiOjE1OTcyNjM4OTgsInNjb3BlIjoib2ZmbGluZV9hY2Nlc3MscHJvZmlsZSIsImN0eSI6InJ0In0.ePDaFSO19PAIZdhKXCkmnv0i4kzf1g49yNYM6cUrsfM&grant_type=refresh_token&redirect_uri=http://localhost:8080/testapp&client_id=g6b3j9vi98l39fao71ivg4h9kh-q3grtghh&client_secret=83lsvr0glu3opumdthijrnudl8" http://localhost:4502/oauth/token
{"access_token":"eyJhbGciOiJIUzI1NiIsInR5cCI6IkpXVCJ9.eyJhdWQiOiJnNmIzajl2aTk4bDM5ZmFvNzFpdmc0aDlraC1xM2dydGdoaCIsImlzcyI6IkFkb2JlIEdyYW5pdGUiLCJzdWIiOiJhbGJpbm9hdXRoIiwiZXhwIjoxNTk3MjY3OTAxLCJpYXQiOjE1OTcyNjQzMDEsInNjb3BlIjoib2ZmbGluZV9hY2Nlc3MscHJvZmlsZSIsImN0eSI6ImF0In0.hYVOVztkzXDhkpHVF3UlfGvS6NFfVhBYLlpr6fn1Gow","expires_in":3600}The access token can be used to fetch the user’s profile data(or other scope data authorized by users)
JWT Bearer Token— Server to Server integration
Let us now see how to use the JWT Bearer token to enable the server to server integration without the resource owner’s intervention.
As a first step, download the AEM OAuth client private key to sign the JWT bearer token also note the private key password(keep the private key and password safe)

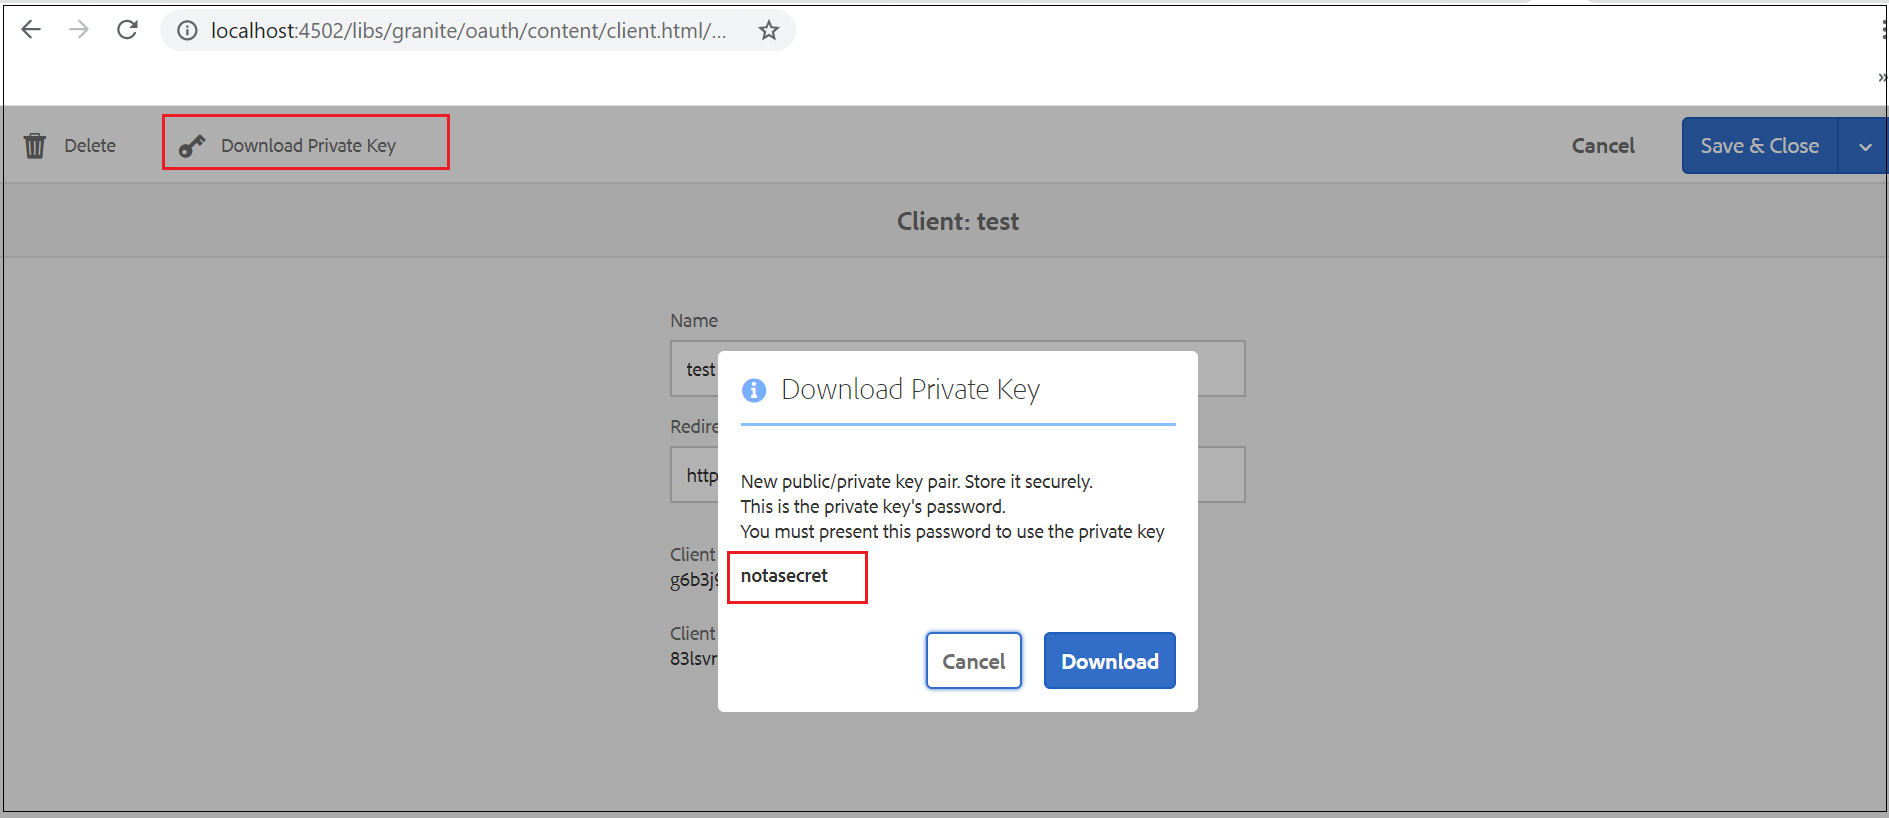
Now generate the public certificate from the downloaded private key, execute the below command — Enter the private key password.
openssl pkcs12 -in store.p12 -out store.crt.pem -clcerts -nokeys
Extract the private key
openssl pkcs12 -in store.p12 -passin pass:notasecret -nocerts -nodes -out store.private.key.txt
Let us now create a JWT token signed with the private key generated in the previous step.
You can use any JWT libraries to generate the JWT token for real scenario’s but I am using https://jwt.io/ for demo.
Header
{
  "alg": "RS256",
  "typ": "JWT"
}
Payload
{
  "aud": "<Token Endpoint",
  "iss": "<Client Id>",
  "sub": "<user name>",
  "exp": <Current time in Milliseconds+expiry>,
  "iat": <Current time in Milliseconds>,
  "scope": "<scope>",
  "cty": "code"
}

Enter the public certificate and the private key generated in the previous step.


Now the JWT token is ready, the token can be used to retrieve the access token from AEM.
curl -H “Content-Type:application/x-www-form-urlencoded” -d “assertion=eyJhbGciOiJSUzI1NiIsInR5cCI6IkpXVCJ9.eyJhdWQiOiJodHRwOi8vbG9jYWxob3N0OjQ1MDIvb2F1dGgvdG9rZW4iLCJpc3MiOiJnNmIzajl2aTk4bDM5ZmFvNzFpdmc0aDlraC1xM2dydGdoaCIsInN1YiI6ImFsYmlub2F1dGgiLCJleHAiOjE1OTcyNzM4OTA5NDA2LCJpYXQiOjE1OTcyNzM4MDk0MDYsInNjb3BlIjoiZGFtX3JlYWQiLCJjdHkiOiJjb2RlIn0.EmXLGX9RK-i4OPh-kA8YSTxi8PSJxVtk7uWsYLcMqXY4Z-ZI6pJK_1uLZdJbFxurs3tLqkg300w6w3M99PTrHZg54J2s9SafZyB7psAh6K8ycEvJDHsUDD1ovZvMfQ__tqhMC8yzGFlODLWaAx095fVHO-ce4pewxdzwv3TQK593xwjtwL_hPRqLkjy6Kvt6Cu0TEJd6YFoMNiftca9KxIMEG9fMOpNkHe4rIo_oSqdmiDzbqBZ-0P_3j4gDO_AYnULF9h42NHOrgAxOucfwZbfxgHc8UODUiLw3f1Mw9WGK9POzdFPeruHcknjRf4J60BwestDbFjfHb_8owXAJwA&grant_type=urn:ietf:params:oauth:grant-type:jwt-bearer&redirect_uri=http://localhost:8080/testapp&client_id=g6b3j9vi98l39fao71ivg4h9kh-q3grtghh&client_secret=83lsvr0glu3opumdthijrnudl8" http://localhost:4502/oauth/token
Now you should be able to download the assets from /content/dam/digital through the access token(based on the scope used while generating the JWT token)
curl -H “Authorization: Bearer eyJhbGciOiJIUzI1NiIsInR5cCI6IkpXVCJ9.eyJhdWQiOiJnNmIzajl2aTk4bDM5ZmFvNzFpdmc0aDlraC1xM2dydGdoaCIsImlzcyI6IkFkb2JlIEdyYW5pdGUiLCJzdWIiOiJhZG1pbiIsImV4cCI6MTU5NzI3NzYwNSwiaWF0IjoxNTk3Mjc0MDA1LCJzY29wZSI6ImRhbV9yZWFkIiwiY3R5IjoiYXQifQ.g-AXNazPxnAP1VbB8Ym1NB_UFW2MuCmYvsPWuZY-jfQ” http://localhost:4502/content/dam/digital/en/asset.jpg > asset.jpg
Token Revocation
The access token granted by the OAuth authorization server(AEM) can be used by the clients to access the protected resources from AEM. Sometimes we may need to revoke the access tokens granted to the clients due to various reasons, AEM provides different options to revoke the tokens.
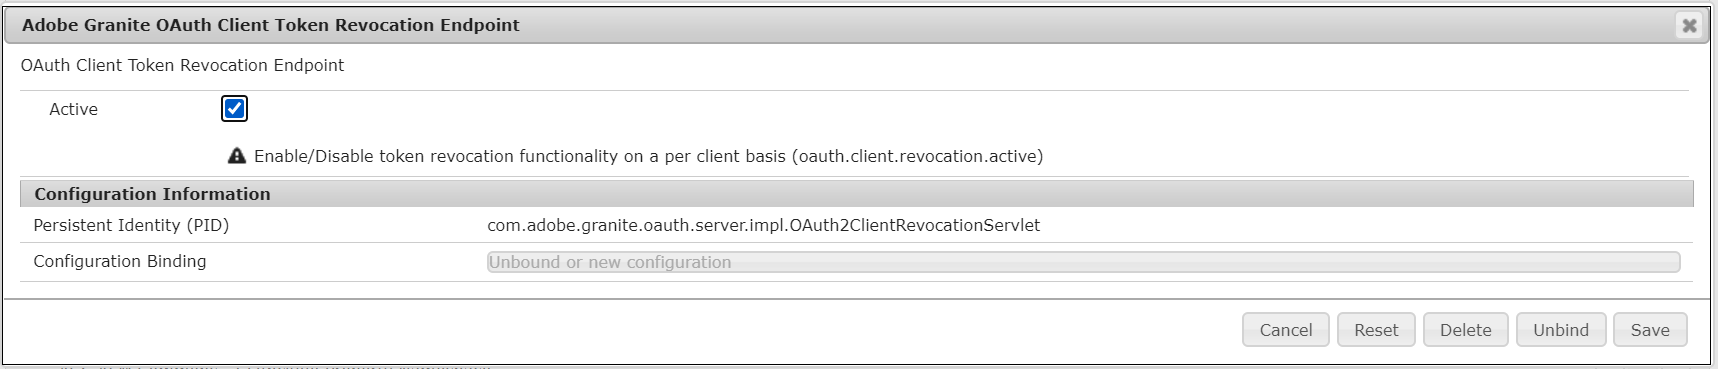
Client Token Revocation — Revoke all the access tokens granted under specific OAuth client. In this scenario, the tokens can be revoked by the user who created/manages the OAuth client in AEM(my case “admin” user).
As a first step, enable the client revocation through system console — “Adobe Granite OAuth Client Token Revocation Endpoint” http://localhost:4502/system/console/configMgr/com.adobe.granite.oauth.server.impl.OAuth2ClientRevocationServlet

Now you should have “Revoke All Tokens” option in OAuth Clients to revoke all the access tokens issued for that specific client.


Revoking Individual Tokens — Revoke the specific individual tokens granted to the clients.
As a first step, enable the individual token revocation through system console — “Adobe Granite OAuth Token Revocation Endpoint” http://localhost:4502/system/console/configMgr/com.adobe.granite.oauth.server.impl.OAuth2RevocationEndpointServlet


Now the individual token revocation is enabled, the individual tokens can be revoked through — http://localhost:4502/libs/granite/oauth/content/tokens.html. The individual tokens should be revoked by the user who granted the access tokens, in my case “albin”


Revoking Individual Tokens through Service — AEM provides API to revoke the access tokens granted to the clients.
As a first step, enable the API revocation through system console — “Adobe Granite OAuth Revocation Endpoint” http://localhost:4502/system/console/configMgr/com.adobe.granite.oauth.server.impl.OAuth2RevocationEndpointServlet. The individual token should be revoked by the user who granted the access tokens, in my case “albin”


Now the API token revocation is enabled, the individual tokens can be revoked through http://localhost:4502/libs/granite/oauth/revoke
curl -u “albin:Welcome123!” -H “Content-Type:application/x-www-form-urlencoded” -d “token=eyJhbGciOiJIUzI1NiIsInR5cCI6IkpXVCJ9.eyJhdWQiOiJnNmIzajl2aTk4bDM5ZmFvNzFpdmc0aDlraC1xM2dydGdoaCIsImlzcyI6IkFkb2JlIEdyYW5pdGUiLCJzdWIiOiJhbGJpbm9hdXRoIiwiZXhwIjoxNTk3MjgwODA2LCJpYXQiOjE1OTcyNzcyMDYsInNjb3BlIjoiZGFtX3JlYWQiLCJjdHkiOiJhdCJ9.rsAguVQgBSLS-SM-WeIo-t3gKyAaCZTPDIqvP9wyY7s” http://localhost:4502/libs/granite/oauth/revoke
As a conclusion, Adobe granite OAuth 2.0 server implementation(com.adobe.granite.oauth.server) provides the support for OAuth 2.0 server functionalities in AEM. The AEM OAuth 2.0 server functionalities can be used to manage the protected resources from AEM through external clients. The required grants and scopes can be used to manage the resources, if required custom scopes can be defined to provide custom resource access.