Trunk Based Development is a branching model in which developers create short-lived feature branches and merge back into the “trunk” branch, often called as the master branch.
The guiding principals of Trunk Based Development
- There is one “trunk” branch where developers merge their changes.
- Developers should merge small changes as often as they can.
- Merges must be reviewed, tested, and must not destroy the “trunk”.
- All code in “trunk” must be release ready at all times.
- Feature branches must be short-lived.
- Keep your commit messages as concise as possible
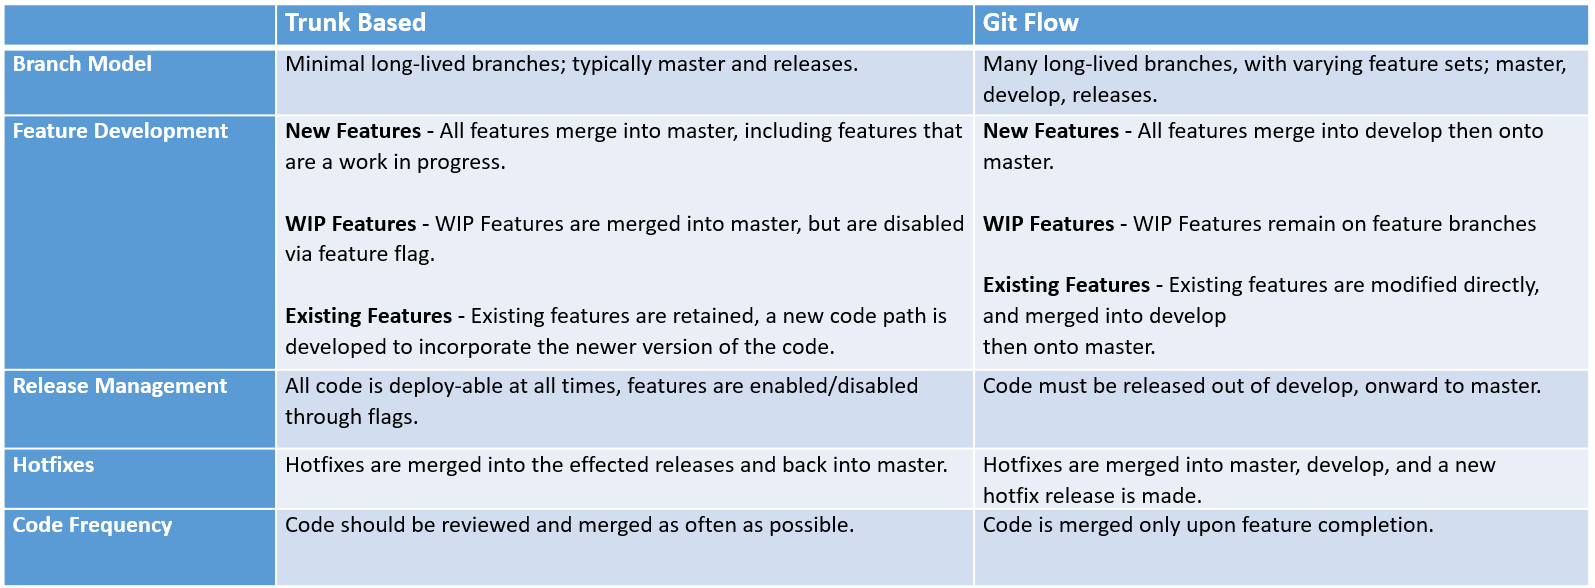
Comparing Trunk Based Development to GitFlow

The Trunk Based Branching Model
The below model can be used for scaled teams, the development is done with short-lived feature branches, the changes are often merged to the “trunk”. For small teams, the developers can directly merge the changes to the “trunk” in small chunks.

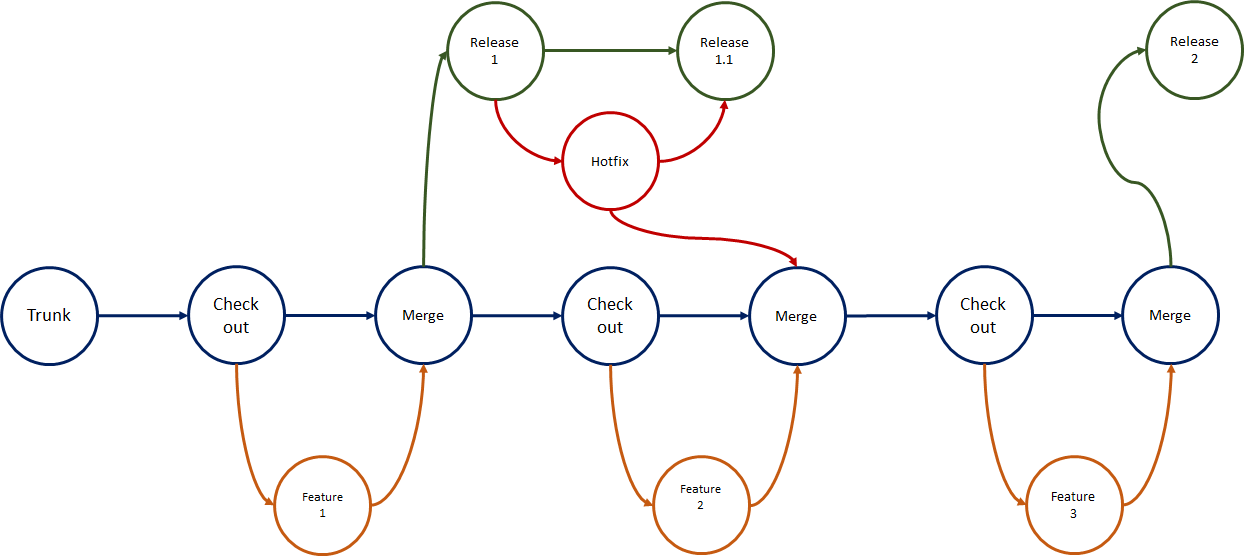
Changes made in the release branches — snapshots of the code when it’s ready to be released — are usually merged back to trunk as soon as possible. One key benefit of the trunk-based approach is that it reduces the complexity of merging events and keeps code current by having fewer development lines and by doing small and frequent merges.
The developers should experienced enough to make this model successful, this model often creates conflicts if the changes are not reviewed and tested rigorously. Use this model if you are looking to push out a new product fast and want to iterate quickly.
Feature Development with Feature Flags
Trunk Based Development uses Feature Flags as a mechanism to manage new feature releases. A feature flag is simply a boolean condition that modifies the behavior of a component, module, or function in your application.
Following a Feature Flag pattern trades the simplicity of isolated branch workflows, such as GitFlow, in favor of flexible feature rollouts, continuous delivery, and application personalization.
Setting Up Feature Flags
A simple way to begin using feature flags is to maintain a single file containing your feature flags. Let us see how to manage the flags in Typescript with React application through a simple approach. The feature flags can also be managed through external tools like optimizel or launchdarkly
featureFlags.tsconst featureFlags = {
hellowordnewfeature: false
}
export function getFeatureFlag(key){
 return featureFlags[key] || false;
}helloword.ts
//return feature based on the feature flagimport { getFeatureFlag } from "./featureFlags";
const createHelloWord = () => {
if(getFeatureFlag("hellowordnewfeature")){
  return createNewHelloWord()
 }
return createOldHelloWorld()
}
Here the new feature is returned based on the flag “hellowordnewfeature”, if the flag is “true” then the new feature(createNewHelloWord) is returned else the old feature(createOldHelloWorld).
This TypeScript module(featureFlags.ts) can be extended to fetch the features from external or internal services.
Existing Feature Development with Feature Flags
Existing feature development with feature flags is slightly more complex but offers more flexibility for continuous delivery and personalization.
Small Incremental Change
If the proposed feature is a small incremental change, we can modify an existing code path to augment behavior. Take for example adding a new calculation for the total.
featureFlags.tsconst featureFlags = {
     hellowordnewfeature: false,
     useNewcalculateTotal:true
}
export function getFeatureFlag(key){
 return featureFlags[key] || false;
}// before
const calculateTotal = (qty, val) => {
   return qty * val
}
// after
const calculateTotal= (qty, val, tax) => {
   if(getFeatureFlag("useNewcalculateTotal")){
      return qty * val * tax
   }
   return qty *val
}
Large Modification
If the proposed feature is large, for example, we want to display a completely new TaxCalculator component, we would need to define a new code path and entry-point for that component.
featureFlags.tsconst featureFlags = {
    hellowordnewfeature: false,
    useNewcalculateTotal:true,
    useNewTaxCalculation:true
}
export function getFeatureFlag(key){
 return featureFlags[key] || false;
}TaxCalculator.tsximport { getFeatureFlag } from "./featureFlags";
import { TaxCalculatorOld, TaxCalculatorNew } from "./components";
const TaxCalculator = props => {
    if(getFeatureFlag("useNewTaxCalculation"){
       return <TaxCalculatorNew />
    }
    return <TaxCalculatorOld />
}
New Feature Development with Feature Flags
New feature development with feature flags is simpler than existing features. Since there are no existing code paths for your code to execute, this code path will be disabled by default while this feature is WIP.
The new feature development process with flags should look like this;
- create a feature flag for your new feature
- begin working on your code
- ensure your flag is false before merging into master
- merge your code frequently
- when the feature is ready for release, remove the flag
Conclusion
Trunk based Development and Feature Flags together can be used for continuous delivery, delivering the features faster to market. Planning them carefully will allow you to quickly deliver the new business features to the system. The feature flags can also be managed through external tools like optimizel or launchdarkly, tools provide SDK to manage the features external to the applications.
References
https://cloud.google.com/solutions/devops/devops-tech-trunk-based-development
No comments:
Post a Comment