Editable templates have been introduced in AEM 6.2, which allows the authors to create and edit templates. Template authors can create and configure templates from the Templates console in the AEM without the help of the development team. Template authors can define the policies, structure, and initial content for the templates that will be shared by all the pages created based on this template.
Editable Templates allow the template-authors to configure the client libraries required to style the websites created based on this template — base/common client libraries are included through page rendering component but site-specific client libraries through template policy configuration.

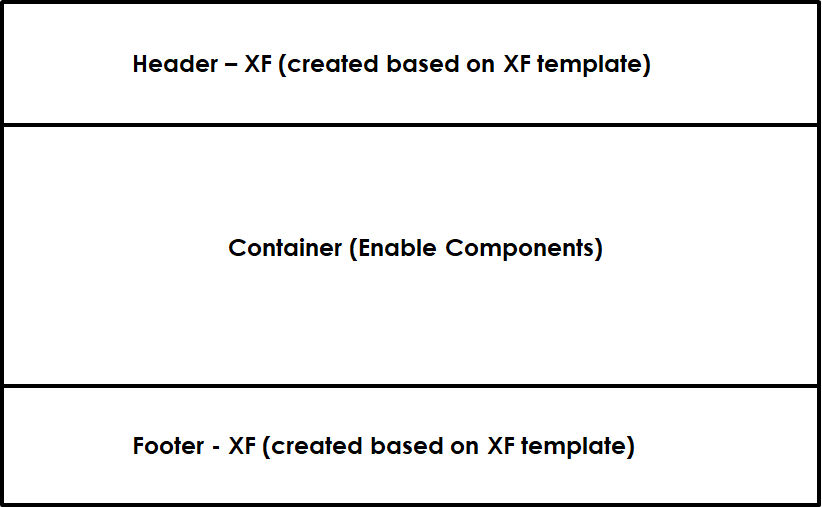
Most of the time we will have a generic template enabled with headers and footers through experience fragment and the container with allowed components that can be managed by Authors while creating the pages, e.g.

This will have some constraint while reusing the template with multiple sites
- site-specific header and footer — customize the header/footer for individual website
- site-specific style/theme — enable different styles/themes for individual sites.
In this tutorial let us see how to enable the editable template with multiple sites that have the different header/footer and styling requirements.
site-specific header/footer:
Most of the time the header and footer are enabled through experience fragment and configured in template level by using experience fragment component so that all pages created based on this template will have the consistent header/footer experience. The issue is while reusing the template with sites that require a localized header and footer, the Experience Fragment core component saves us here, the Experience Fragment core component enables the support for localized fragment content
"Supports references for localized content: if the component is defined in a template and if the fragment is part of a localized structure below /content/experience-fragments that follows the same patterns as the site below /content, the fragment with the same localization (language, blueprint or live copy) as the current page will be rendered".If the experience fragments and the sites follow the same localized structure, the experience fragment core component uses the localized fragment content based on the site language.

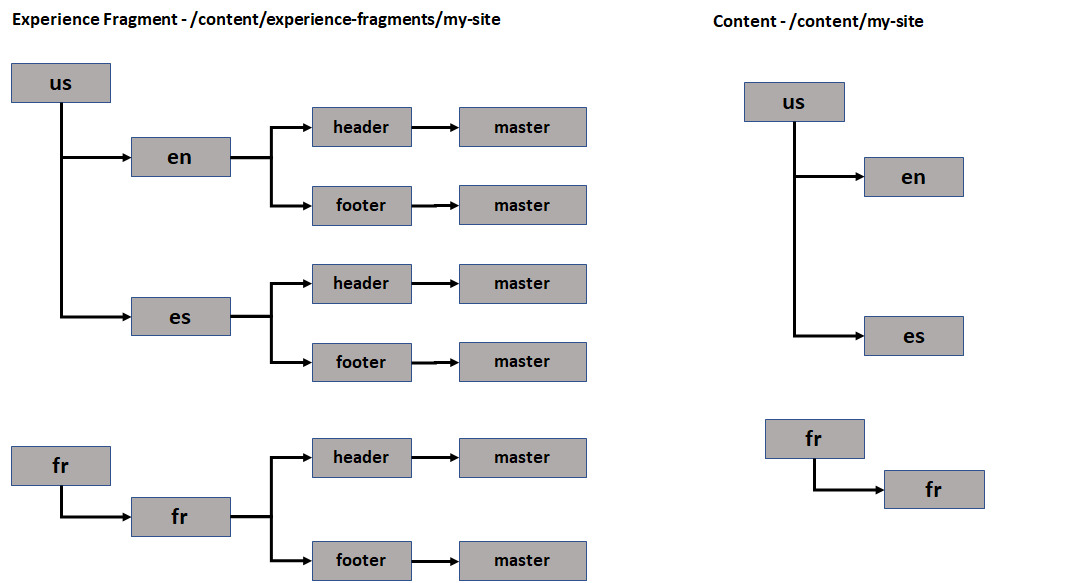
The experience fragment components in the template are enabled with default experiment fragment — /content/experience-fragments/my-site/us/en/header/master and /content/experience-fragments/my-site/us/en/footer/master, while accessing the different localized sites the experience fragment core component derives the localized fragment path based on the site structure and applies that to the pages.
e.g while accessing the content from /us/es the following fragments are applied —/content/experience-fragments/my-site/us/es/header/master and /content/experience-fragments/my-site/us/es/footer/master , the same case for other localized sites.
This experience fragment localization feature helps us to reuse the template across different websites that have localized header and footer needs without creating site-specific templates.
site-specific style/theme
Most of the time we may have the need to enable site-specific style/theme for the websites that are built on the same templates. By default Editable template and core components won't support different styles for the websites built on the same template — the client libraries are enabled either in the page rendering component or in the template. The cq:designPath value configured in the site property will not be honored by editable templates and core components, the cq:designPath is more used by the static template.
Let us see a custom approach that will help us to enable site-specific style/themes(client library).
The front end module should generate the site-specific client library that can be configured for individual websites, refer to the link below for the details on enabling site-specific client libraries through the UI frontend module.
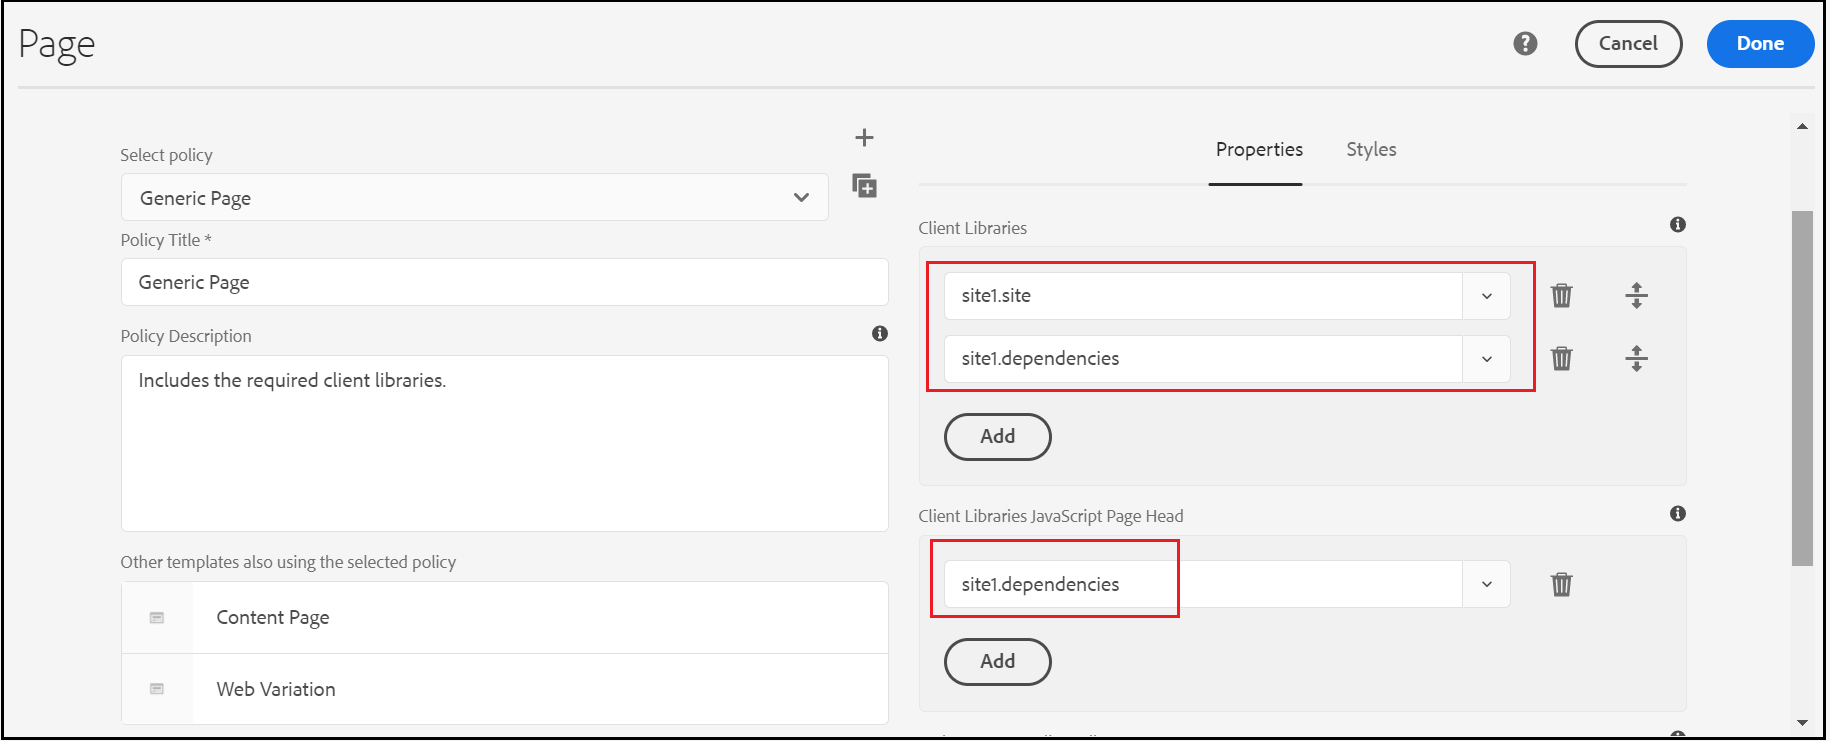
The above front end module generates the site-specific client library in the following format
— <site name>.site e.g. site1.site, site2.site
— <site name>.dependencies e.g site1.dependencies, site2.dependencies
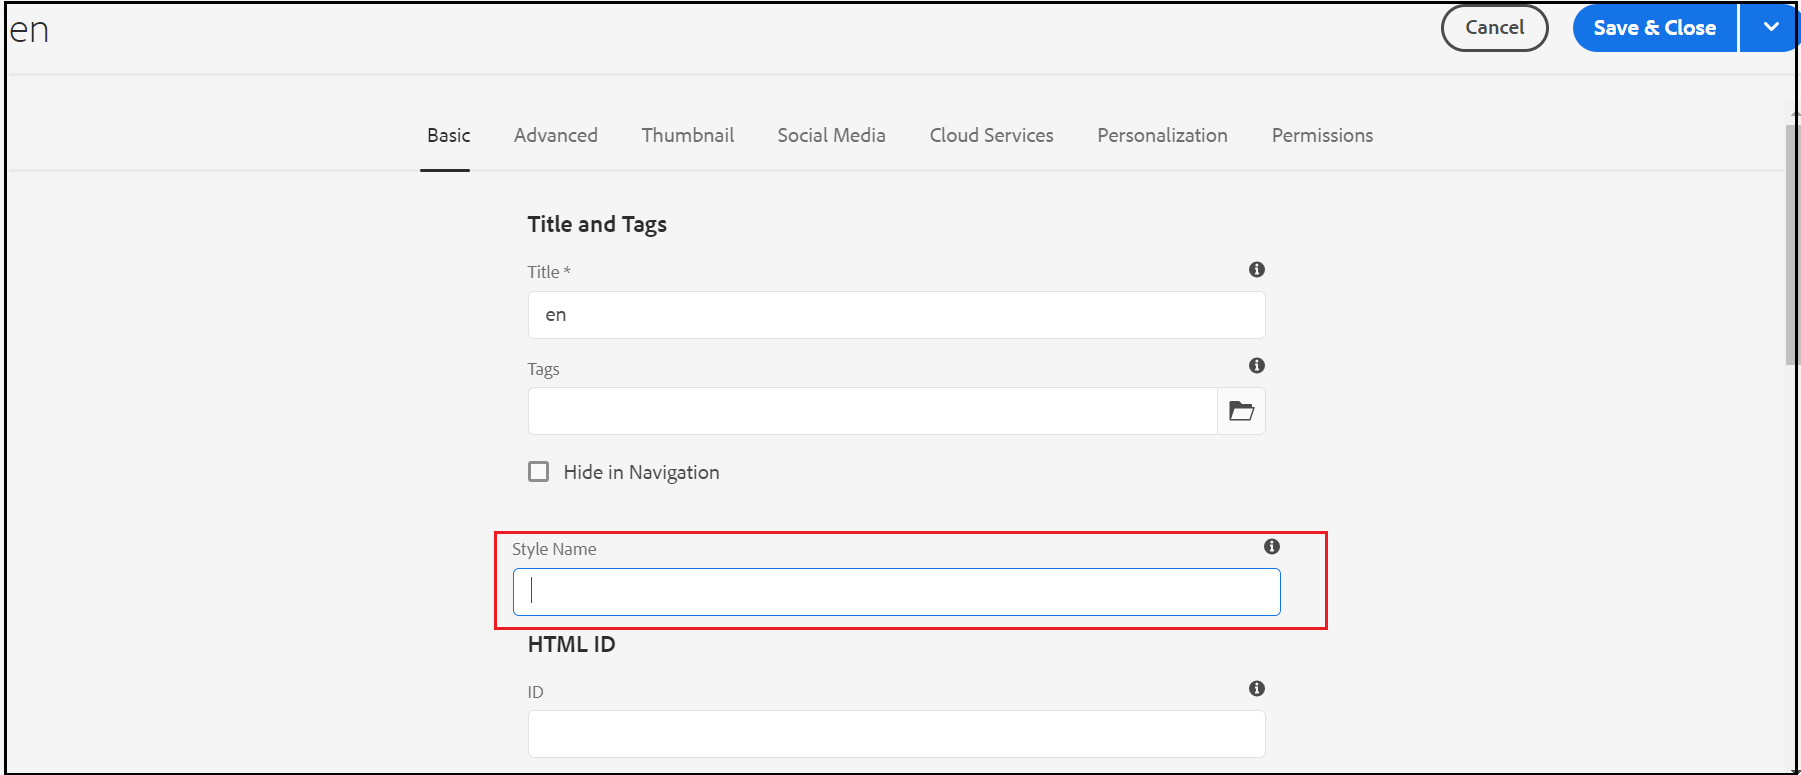
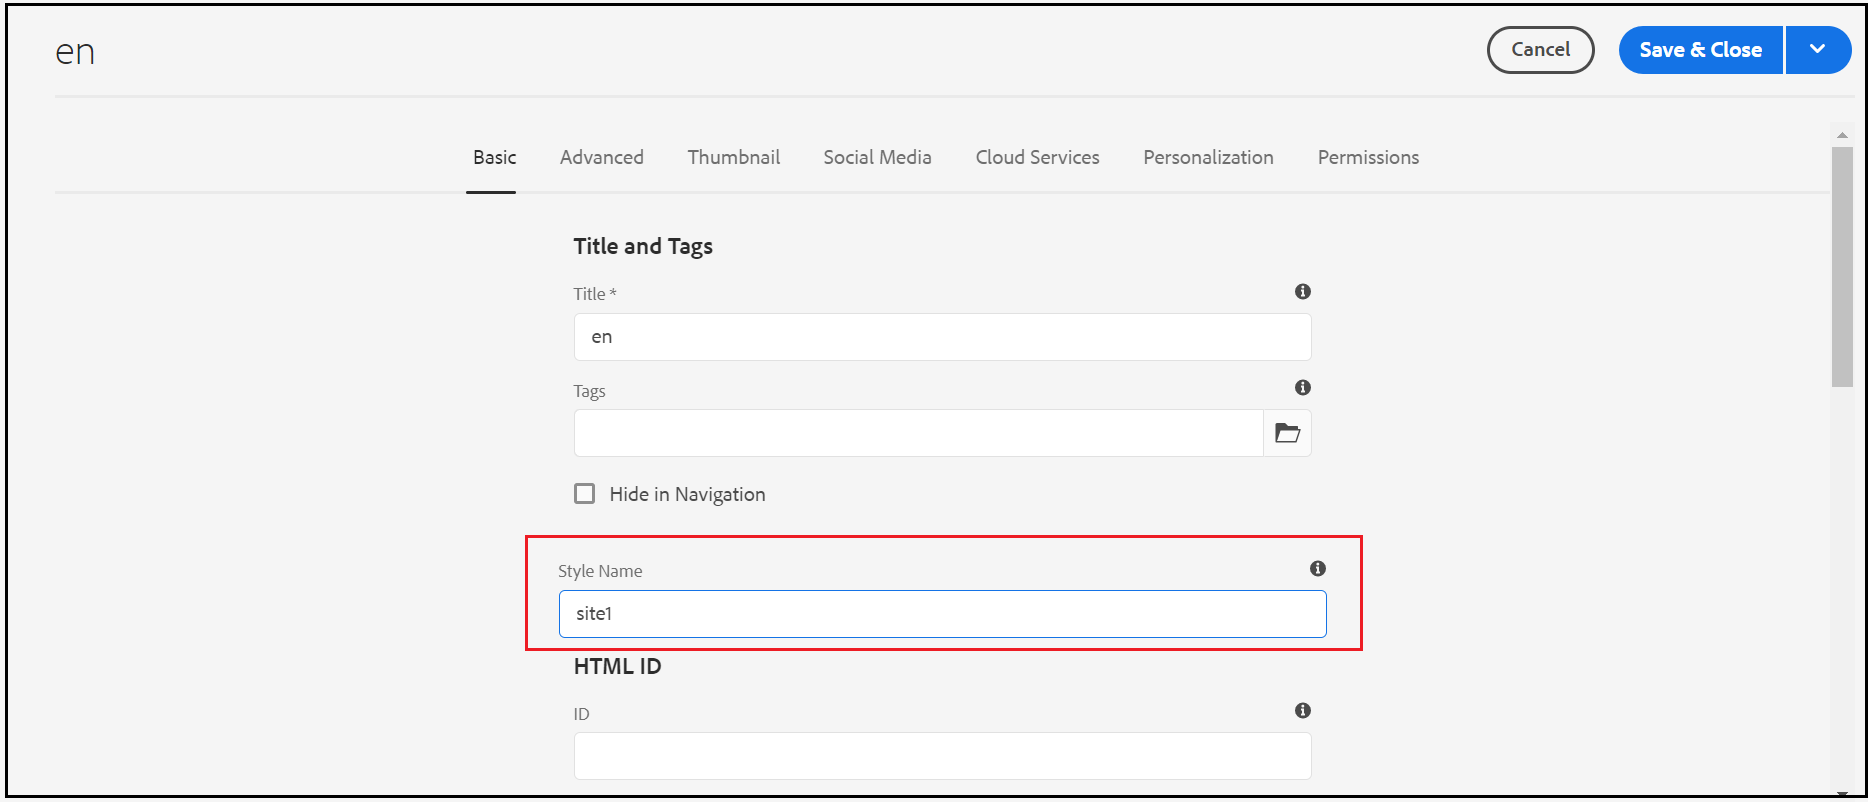
As a first step enable the additional property- styleName to the page dialog (if required enable dropdown list with predefined style values, also the property can be enabled in all level to apply different site and page level styles) — the styleName value is equal to the site names used by ui frontend module e.g site1, site2 (use context-aware configuration instead of page properties if required)
{
   "jcr:primaryType":"nt:unstructured",
   "jcr:title":"Page",
   "trackingFeature":"core-components:page:v2",
   "helpPath":"https://www.adobe.com/go/aem_cmp_page_v2",
   "extraClientlibs":[
      "cq.common.wcm",
      "core.wcm.components.page.v2.editor",
      "cq.wcm.msm.properties",
      "granite.contexthub.configuration",
      "cq.siteadmin.admin.properties"
   ],
   "mode":"edit",
   "sling:resourceType":"cq/gui/components/authoring/dialog",
   "content":{
      "jcr:primaryType":"nt:unstructured",
      "granite:class":"cq-dialog-content-page",
      "sling:resourceType":"granite/ui/components/coral/foundation/container",
      "items":{
         "jcr:primaryType":"nt:unstructured",
         "tabs":{
            "jcr:primaryType":"nt:unstructured",
            "granite:class":"cq-siteadmin-admin-properties-tabs",
            "size":"L",
            "sling:resourceType":"granite/ui/components/coral/foundation/tabs",
            "items":{
               "jcr:primaryType":"nt:unstructured",
               "basic":{
                  "jcr:primaryType":"nt:unstructured",
                  "jcr:title":"Basic",
                  "sling:resourceType":"granite/ui/components/coral/foundation/fixedcolumns",
                  "items":{
                     "jcr:primaryType":"nt:unstructured",
                     "column":{
                        "jcr:primaryType":"nt:unstructured",
                        "sling:resourceType":"granite/ui/components/coral/foundation/container",
                        "items":{
                           "jcr:primaryType":"nt:unstructured",
                           "styleName":{
                              "jcr:primaryType":"nt:unstructured",
                              "name":"./styleName",
                              "fieldLabel":"Style Name",
                              "sling:orderBefore":"htmlid",
                              "sling:resourceType":"granite/ui/components/coral/foundation/form/textfield",
                              "fieldDescription":"Style Name - Site Specific Theme"
                           }
                        }
                     }
                  }
               }
            }
         }
      }
   }
}
Enable sling model to to return the site specific client library names based on the inherited styleName property passed from customheaderlibs.html and customfooterlibs.html files of the page rendering component.
import javax.inject.Inject;import org.apache.sling.api.SlingHttpServletRequest;
import org.apache.sling.models.annotations.Model;
import org.apache.sling.models.annotations.Optional;@Model(adaptables = {
    SlingHttpServletRequest.class
})
public class StyleNameModel {@Inject @Optional
private String styleName;public String getStyleNameSite() {return styleName != null ? styleName.concat(".site") : "site1.site";
    }public String getStyleNameDependency() {
        return styleName != null ? styleName.concat(".dependencies") : "site1.dependencies";
    } }
Enable the client library categories into the page rendering component(e.g /apps/multisitefrontenddemo/components/page) — customheaderlibs.html and customfooterlibs.html, the inherited style name property is injected to StyleNameModel — the property form current page if not available then from the parent hierarchy
Add the below code to customheaderlibs.html
<sly data-sly-use.style="${'com.multisitefrontenddemo.core.models.StyleNameModel' @styleName=inheritedPageProperties.styleName}"/><sly data-sly-use.clientLib="/libs/granite/sightly/templates/clientlib.html">
    <sly data-sly-call="${clientlib.css @ categories=[style.styleNameSite, style.styleNameDependency] }">
</sly>
Add the below code to customfooterlibs.html
<sly data-sly-use.style="${'com.multisitefrontenddemo.core.models.StyleNameModel' @styleName=inheritedPageProperties.styleName}"/><sly data-sly-use.clientLib="/libs/granite/sightly/templates/clientlib.html">
    <sly data-sly-call="${clientlib.js @ categories=[style.styleNameSite, style.styleNameDependency] }">
</sly>
Now remove the client library configurations from template policy and enable the required style name to the site root or individual pages

Now the site-specific style is applied based on the configuration, the style to the page is applied in the following order
— Apply the style name from the current page
— Apply the style name from any of the available parent page (navigated till root node)
— the default style is applied if no style name configured for the current page or to the parent hierarchy.
The default style is applied while editing the pages through the template editor — the structure and initial content.
The behavior can be changed based on your project need e.g. restrict the style configuration only to the site root node
Demo Project — https://github.com/techforum-repo/youttubedata/tree/master/aem/multisitefrontenddemo
Refer to the below video for more detail
No comments:
Post a Comment