ChatGPT is an AI language model developed by OpenAI, capable of generating human-like text based on input. The model is trained on a large corpus of text data and can generate responses to questions, summarize long texts, write stories, and much more.
The OpenAI API can integrate AI models with different systems.
AEM already enables some of the Generative AI capabilities like — Content Creation, Summarization, rewriting, etc., also Adobe Integrate Adobe Firefly (a range of creative AI models to AEM DAM) to simplify content creation and management. I will explain this in more detail in another post.
Integrating AEM with ChatGPT empowers content authors to easily create content that meets the SEO requirements, e.g., create a title/description for a page, create a story on a topic, summarize the content, etc.; the ChatGPT generated content can be optimized further based on the need.
In this post, let us see how to integrate AEM with ChatGPT to empower the authors with content authoring.
As a first step, enable a servlet connecting the chatgpt model with the user prompt and returning the response.
ChatServlet.java
package com.chatgpt.core.servlets;

import javax.servlet.Servlet;
import javax.servlet.ServletException;
import java.io.IOException;
import java.util.logging.Logger;
import java.util.ArrayList;
import java.util.List;

import org.apache.sling.api.servlets.SlingSafeMethodsServlet;
import org.osgi.service.component.annotations.Component;
import org.apache.sling.api.SlingHttpServletRequest;
import org.apache.sling.api.SlingHttpServletResponse;
import org.apache.sling.api.servlets.HttpConstants;
import org.osgi.framework.Constants;

import com.chatgpt.core.beans.ChatGptRequest;
import com.chatgpt.core.beans.ChatGptResponse;
import com.fasterxml.jackson.databind.ObjectMapper;

import org.apache.http.HttpResponse;
import org.apache.http.client.HttpClient;
import org.apache.http.client.methods.HttpPost;
import org.apache.http.entity.StringEntity;
import org.apache.http.impl.client.HttpClients;
import org.apache.http.util.EntityUtils;

@Component(
    immediate = true,
    service = Servlet.class,
    property = {
        Constants.SERVICE_DESCRIPTION + "=ChatGPT Integration",
        "sling.servlet.methods=" + HttpConstants.METHOD_GET,
        "sling.servlet.paths=" + "/bin/chat",
        "sling.servlet.extensions={\"json\"}"
    }
)
public class ChatServlet extends SlingSafeMethodsServlet {

    private static final Logger LOGGER = Logger.getLogger(ChatServlet.class.getName());

    private static final String CHATGPT_API_ENDPOINT = "https://api.openai.com/v1/chat/completions";

    private static final HttpClient client = HttpClients.createDefault();
    private static final ObjectMapper MAPPER = new ObjectMapper();

    @Override
    protected void doGet(SlingHttpServletRequest request, SlingHttpServletResponse response) throws ServletException, IOException {
        String prompt = request.getParameter("prompt");
        String message = generateMessage(prompt);
        response.getWriter().write(message);
    }

    private static String generateMessage(String prompt) throws IOException {

            // Generate the chat message using ChatGPT API
            String requestBody = MAPPER.writeValueAsString(new ChatGptRequest(prompt,"gpt-3.5-turbo","user"));
            HttpPost request = new HttpPost(CHATGPT_API_ENDPOINT);
            request.addHeader("Authorization", "Bearer <Open API Token>");
            request.addHeader("Content-Type", "application/json");
            request.setEntity(new StringEntity(requestBody));
            HttpResponse response = client.execute(request);
            ChatGptResponse chatGptResponse = MAPPER.readValue(EntityUtils.toString(response.getEntity()), ChatGptResponse.class);
            String message = chatGptResponse.getChoices().get(0).getMessage().getContent();

            return message;

    }


    public static void main(String[] args) {
        try {
            System.out.println(generateMessage("What is Adobe AEM"));
        } catch (IOException e) {
            e.printStackTrace();
        }
    }

}
Change the gpt model based on your need, gpt-3.5-turbo is the latest model currently available for API access; the model details can be found Models — OpenAI API
The ‘role’ can take one of three values: ‘system’, ‘user’ or the ‘assistant’.
These roles help define the context of the conversation; even you can specify the previous conversation context by adding messages with different roles, user — the message sent by the user, and assistant — the response from API.
Not mandatory to specify all the roles; I have used only the user role to generate the response; you can use other roles to give more context to the conversation.
ChatGptRequest.java
package com.chatgpt.core.beans;

import lombok.Data;
import java.util.List;
import java.util.ArrayList;

@Data
public class ChatGptRequest {
        private final int max_tokens;
    private final String model;
    private List<Message> messages;

    public ChatGptRequest(String prompt,String model, String role)
    {
        this.max_tokens=100;
        this.model=model;
        this.messages=new ArrayList<>();
        Message message=new Message();
        message.setRole(role);
        message.setContent(prompt);
        this.messages.add(message);
    }

}
max_tokens — specifies the maximum number of tokens the API should generate in response to a prompt. Tokens are the individual words and punctuation marks that make up the text. Adjust the max_tokens based on your prompts and the expected response.
ChatGptResponse.java
package com.chatgpt.core.beans;

import java.util.List;

import com.fasterxml.jackson.annotation.JsonIgnoreProperties;

import lombok.Data;

@Data
@JsonIgnoreProperties(ignoreUnknown = true )
public class ChatGptResponse {
    private List<Choice> choices;

    @Data
    @JsonIgnoreProperties(ignoreUnknown = true )
    public static class Choice {
        private Message message;

    }
}
Message.java
package com.chatgpt.core.beans;

import com.fasterxml.jackson.annotation.JsonIgnoreProperties;

import lombok.Data;

@Data
@JsonIgnoreProperties(ignoreUnknown = true )
public class Message {
    private String role;
    private String content;

}
Now Generate the OpenAI API Key through Account API Keys — OpenAI API
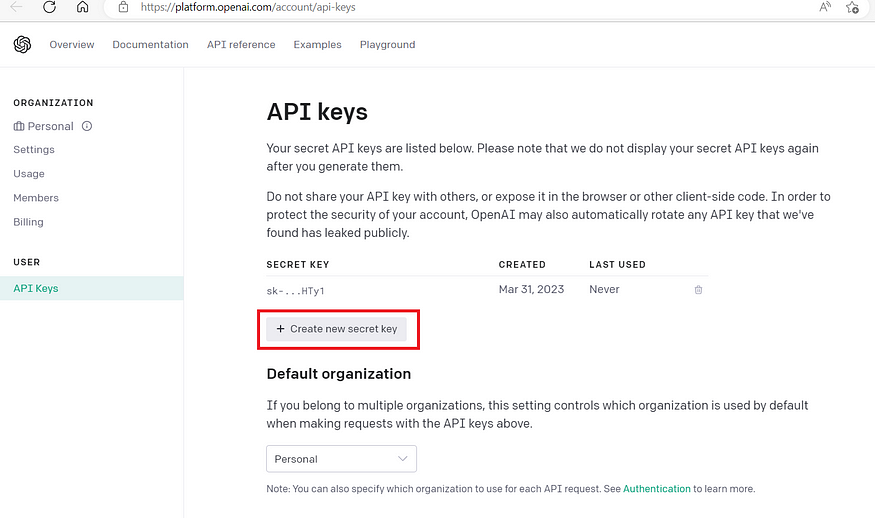
Replace <Open API Token> in the servlet with the actual token; ensure the token is secured, and you can keep the token as an OSGI configuration.
The API is billed based on the token usage; some free tokens are enabled for initial API testing; after that, you should enable the billing details to use the API.
Now the servlet can be invoked as http://localhost:4502/bin/chat.json?prompt=<<Prompt>> e.g., http://localhost:4502/bin/chat.json?prompt=what is AEM
The servlet can be invoked from components, pages, or toolbars to generate the required content.
In this post lets us see how to add a button on the title component edit toolbar to integrate with the above servlet to generate the content whenever required — the condition on the action can be changed to enable the chatgpt action on all the components or specific components (also the servlet can be invoked in multiple other ways).
Create a client library under your project with the below JS and add cq.authoring.editor.sites.page.hook for the categories.

ToolbarAction.CHATGPT.js
(function ($, channel, window, undefined) {
  "use strict";

  var ACTION_ICON = "coral-Icon--gear";
  var ACTION_TITLE = "CHATGPT";
  var ACTION_NAME = "ChatGPT";

  var chatgptAction = new Granite.author.ui.ToolbarAction({
    name: ACTION_NAME,
    icon: ACTION_ICON,
    text: ACTION_TITLE,
    execute: function (editable) {
      showDialog();
    },
    condition: function (editable) {
      return editable && editable.type === "chatgptintegration/components/title";
    },
    isNonMulti: true,
  });

  channel.on("cq-layer-activated", function (event) {
    if (event.layer === "Edit") {
      Granite.author.EditorFrame.editableToolbar.registerAction("CHATGPT", chatgptAction);
    }
  });


function showDialog() {
  // Create the dialog
  var dialog = new Coral.Dialog().set({
    id: 'chatgptDialog',
    header: {
      innerHTML: 'Generate Content through ChatGPT'
    },
    content: {
      innerHTML: '<form class="coral-Form coral-Form--vertical"><section class="coral-Form-fieldset"><div class="coral-Form-fieldwrapper"><textarea is="coral-textarea" class="coral-Form-field" placeholder="Enter your prompt" id="textarea1"  name="name"></textarea></div><div class="coral-Form-fieldwrapper"> <textarea is="coral-textarea" class="coral-Form-field" placeholder="Result will be displayed here" id="textarea2"  name="name"></textarea></div></section></form>'
    },
    footer: {
      innerHTML: '<button is="coral-button" variant="primary">Generate</button><button is="coral-button" variant="primary" coral-close>Close</button>'
    }
  });

    // Add an event listener to the submit button
    dialog.footer.querySelector("button").addEventListener("click", function () {
      var textarea1Value = dialog.content.querySelector("#textarea1").value;
      var servletUrl = "/bin/chat?prompt=" + encodeURIComponent(textarea1Value);

       dialog.content.querySelector("#textarea2").value = 'Generating...';

      // Send a request to the servlet
      var xhr = new XMLHttpRequest();
      xhr.open("GET", servletUrl);
      xhr.onreadystatechange = function () {
        if (xhr.readyState === XMLHttpRequest.DONE && xhr.status === 200) {
          dialog.content.querySelector("#textarea2").value = xhr.responseText;
        }
      };
      xhr.send();
    });

    // Open the dialog
    document.body.appendChild(dialog);
    dialog.show();
  }
})(jQuery, jQuery(document), this);
js.txt
#base=js
ToolbarAction.CHATGPT.js
Now the Title component edit toolbar displays the chatgpt actions.

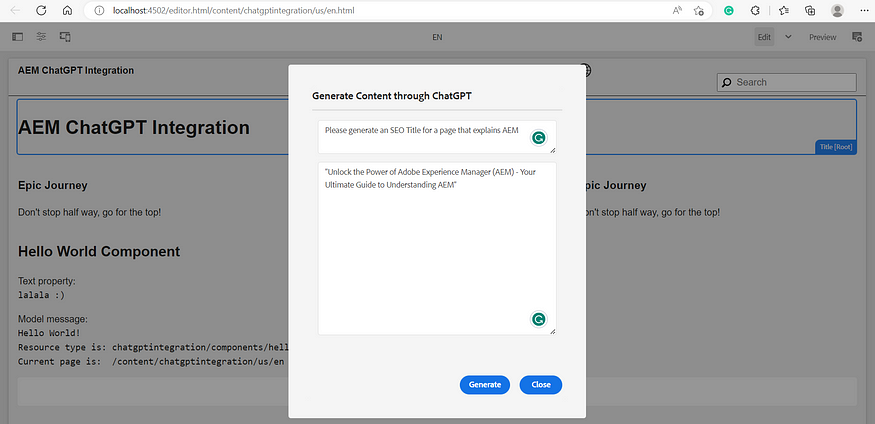
Clicking on the action will display the dialog to generate the required content through the chatgpt integration.
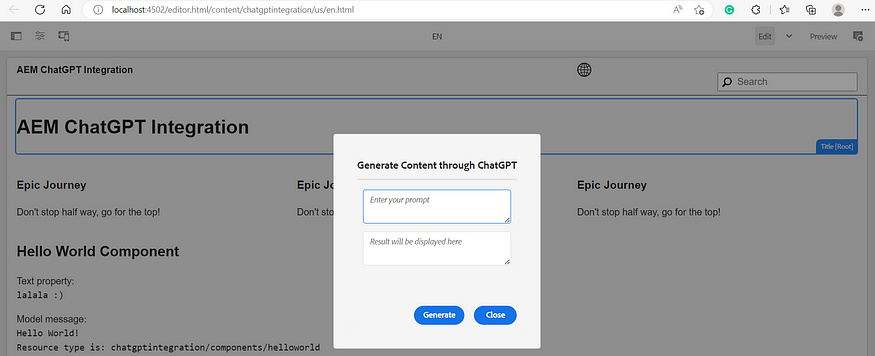
Enter the prompt for generating the content and Click on Generate button.
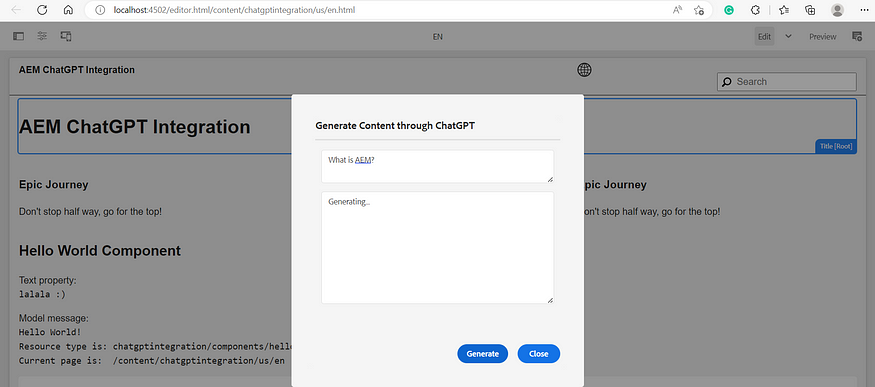
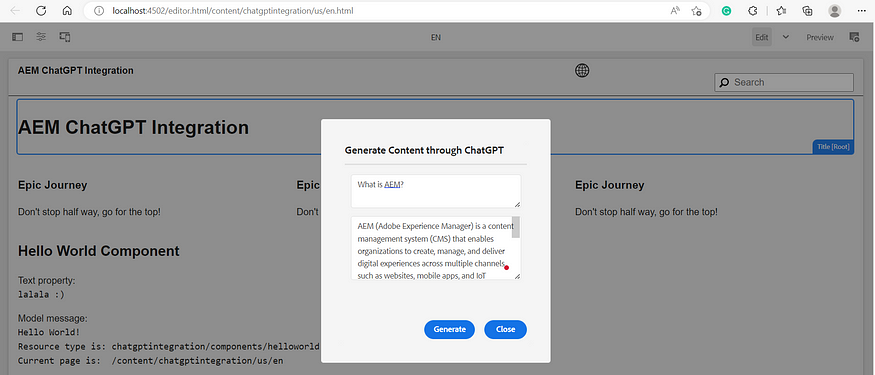
Now the authors can use the chatgpt integration to perform the different content operations through ChatGPT —Generate the content, Summarize, generate a title, generate a description, etc.; modify the content based on the business context.
AEM already enables some of the Generative AI capabilities like — Content Creation, Summarization, rewriting, etc., also Adobe Integrate Adobe Firefly (a range of creative AI models to AEM DAM) to simplify content creation and management. I will explain this in more detail in another post.
AEM Project Reference— youttubedata/aem/chatgptintegration at master · techforum-repo/youttubedata (github.com)
No comments:
Post a Comment