Thursday, February 3, 2022

AEM(Adobe Experience Manager) Headless Implementation— Workflow

 My earlier post explained the steps to enable headless content sharing through GraphQL. Refer to https://medium.com/tech-learnings/how-to-deliver-headless-content-through-graphql-api-and-content-fragments-da2b2d22df06 for more details on delivering headless content through GraphQL API and Content Fragments.

In this post let us quickly see the different activities to share the headless content through GraphQL and the different roles performing those activities(this is based on my understanding, feel free to give your feedback).

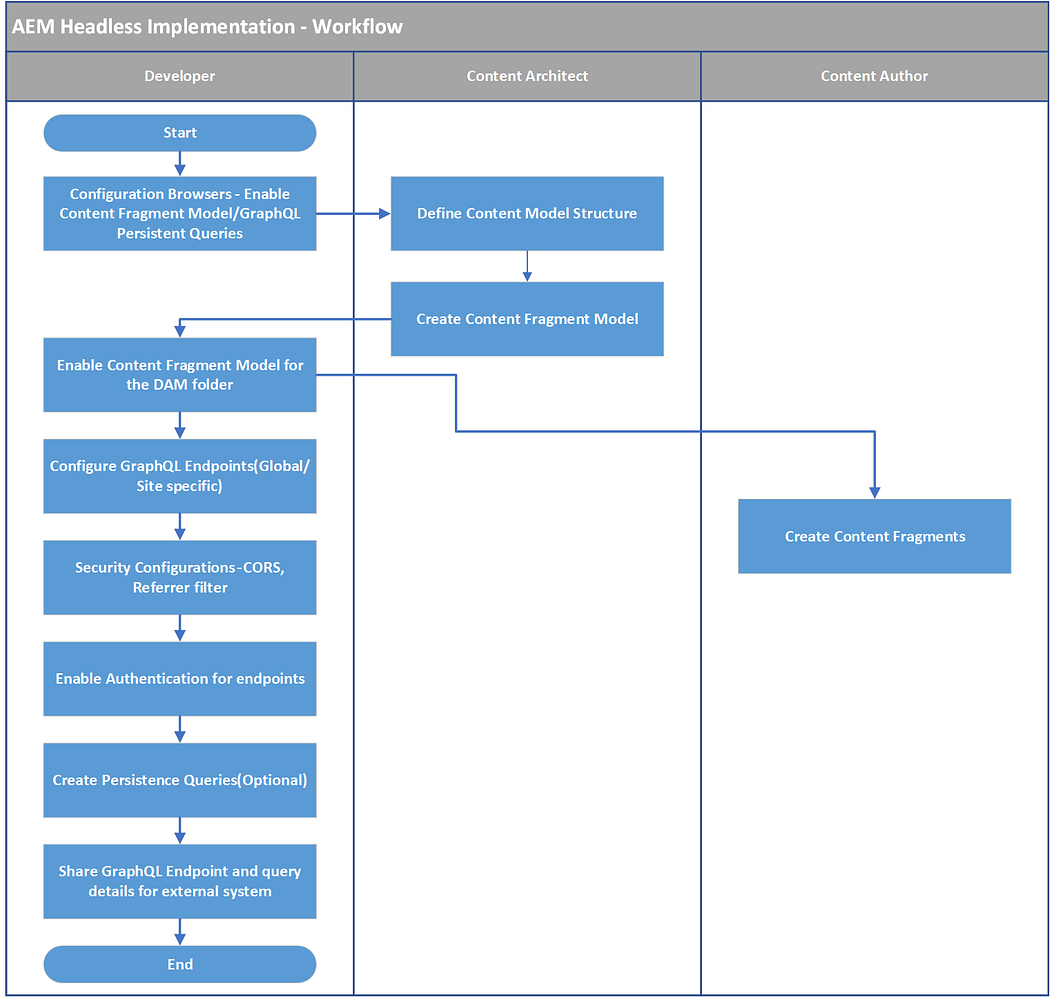
The different roles to enable the headless content

  • Developer
  • Content Architect
  • Content Author

Developer:

The developer performs most of the technical configurations to enable Content Architect and Content Authors to produce headless content. Additionally, enable the GraphQL endpoint configurations that can be consumed by external applications to fetch headless content.

  • Configuration Browsers — Enable Content Fragment Model/GraphQL Persistent Queries
  • Enable Content Fragment Model for the DAM folder
  • Create Persistence Queries(Optional)
  • Configure GraphQL Endpoints(Global/Site-specific)
  • Security Configurations — CORS, Referrer filter
  • Enable Authentication for endpoints
  • Share GraphQL Endpoint and query details for external system

Content Architect:

The content author defines the content model structure, relationship to share the content with external systems, also creates the required Content Fragment Models in AEM.

  • Define Content Model Structure
  • Create Content Fragment Model

Content Author:

Content Author’s creates the content by using the Content Fragment Model defined by the Content Architect.

  • Create Content Fragments

All the configurations e.g Endpoints, Model, Content Fragments should be published to make them available to the AEM publisher so that the Endpoints can be consumed by external systems.

Friday, January 7, 2022

Different Options to set up the local HTTP server

 Most of the time working on a project required testing the files through a local HTTP server quickly, in this post lets us see the different options to quickly enable the HTTP server in the local system.

Python HTTP Server:

Ensure the Python is installed into your system. Python can be downloaded from https://www.python.org/

Now CD to the folder where your local files are placed

Start the server, the default port is 8000, specify a different port if required.

python3 -m http.serveror python3 -m http.server 80

If Python version returned is 2.X

python -m SimpleHTTPServer

The files are now accessible through an HTTP URL

http://localhost:8080/Test.htmlhttp://localhost:8080/Test-Data.txt

Node— HttpServer

The http-server is a simple, zero-configuration command-line static HTTP server.

Install the http-server through the following command(ensure the latest node/npm packages are installed)

npm install http-server -g

Now CD to the folder where your local files are placed

Start the server through the below command, the default port is 8080, if required specify the different port number

http-server .
http-server -p 8081 .

The files are now accessible through an HTTP URL

http://localhost:8080/Test.htmlhttp://localhost:8080/Test-Data.txt

Refer to https://www.npmjs.com/package/http-server for more details.

Serve

The serve server is a simple HTTP server

CD to the folder where your local files are placed(ensure the latest node/npm packages are installed)

npx serve

Now the local files can be accessed through HTTP

Static-server

simple http server to serve static resource files from a local directory.

CD to the folder where your local files are placed(ensure the latest node/npm packages are installed)

npx static-server

Now the local files can be accessed through HTTP

Web Server for Chrome

A Web Server for Chrome serves web pages from a local folder using HTTP

Install the “Web Server for Chrome” plugin and launch the app

Select the folder where the files are located, change the port number if required also other configurations

Now the files are accessible through HTTP(HTTPS can be enabled if required)

Fenix Webserver

Simple static desktop web server, download from https://github.com/coreybutler/fenix/releases

Execute Fenix.exe, Create a new web server by selecting the local folder

Now the files are accessible through HTTP

There are several ways to run a local static server, select an option based on your need and simplicity.