This tutorial explains how to configure nested facet in Adobe Search and Promote.
Nested Facet
Nested facets are facets that display multiple levels of categories as in the following


The Books, Discount and Watches categories are in the top or parent facet. The subcategories, such as Legal, 10% and Tax, are in the lower or child facet.
The current supported nested facet depth is two, but it can be anywhere along the drill-down list.
The data for this facet must follow a convention in describing the two levels of categories. For example, a facet value can be ‘Books:Legal’ where the parent category is ‘Books’ and the child category is ‘Legal’. The ‘:’ is used as a delimiter to separate them.
To generate the data in this format, you can use a filter script to combine two existing categories.
The following are the behaviors of various types of nested facets:
Behavior of nested facet type
Normal
The behavior of a normal nested facet is that it shrinks if other facets narrow the search. Normal If the nested facet is selected, it shrinks down toward its selection. If a parent facet is selected, only that parent appears with all of its remaining children facets. If a child facet is selected, the facet only shows the selected parent facet and the selected child facet.
Sticky
The behavior of a sticky nested facet is that it tries to keep the facet open as much as possible based on the state of other facets Sticky or search criteria. If the child facet is selected, it counts toward the sticky depth
Multi-Select
The behavior of a multi-select facet is that it keeps the facet open. Any new selections try to wipe out all other facet Multi-Select selections unless the facet is a “parent” of the category nested facet. In this case, “parent” refers to category facets, not top-level categories of a nested facet.
Category Multi-Select
Like Multi-Select nested facet type with the following exceptions: Category Multi-Select
- Any other facets previously chosen are deselected if this facet is selected for the first time.
- Other facets previously chosen are also deselected if the customer drills straight down to the child facet without clicking the parent facet or a sibling of a different parent facet is chosen.
- They can have parents in the sense that category facets have parents. Do not confuse this behavior with parent-child relationships found with all nested facets.
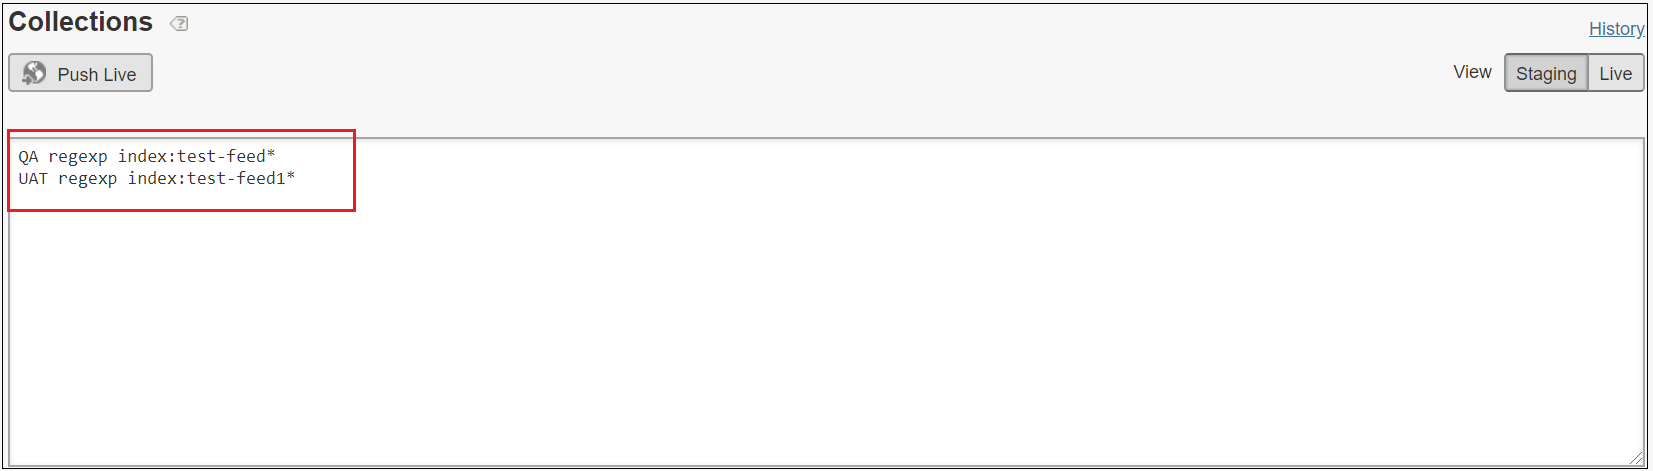
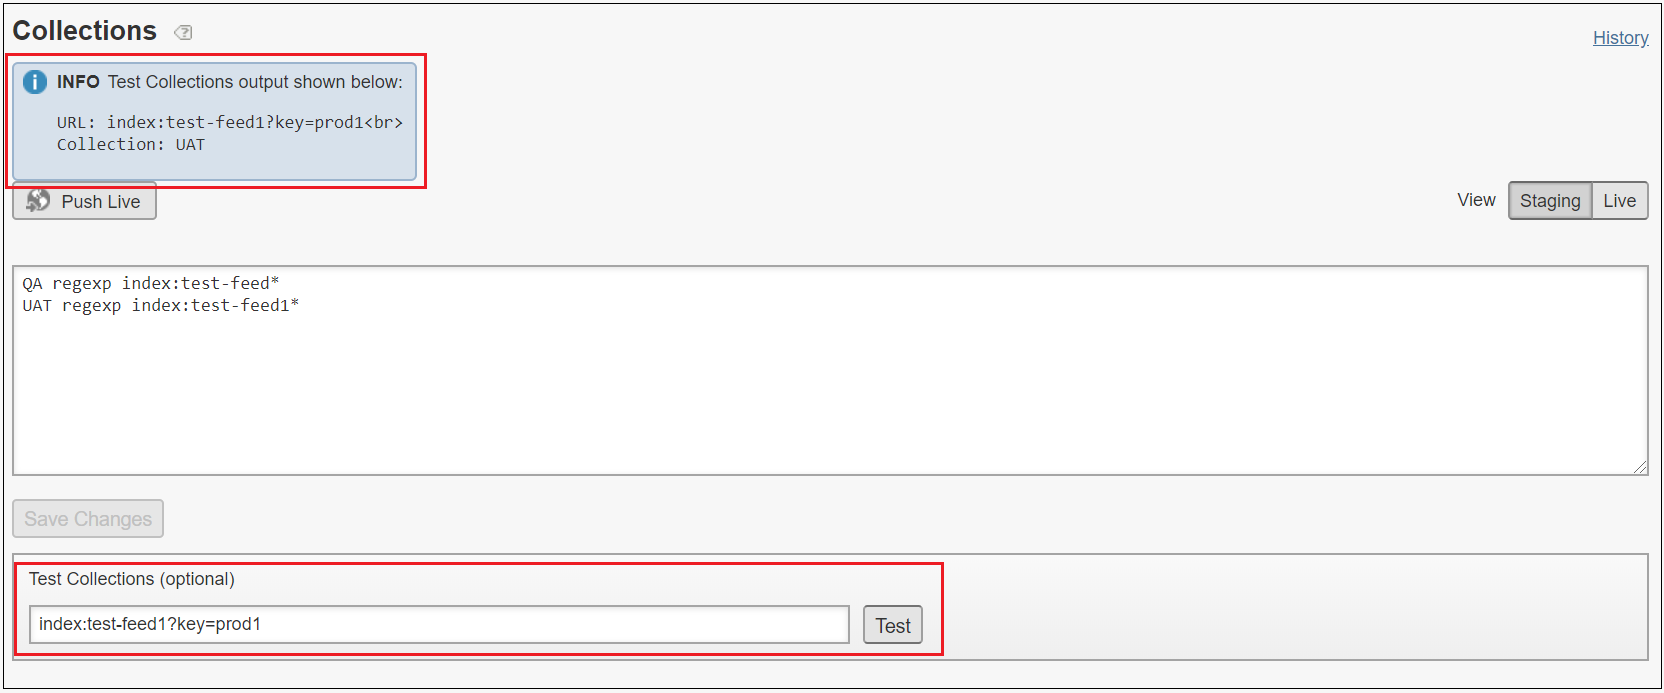
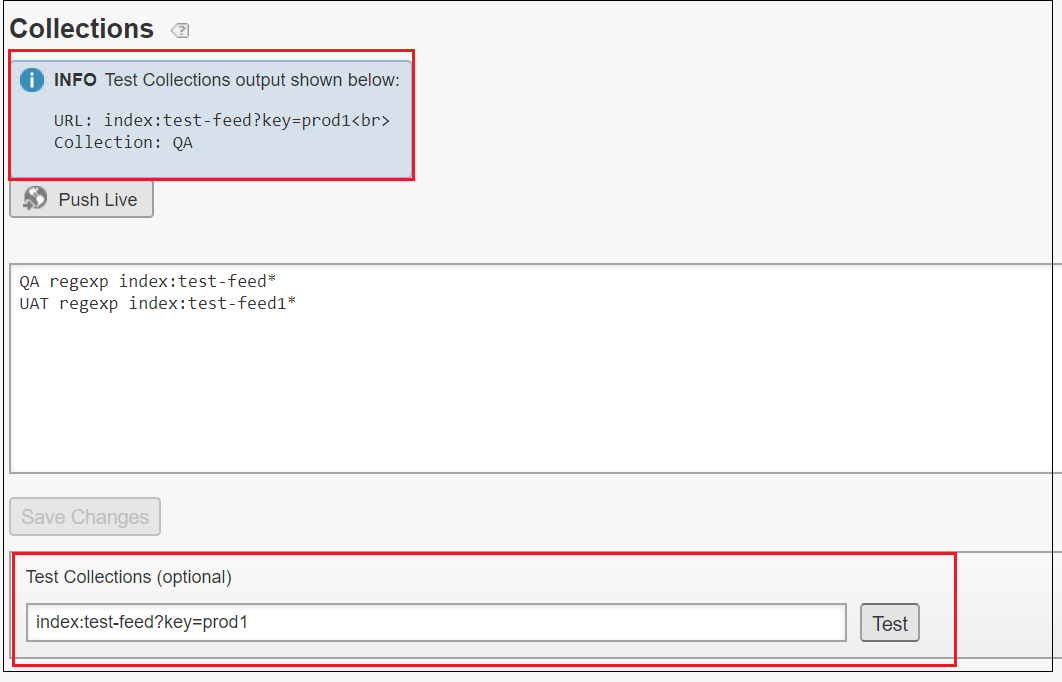
Refer the following URL to configure the basic navigation and dynamic facet in Adobe Search and Promote
Keep the following in mind when you create a nested facet:
- Each nested facet requires one user-defined meta tag field.
- Nested facets are composed of two other facets, the parent facet and the child facet. They can be single value facets or multi-value facets. The mixing of single-value facets and multi-value facets is not allowed.
- You need to determine if this facet will be used in the search field table. The field table requires the nested facet itself and its compositing facets.
- Consider using JSON to implement nested facets; it is easier.
Configure nested facet
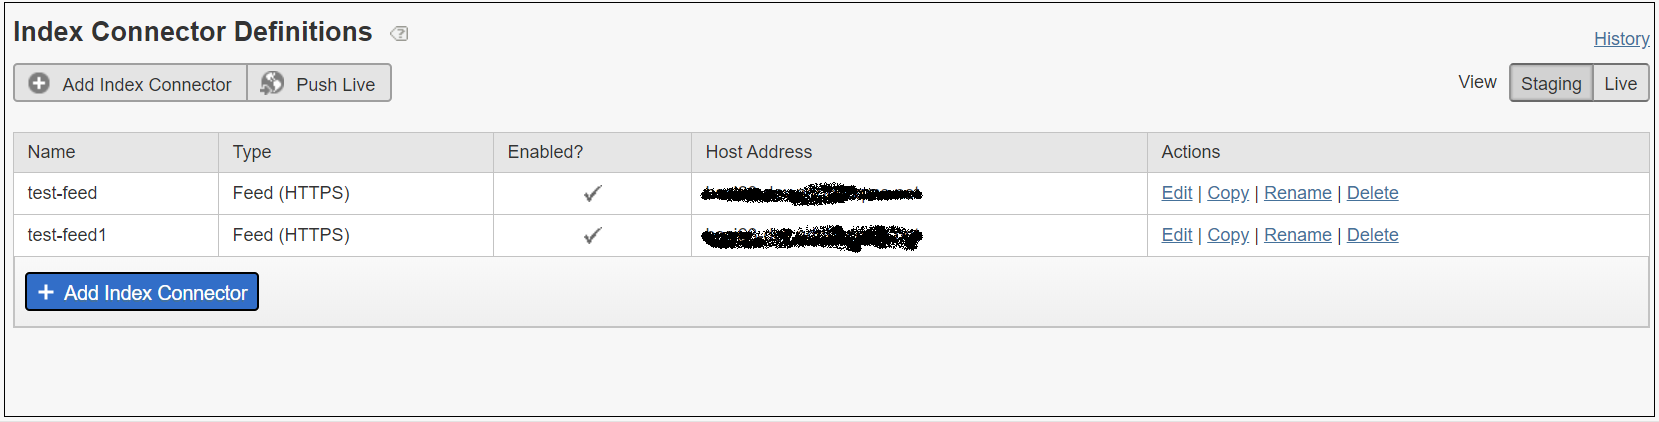
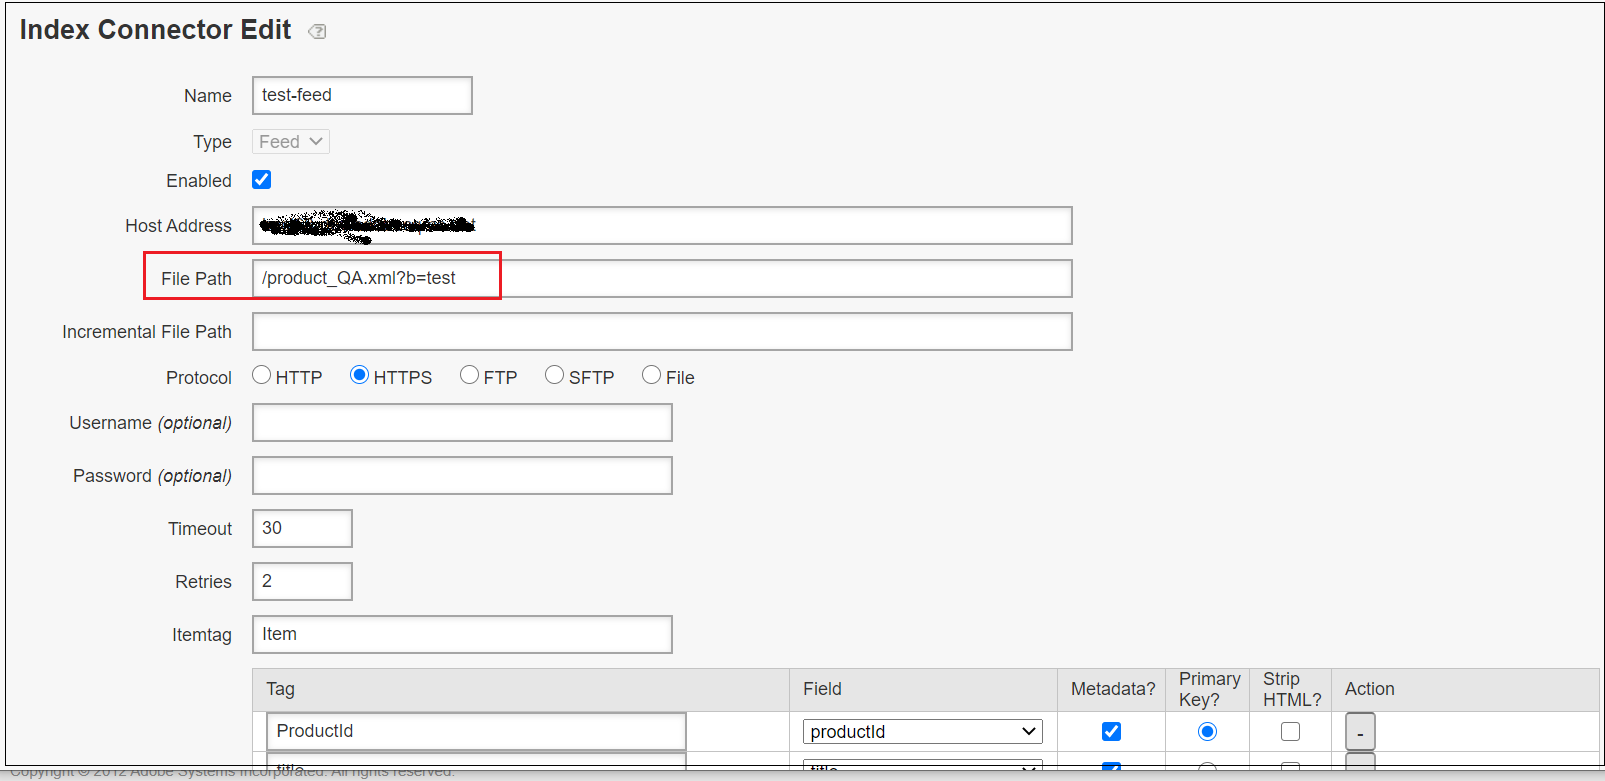
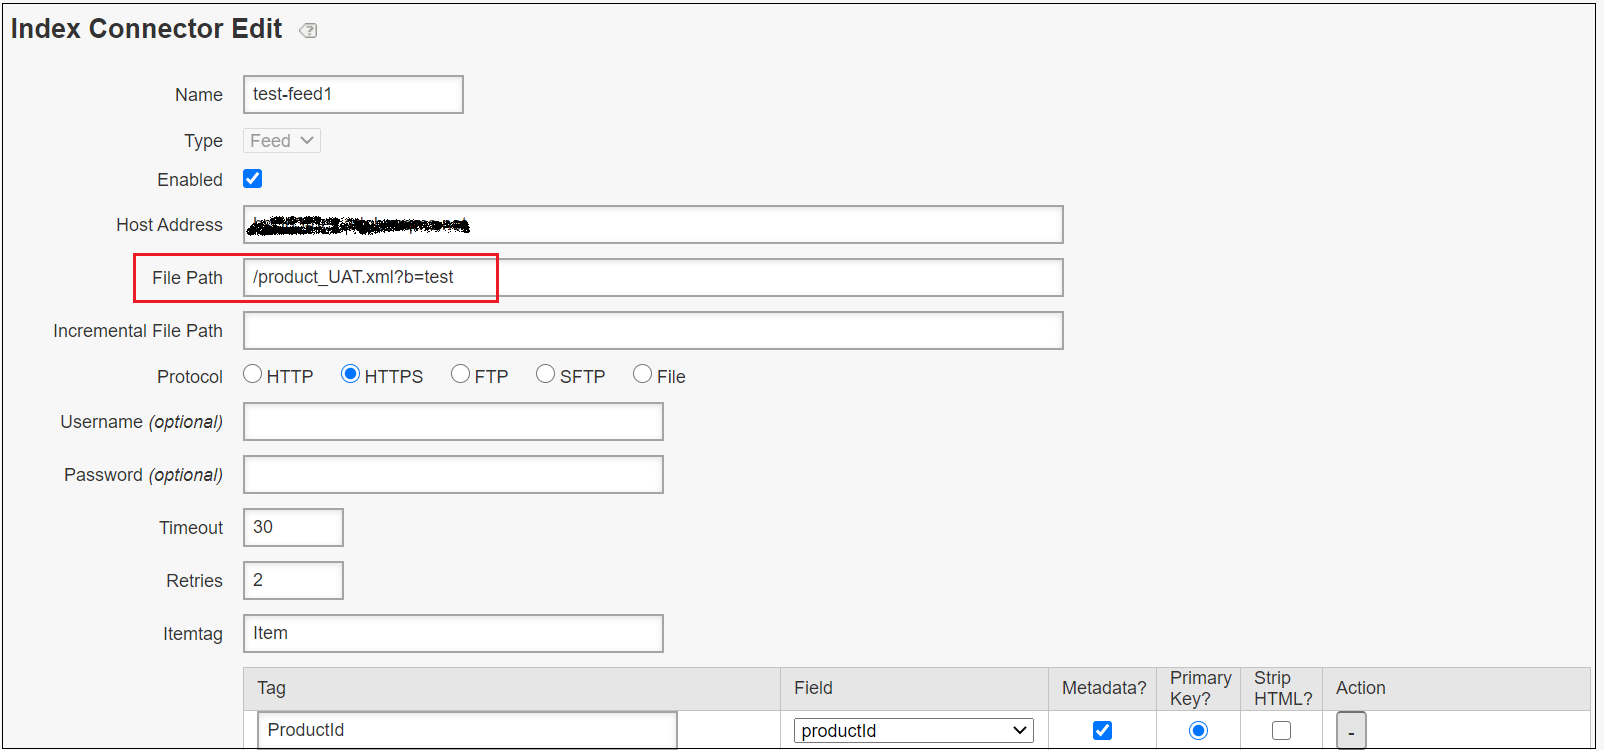
As a first step, let us enable the required fields in the IndexConnector data feed(I am using IndexConnector for indexing the data)
product_QA.xml
<feed xmlns:xs="http://www.w3.org/2001/XMLSchema" version="2.0">
<channel>
<title>Product Feed</title>
<Item>
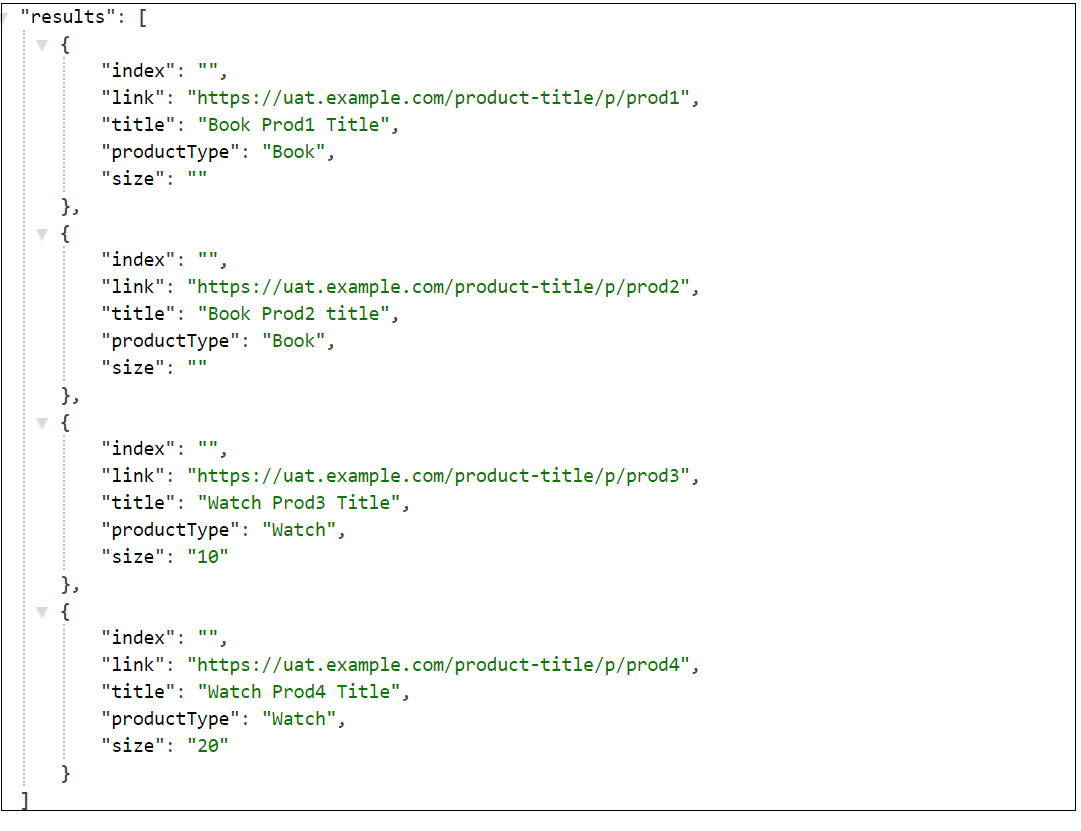
<link>https://qa.example.com/product-title/p/prod1</link>
<title>
<![CDATA[Book Prod1 Title]]>
</title>
<description>
<![CDATA[<p>Prod1 description</p>]]>
</description>
<productType>Book</productType>
<t1>Books|Discount</t1>
<t2>Legal|10%</t2>
<ProductId>prod1</ProductId>
<imageUrl>/content/dam/Images/product/prod1.jpg</imageUrl>
</Item><Item>
<link>https://qa.example.com/product-title/p/prod3</link>
<title>
<![CDATA[Book Prod2 Title]]>
</title>
<description>
<![CDATA[<p>Prod2 description</p>]]>
</description>
<productType>Book</productType>
<t1>Books|Discount</t1>
<t2>Tax|10%</t2>
<size>10</size>
<ProductId>prod2</ProductId>
<imageUrl>/content/dam/Images/product/prod3.jpg</imageUrl>
</Item><Item>
<link>https://qa.example.com/product-title/p/prod1</link>
<title>
<![CDATA[Watch Prod3 Title]]>
</title>
<description>
<![CDATA[<p>Prod3 description</p>]]>
</description>
<productType>Watch</productType>
<t1>Watches|Discount</t1>
<t2>Gramini|5%</t2>
<ProductId>prod3</ProductId>
<imageUrl>/content/dam/Images/product/prod3.jpg</imageUrl>
</Item><Item>
<link>https://qa.example.com/product-title/p/prod3</link>
<title>
<![CDATA[Watch Prod3 Title]]>
</title>
<description>
<![CDATA[<p>Prod4 description</p>]]>
</description>
<productType>Watch</productType>
<t1>Watches|Discount</t1>
<t2>Samsung|5%</t2>
<size>10</size>
<ProductId>prod4</ProductId>
<imageUrl>/content/dam/Images/product/prod3.jpg</imageUrl>
</Item></channel>
</feed>
The field “t1” defines the parent categories and filed “t2" defines the corresponding child categories. This helps to add the individual items to a different nested categories. The simple nested facet can also be defined combining existing fields with single values e.g <productType>Books</productType> and <subCategory>Legal</subCategory>
This data is converted to the following format by the filtering script during the indexing process.
e.g multiple “parent”child” categories
Book:Legal|Discount:10%
Single “parent:child” category
Books:Legal
Let us now create new metadata for fields “t1” and “t2”, Settings →Metadata →Definitions

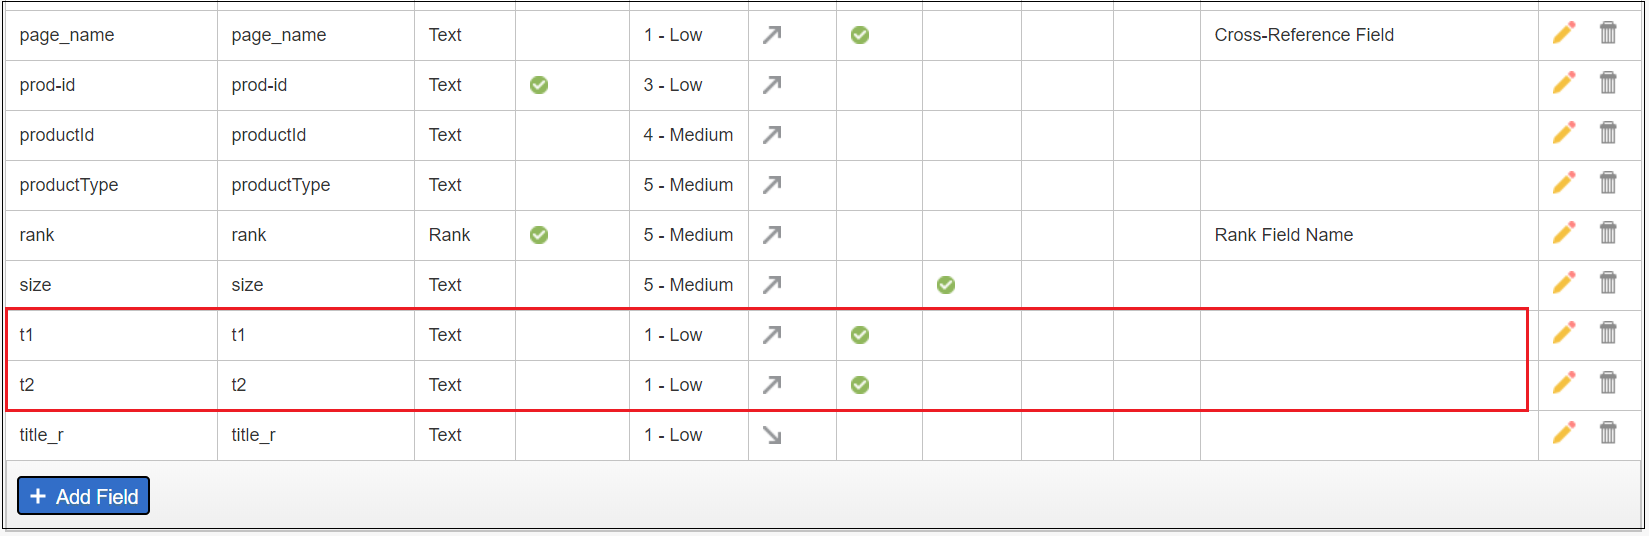
Create a metadata definition for the nested facet e.g “n1"

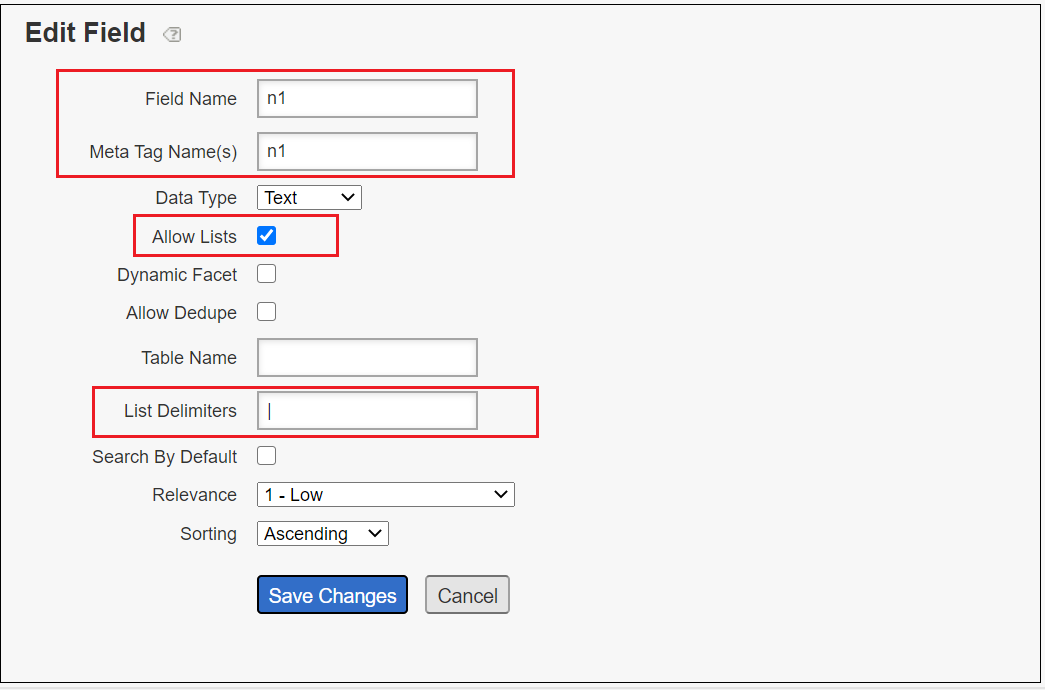
Select “Allow List” if multiple “parent:child” categories need to be enabled as part of the nested facet e.g Book:Legal|Discount:10%
List Delimiters — Delimiters separate the individual “parent:child” categories.
Update IndexConnector definition with “t1” and “t2” fields, Settings →Crawling →Index Connector

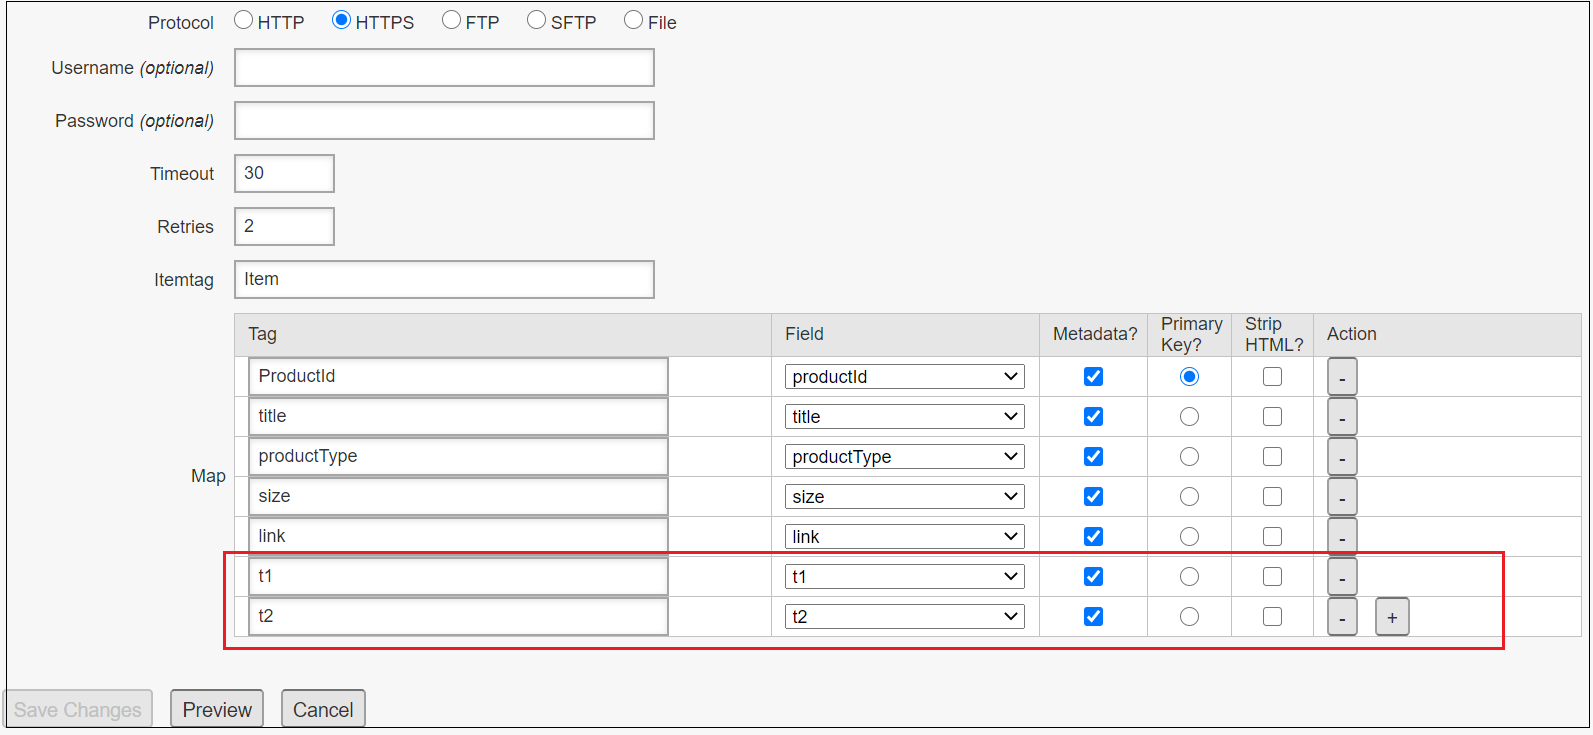
Now define 3 different facets “t1” and “t2”(normal) and “n1”(nested facet), Design →Navigation →Facets

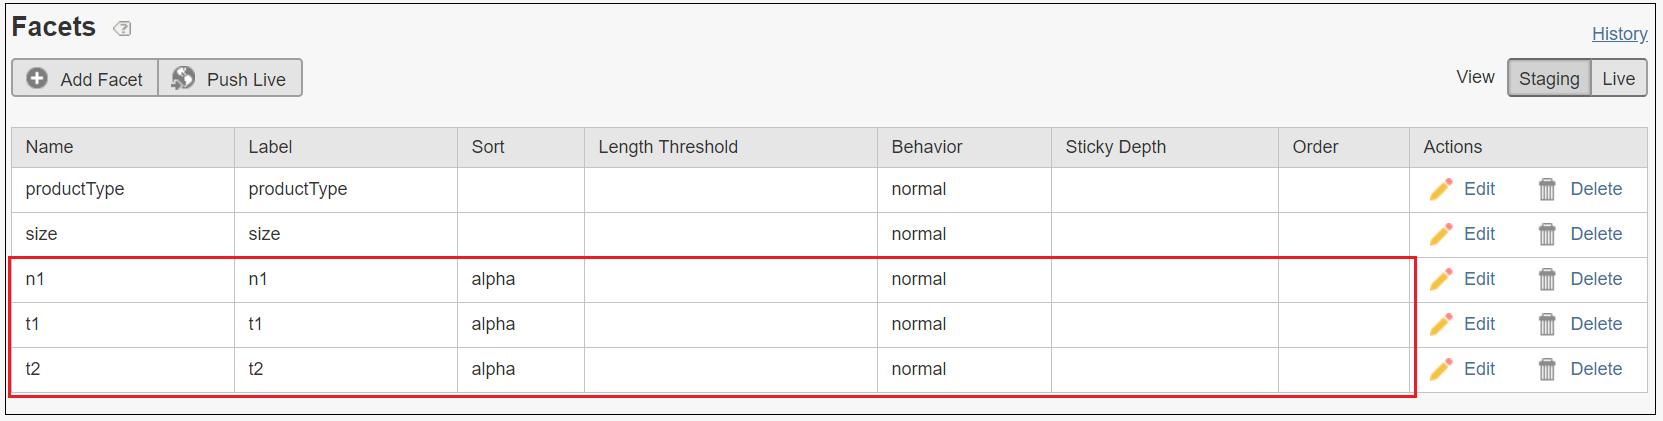

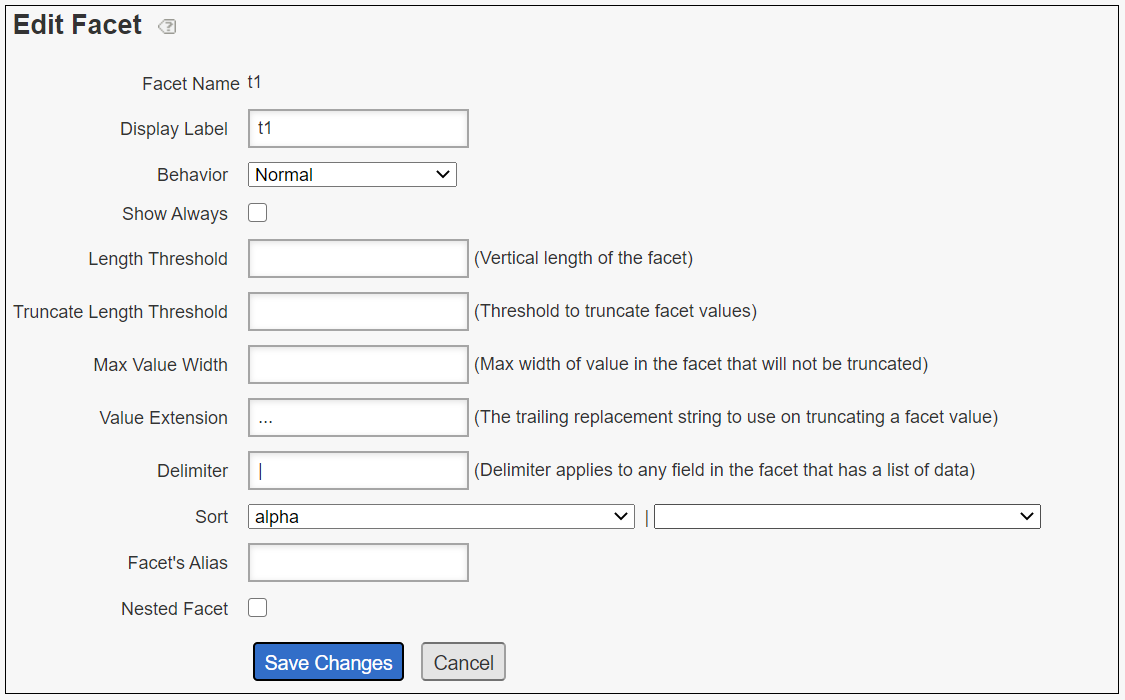

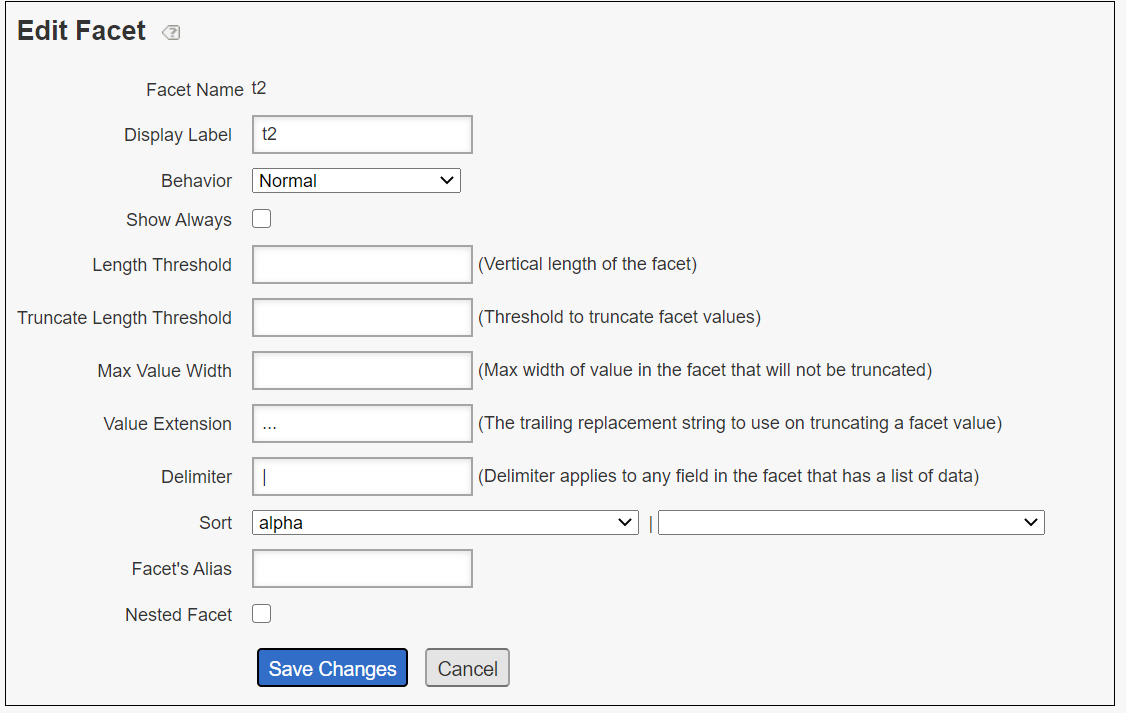

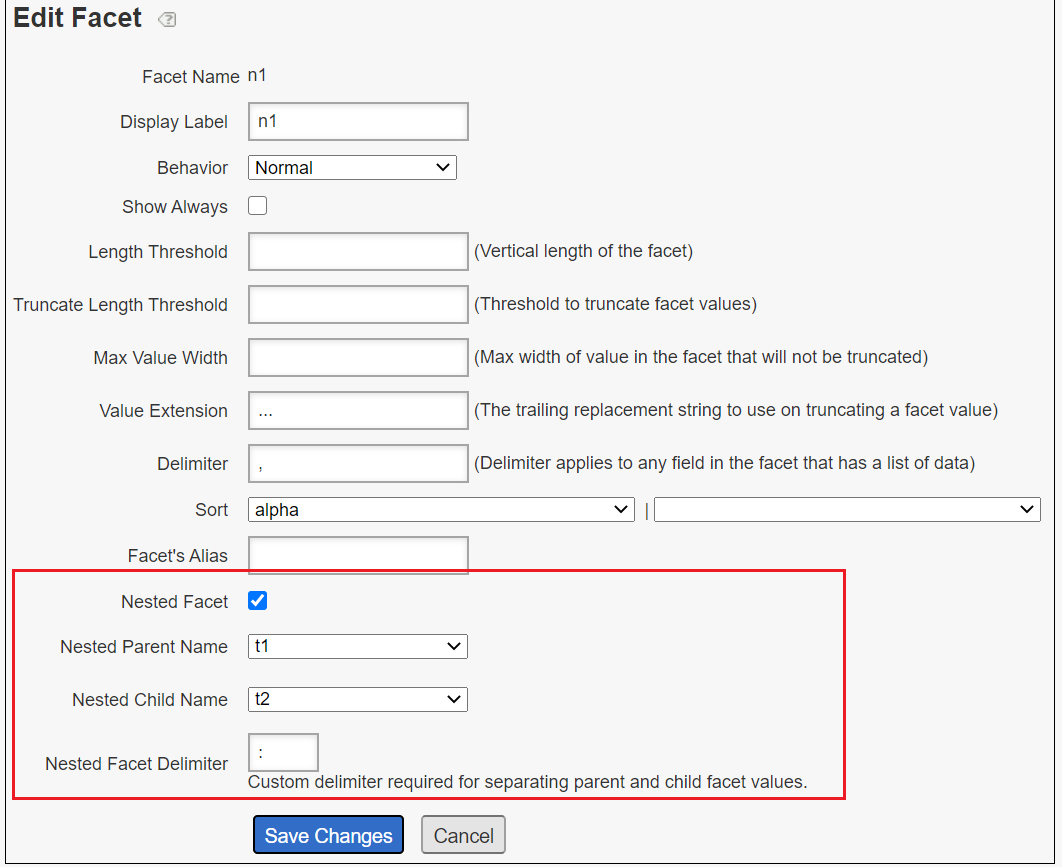
Enable “Nested Facet” option, select the parent and child facet defined earlier . Add the delimiter desperate the parent and child categories e.g “parent:child”
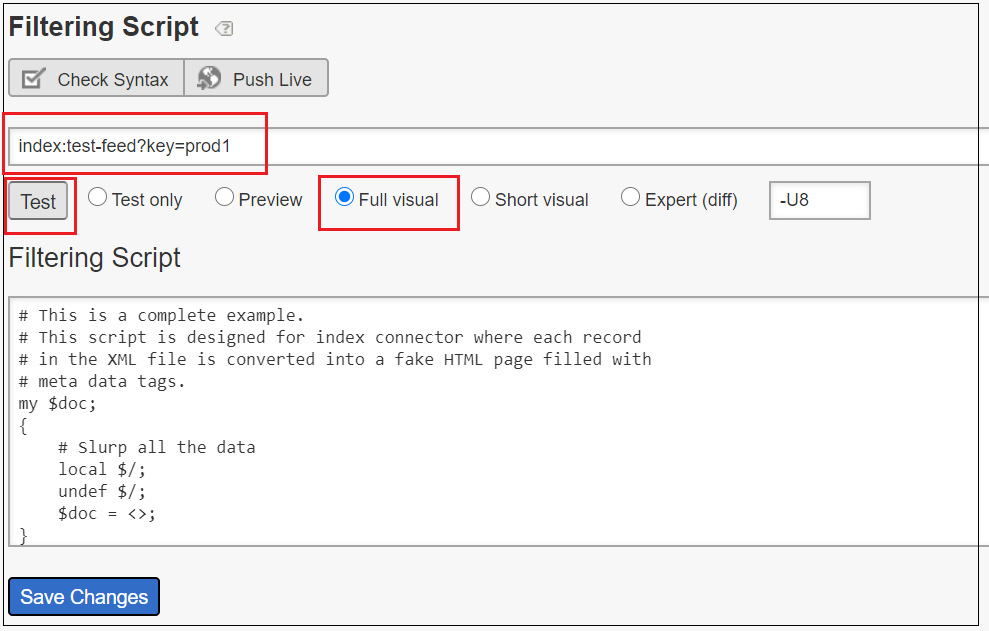
Let us now enable the filtering script that convert the data into the required format for nested facet, Settings →Filtering →Filtering Script
Add the below filtering script — this filtering script is enable for IndexConnector entry point with multiple value facet
# This is a complete example.
# This script is designed for index connector where each record
# in the XML file is converted into a fake HTML page filled with
# meta data tags.
my $doc;
{
    # Slurp all the data
    local $/;
    undef $/;
    $doc = <>;
}# All legitimate index connector data has key in its URL.
# Process the page if and only if it is coming from index connector and
# it is not the first entry point page.  Entry point pages don't have key
# in the URL.
if ( $main::search_url =~ /\?key=/ ) {
    my $meta = {};# Mine and scrape the meta fields from the page
    my @lines = split( /\n/, $doc );
    foreach my $line (@lines) {
        if ( $line =~ m{<meta name="(.*?)" content="(.*?)" />} ) {
            $meta->{ lc($1) } = $2;
        }
    }my $t1 = $meta->{'t1'};
    my $t2 = $meta->{'t2'};if ( defined $t1 && $t1 ) {
        my @t1arr = split( /\|/, $t1 );
        if ( scalar @t1arr > 0 ) {
             if (defined $t2 && $t2) {
    my @t2arr = split( /\|/, $t2 );
    if ( scalar @t2arr > 0 )
    {
     my $max = ((scalar @t1arr) < (scalar @t2arr)) ? (scalar @t1arr) : (scalar @t2arr);
     for (my $i = 0; $i < $max; $i++)
     {
      $t1arr[$i] .= ":" . $t2arr[$i];
     }
    }
            }
   my $output = join( '|', @t1arr );
     $doc =~ s{</head>}{<meta name="n1" content="$output" />\n</head>};
        }
    }
}# Prints the entire page back out.
print $doc;
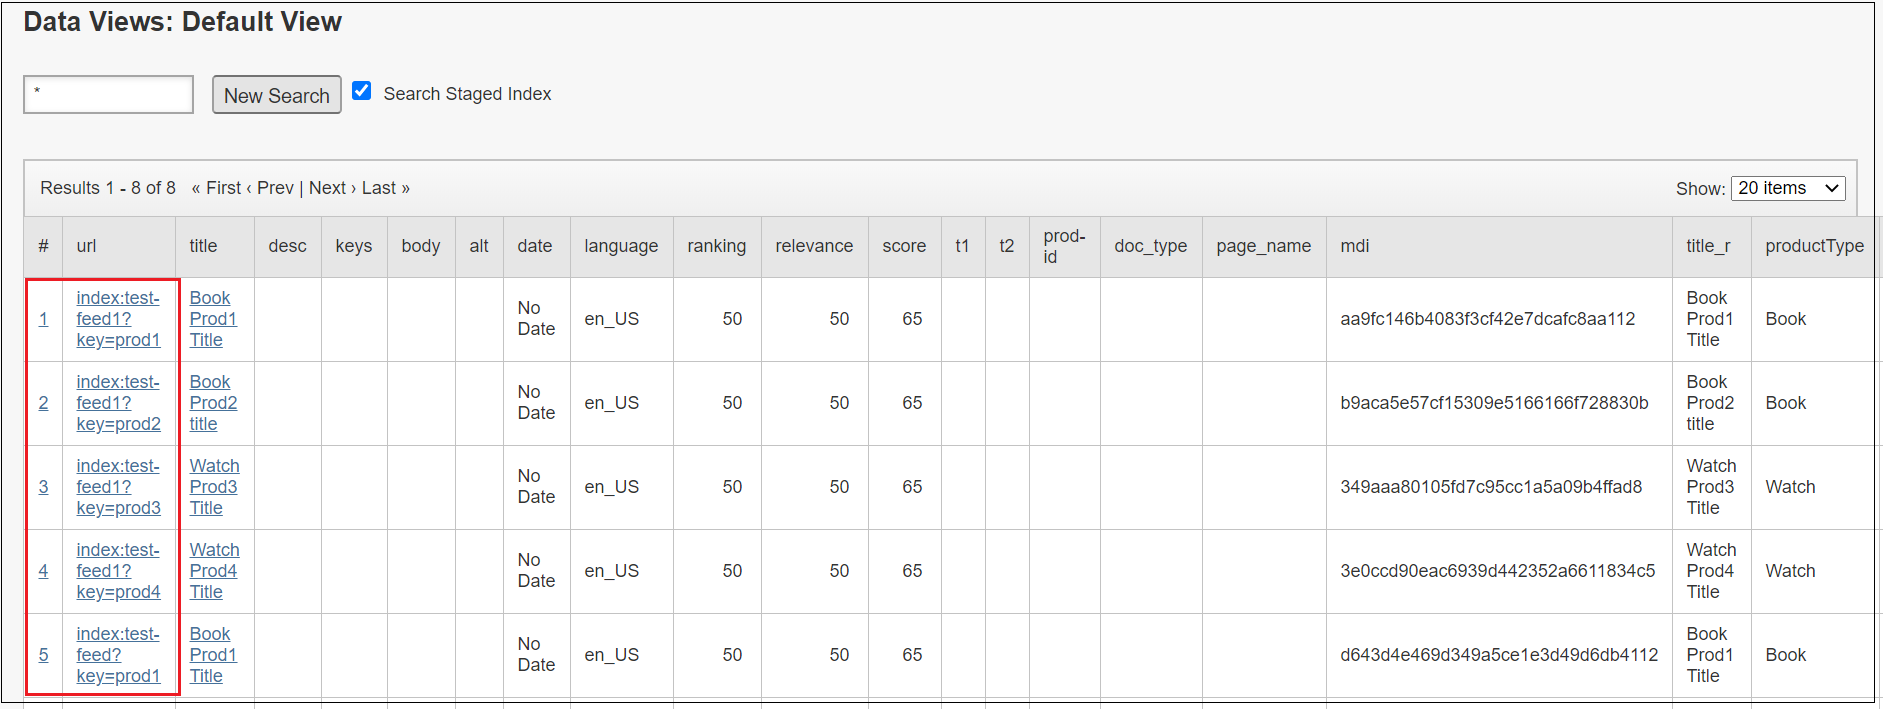
The script can be tested with sample URL


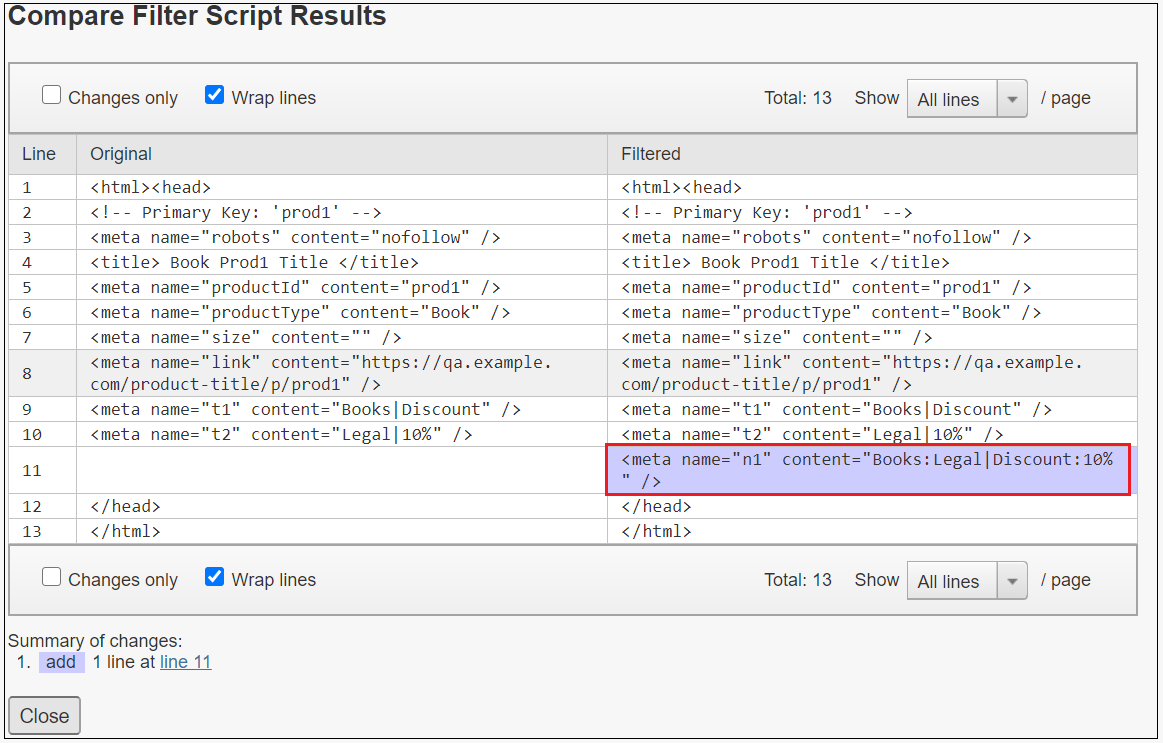
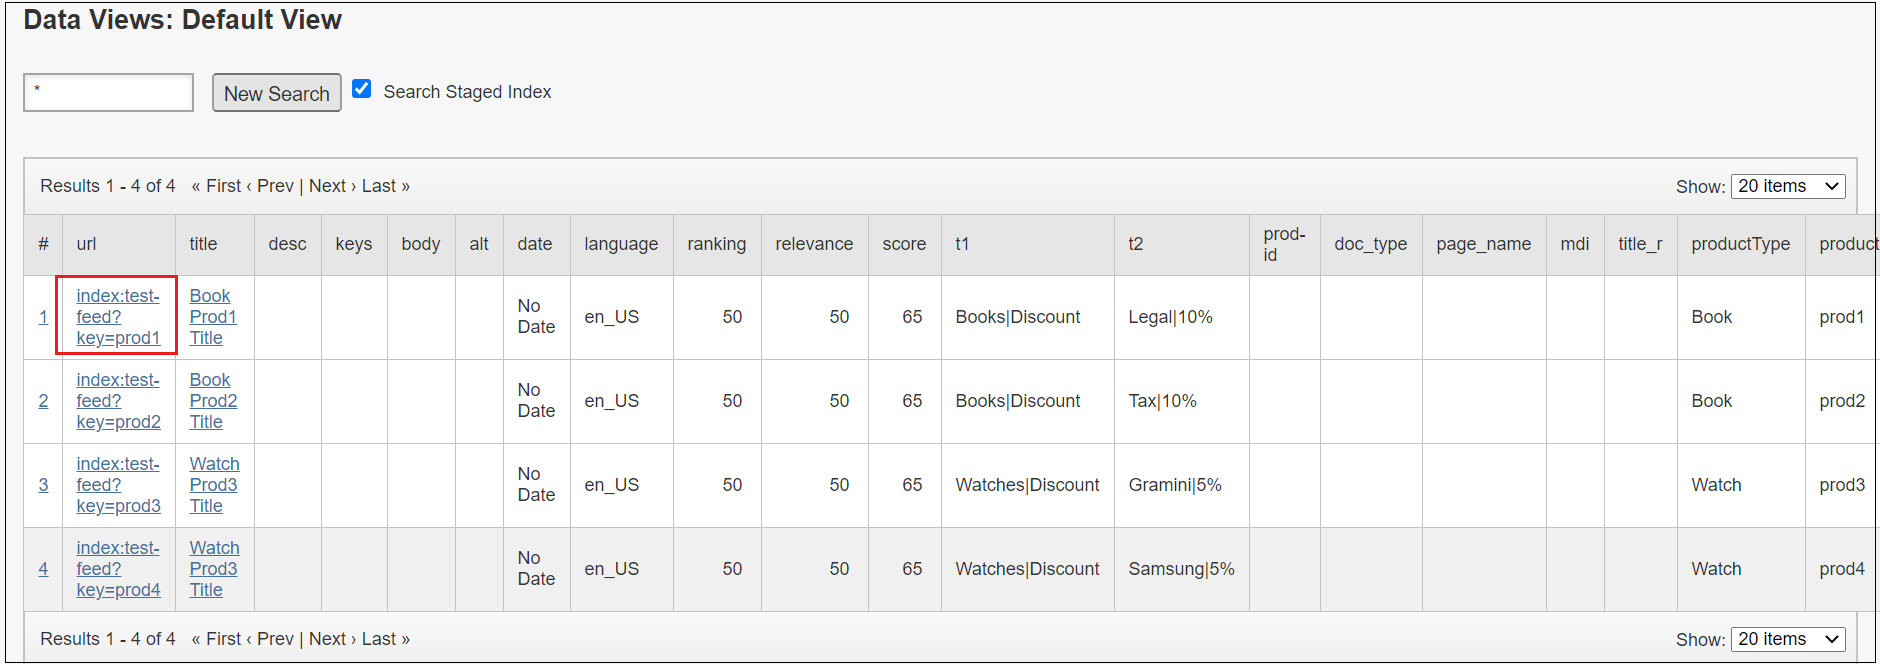
The test URL can be taken from Reports →Data Views →Default View

Refer https://docs.adobe.com/content/help/en/search- promote/using/design/c-about-facets.html for details on filtering script for URL based Indexing.
Now update the Transport template with the nested facet, Design →Templates
<search-content-type-header charset="UTF-8">
{
"general": {
"query" : "<search-query />",
"total" : "<search-total />",
"lower" : "<search-lower />",
"upper" : "<search-upper />"
},
"facets" : [
{
"name" : "n1",
"values" : [<search-field-value-list name="n1" quotes="yes" data="values" sortby="values" encoding="json" />],
"counts" : [<search-field-value-list name="n1" quotes="no" data="results" sortby="values" />]
}
],
"results" : [
<search-results>
{
"fields" :
[
{
"name" : "mdi",
"value" : "<search-display-field name="mdi" length="500" encoding="json" />"
},
{
"name" : "title",
"value" : "<search-display-field name="title" encoding="json" />"
},
{
"name" : "productType",
"value" : "<search-display-field name="productType" encoding="json" />"
}
]
}
<search-if-not-last>,</search-if-not-last>
</search-results>
]
}
Update the Presentation template with the nested facet
<guided-content-type-header content="application/json" />
<guided-if-query-param-defined gsname="callback" /><guided-query-param gsname="callback" />(</guided-if-query-param-defined>
{
 "general" :
 {
  "query" : "<guided-query-param gsname='q' />",
  "total" : "<guided-results-total />",
  "page_lower" : "<guided-results-lower>",
  "page_upper" : "<guided-results-upper>",
  "page_total": "<guided-page-total/>"
 },
    "facets" :
     [
  <guided-zone gsname="Facets_Default">
   <guided-facet  gsname="n1" >
   {
    "values" :
    [
     <guided-facet-values>
     {
      "value" : "<guided-facet-value  escape="ijson">",
      "selected" : "<guided-if-facet-value-selected>true<guided-else-facet-value-selected>false</guided-if-facet-value-selected>",
      "count" : "<guided-facet-count>",
      "link" : "<guided-facet-value-path>",
      "undolink" : "<guided-facet-value-undo-path>",

     "child" :
     [
      <guided-if-facet-value-has-children>

      <guided-facet-value-children>
      {
       "value" : "<guided-facet-value  escape="ijson">",
       "selected" : "<guided-if-facet-value-selected>true<guided-else-facet-value-selected>false</guided-if-facet-value-selected>",
       "count" : "<guided-facet-count>",
       "link" : "<guided-facet-value-path>",
       "undolink" : "<guided-facet-value-undo-path>"
      }<guided-if-not-last>,</guided-if-not-last>
      </guided-facet-value-children>

     </guided-if-facet-value-has-children>

     ]
     }<guided-if-not-last>,</guided-if-not-last>
     </guided-facet-values>
    ]
   }
   </guided-facet></guided-zone>
    ],
 "results" :
 [
  <guided-results gsname="default">
  {
   "index" : "<guided-result-index />",
   "title" : "<guided-result-field gsname="title" escape="ijson" />",
   "productType" : "<guided-result-field gsname="productType" escape="ijson" />"
  }<guided-if-not-last>,</guided-if-not-last>
  </guided-results>
 ]
}
<guided-if-query-param-defined gsname="callback">)</guided-if-query-param-defined>
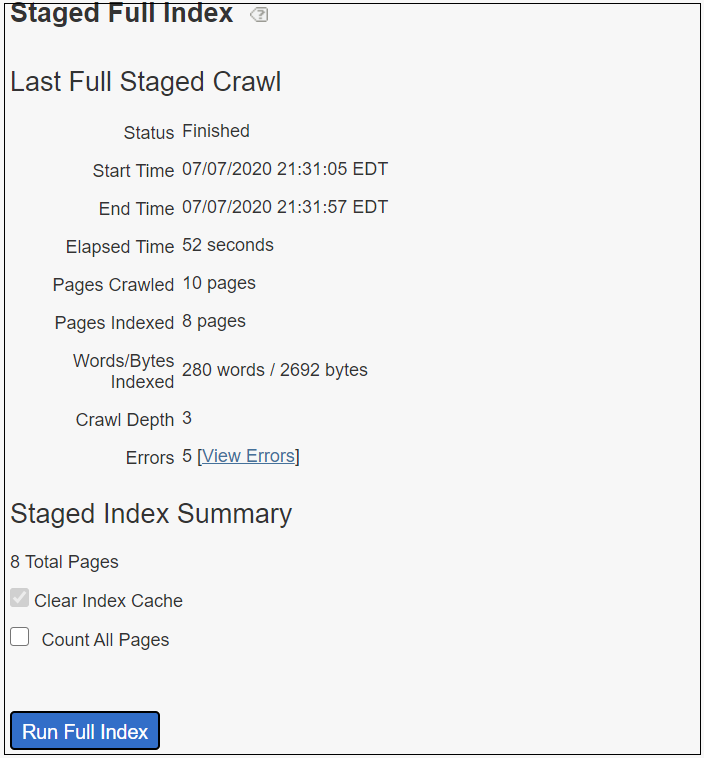
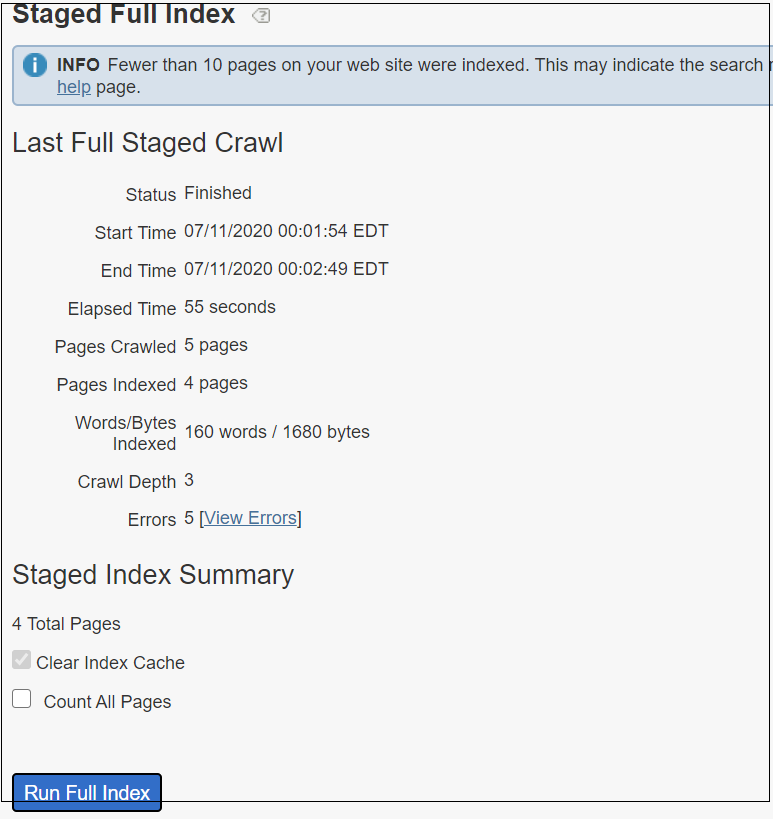
The configurations are ready, let us now run a Stage indexing (note the configuration are not pushed to live yet)
Index →Full Index →Staged Index →Run Full Index

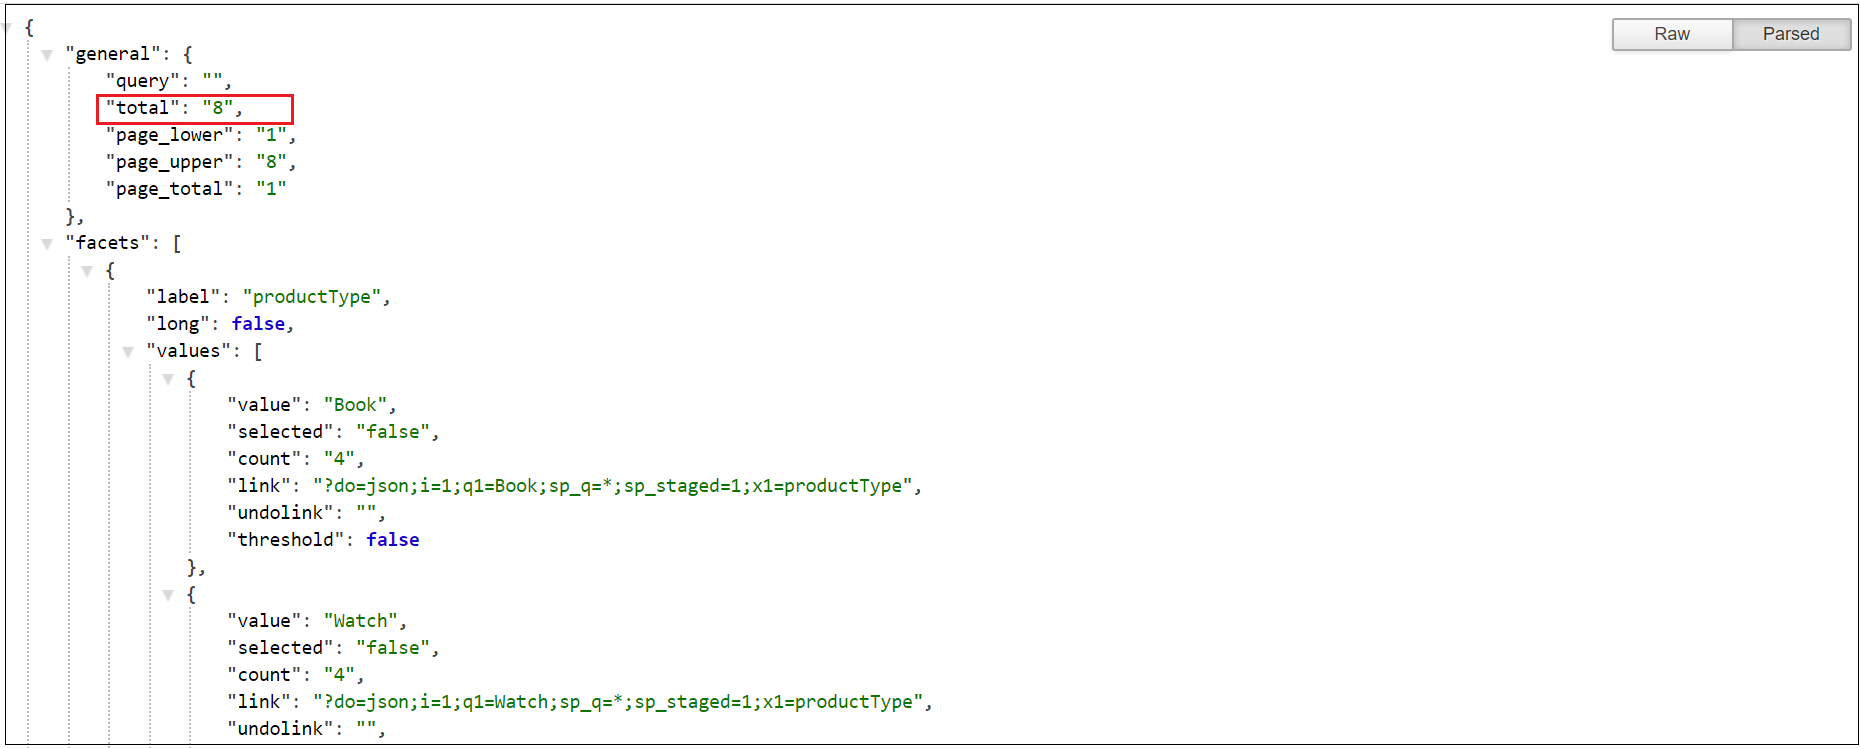
Access http://stage-xxxxxxxxxxx.guided.ss-omtrdc.net/do=json&sp_staged=1&sp_q=*
xxxxxxxxxxx — Search and Promote account number
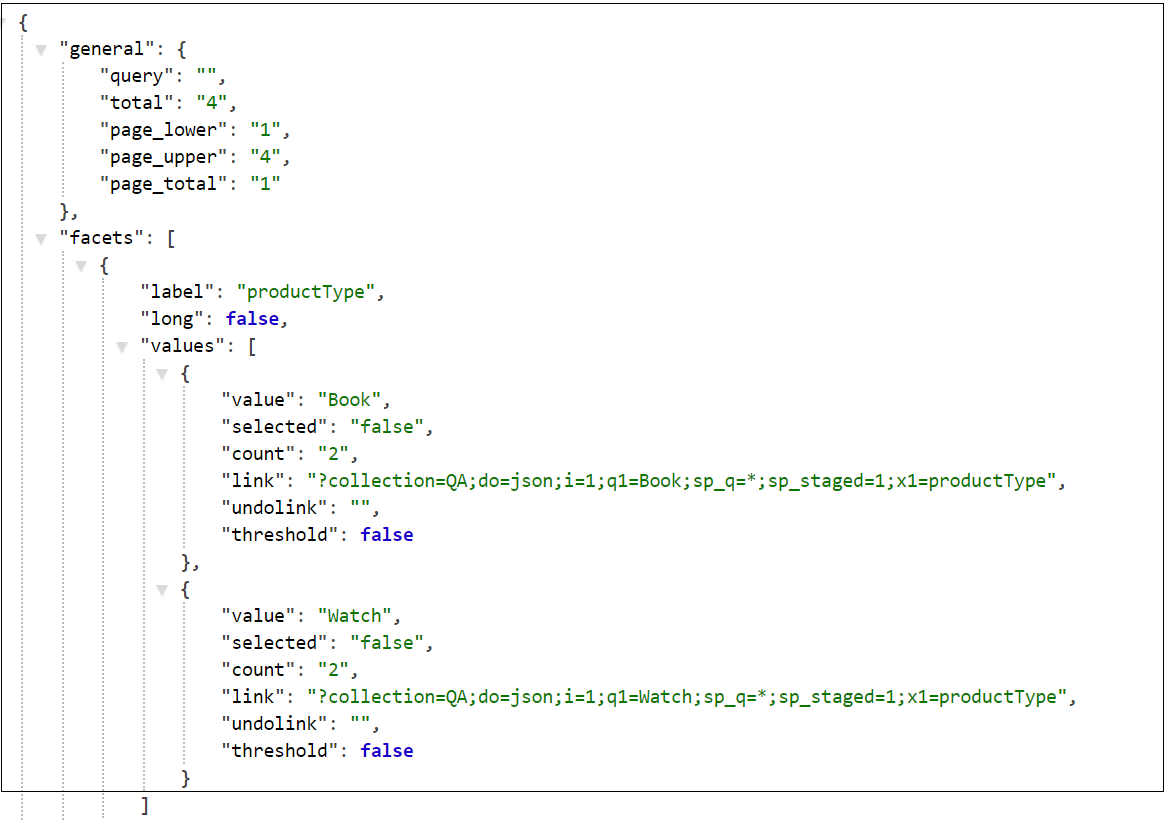
This will respond with JSON data which contains the required facet and meta data details.
{
"general": {
"query": "*",
"total": "4",
"page_lower": "1",
"page_upper": "4",
"page_total": "1"
},
"facets": [
{
"values": [
{
"value": "Books",
"selected": "false",
"count": "2",
"link": "?do=json;i=1;q=*;q1=Books;sp_staged=1;x1=t1",
"undolink": "",
"child": [
{
"value": "Legal",
"selected": "false",
"count": "1",
"link": "?do=json;i=1;q=*;q1=Books;sp_staged=1;x1=t1;i=1;q2=Legal;x2=t2",
"undolink": ""
},
{
"value": "Tax",
"selected": "false",
"count": "1",
"link": "?do=json;i=1;q=*;q1=Books;sp_staged=1;x1=t1;i=1;q2=Tax;x2=t2",
"undolink": ""
}
]
},
{
"value": "Discount",
"selected": "false",
"count": "4",
"link": "?do=json;i=1;q=*;q1=Discount;sp_staged=1;x1=t1",
"undolink": "",
"child": [
{
"value": "10%",
"selected": "false",
"count": "2",
"link": "?do=json;i=1;q=*;q1=Discount;sp_staged=1;x1=t1;i=1;q2=10%25;x2=t2",
"undolink": ""
},
{
"value": "5%",
"selected": "false",
"count": "2",
"link": "?do=json;i=1;q=*;q1=Discount;sp_staged=1;x1=t1;i=1;q2=5%25;x2=t2",
"undolink": ""
}
]
},
{
"value": "Watches",
"selected": "false",
"count": "2",
"link": "?do=json;i=1;q=*;q1=Watches;sp_staged=1;x1=t1",
"undolink": "",
"child": [
{
"value": "Gramini",
"selected": "false",
"count": "1",
"link": "?do=json;i=1;q=*;q1=Watches;sp_staged=1;x1=t1;i=1;q2=Gramini;x2=t2",
"undolink": ""
},
{
"value": "Samsung",
"selected": "false",
"count": "1",
"link": "?do=json;i=1;q=*;q1=Watches;sp_staged=1;x1=t1;i=1;q2=Samsung;x2=t2",
"undolink": ""
}
]
}
]
}
],
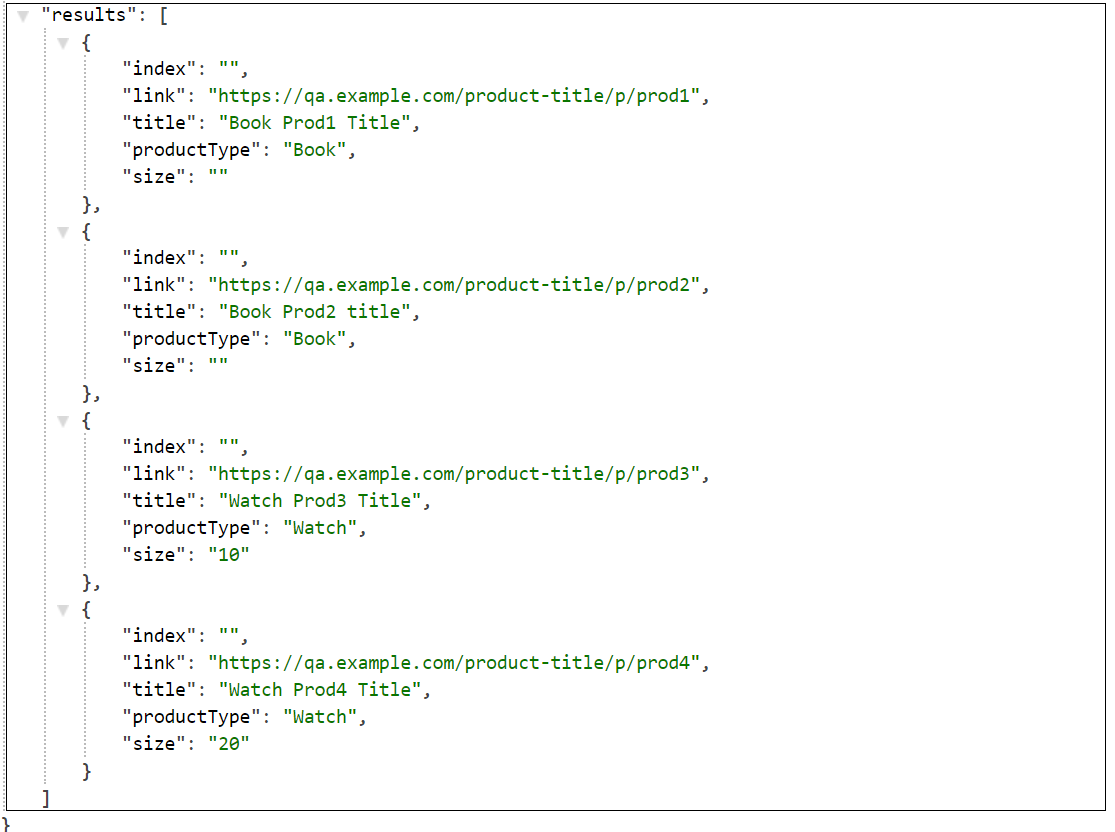
"results": [
{
"index": "",
"title": "Book Prod1 Title",
"productType": "Book"
},
{
"index": "",
"title": "Book Prod2 Title",
"productType": "Book"
},
{
"index": "",
"title": "Watch Prod3 Title",
"productType": "Watch"
},
{
"index": "",
"title": "Watch Prod3 Title",
"productType": "Watch"
}
]
}The configuration can be pushed live after successful validation and run a live index →Full Index →Live Index →Run Full Index
The URL to access live data http://xxxxxxxxxxx.guided.ss-omtrdc.net/do=json&sp_q=*
The facet data in the response can be used to present the filtering options to users to narrow down the website search.