This tutorial explains the complete details on configuring sling mapping for resource resolution in Adobe Experience Manager.
Resource mapping is used to define the content mapping and redirects in AEM.
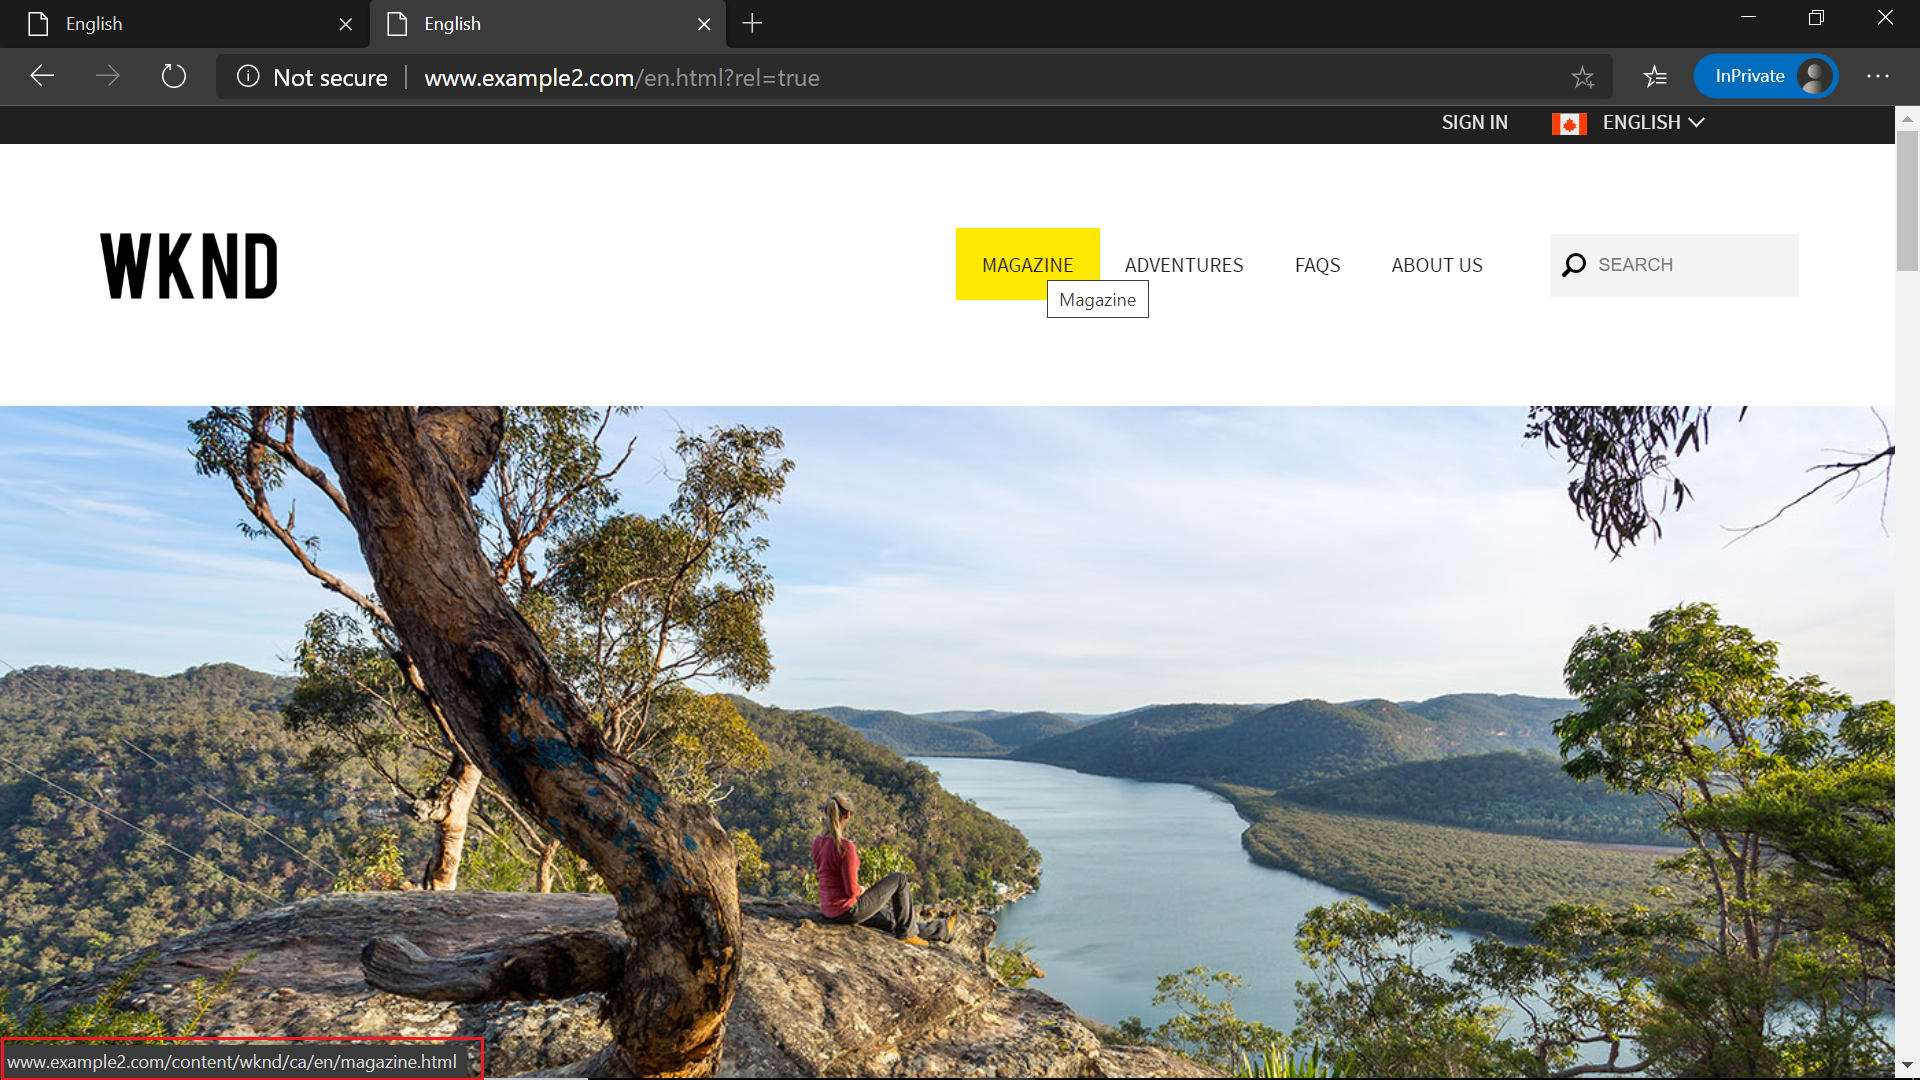
I have enabled two sample domains www.example1.com and www.example2.com pointing to /content/wknd/us/en and /content/wknd/ca/en nodes respectively(sample wknd website nodes).
The flow is as below

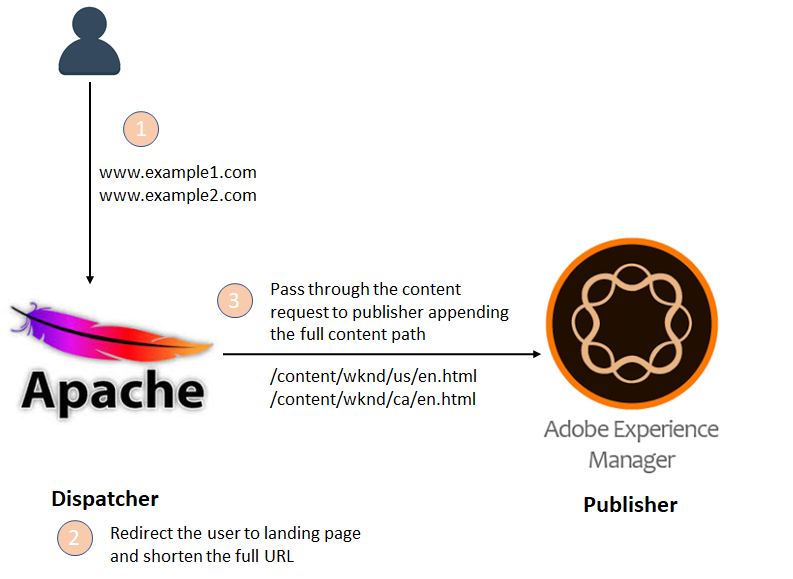
The user request for www.example1.com and www.example2.com, the Apache redirects the user to the domain specific landing pages and also redirect the user to the shortened URL(hide/content/wknd/<country code> if user access the page with full content path). The dispatcher pass through the shortened content URL’s to publisher by appending the full content path /content/wknd/<country code>
As first step let us enable the virtual host configurations for www.example1.com and www.example2.com in Apache(Dispatcher)
<VirtualHost *:80>
    ServerAdmin [email protected]
    DocumentRoot "C:\opt\communique\dispatcher\cache"
    ServerName www.example1.com

    RewriteEngine On
    RewriteRule ^/$ /en.html [R=301]
    RewriteRule ^/content/wknd/us/(.*)$ /$1 [NE,L,R=301]

    RewriteCond %{REQUEST_URI} !^/apps
    RewriteCond %{REQUEST_URI} !^/content
    RewriteCond %{REQUEST_URI} !^/etc
    RewriteCond %{REQUEST_URI} !^/home
    RewriteCond %{REQUEST_URI} !^/libs
    RewriteCond %{REQUEST_URI} !^/bin
    RewriteCond %{REQUEST_URI} !^/tmp
    RewriteCond %{REQUEST_URI} !^/var
    RewriteRule ^/(.+)$ /content/wknd/us/$1 [NC,PT,L]   <Directory />
     <IfModule disp_apache2.c>
       SetHandler dispatcher-handler
     </IfModule>
     Options Indexes FollowSymLinks Includes
     # Set includes to process .html files
     AddOutputFilter INCLUDES .html
     AddOutputFilterByType INCLUDES text/html
     AllowOverride None
   </Directory>
</VirtualHost><VirtualHost *:80>
    ServerAdmin [email protected]
    DocumentRoot "C:\opt\communique\dispatcher\cache"
    ServerName www.example2.com

    RewriteEngine On
    RewriteRule ^/$ /en.html [R=301]
    RewriteRule ^/content/wknd/ca/(.*)$ /$1 [NE,L,R=301]

    RewriteCond %{REQUEST_URI} !^/apps
    RewriteCond %{REQUEST_URI} !^/content
    RewriteCond %{REQUEST_URI} !^/etc
    RewriteCond %{REQUEST_URI} !^/home
    RewriteCond %{REQUEST_URI} !^/libs
    RewriteCond %{REQUEST_URI} !^/bin
    RewriteCond %{REQUEST_URI} !^/tmp
    RewriteCond %{REQUEST_URI} !^/var
    RewriteRule ^/(.+)$ /content/wknd/ca/$1 [NC,PT,L]

   <Directory />
     <IfModule disp_apache2.c>
       SetHandler dispatcher-handler
    </IfModule>
    Options Indexes FollowSymLinks Includes
    # Set includes to process .html files
    AddOutputFilter INCLUDES .html
    AddOutputFilterByType INCLUDES text/html
    AllowOverride None
   </Directory>
</VirtualHost>
“DispatcherUseProcessedURL on” configuration should be enabled in dispatcher configuration to enable the Pass Through URL’s to work
e.g
<IfModule disp_apache2.c># location of the configuration file. eg: 'conf/dispatcher.any'
    DispatcherConfig conf/author_dispatcher.any

    # location of the dispatcher log file. eg: 'logs/dispatcher.log'
    DispatcherLog    logs/dispatcher.log

    # log level for the dispatcher log, can be either specified
    # as a string or an integer (in parentheses)
    # error(0): Errors
    # warn(1):  Warnings
    # info(2):  Infos
    # debug(3): Debug
    # trace(4): Trace
    DispatcherLogLevel Debug

    # if turned on, the dispatcher looks like a normal module
    DispatcherNoServerHeader Off

    # if turned on, request to / are not handled by the dispatcher
    # use the mod_alias then for the correct mapping
    DispatcherDeclineRoot Off

    # if turned on, the dispatcher uses the URL already processed
    # by handlers preceeding the dispatcher (i.e. mod_rewrite)
    # instead of the original one passed to the web server.
    DispatcherUseProcessedURL on

    # if turned to 1, the dispatcher does not spool an error
    # response to the client (where the status code is greater
    # or equal than 400), but passes the status code to
    # Apache, which e.g. allows an ErrorDocument directive
    # to process such a status code.
    #
    # Additionally, one can specify the status code ranges that should
    # be left to web server to handle, e.g.
    #
    # DispatcherPassError 400-404,501
    DispatcherPassError 0#
    # DispatcherKeepAliveTimeout specifies the number of seconds a
    # connection to a backend should be kept alive. If not set or
    # set to zero, connections are not kept alive.
    #
    #DispatcherKeepAliveTimeout 60</IfModule>
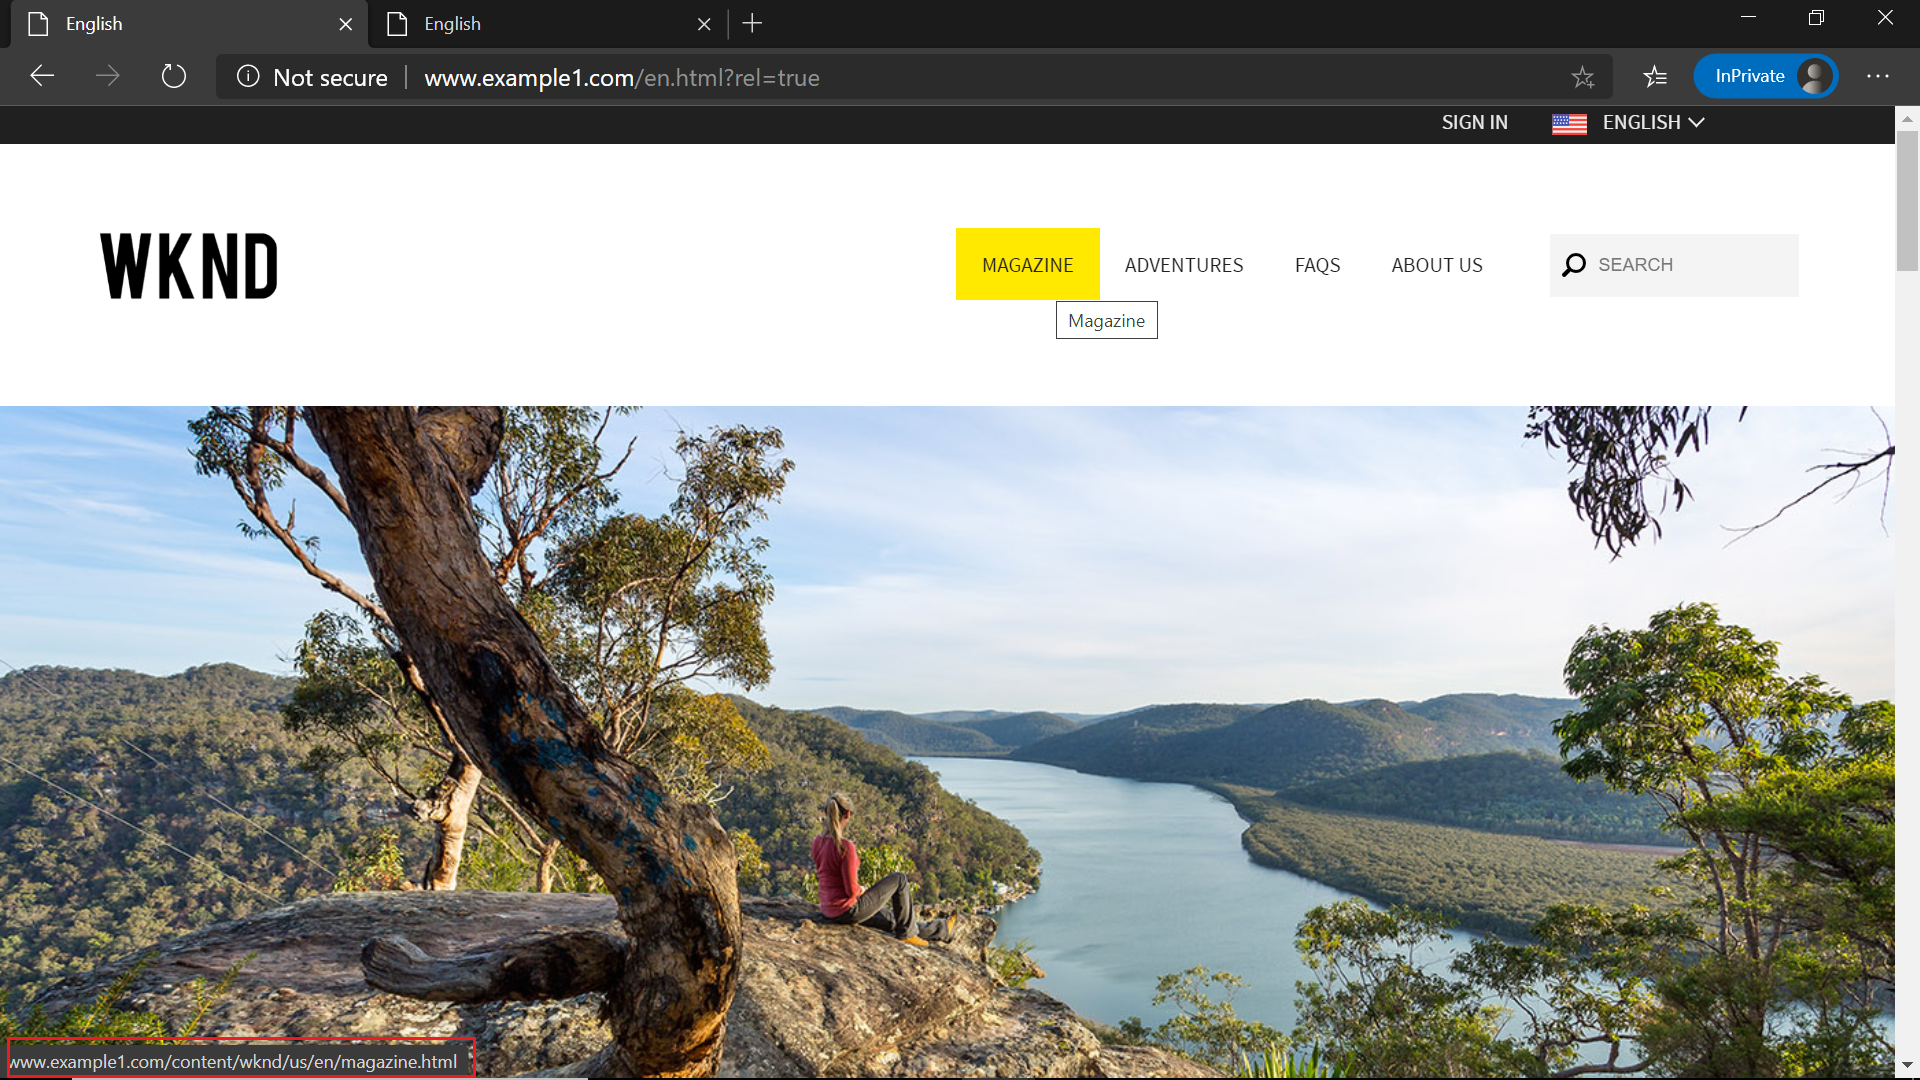
Now both the domains www.example1.com and www.example2.com are accessible, this will display the mapped landing page content but the internal page links still point to the complete URL(/content/wknd/<<country code>>)


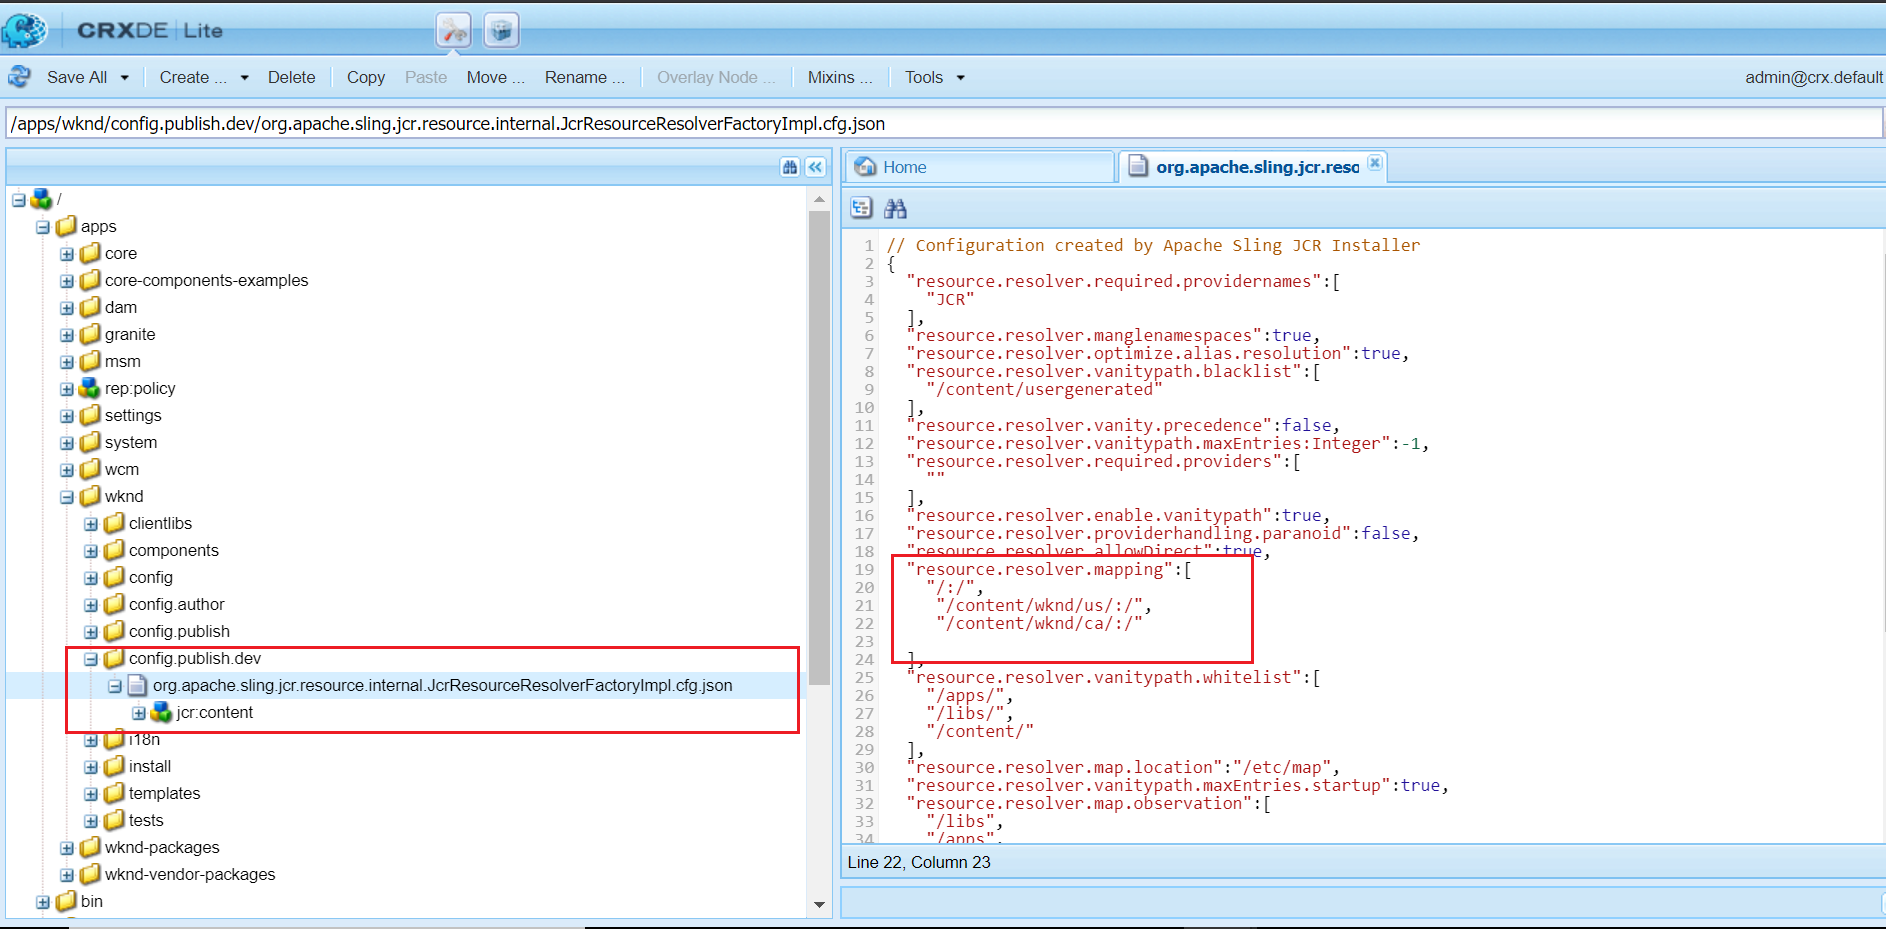
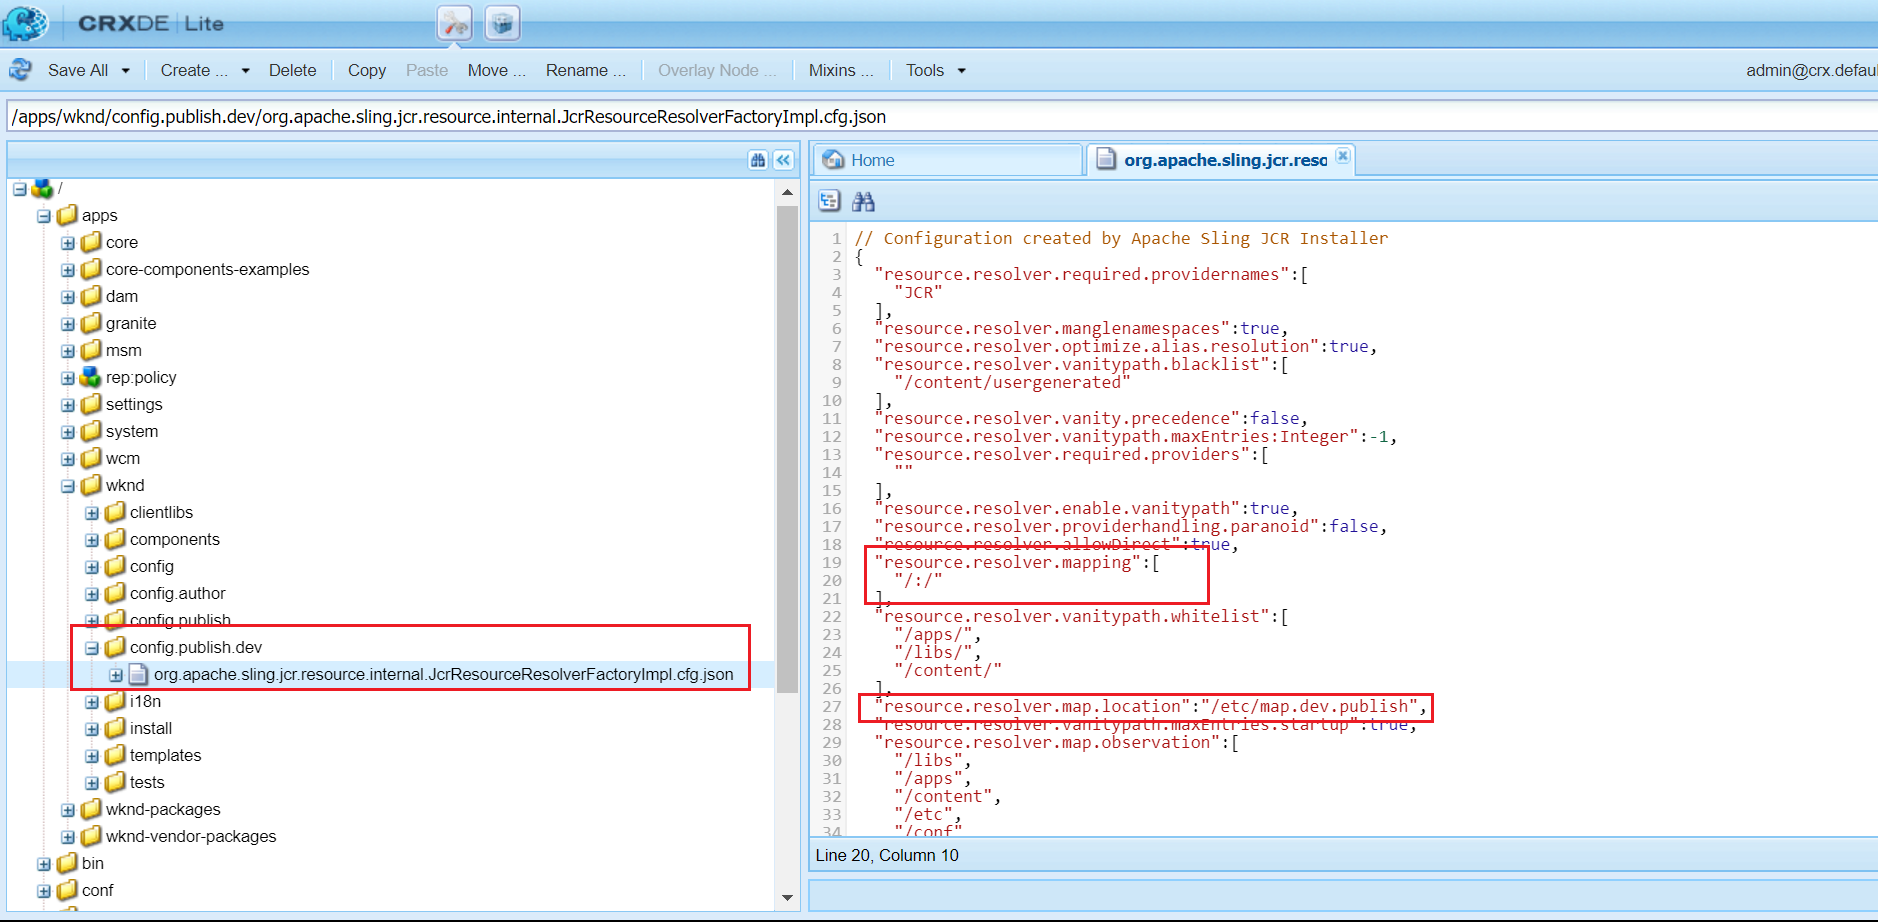
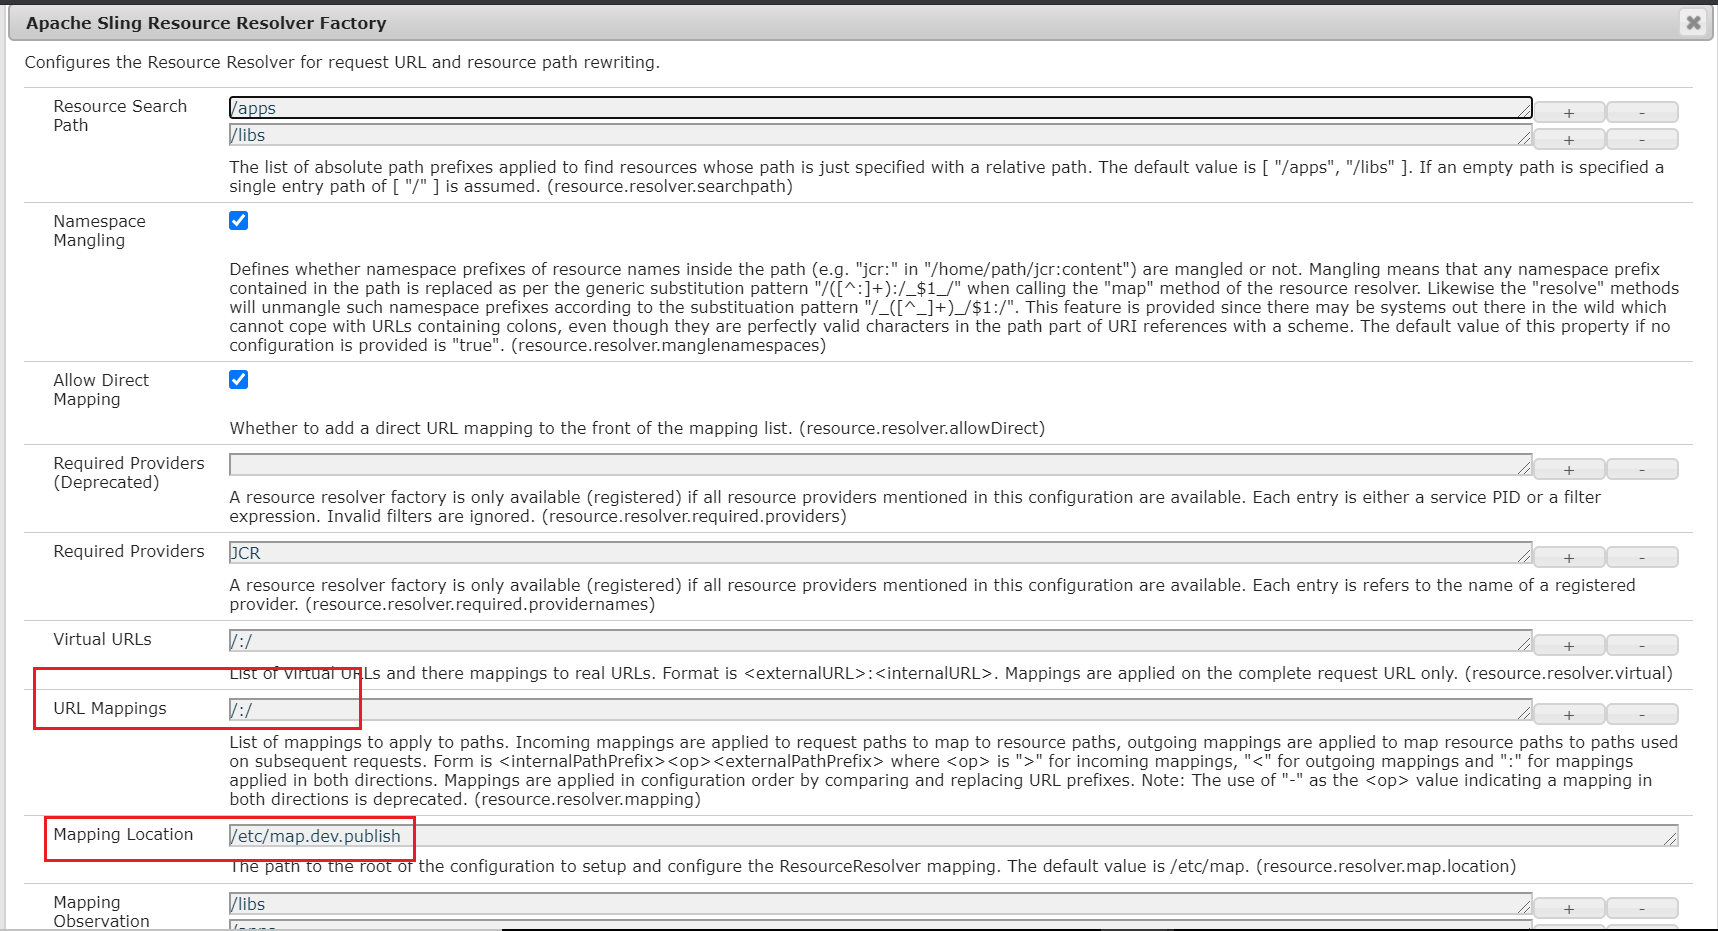
Let us now enable the run mode specific(my case the server is enabled with additional run mode “dev”) ResourceResolver configuration — “Apache Sling Resource Resolver Factory” to reverse map the internal full content path to the shortened URL— enable the mapping for all the required content paths.

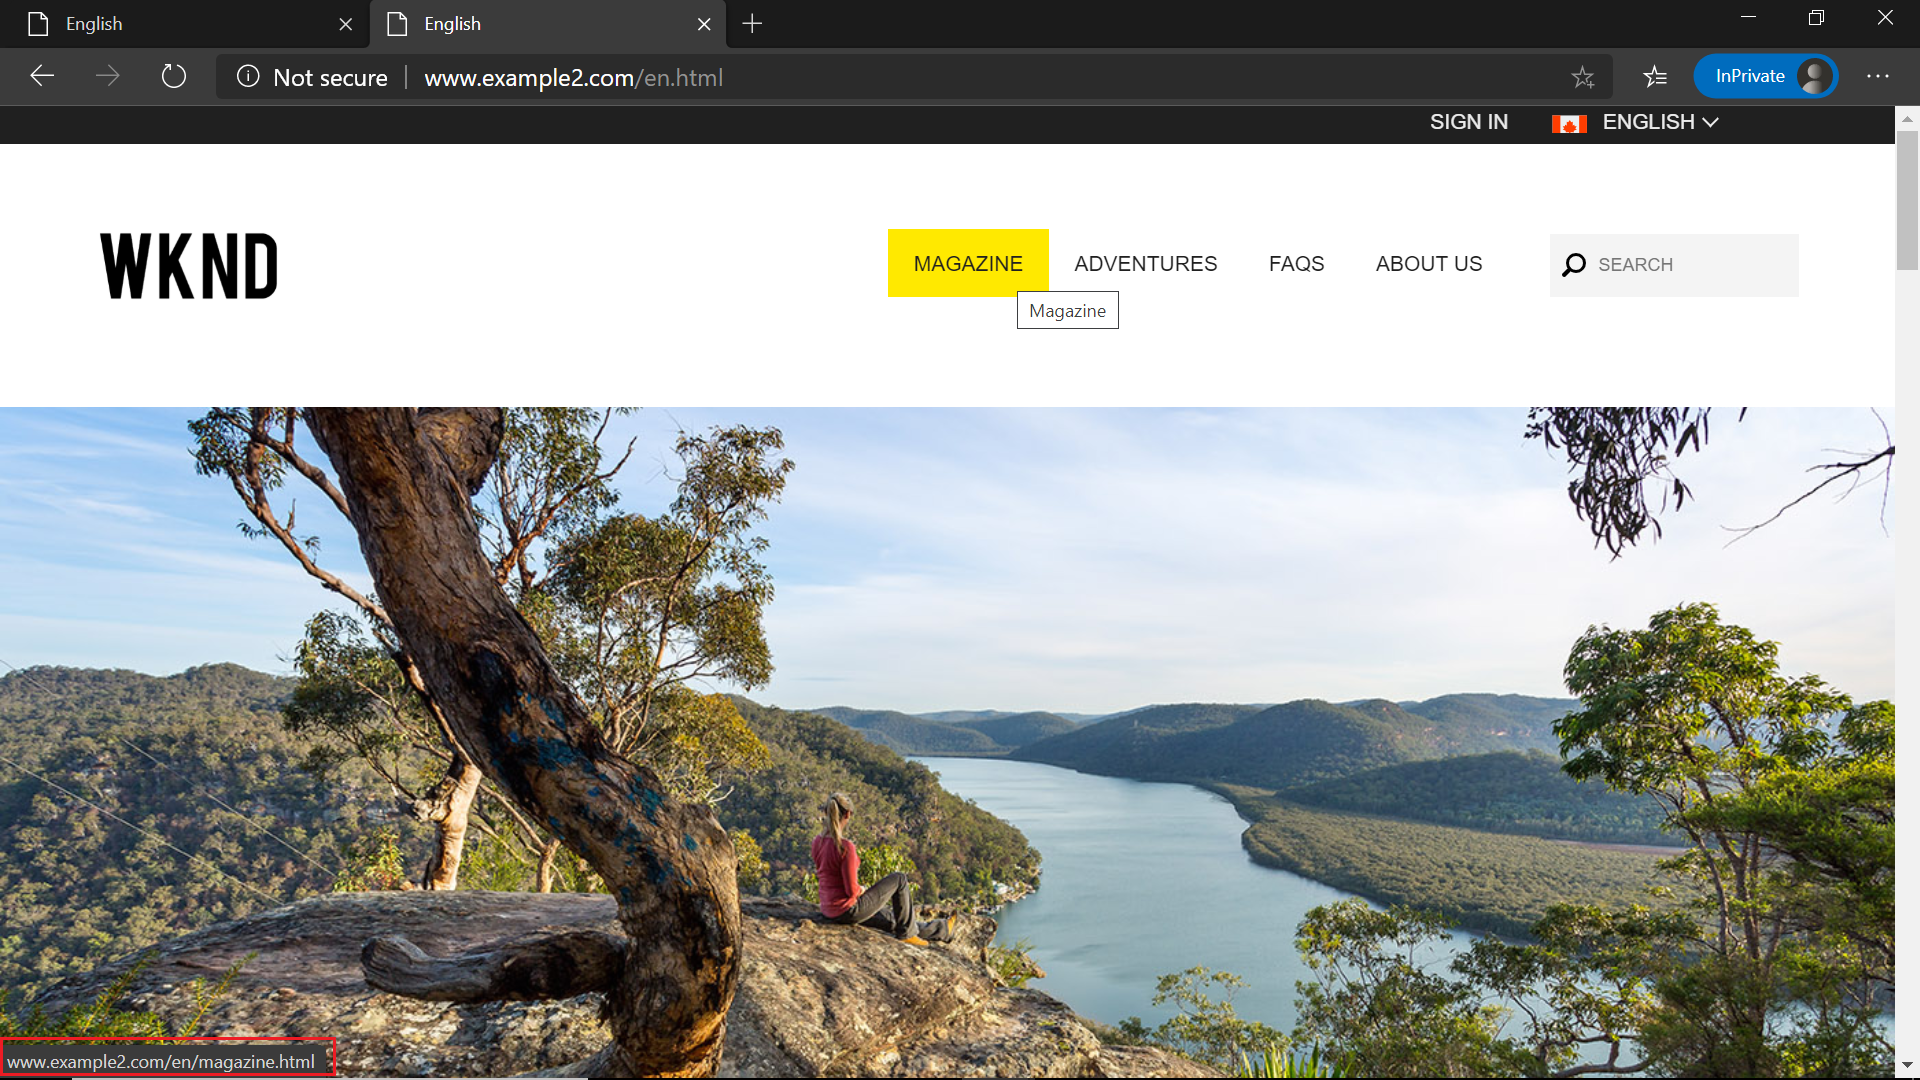
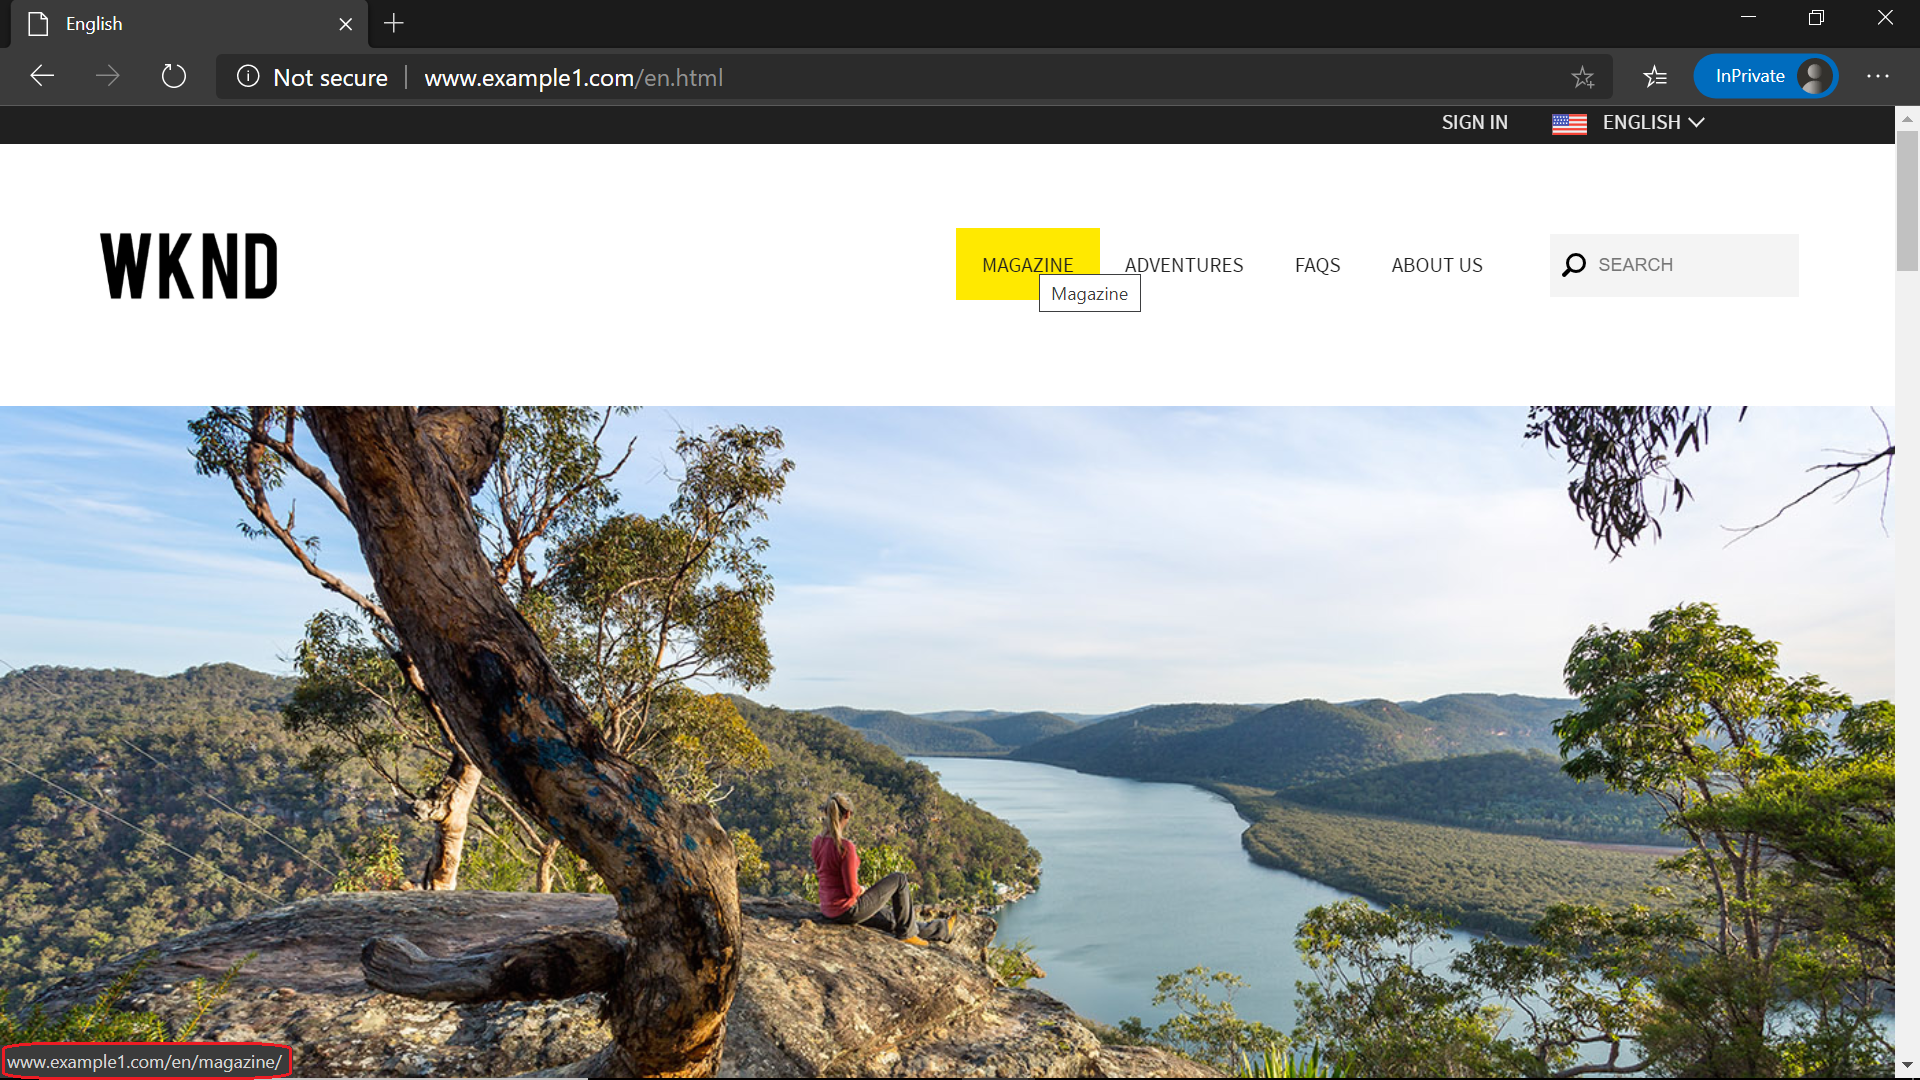
Now the internal page links are transformed to shortened URL based on the URL mappings in the Resource Resolver.


This approach has multiple draw backs —
- the mapping don’t supports the regex expressions
- it doesn’t support cross-site links because this rewriting method is not domain-aware
- reverse map the content path to the corresponding domain wont work
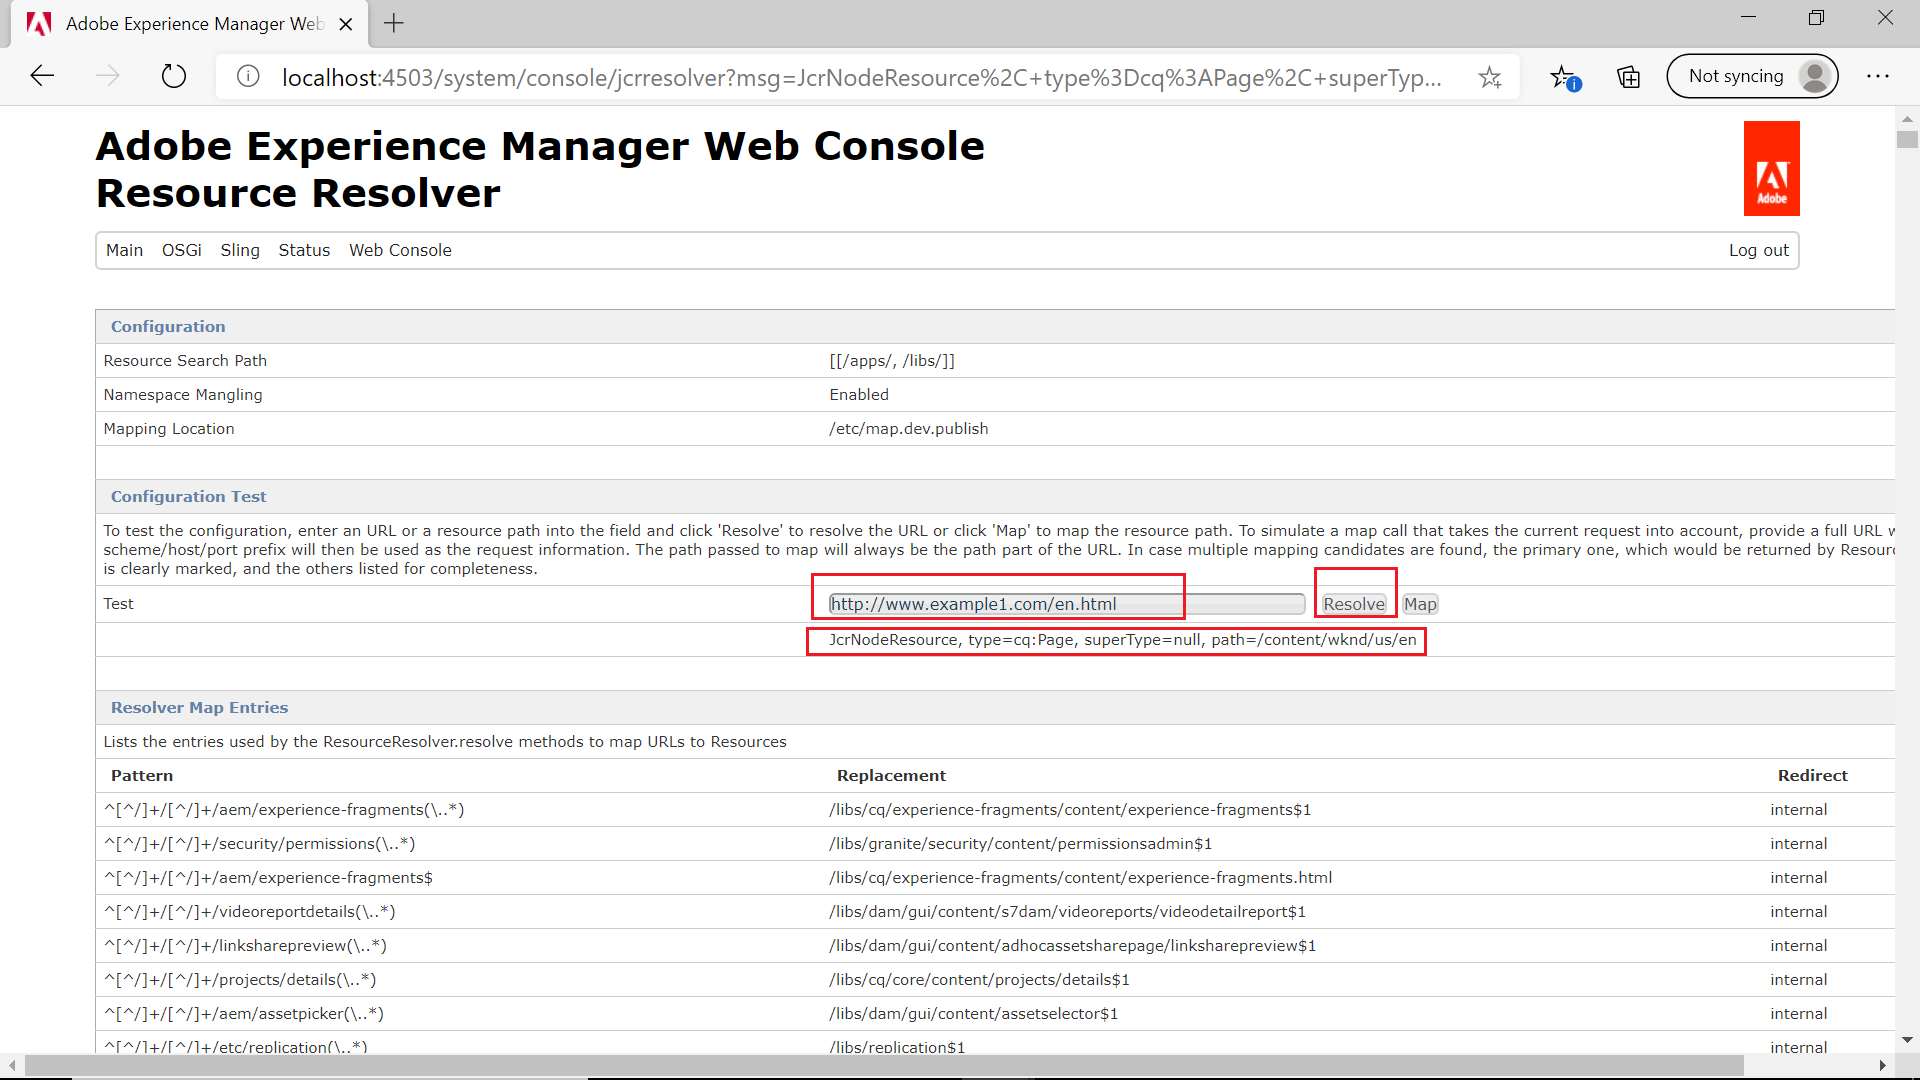
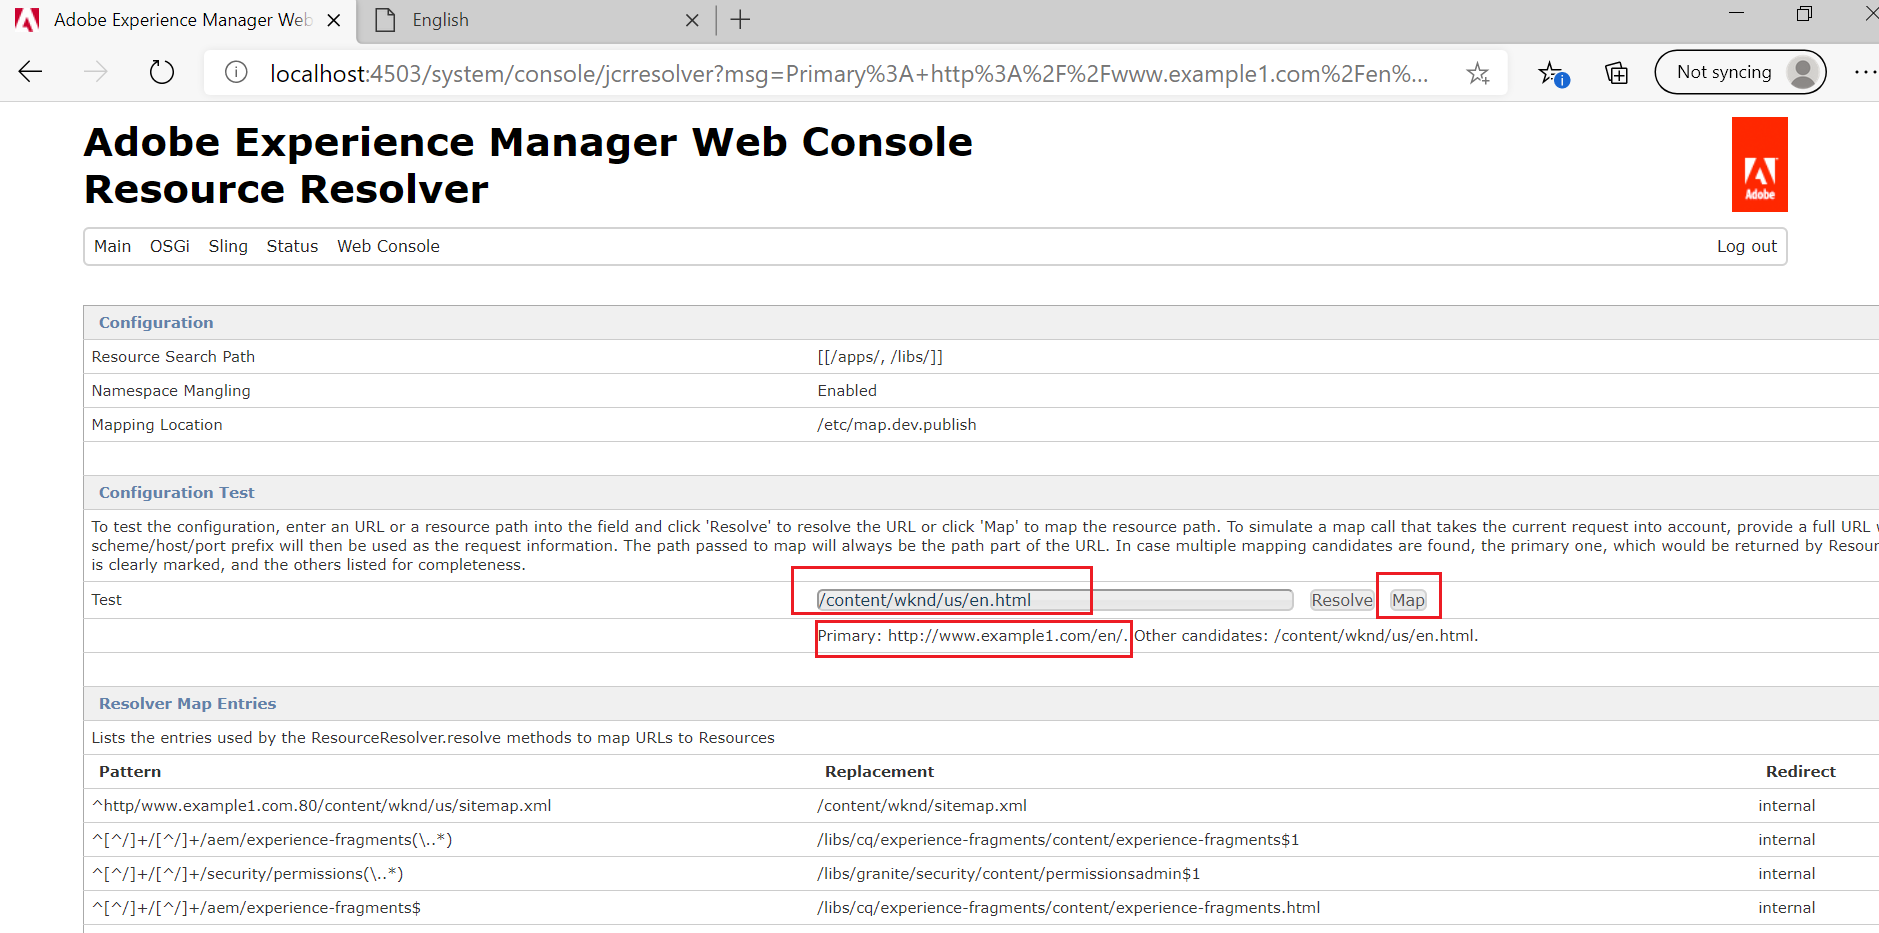
The incoming URL will be resolved without any issue as the dispatcher always send the complete path(e.g /content/wknd/us/en.html) to the publisher — http://localhost:4503/system/console/jcrresolver.

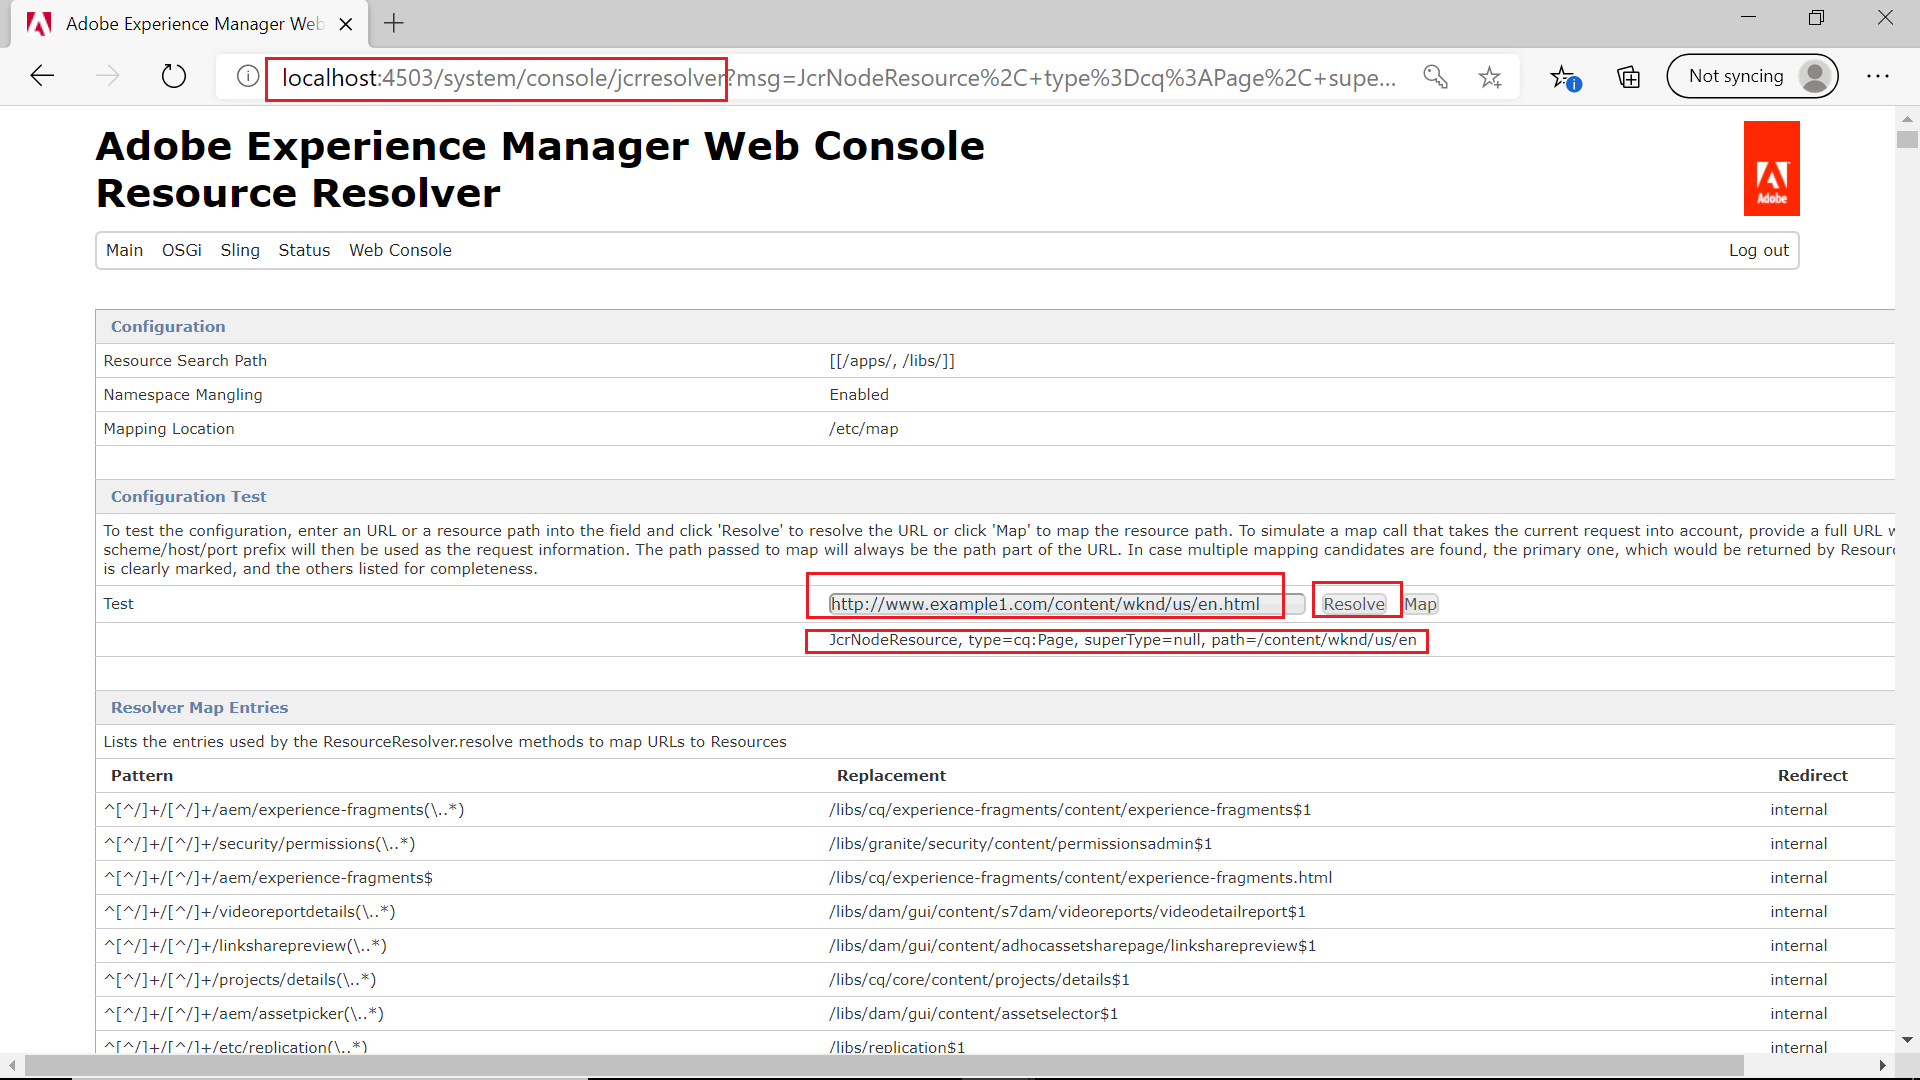

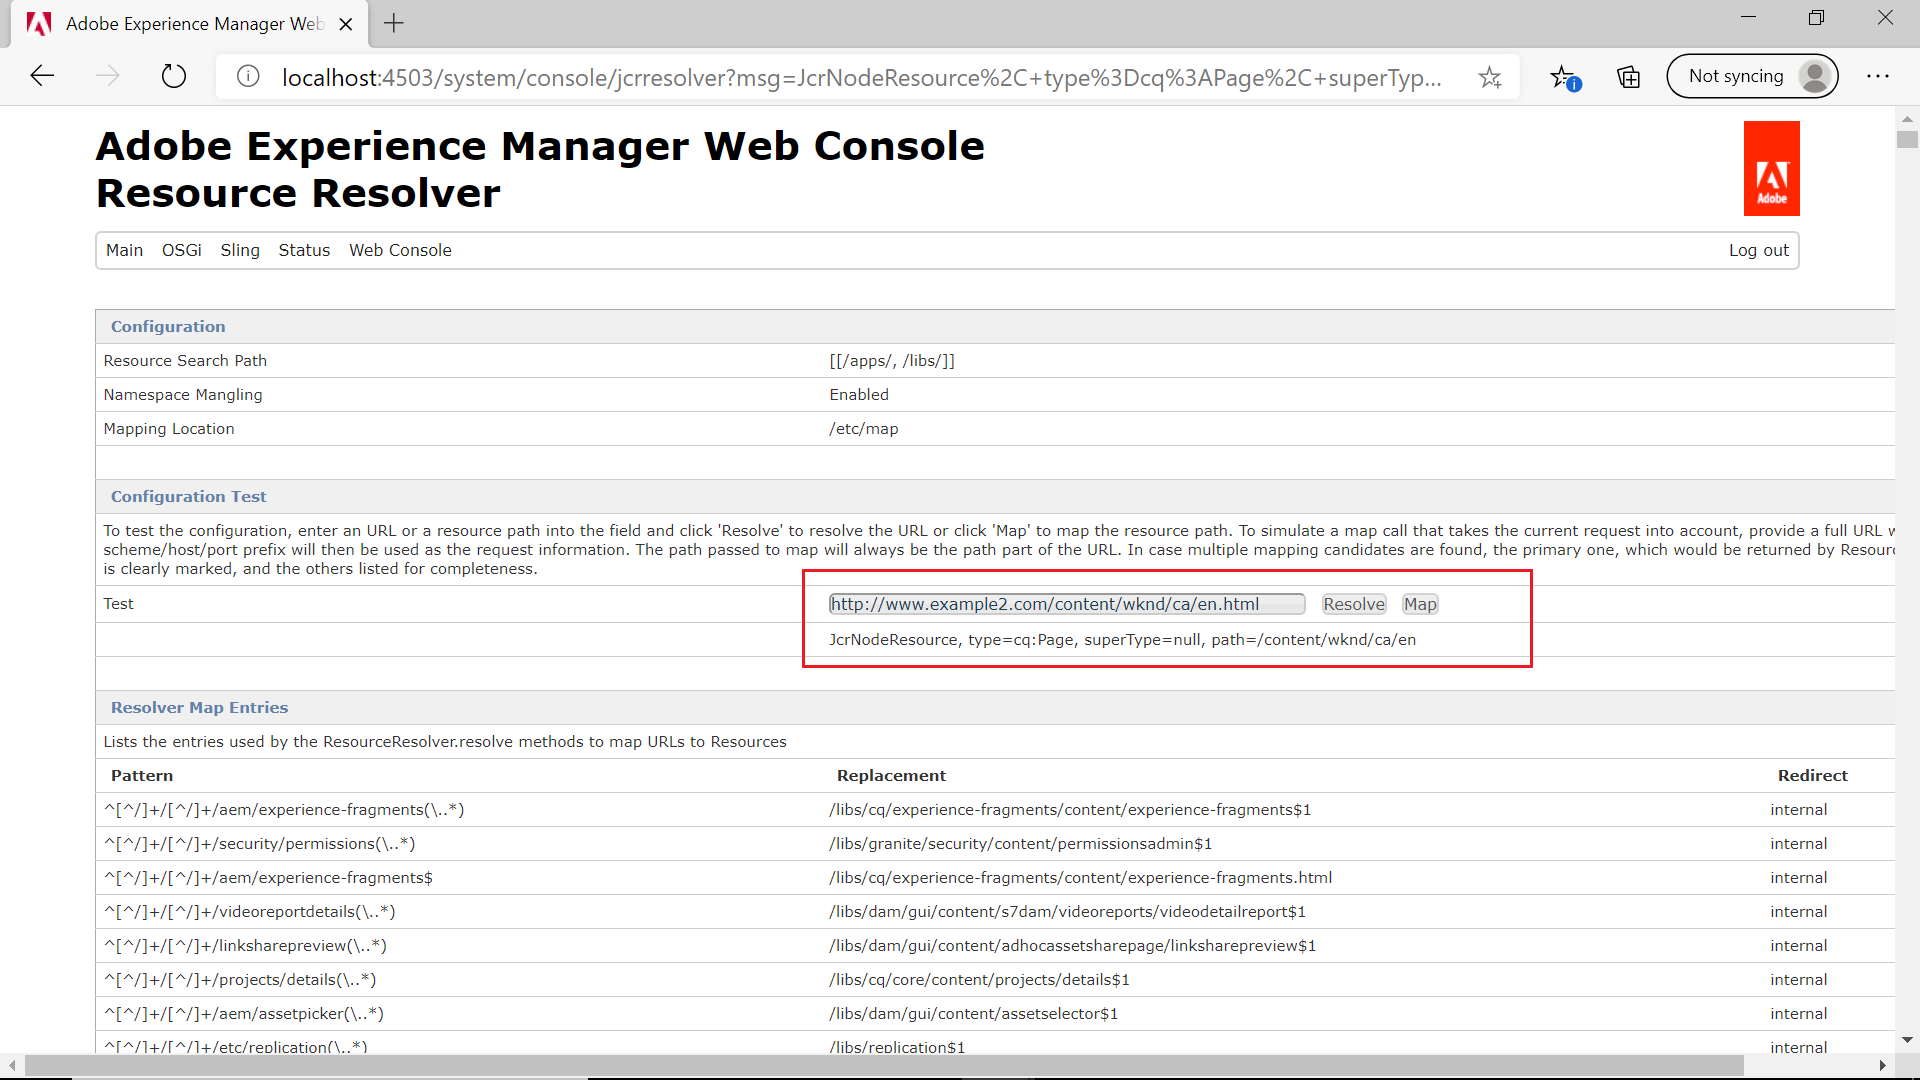
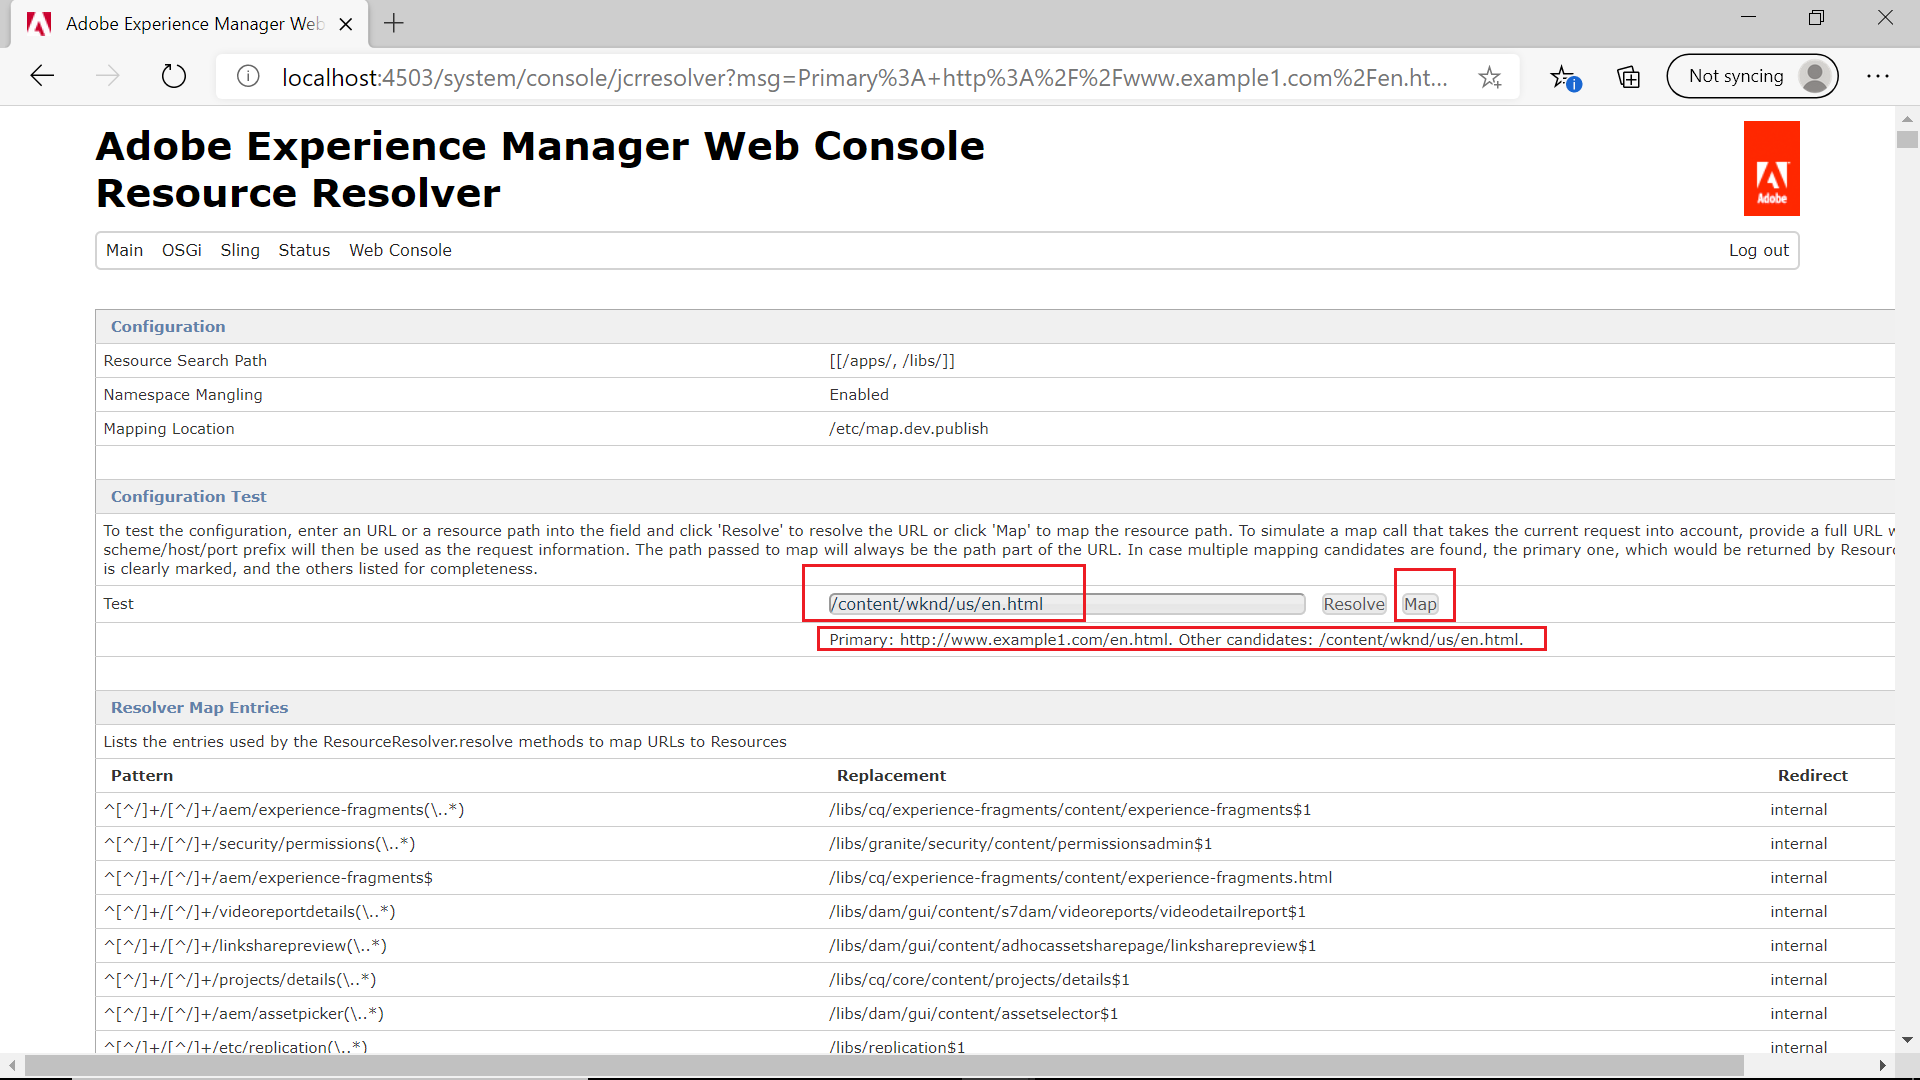
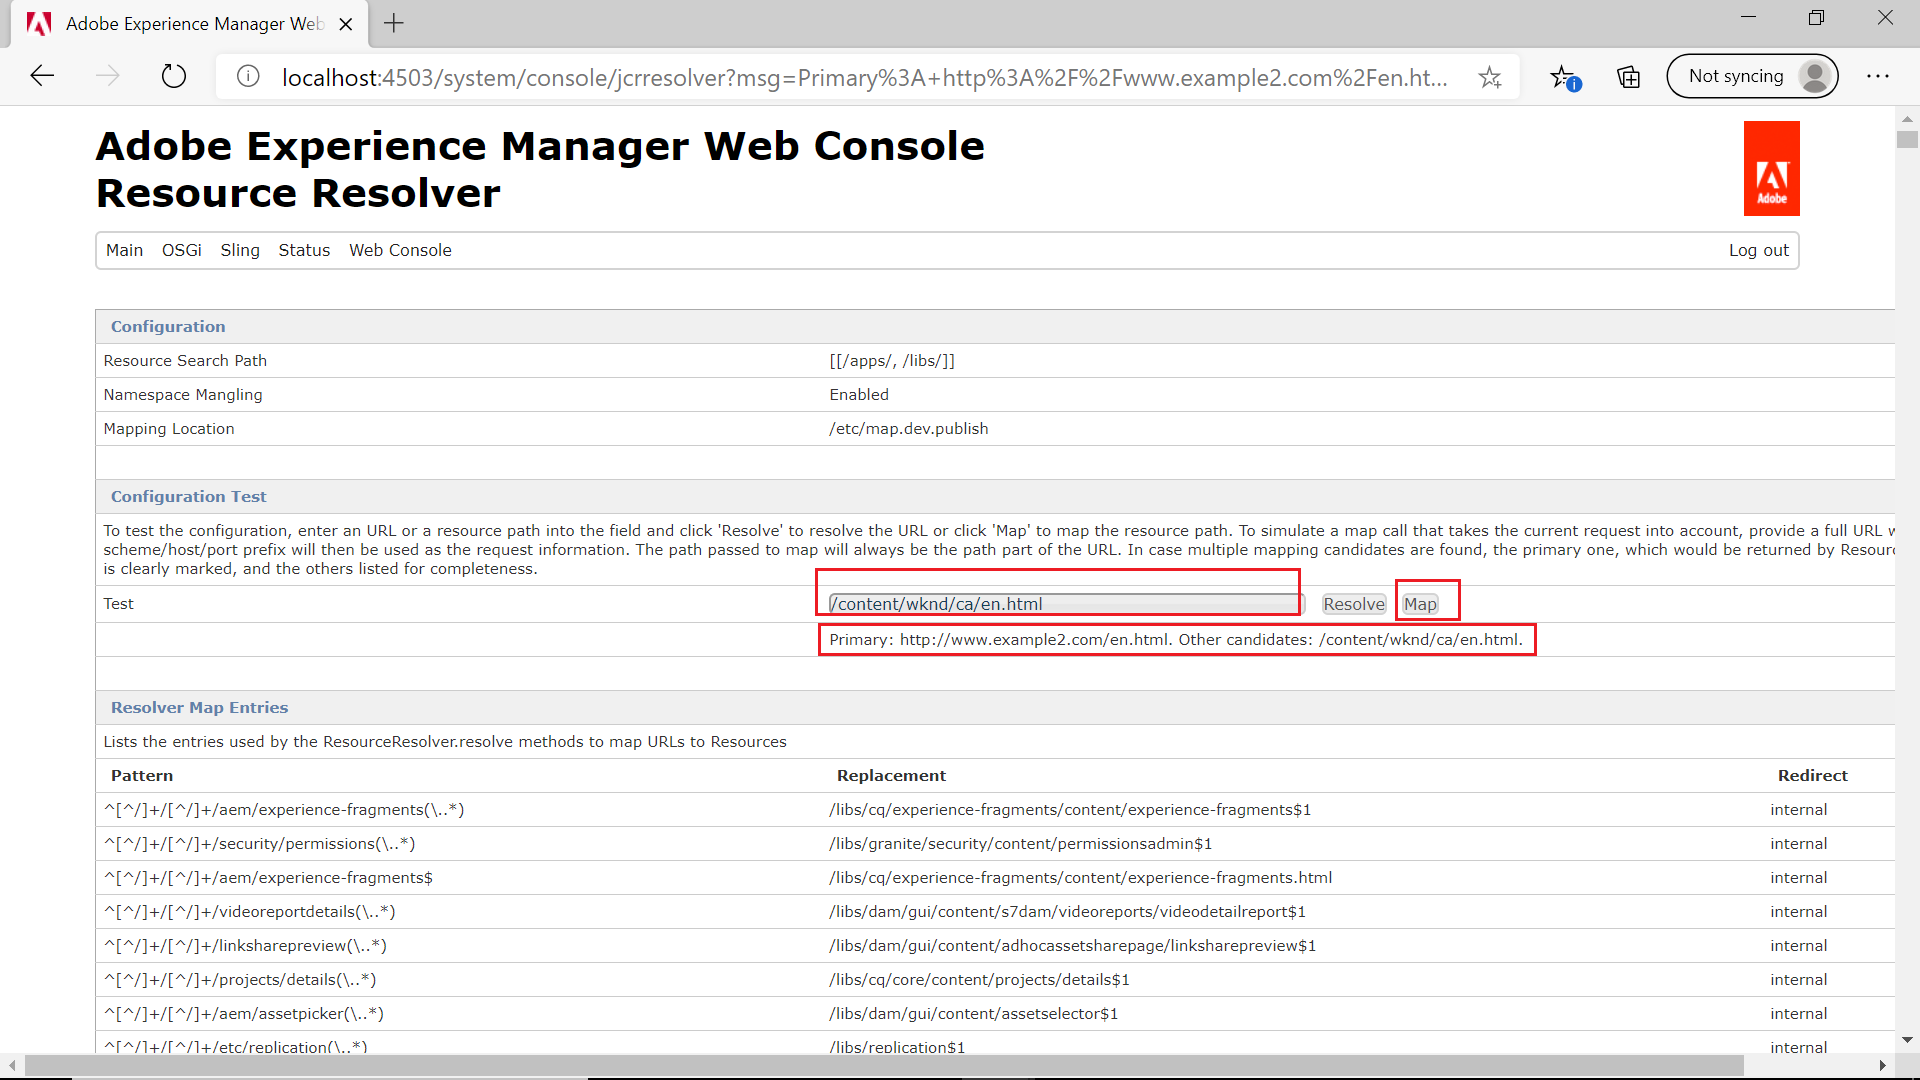
The content path is not reversed mapped to the domain URL

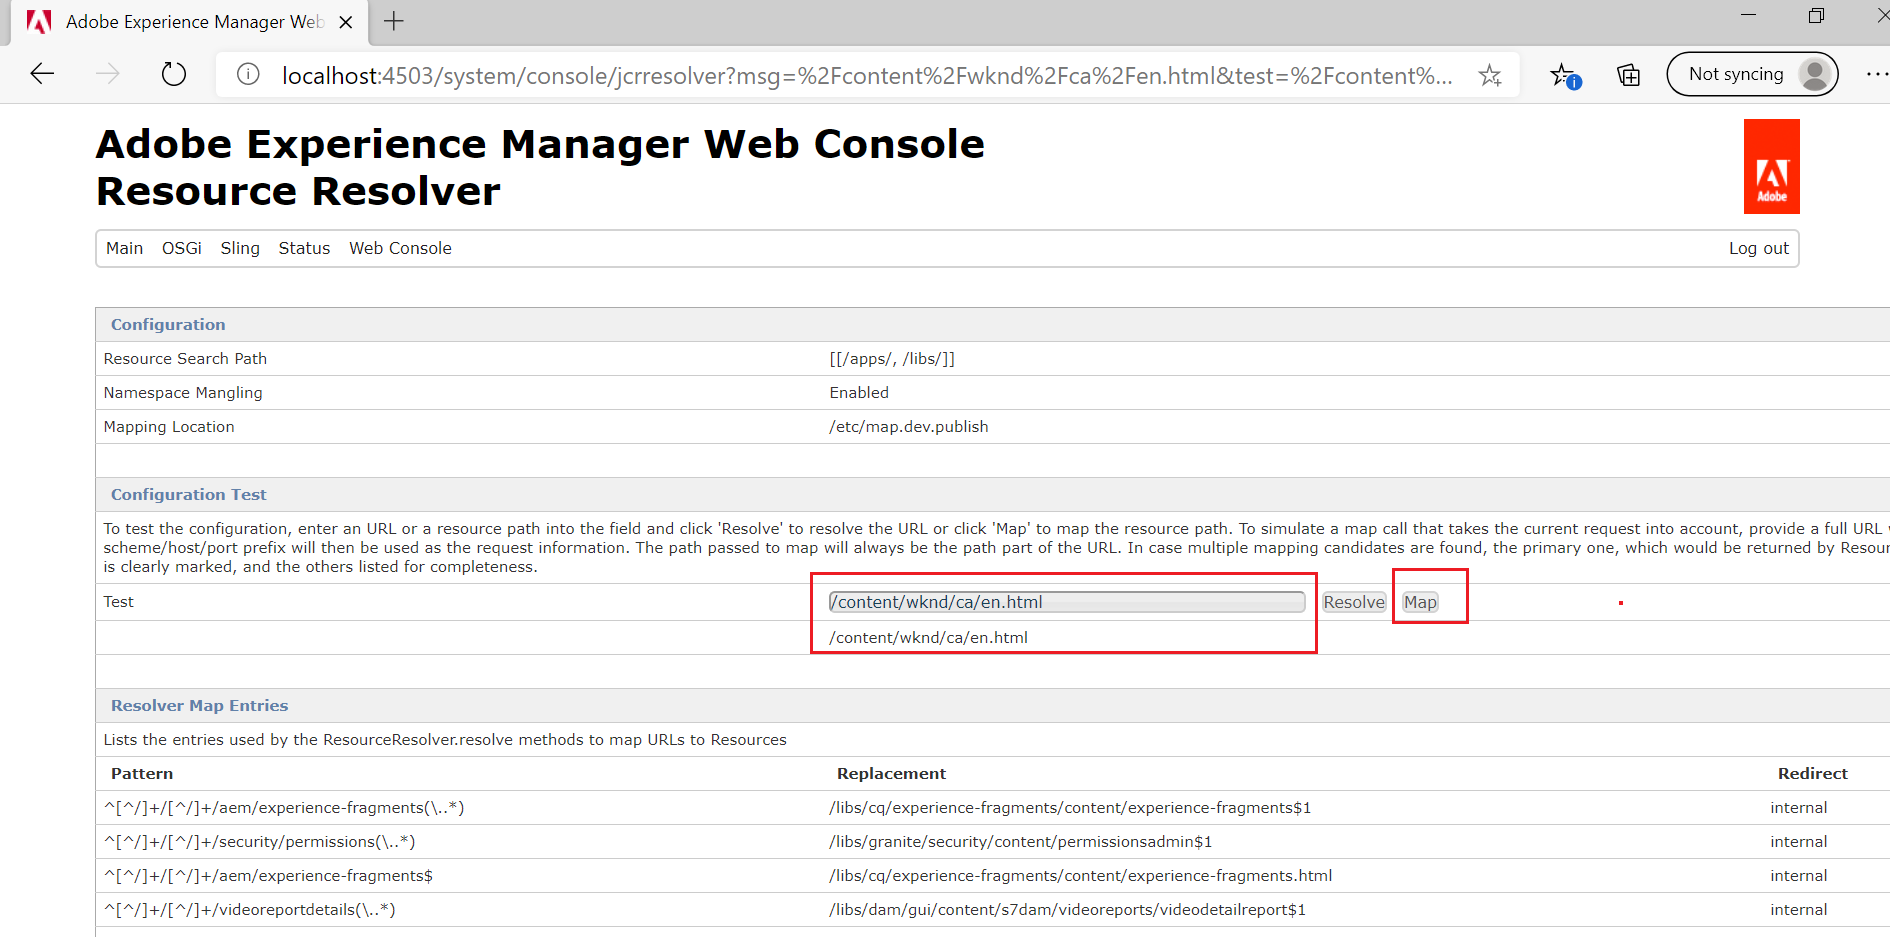
This will create issues while supporting multiple domains in the AEM platform and need to link the pages between sites(the components should identify the domain corresponding to the content path while linking the pages from different sites — ResourceResolver.map(…))
We should use the etc mapping to enable the forward resolving(resolve the incoming URL to content path) and reverse mapping (map the content path to the domain)
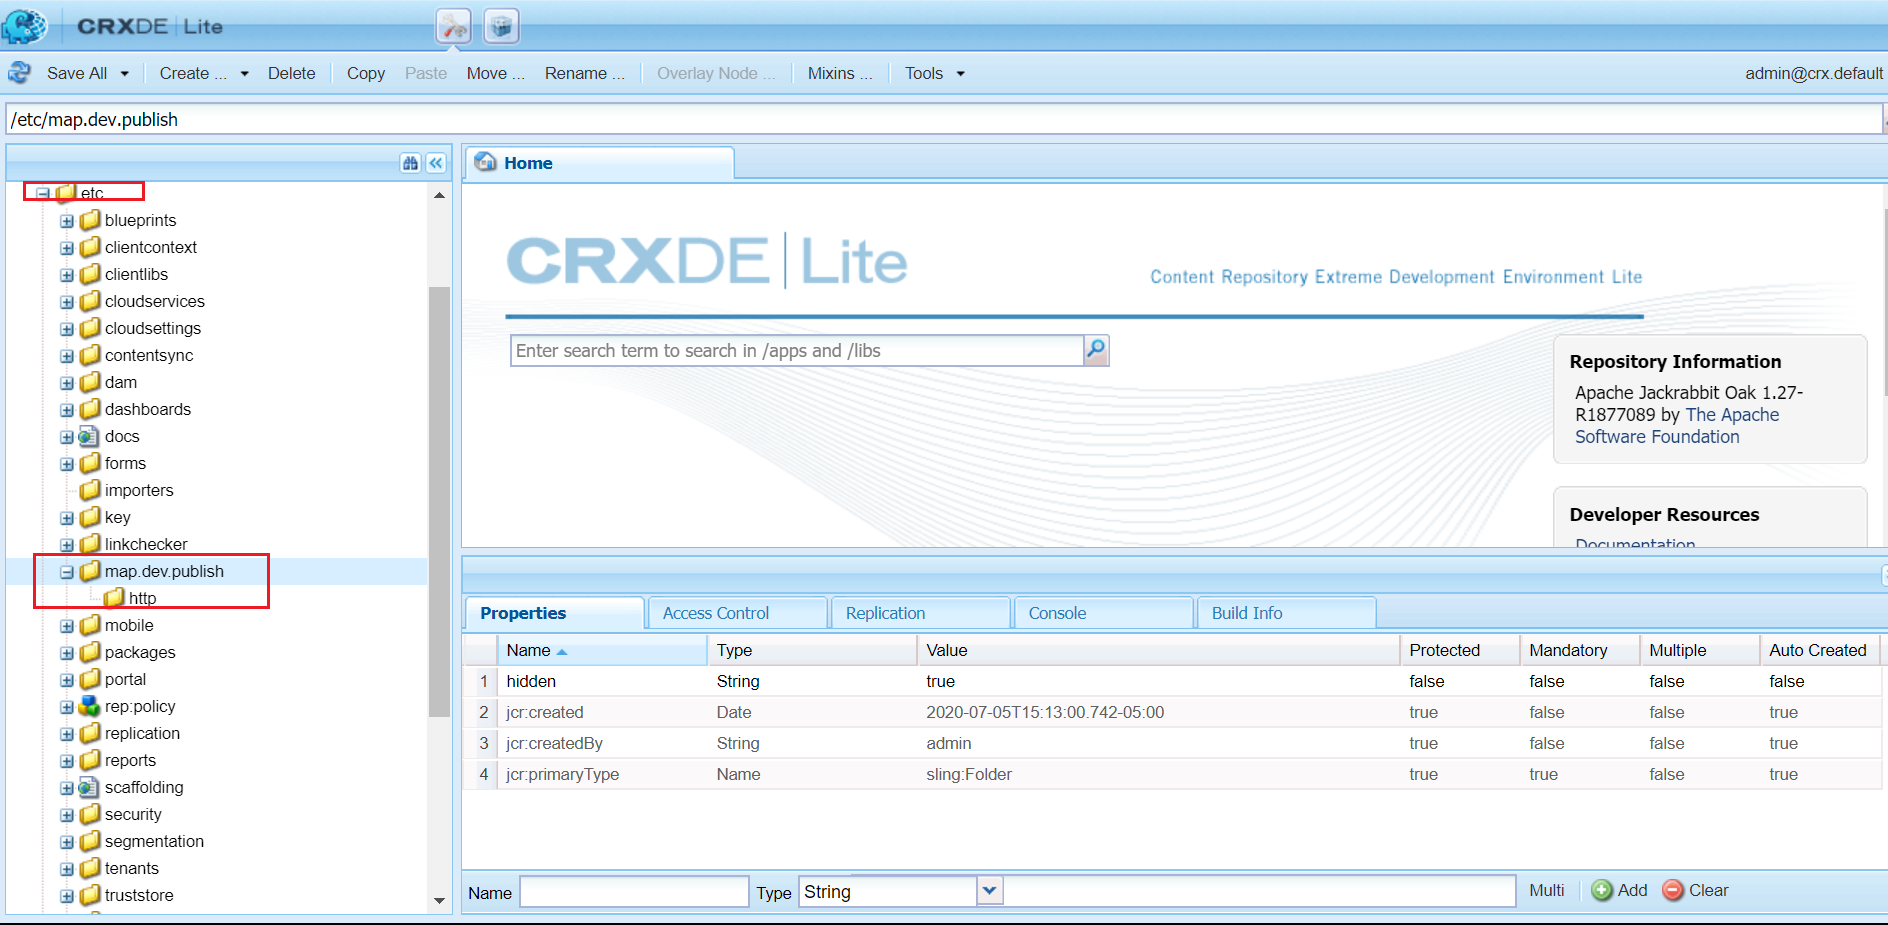
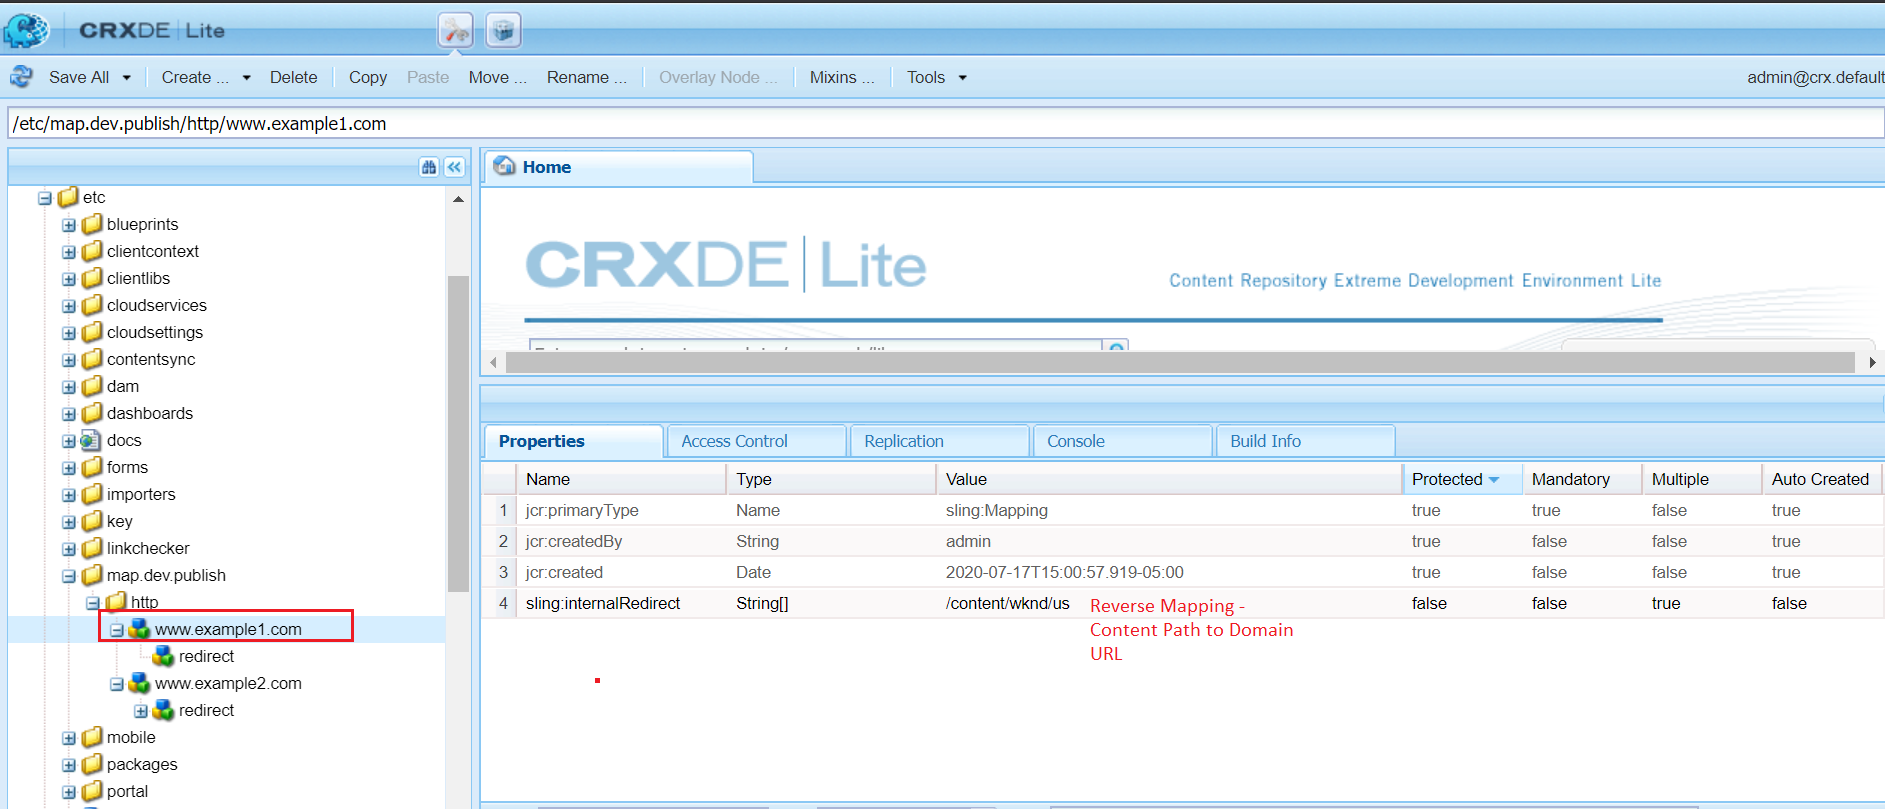
As a first step create an environment specific mapping folder (sling:Folder)— /etc/map.dev.publish, the etc mapping configurations won’t honor the run mode but it is possible to enable the environment specific configuration by enabling different folders e.g map.dev.publish, map.uat.publish, map.stage.publish and map.prod.publish and configure the folder to the run mode specific JCR Resolver configuration( “Apache Sling Resource Resolver Factory”).
Create a folder http or https(sling:Folder) under map.dev.publish based on the protocol used to communicate to publisher, use https even the SSL is terminated at load balancer level — the mapping details can be stored to code repository for better management.


Enable the below Sling Mappings under /etc/map.dev.publish /http(s) based on the protocol used— this will enable the forward mapping(resolve) — map the incoming URL to the content path(forward mapping is optional as the dispatcher is already sending the complete content path to publisher) and reverse mapping (map)— map the content path to shortened DNS URL.
{
"jcr:primaryType": "sling:Folder",
"jcr:createdBy": "admin",
"jcr:created": "Sun Jul 05 2020 15:13:00 GMT-0500",
"www.example1.com": {
"jcr:primaryType": "sling:Mapping",
"jcr:createdBy": "admin",
"jcr:created": "Fri Jul 17 2020 15:00:57 GMT-0500",
"sling:internalRedirect": [
"/content/wknd/us"
],
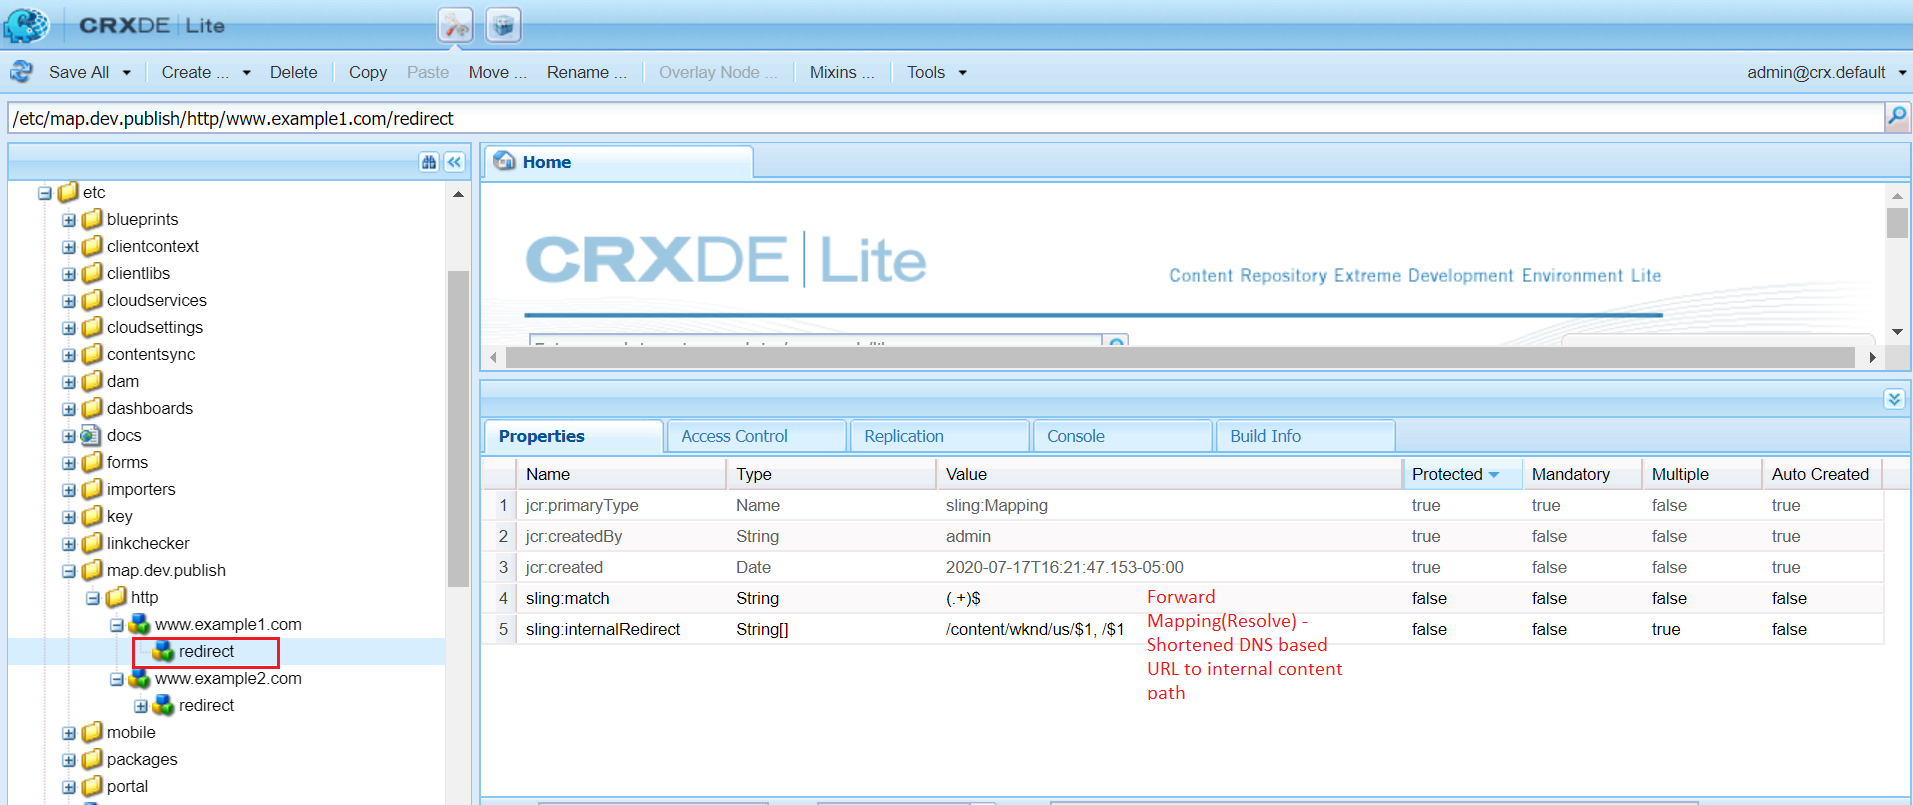
"redirect": {
"jcr:primaryType": "sling:Mapping",
"jcr:createdBy": "admin",
"jcr:created": "Fri Jul 17 2020 16:21:47 GMT-0500",
"sling:match": "(.+)$",
"sling:internalRedirect": [
"/content/wknd/us/$1",
"/$1"
]
}
},
"www.example2.com": {
"jcr:primaryType": "sling:Mapping",
"jcr:createdBy": "admin",
"jcr:created": "Fri Jul 17 2020 15:00:57 GMT-0500",
"sling:internalRedirect": [
"/content/wknd/ca"
],
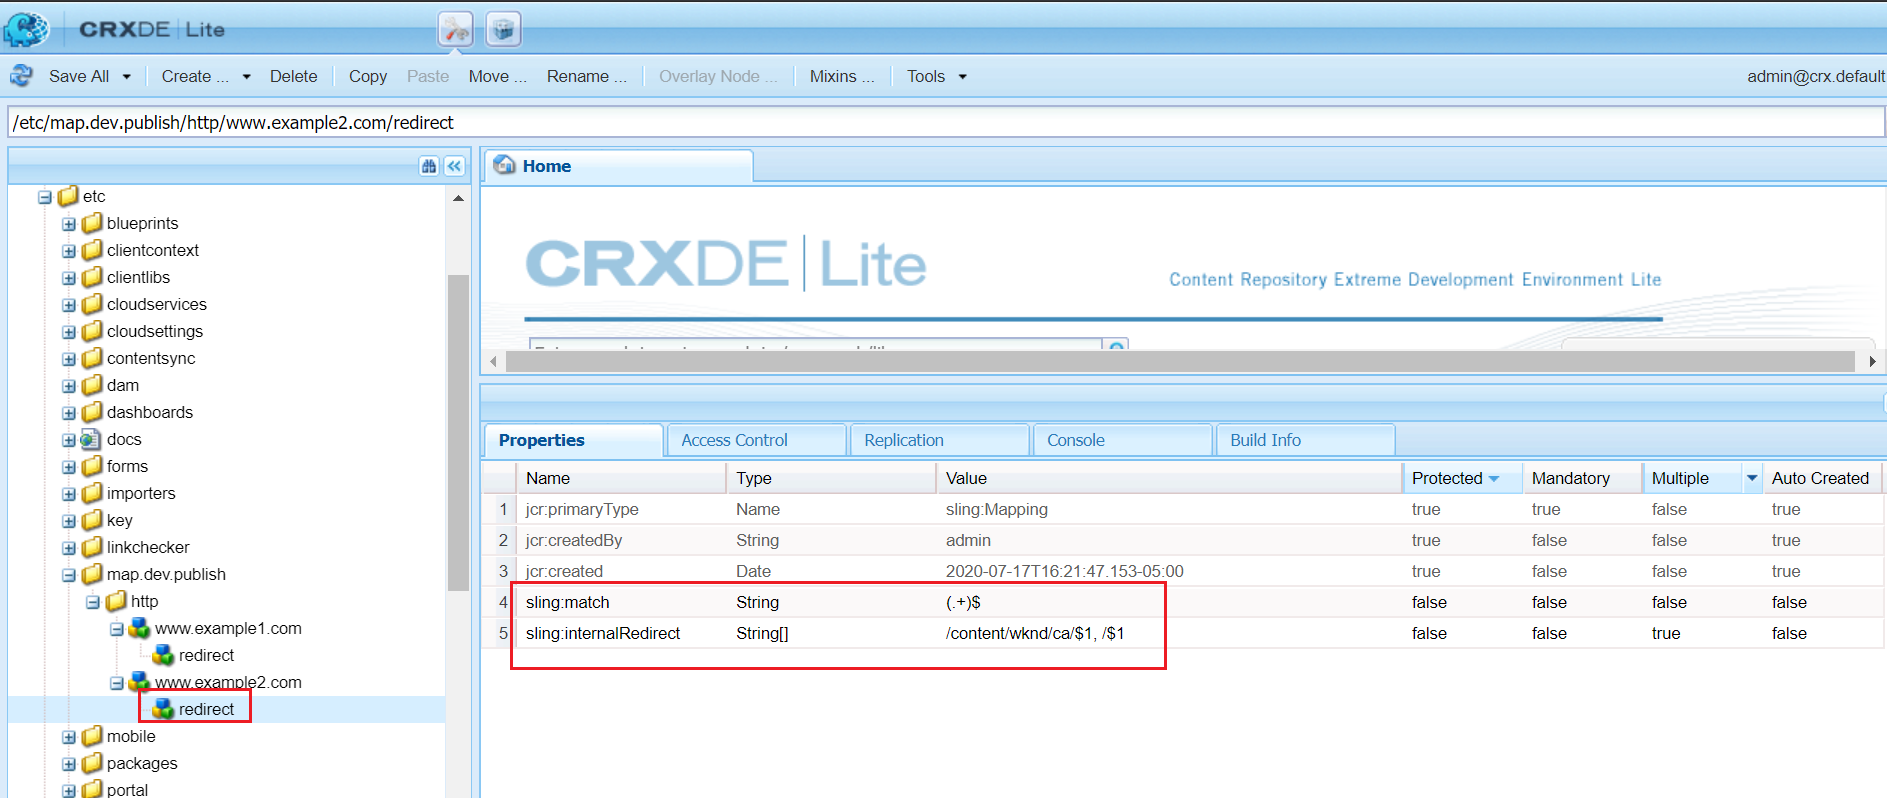
"redirect": {
"jcr:primaryType": "sling:Mapping",
"jcr:createdBy": "admin",
"jcr:created": "Fri Jul 17 2020 16:21:47 GMT-0500",
"sling:match": "(.+)$",
"sling:internalRedirect": [
"/content/wknd/ca/$1",
"/$1"
]
}
}
}


Now the forward and reverse mapping works as expected


The resolve and map methods of org.apache.sling.api.resource.ResourceResolver interface can be used to resolve/map the resources in java services/components.
Let us now enable some additional sling mappings
Resolve(Forward Mapping) the specific incoming URL to a different content path.
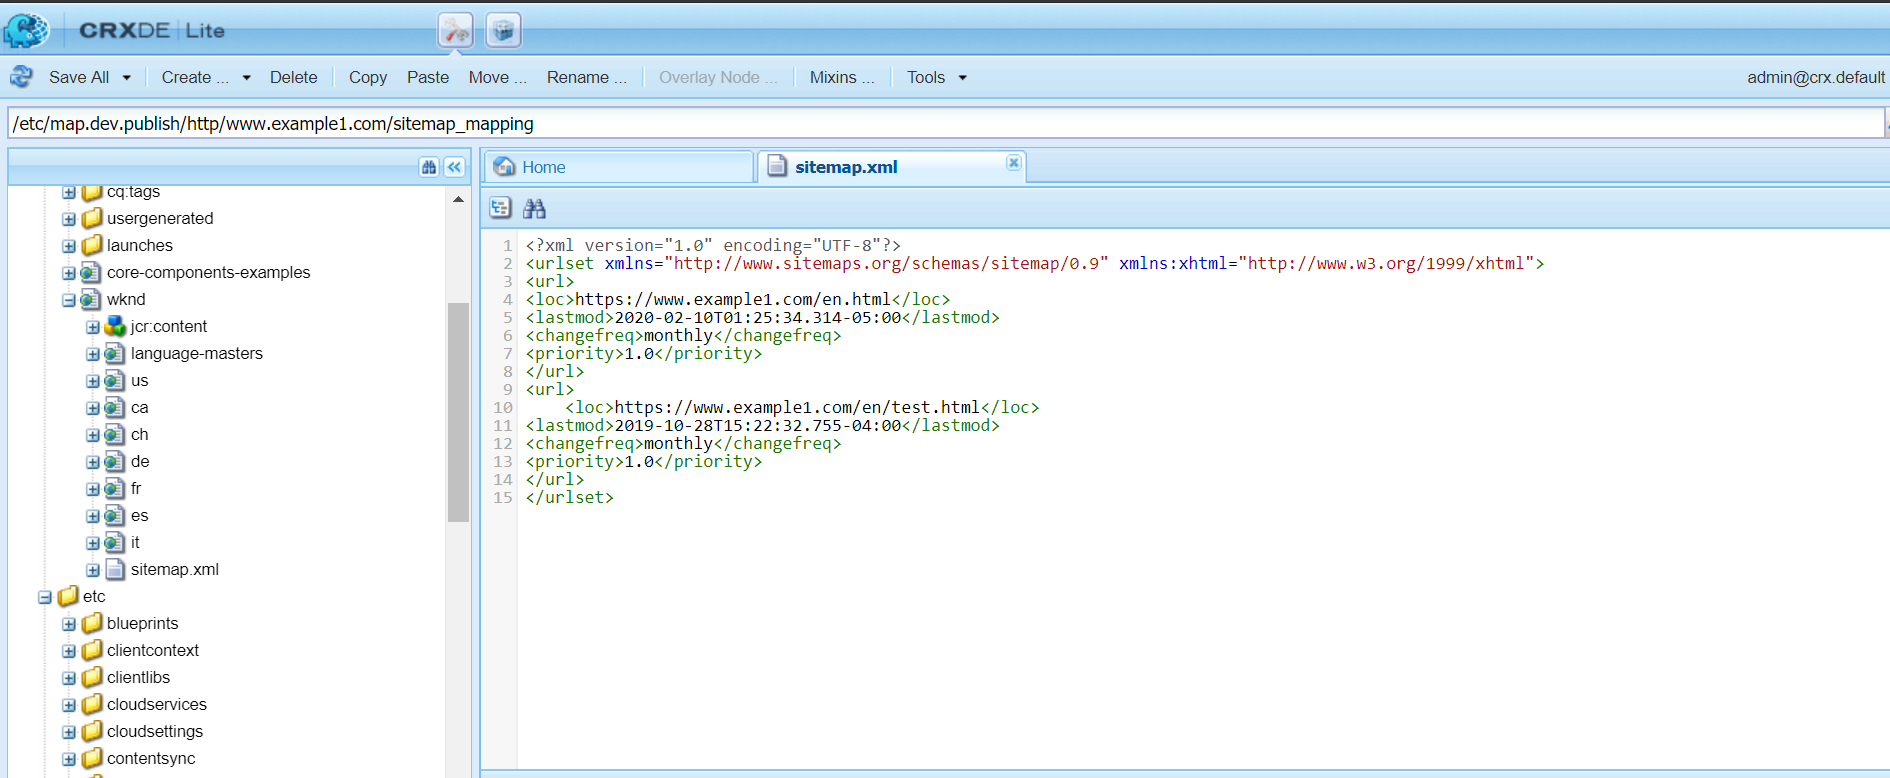
e.g the incoming request to the sitemap.xml file should be internally mapped to a different location where the file is located(under /content/wknd)
Create a node sitemap_mapping of type “sling:Mapping” under /etc/map.dev.publish/www.example1.com and add the below properties
{
  "jcr:primaryType": "sling:Mapping",
  "jcr:createdBy": "admin",
  "jcr:created": "Fri Jul 17 2020 16:21:47 GMT-0500",
  "sling:match": "content/wknd/us/sitemap.xml",
  "sling:internalRedirect": [
    "/content/wknd/sitemap.xml"
  ]
}

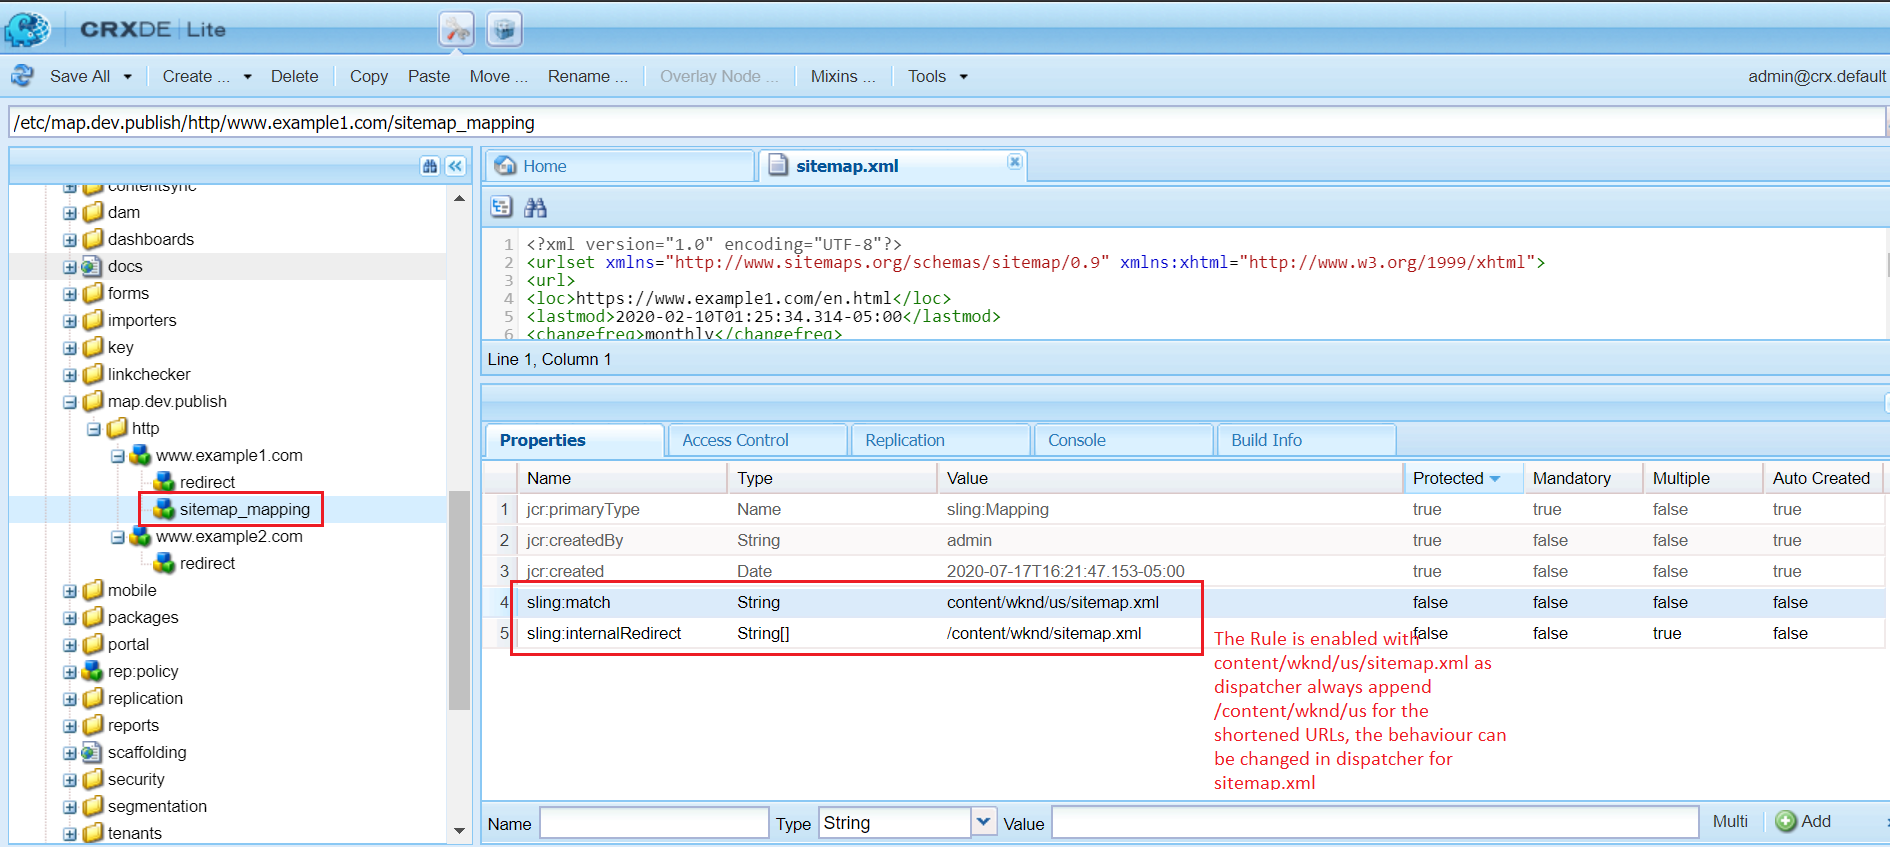
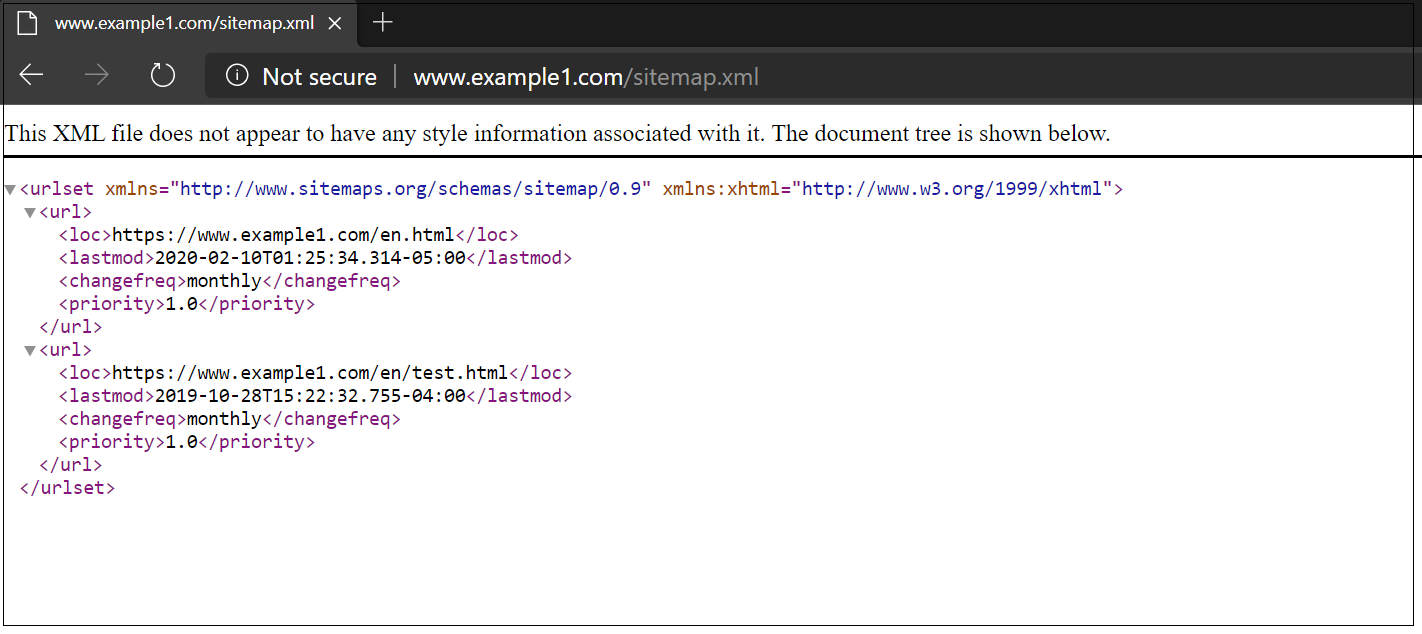
Now the request to sitemap.xml — http://www.example.com/sitemap.xml displays the content from /content/wknd/sitemap.xml(enabled sample sitemap.xml file under /content/wknd)


Multiple forward mappings can be created as required for the specific domain.
Reverse Map the URLs to remove the .html extension from the page links
Let us now enable additional reverse mapping to remove the html extension from internal page links.
Create a node reverse_no_html of type “sling:Mapping” under /etc/map.dev.publish/www.example1.com and add the below properties
{
  "jcr:primaryType": "sling:Mapping",
  "jcr:createdBy": "admin",
  "jcr:created": "Fri Jul 17 2020 16:21:47 GMT-0500",
  "sling:match": "$1/",
  "sling:internalRedirect": [
    "/content/wknd/us/(.*).html"
  ]
}

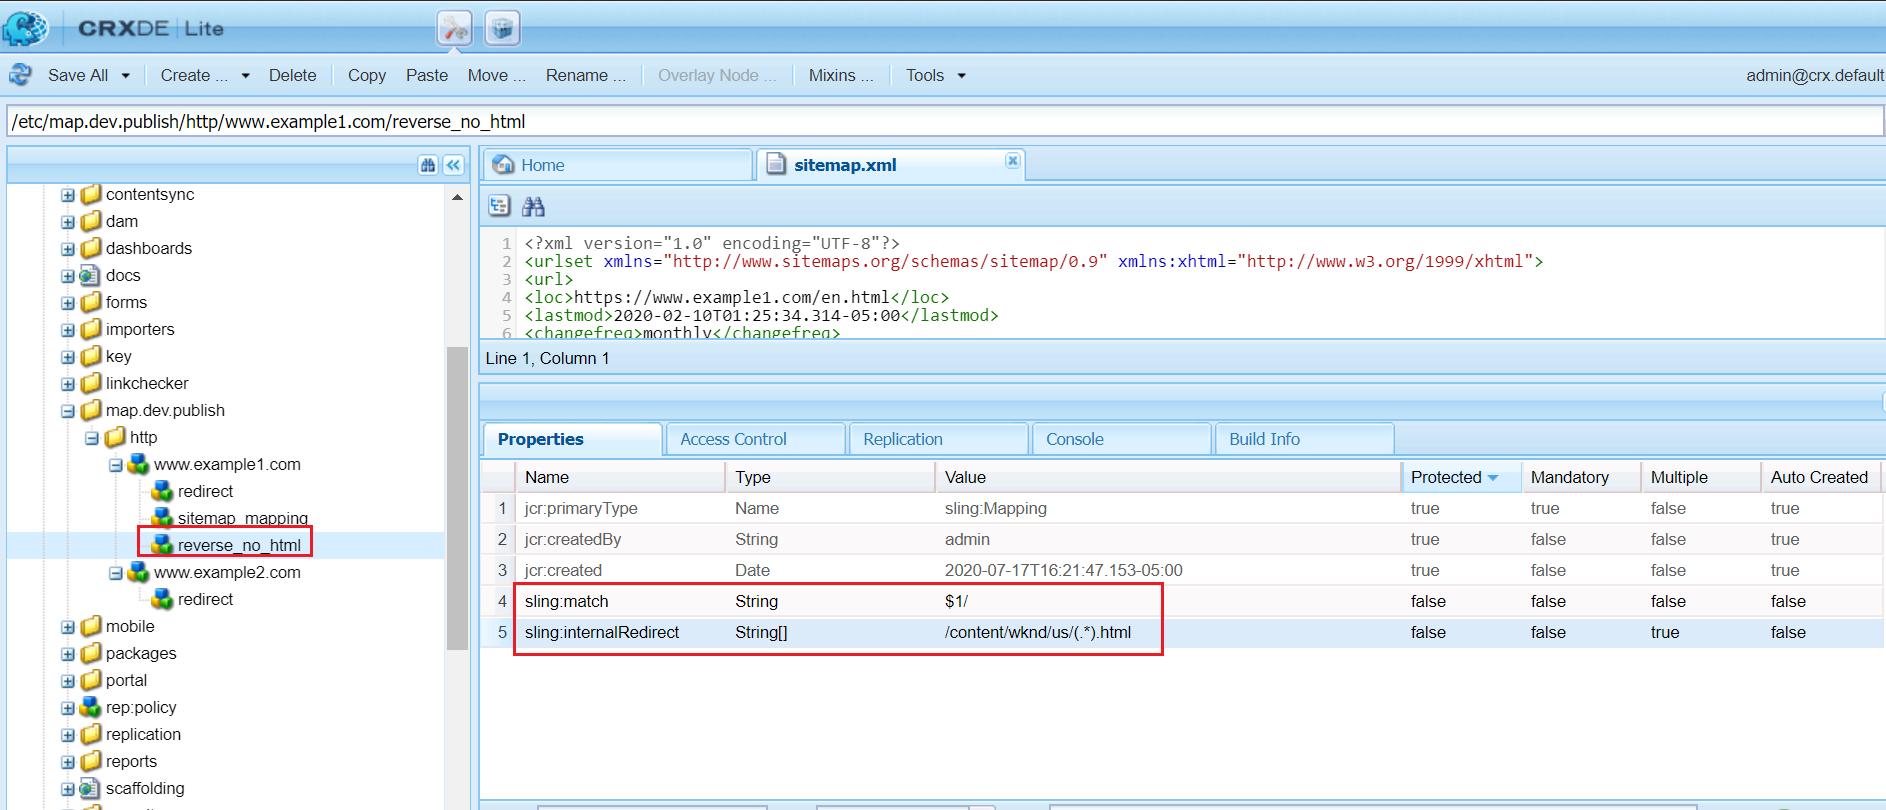


Multiple reverse mappings can be created as required for the specific domain.
Enable external redirects for specific URL’s
Let us now enable a external redirect, redirect the request with string “test” to a external URL — https://albinsblog.com
Create a node external_redirect of type “sling:Mapping” under /etc/map.dev.publish/www.example1.com and add the below properties
{
  "jcr:primaryType": "sling:Mapping",
  "jcr:createdBy": "admin",
  "sling:redirect": "https://www.albinsblog.com",
  "jcr:created": "Fri Jul 17 2020 16:21:47 GMT-0500",
  "sling:match": "content/wknd/us/test.html"
}

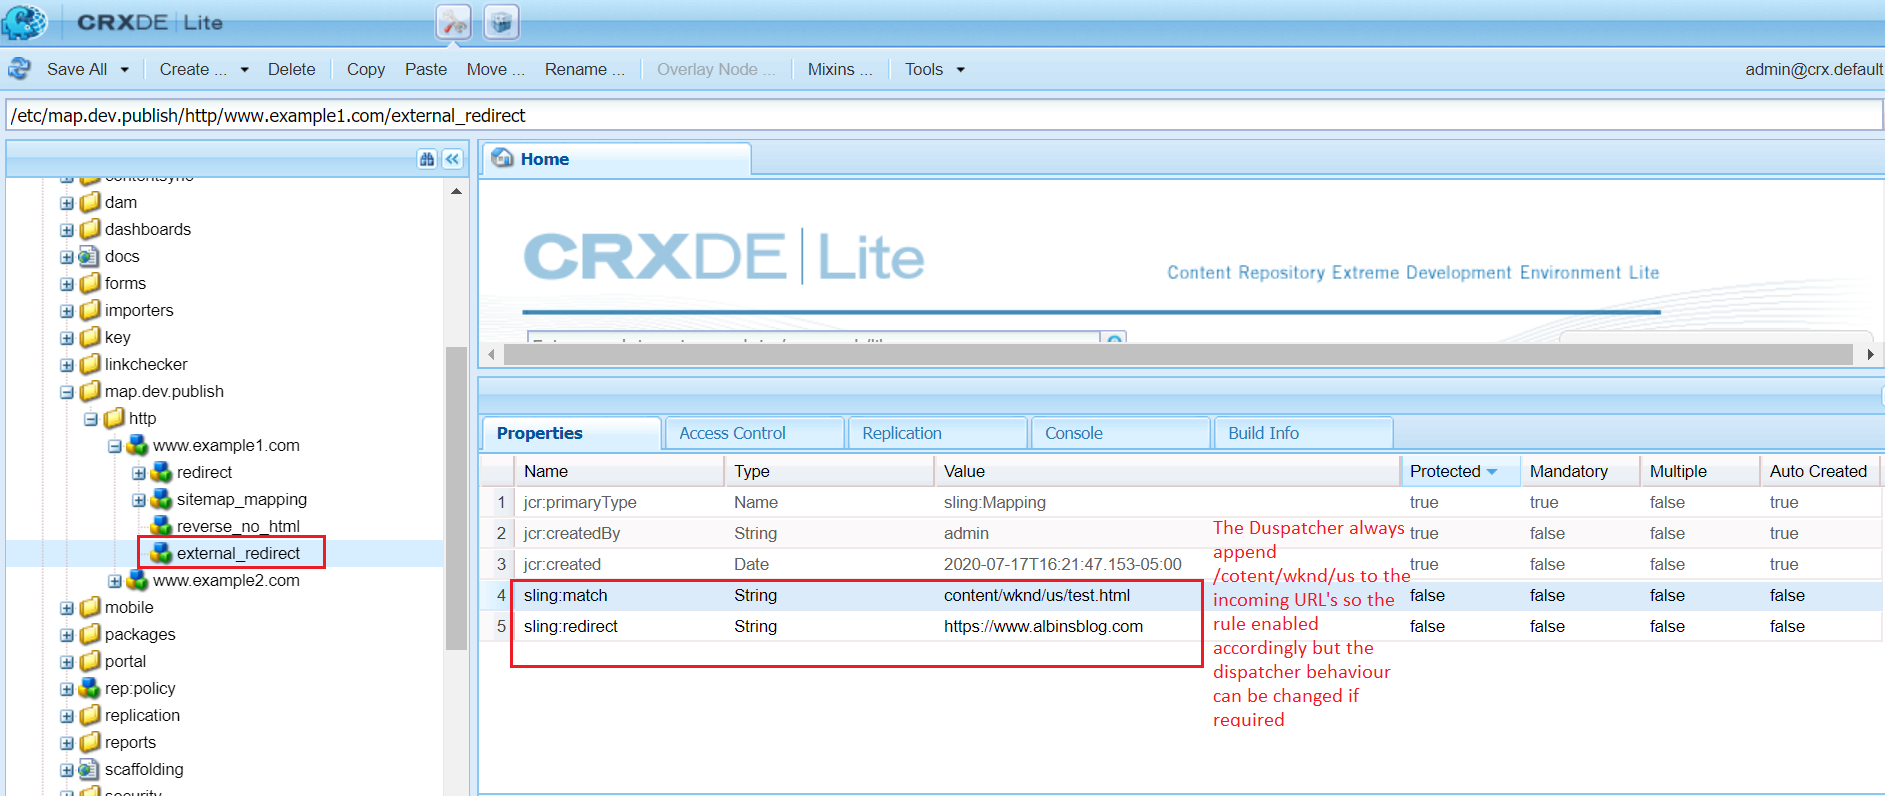
Now the URL http://www.example1.com/test.html will be redirected to https://www.albinsblog.com
The complete Sling Mappings - http://localhost:4503/etc/map.dev.publish/http.infinity.json
{
  "jcr:primaryType": "sling:Folder",
  "jcr:createdBy": "admin",
  "jcr:created": "Sun Jul 05 2020 15:13:00 GMT-0500",
  "www.example1.com": {
    "jcr:primaryType": "sling:Mapping",
    "jcr:createdBy": "admin",
    "jcr:created": "Fri Jul 17 2020 15:00:57 GMT-0500",
    "sling:internalRedirect": [
      "/content/wknd/us"
    ],
    "redirect": {
      "jcr:primaryType": "sling:Mapping",
      "jcr:createdBy": "admin",
      "jcr:created": "Fri Jul 17 2020 16:21:47 GMT-0500",
      "sling:match": "(.+)$",
      "sling:internalRedirect": [
        "/content/wknd/us/$1",
        "/$1"
      ]
    },
    "sitemap_mapping": {
      "jcr:primaryType": "sling:Mapping",
      "jcr:createdBy": "admin",
      "jcr:created": "Fri Jul 17 2020 16:21:47 GMT-0500",
      "sling:match": "content/wknd/us/sitemap.xml",
      "sling:internalRedirect": [
        "/content/wknd/sitemap.xml"
      ]
    },
    "reverse_no_html": {
      "jcr:primaryType": "sling:Mapping",
      "jcr:createdBy": "admin",
      "jcr:created": "Fri Jul 17 2020 16:21:47 GMT-0500",
      "sling:match": "$1/",
      "sling:internalRedirect": [
        "/content/wknd/us/(.*).html"
      ]
    },
    "external_redirect": {
      "jcr:primaryType": "sling:Mapping",
      "jcr:createdBy": "admin",
      "sling:redirect": "https://www.albinsblog.com",
      "jcr:created": "Fri Jul 17 2020 16:21:47 GMT-0500",
      "sling:match": "content/wknd/us/test.html"
    }
  },
  "www.example2.com": {
    "jcr:primaryType": "sling:Mapping",
    "jcr:createdBy": "admin",
    "jcr:created": "Fri Jul 17 2020 15:00:57 GMT-0500",
    "sling:internalRedirect": [
      "/content/wknd/ca"
    ],
    "redirect": {
      "jcr:primaryType": "sling:Mapping",
      "jcr:createdBy": "admin",
      "jcr:created": "Fri Jul 17 2020 16:21:47 GMT-0500",
      "sling:match": "(.+)$",
      "sling:internalRedirect": [
        "/content/wknd/ca/$1",
        "/$1"
      ]
    }
  }
}
The jcr package can be downloaded from the below link
References
The sling mapping helps us to map the incoming request to the internal content path and at the same time map the internal content path to the complete DNS based shortened URL. This will enable the AEM platform to support multi tenants and allows the author to cross link the websites just through the content path(AEM automatically maps the content path to the domain URL)