Tuesday, December 4, 2018

How to use Index Connector in Adobe Search and Promote

How to use Index Connector in Adobe Search and Promote


This tutorial explains the details on how to use Index Connector in Adobe Search and Promote.
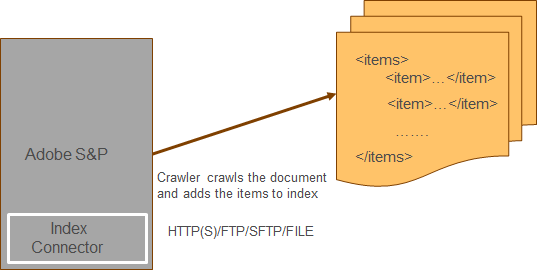

Index Connector


Index Connector enable us to define additional input sources for indexing XML pages or any kind of feed.

Search and Promote allows us to add the website URL’s as an entry point to crawl the pages for indexing, the URL’s also can be crawled and indexed through Index Connector.(the URL entry points and Index Connectors can be defined together for crawling and indexing)

For example, the Index Connector can be used to index the large number of product data from eCommerce systems to reduce the crawling and indexing time. Index Connector approach provides better crawling/indexing performance.

A XML data feed consists of records corresponds to the individual documents that can be added to the index

A text data feed contains new-line-delimited records corresponds to the individual documents that can be added to the index

Mapping can be enabled to map the feed data to the metadata fields in the resulting index

Multiple protocols can be used to connect to the input feed sources from Index Connector — HTTP(S)/FTP/SFTP/FILE


The IndexConnector is not enabled by default in S&P account, the same should be enabled by Adobe S&P account team.

Define Index Connector


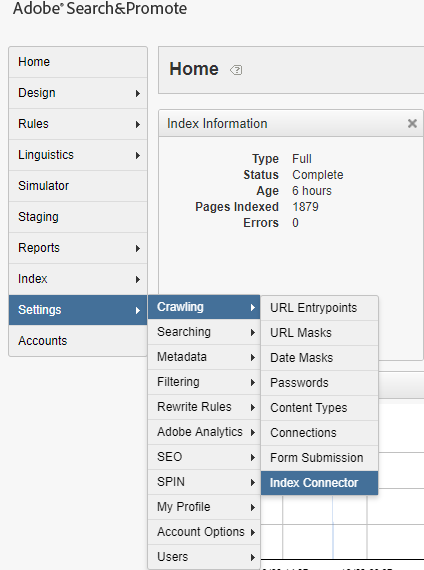
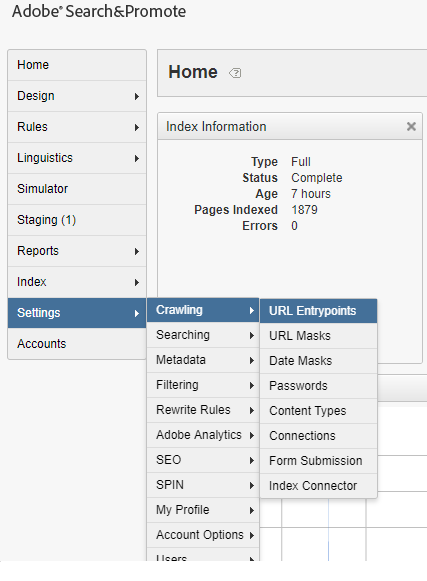
After enabling the Index Connector to the account, the same can be accessed from Settings →Crawling →Index Connector


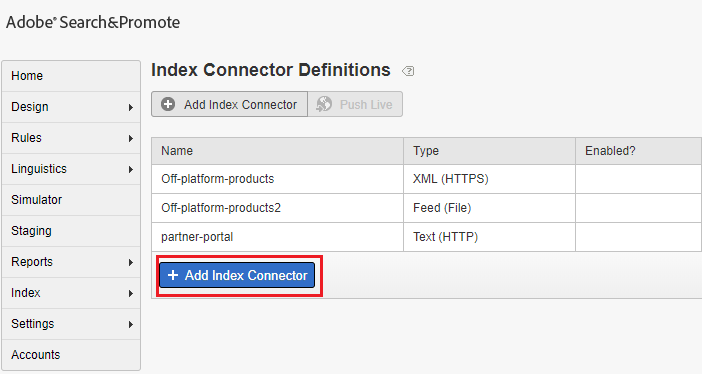
As a first step add a Index Connector


Sample product feed file(XML)

<feed xmlns:xs=”http://www.w3.org/2001/XMLSchema" version=”2.0">
<channel>
<title>Product Feed</title>
<Item>
<title>
<![CDATA[product-title]]>
</title>
<pubDate>05/09/2011</pubDate>
<pubYear>2011</pubYear>
<description>
<![CDATA[<p>product description</p>]]>
</description>
<productType>Research</productType>
<category>
<![CDATA[Financial Planning|Financial Planners|Research]]>
</category>
<ProductId>123</ProductId>
<imageUrl>/content/dam/Images/product/123.jpg</imageUrl>
</Item>
<Item>
<title>
<![CDATA[product-title]]>
</title>
<pubDate>05/09/2011</pubDate>
<pubYear>2011</pubYear>
<description>
<![CDATA[<p>product description</p>]]>
</description>
<productType>Research</productType>
<category>
<![CDATA[Financial Planning|Financial Planners|Research]]>
</category>
<ProductId>1234</ProductId>
<imageUrl>/content/dam/Images/product/1234.jpg</imageUrl>
</Item>
<Item>
<link>https:/www.example.com/product-title/p/12345</link>
<title>
<![CDATA[product-title]]>
</title>
<pubDate>05/09/2011</pubDate>
<pubYear>2011</pubYear>
<description>
<![CDATA[<p>product description</p>]]>
</description>
<productType>Research</productType>
<category>
<![CDATA[Financial Planning|Financial Planners|Research]]>
</category>
<ProductId>12345</ProductId>
<imageUrl>/content/dam/Images/product/12345.jpg</imageUrl>
</Item>
</channel>
</feed>

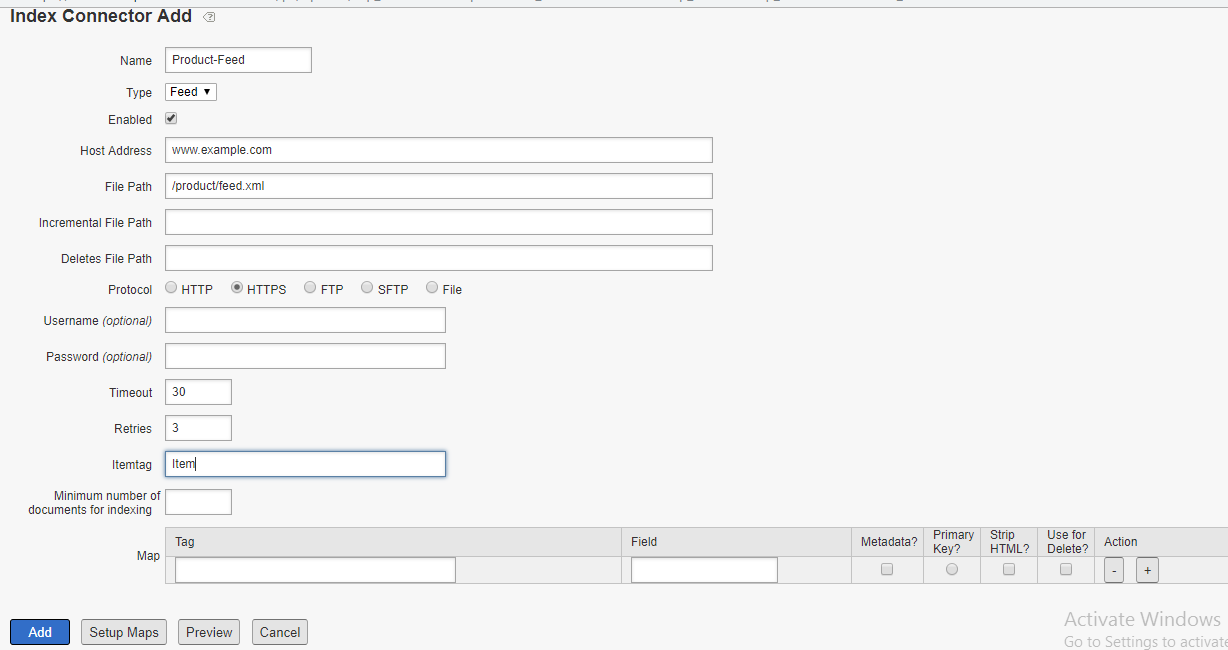
The feed file is available through HTTP(S) URL — www.example.com/product/feed.xml, the Index Connector can also access the feed through FTP, SFTP and FILE protocol’s.

Enter a name for the Index Connector

Select Type as Feed

Select Enabled

Configure Host Address and File Path

Select the appropriate Protocol

Configure the Timeout and Retries as required

Itemtag — tag represents the individual records


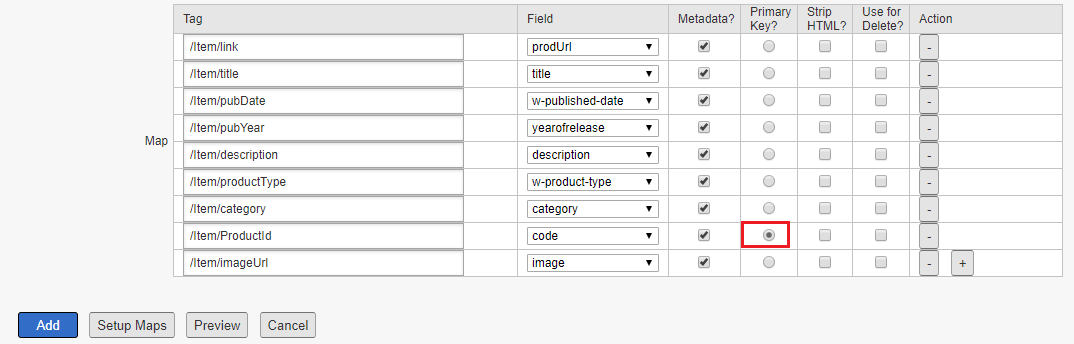
Enable the mapping for the fields from feed file to metadata defined, define a primary key value that will identify each record uniquely.


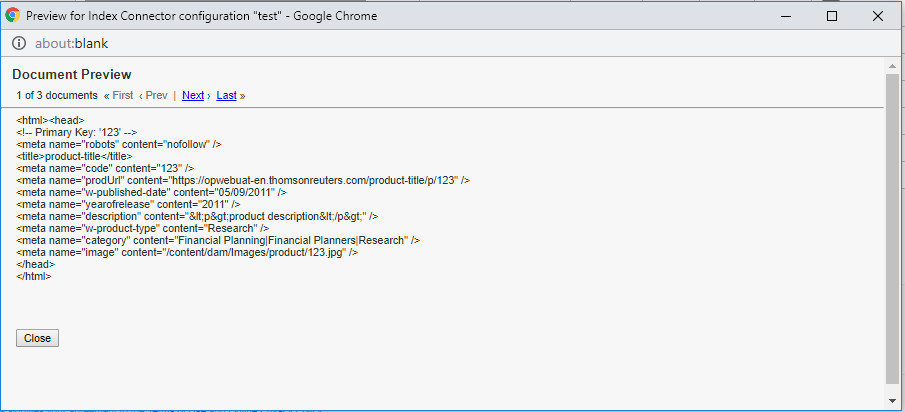
The configurations can be previewed before adding the Index Connector, click on Preview button


The Index Connector configuration is now ready, enable the Index Connector as URL entry point for crawling and indexing Setting → Crawling → URL Entrypoints


Select the Index Connector defined in the above step from the drop down “ — Add Index Connector Configurations — “


Now the configurations are ready, run a full live index so the new records will be reflected in the search result.

The Index Connector will provide the easy option to index the documents from feed data, this provides better performance during crawling and indexing. The Index connector can be used to index large volume of data for eCommerce systems.


Monday, September 17, 2018

How to Enable Custom Validation on multifield Touch UI — Adobe Experience Manager(AEM)

How to Enable Custom Validation on multifield Touch UI — Adobe Experience Manager(AEM)


This tutorial explains the approach to enable custom validation on multifield Touch UI. 

We are going to enable the email validation for the email filed defined inside multifield through custom script. 

Define Dialog 


As a first step, define a dialog with multi fields. The XML structure of the sample dialog is below
<?xml version="1.0" encoding="UTF-8"?>
<jcr:root xmlns:sling="" xmlns:cq="" xmlns:jcr="" xmlns:nt=""
jcr:primaryType="nt:unstructured"
jcr:title="63 Collapsible Multifield"
sling:resourceType="cq/gui/components/authoring/dialog"
extraClientlibs="[customvalidation]">
<content
jcr:primaryType="nt:unstructured"
sling:resourceType="granite/ui/components/coral/foundation/fixedcolumns">
<items jcr:primaryType="nt:unstructured">
<column
jcr:primaryType="nt:unstructured"
sling:resourceType="granite/ui/components/coral/foundation/container">
<items jcr:primaryType="nt:unstructured">
<products
jcr:primaryType="nt:unstructured"
sling:resourceType="granite/ui/components/coral/foundation/form/multifield"
composite="{Boolean}true"
eaem-show-on-collapse="EAEM.showProductName"
fieldLabel="Products">
<field
jcr:primaryType="nt:unstructured"
sling:resourceType="granite/ui/components/coral/foundation/container"
name="./products">
<items jcr:primaryType="nt:unstructured">
<column
jcr:primaryType="nt:unstructured"
sling:resourceType="granite/ui/components/coral/foundation/container">
<items jcr:primaryType="nt:unstructured">
<product
jcr:primaryType="nt:unstructured"
sling:resourceType="granite/ui/components/coral/foundation/form/textfield"
fieldDescription="Name of Product"
fieldLabel="Product Name"
name="./product"/>
<email
jcr:primaryType="nt:unstructured"
sling:resourceType="granite/ui/components/coral/foundation/form/textfield"
fieldLabel="Email"
name="./email"/>
</items>
</column>
</items>
</field>
</products>
</items>
</column>
</items>
</content>
</jcr:root>

aem-touch-ui-multi-field-validation


Enable the validation for Email


Let us now enable the validation for email fields — the email id field is validated for valid email id. The form should not be submitted if there are at least one email filed is entered with invalid email address.

The email fields should be highlighted in different style for easy identification of validation errors.

Define a cq:ClientLibraryFolder node under the component with the name clientlibs and add the below properties.

categories (String[]) — <define category name> e.g customvalidation

aem-touch-ui-multi-field-validation


Create a folder with name js and add a file with name js.txt under it. Also, Add a file with name validation.js under clientlibs folder.

aem-touch-ui-multi-field-validation

Add the below script in validation.js
(function (document, $, ns) {
"use strict";
$(document).on("click", ".cq-dialog-submit", function (e) {
e.stopPropagation();
e.preventDefault();
var $form = $(this).closest("form.foundation-form"),
$inputs = $form.find("[name$='./email']"),
$input=null,
emailid,
isError=false,
patterns = {
emailadd: /^([a-z\d!#$%&'*+\-\/=?^_`{|}~\u00A0-\uD7FF\uF900-\uFDCF\uFDF0-\uFFEF]+(\.[a-z\d!#$%&'*+\-\/=?^_`{|}~\u00A0-\uD7FF\uF900-\uFDCF\uFDF0-\uFFEF]+)*|"((([ \t]*\r\n)?[ \t]+)?([\x01-\x08\x0b\x0c\x0e-\x1f\x7f\x21\x23-\x5b\x5d-\x7e\u00A0-\uD7FF\uF900-\uFDCF\uFDF0-\uFFEF]|\\[\x01-\x09\x0b\x0c\x0d-\x7f\u00A0-\uD7FF\uF900-\uFDCF\uFDF0-\uFFEF]))*(([ \t]*\r\n)?[ \t]+)?")@(([a-z\d\u00A0-\uD7FF\uF900-\uFDCF\uFDF0-\uFFEF]|[a-z\d\u00A0-\uD7FF\uF900-\uFDCF\uFDF0-\uFFEF][a-z\d\-._~\u00A0-\uD7FF\uF900-\uFDCF\uFDF0-\uFFEF]*[a-z\d\u00A0-\uD7FF\uF900-\uFDCF\uFDF0-\uFFEF])\.)+([a-z\u00A0-\uD7FF\uF900-\uFDCF\uFDF0-\uFFEF]|[a-z\u00A0-\uD7FF\uF900-\uFDCF\uFDF0-\uFFEF][a-z\d\-._~\u00A0-\uD7FF\uF900-\uFDCF\uFDF0-\uFFEF]*[a-z\u00A0-\uD7FF\uF900-\uFDCF\uFDF0-\uFFEF])\.?$/i
};
$inputs.each(function(index, input) {$input = $(input);
emailid=$input.val();
if(emailid != "" && !patterns.emailadd.test(emailid) && (emailid != null)) {
isError=true;
$input.css("border", "2px solid #FF0000");
ns.ui.helpers.prompt({
title: Granite.I18n.get("Invalid Input"),
message: "Please Enter a valid Email Address",
actions: [{
id: "CANCEL",
text: "CANCEL",
className: "coral-Button"
}],
callback: function (actionId) {
if (actionId === "CANCEL") {
}
}
});
}else
{
$input.css("border", "");
}
});

if(!isError){
$form.submit();
}
});

})(document, Granite.$, Granite.author);

Add the below content inside js.txt


js/validation.js

Add the below property in cq:dialog node

extraClientlibs String[] —customvalidation(the client library defined in the previous step)

aem-touch-ui-multi-field-validation


Author the component to a page

The error message will be displayed if the email address is invalid in the email fields also the email fields will be marked in red border on error, the form will be submitted on correcting all the email issues.

aem-touch-ui-multi-field-validation


aem-touch-ui-multi-field-validation


This concludes enabling the custom email validation to the multifield in touch UI dialog’s. The extraClientlibs dialog property can be used to load the custom java script to the dialog’s, the script can handle the appropriate events and handle the filed validation. The script can be customized as required to handle different validation scenarios.


Saturday, September 15, 2018

Improve the performance of the Adobe Experience Manager(AEM) websites

Improve the performance of the Adobe Experience Manager(AEM) websites


This post explains my experience on improving the Adobe Experience Manager(AEM) website performance

"Cache as much as possible" - CDN layer:


The caching is the important thing to be considered for improving the performance, in AEM setup the dispatcher will be used for caching the static content.
The CDN can be added on top of dispatcher to distributed caching to support the caching in different region to provide better performance. As the CDN is distributed at least by region the user will be served from nearby region to improve the performance. in this setup publishers will be only receive the initial request and subsequent request will be served by CDN and dispatcher.

There are multiple CDN options like Akamai and AWS Cloud Front. The request flow diagram below

network_flow_aem

Cache-Control max-age header:


Specify the cache control header with required max-age value to control the amount of time the files are cached by browser.

Add higher max-age values for static resources so that the browser caching can be used optimaly for bettwr performance.

The max-age can be be added as part of the virtual host configuration. e.g

<filesMatch ".(css|js|)$">
Header set Cache-Control "max-age=2628000"
</filesMatch>

<filesMatch ".(jpg|jpeg|png|gif|html|ico)$">
Header set Cache-Control "max-age=900"
</filesMatch>


Versioning of CSS and JS files:


The performance gain is achieved through browser caching static files for specified time(max-age). The browser cache busting is important to update the modified static files in browser, say the browser has the CSS file cached for one month and you want to change the CSS. You need a strategy for breaking the cache and forcing the browser to download a new copy of the CSS.

Change the version number of the static files upon modification so that the browser cache will be updated with new file irrespective of the max-age configuration. 

The versioning of static resources can be enabled in AEM through "ACS Commons Versioned Clientlibs" - https://adobe-consulting-services.github.io/acs-aem-commons/features/versioned-clientlibs/index.html


Wednesday, September 12, 2018

java.lang.UnsupportedOperationException: Deserialization not allowed for class [Ljava.lang.Object; - Adobe Experience Manager(AEM)

java.lang.UnsupportedOperationException: Deserialization not allowed for class [Ljava.lang.Object; - Adobe Experience Manager(AEM)

We were receiving the following exception while deserializing the objects in AEM

java.lang.UnsupportedOperationException: Deserialization not allowed for class com.test.Test; (on Wed Sep 12 16:32:50 CDT 2018)
        at org.kantega.notsoserial.DefaultNotSoSerial.preventDeserialization(DefaultNotSoSerial.java:256)
        at org.kantega.notsoserial.DefaultNotSoSerial.onBeforeResolveClass(DefaultNotSoSerial.java:248)
        at org.kantega.notsoserial.ObjectInputStreamClassVisitor.onBeforeResolveClass(ObjectInputStreamClassVisitor.java:48)
        at java.io.ObjectInputStream.readNonProxyDesc(ObjectInputStream.java:1819)
        at java.io.ObjectInputStream.readClassDesc(ObjectInputStream.java:1713)
        at java.io.ObjectInputStream.readArray(ObjectInputStream.java:1874)
        at java.io.ObjectInputStream.readObject0(ObjectInputStream.java:1529)
        at java.io.ObjectInputStream.defaultReadFields(ObjectInputStream.java:2231)
        at java.io.ObjectInputStream.readSerialData(ObjectInputStream.java:2155)
        at java.io.ObjectInputStream.readOrdinaryObject(ObjectInputStream.java:2013)
        at java.io.ObjectInputStream.readObject0(ObjectInputStream.java:1535)
        at java.io.ObjectInputStream.readObject(ObjectInputStream.java:422)

The issue is due to the class name was not white listed in "Deserialization Firewall Configuration",Deserialization Firewall  help as to mitigation the deserialization attacks in Java
It gives you complete control over which classes your application should be allowed to deserialize.

deserialization_firewall_aem
The error got changed to the below one after white listing the custom package name in "Deserialization Firewall Configuration".

java.lang.UnsupportedOperationException: Deserialization not allowed for class [Ljava.lang.Object; (on Wed Sep 12 16:32:50 CDT 2018)
        at org.kantega.notsoserial.DefaultNotSoSerial.preventDeserialization(DefaultNotSoSerial.java:256)
        at org.kantega.notsoserial.DefaultNotSoSerial.onBeforeResolveClass(DefaultNotSoSerial.java:248)
        at org.kantega.notsoserial.ObjectInputStreamClassVisitor.onBeforeResolveClass(ObjectInputStreamClassVisitor.java:48)
        at java.io.ObjectInputStream.readNonProxyDesc(ObjectInputStream.java:1819)
        at java.io.ObjectInputStream.readClassDesc(ObjectInputStream.java:1713)
        at java.io.ObjectInputStream.readArray(ObjectInputStream.java:1874)
        at java.io.ObjectInputStream.readObject0(ObjectInputStream.java:1529)
        at java.io.ObjectInputStream.defaultReadFields(ObjectInputStream.java:2231)
        at java.io.ObjectInputStream.readSerialData(ObjectInputStream.java:2155)
        at java.io.ObjectInputStream.readOrdinaryObject(ObjectInputStream.java:2013)
        at java.io.ObjectInputStream.readObject0(ObjectInputStream.java:1535)
        at java.io.ObjectInputStream.defaultReadFields(ObjectInputStream.java:2231)
        at java.io.ObjectInputStream.readSerialData(ObjectInputStream.java:2155)
        at java.io.ObjectInputStream.readOrdinaryObject(ObjectInputStream.java:2013)
        at java.io.ObjectInputStream.readObject0(ObjectInputStream.java:1535)
        at java.io.ObjectInputStream.readObject(ObjectInputStream.java:422)

The class name "[Ljava.lang.Object" should be white listed as the deserialization type is array of custom objects, the "Deserialization Firewall Configuration" already enabled with default value "[" so that all the arrray type should be white listed.

In our case unfortunately the default "[" value was removed from the configuration and due to that the serialization for array types are rejected. The issue got resolved after adding the default value "["

Please make sure the default value "["  is not removed from white list to support array type.

deserialization_firewall_aem

This is for my reference but i am happy if this help someone.


Thursday, September 6, 2018

Adobe Experience Manager(AEM) On-Premises to Adobe Managed Service(AMS) Cloud Migration

Adobe Experience Manager(AEM) On-Premises to Adobe Managed Service(AMS) Cloud Migration


This post explains the different things that should be considered while migrating On-Premises Adobe Experience Manager(AEM) platform to the AWS cloud managed through AMS.

AMS cloud migration provides lot of benefits -

  • Extend the server capacity based on the demand
  • Quick spinning up of new servers
  • Less management and initial setup cost
  • Better security and monitoring of platform
  • Streamlined process
  • Higher availability

We have to consider this option based on the how much control we require on the production environment - AMS environments will be restricted for client access.

AMS_deployment_model

Below are some of the important items need attention while migrating the On-Premises AEM platform to AMS Cloud.

Deployment options:


There is different deployment options available based on the SLA

AMS_deployment_by_SLA