Saturday, July 5, 2014

Invoking Salesforce REST based web service from Java

Invoking Salesforce REST based web service from Java

This post will explain the approach to call the Salesfore REST based webservice through java.
I have exposed a Apex class as REST service from salesforce to fetch the account details.

@RestResource(urlMapping='/AccountDetails/*')
global with sharing class AccountDetails {

    @HttpGet
    global static Account doGet() {
        RestRequest req = RestContext.request;
        RestResponse res = RestContext.response;
        String accountId = req.requestURI.substring(req.requestURI.lastIndexOf('/')+1);
        System.debug('Account Id:'+accountId);
        Account result = [SELECT Id, Name, Phone, Website FROM Account WHERE Id = :accountId];
        return result;
    }
}

The communication is of two steps
  •  getting the access_token 
  •  invoking the service endpoint by attaching the access_token to the request.
To obtain an access token, we will send an HTTP POST request to the authentication endpoint exposed by Salesforce - https://login.salesforce.com/services/oauth2/token  with the details client_id, client_secret, username and password.This values can be get from the configured Connected Apps from salesforce.


Friday, July 4, 2014

Ignoring the Host Name verification while invoking the HTTPS service through HttpsURLConnection

Ignoring the Host Name verification while invoking the HTTPS service through HttpsURLConnection

Sometimes you may receive the Host Name mismatch exception while invoking the HTTPS service from the Java client even though the valid certificate is installed to the key store.

javax.net.ssl.SSLHandshakeException: java.security.cert.CertificateException: No name matching <Host Name> found

The root cause of the exception is the CN name of the certificate is not matching with the host name used to connect the service.

In real scenario while the certificate is signed with third party certificate authority , the CN name will be specified as the host name of the server where the service is hosted or wildcard name will be specified e.g *.example.com to represent all sub domains in a domain. So there will not be any issue while connecting to the service.

This mismatch exception will happen most of the time communicating with self signed certificate, the certificate is signed with CN name that is not matching with the host name.

How to Fix the issue

To resolve the issue, the certificate should be signed with proper CN name or we can create a custom host name verifier to customize the host name verification functionality.

We have to return true from the custom host name verifier for the host name for which the CN name is mismatching.This will connect to the service irrespective of the host name used .

import java.io.BufferedReader;
import java.io.DataOutputStream;
import java.io.InputStream;
import java.io.InputStreamReader;
import java.net.URL;
import java.net.HttpURLConnection;

public class HTTPCaller {
static {
   javax.net.ssl.HttpsURLConnection.setDefaultHostnameVerifier(
   new javax.net.ssl.HostnameVerifier(){
       public boolean verify(String hostname,
               javax.net.ssl.SSLSession sslSession) {
           if (hostname.equals("localhost")) {
               return true;
           }
           return false;
       }
   });
}

    public static String execute() {
        String targetURL="https://localhost/test"
        URL url;
        HttpURLConnection connection = null;
        try {
            url = new URL(targetURL);
            url = new URL(url.toString());              

            connection = (HttpURLConnection)url.openConnection();
            connection.setRequestProperty("accept", "application/xml"); //for GET service to return xml payload

            InputStream is = connection.getInputStream();
            BufferedReader rd = new BufferedReader(new InputStreamReader(is));
            System.out.println("\n Received response" + System.currentTimeMillis());

            String line;
            StringBuffer response = new StringBuffer();
            while ((line = rd.readLine()) != null) {
                response.append(line);
                response.append('\r');
            }
            rd.close();
            return response.toString();
        } catch (Exception e) {
            e.printStackTrace();
            return (e.getClass().getName()+":"+e.getMessage().toString());
        }
        finally {
            if (connection != null) {
                connection.disconnect();
            }
        }
    }

Wednesday, July 2, 2014

Encrypting XML Payload through XSLT in Spring WS

Encrypting XML Payload through XSLT in Spring WS

The below document explain the approach to This document will explain the approach to encrypt the critical elements of XML payload while invoking the services in Spring WS or storing the data to a database table through XSLT.


Encrypting_XML_Payload.pdf

Tuesday, July 1, 2014

Unit Testing the Velocity Templates in spring

Unit Testing the Velocity Templates in spring

It is painful to test the Velocity Template  by deploying to the server while doing frequent changes.
The unit testing  will help as to overcome this and do proper testing without deploying the project to the server.
This post will explain the approach to unit test the Velocity Templates through eclipse.

Spring velocity configurations

Create a Velocity-test.xml configuration file to configure the velocity bean - instead of creating separate configuration file we can also use the project configuration file that has the velocity bean configuration (e.g. application-context.xml)


Change the vm template path accordingly.

Create a test java class (VelocityTest.java)

import java.io.*;
import java.util.ArrayList;
import org.apache.velocity.app.VelocityEngine;
import org.apache.velocity.context.*;
import org.springframework.context.ApplicationContext;
import org.springframework.context.support.ClassPathXmlApplicationContext;
import com.thomson.ecom.core.velocity.VelocityContextBuilder;
public class VelocityTest
{
public static void main(String[] args) throws Exception
{
ApplicationContext ctx = new ClassPathXmlApplicationContext("classpath:velocity-test.xml");
ArrayList<Employee> employeeList=new ArrayList<Employee>();

Employee emp1=new Employee();
emp1.setContactNo("111111");
emp1.setDept("CSC");
emp1.setEmail("a@gmail.com");
emp1.setEmpName("Albin");
emp1.setEmpNo("1");
emp1.setLocation("Bangalore");
employeeList.add(emp1);

Employee emp2=new Employee();
emp2.setContactNo("22222");
emp2.setDept("IT");
emp2.setEmail("b@gmail.com");
emp2.setEmpName("Albin1");
emp2.setEmpNo("2");
emp2.setLocation("Bangalore");
employeeList.add(emp2);

Employee emp3=new Employee();
emp3.setContactNo("33333");
emp3.setDept("IT");
emp3.setEmail("c@gmail.com");
emp3.setEmpName("Albin2");
emp3.setEmpNo("3");
emp3.setLocation("Bangalore");
employeeList.add(emp3);

VelocityEngine engine = ctx.getBean("velocityEngine", VelocityEngine.class);
Context velocityCtx = VelocityContextBuilder.getInstance().buildContext();
velocityCtx.put("empList", employeeList);

Writer w = new FileWriter(new File("D:\\Albin\\velocity.html"));
engine.mergeTemplate("EmployeeEmailTemplate.vm", velocityCtx, w);
w.close();

System.exit(0);
}
}

Change the velocity.html file path and the vm template name accordingly.
Pass the required inputs to the velocityCtx map.
Execute the VelocityTest.java; this will generate the velocity.html file in the specified location.

Resolving cvc-elt.1: Cannot find the declaration of element 'beans' in Spring

Resolving cvc-elt.1: Cannot find the declaration of element 'beans' in Spring

I was receiving the following exception while running the Spring application in standalone mode with maven and eclipse.

Exception in thread "main" org.springframework.beans.factory.xml.XmlBeanDefinitionStoreException: Line 11 in XML document from class path resource [encrypt/encrypting-test.xml] is invalid; nested exception is org.xml.sax.SAXParseException: cvc-elt.1: Cannot find the declaration of element 'beans'.
at org.springframework.beans.factory.xml.XmlBeanDefinitionReader.doLoadBeanDefinitions(XmlBeanDefinitionReader.java:396)
at org.springframework.beans.factory.xml.XmlBeanDefinitionReader.loadBeanDefinitions(XmlBeanDefinitionReader.java:334)
at org.springframework.beans.factory.xml.XmlBeanDefinitionReader.loadBeanDefinitions(XmlBeanDefinitionReader.java:302)
at org.springframework.beans.factory.support.AbstractBeanDefinitionReader.loadBeanDefinitions(AbstractBeanDefinitionReader.java:143)

Caused by: org.xml.sax.SAXParseException: cvc-elt.1: Cannot find the declaration of element 'beans'.
at org.apache.xerces.util.ErrorHandlerWrapper.createSAXParseException(Unknown Source)
at org.apache.xerces.util.ErrorHandlerWrapper.error(Unknown Source)

Unfortunately, I could not able to find any issue in my bean configuration file.

<? xml version="1.0" encoding="UTF-8 ?>
<beans xmlns="http://www.springframework.org/schema/beans" xmlns:xsi="http://www.w3.org/2001/XMLSchema-instance" xmlns:jee="http://www.springframework.org/schema/jee" xmlns:context="http://www.springframework.org/schema/context" xsi:schemaLocation=" http://www.springframework.org/schema/beans http://www.springframework.org/schema/beans/spring-beans-3.1.xsd http://www.springframework.org/schema/jee http://www.springframework.org/schema/jee/spring-jee-3.1.xsd http://www.springframework.org/schema/context http://www.springframework.org/schema/context/spring-context-3.1.xsd">

    <bean id="encryptXMLPayload" class="com.encrypt.EncryptXMLPayload">
          <property name="encryptor" ref="encryptor" /> 
          <property name="messageStylesheet" value="classpath:encrypt/encryptXMLPayload.xslt" />
     </bean>
     <bean id="encryptor" class="com.encrypt.Encryptor" init-method="init">
           <property name="keyData" value="pYOkcj4_kf-4hn-A-IkclLWDBJI-T5bd"/>
     </bean> 
 </beans>

After analysis, the issue is with version mismatch between the pom.xml(spring version configured) and the schema version  configured in the bean configuration file

<dependency>
<groupId>org.springframework</groupId>
<artifactId>spring-core</artifactId>
<version>3.0.0.RELEASE</version>
<scope>compile</scope>
</dependency>

<? xml version="1.0" encoding="UTF-8 ?>
<beans xmlns="http://www.springframework.org/schema/beans" xmlns:xsi="http://www.w3.org/2001/XMLSchema-instance" xmlns:jee="http://www.springframework.org/schema/jee" xmlns:context="http://www.springframework.org/schema/context" xsi:schemaLocation=" http://www.springframework.org/schema/beans http://www.springframework.org/schema/beans/spring-beans-3.1.xsd http://www.springframework.org/schema/jee http://www.springframework.org/schema/jee/spring-jee-3.1.xsd http://www.springframework.org/schema/context http://www.springframework.org/schema/context/spring-context-3.1.xsd">


How to Fix


The issue got resolved after changing the schema version to 3.0 in the bean configuration file as shown below

<? xml version="1.0" encoding="UTF-8 ?>
<beans xmlns="http://www.springframework.org/schema/beans" xmlns:xsi="http://www.w3.org/2001/XMLSchema-instance" xmlns:jee="http://www.springframework.org/schema/jee" xmlns:context="http://www.springframework.org/schema/context" xsi:schemaLocation=" http://www.springframework.org/schema/beans http://www.springframework.org/schema/beans/spring-beans-3.0.xsd http://www.springframework.org/schema/jee http://www.springframework.org/schema/jee/spring-jee-3.0.xsd http://www.springframework.org/schema/context http://www.springframework.org/schema/context/spring-context-3.0.xsd"> 

The spring version configured in the pom.xml and the schema version used in the bean configuration files should be matching.

Loading configuration properties from Database Table in Spring Application

Loading configuration properties from Database Table in Spring Application

This is better approach to store the configuration properties to a database table so that this can be managed easily.
This post will explains the approach to store and retrieve the configuration properties from database table in spring project.

Bean definition in Spring context file:

Configure the below bean definition to the spring context file

<!--  Loads properties to set environment-specific values within the DB table for that environment -->
<bean class="org.springframework.beans.factory.config.PropertyPlaceholderConfigurer">
<property name="systemPropertiesModeName" value="SYSTEM_PROPERTIES_MODE_OVERRIDE" />
<property name="properties">
<bean class="org.apache.commons.configuration.ConfigurationConverter"
factory-method="getProperties">
<constructor-arg>
<bean class="org.apache.commons.configuration.DatabaseConfiguration">
  <constructor-arg>
  <ref bean="propertyDataSource"/>
</constructor-arg>
     <constructor-arg value="Properties"/>  <!--  DB Table -->
     <constructor-arg value="prop_key"/> <!-- DB Key Column -->
   <constructor-arg value="prop_value"/> <!--  DB Value Column -->
   </bean>
</constructor-arg>
</bean>
</property>
</bean>

Properties database table

The Properties database table should be pre-created with the required configuration values

Prop_keyProp_value
ftp.hostlocalhost
ftp.useralbin

Data source configuration

The datasource ref bean  propertyDataSource should be configured in the spring context file.

<jee:jndi-lookup id="propertyDataSource" jndi-name="java:comp/env/jdbc/propertyDS"/>

Here i am using the Tomcat server, the actual datasource - jdbc/propertyDS should be configured in context.xml file of the Tomcat server.

<Resource name="jdbc/propertyDS "
auth="Container"
type="javax.sql.DataSource"
username="property_user"
password="property "
driverClassName="com.microsoft.sqlserver.jdbc.SQLServerDriver"
url="jdbc:sqlserver://localhost:1433;DatabaseName=Soa"
maxActive="4"
maxIdle="2"/>

Refer the properties

Now the properties can be referred as shown below

<bean id="ftp" class="com.doc.FTPService">
<property name="host" value="${ftp.host}"/>
<property name="user" value="${ftp.user}"/>
</bean>

Sunday, June 29, 2014

Spring Web service with NTLM Authentication

Spring Web service with NTLM Authentication

NTLM is a proprietary authentication scheme developed by Microsoft and optimized for Windows operating system.

This post will explain how to invoke the NTLM authentication enabled web services from spring integration.

Spring Web Service uses the Apache HTTPClient to communicate to the NTLM authentication enabled services.

We named our spring bean as WebServiceNTLMAuhCommunicationClientImpl, it will extend the class org.springframework.ws.client.core.support.WebServiceGatewaySupport

We have overridden the method initGateway to set the org.apache.commons.httpclient.NTCredentials object to CommonsHttpMessageSender.

The userName, password and the domain name should be provided to createthe NTCredential object.

The afterPropertiesSet method on CommonsHttpMessageSender class should be invoked after setting the credential - afterPropertiesSet method will set the credentials to HttPClient.

WebServiceNTLMAuhCommunicationClientImpl.java

import org.apache.commons.httpclient.Credentials;
import org.apache.commons.httpclient.NTCredentials;
import org.springframework.ws.client.core.support.WebServiceGatewaySupport;
import org.springframework.ws.transport.http.CommonsHttpMessageSender;

public class WebServiceNTLMAuhCommunicationClientImpl extends WebServiceGatewaySupport {
 private String basicAuthUsername;
 private String basicAuthPassword;
 private String domain;
 private String hostname;


 public String getHostname() {
  return hostname;
 }

  public void setHostname(String hostname) {
  this.hostname = hostname;
 }

  public Object send(String url, Object request)
 {
  return this.getWebServiceTemplate().marshalSendAndReceive(
    url, request, null);
 }

 public void setBasicAuthPassword(String basicAuthPassword)
    {
     this.basicAuthPassword = basicAuthPassword;
    }

  public void setBasicAuthUsername(String basicAuthUsername)
    {
     this.basicAuthUsername = basicAuthUsername;
    }

 public String getDomain() {
  return domain;
 }

  public void setDomain(String domain) {
  this.domain = domain;
 }

  @Override
    protected void initGateway() throws Exception
    {
  if(this.basicAuthUsername != null || this.basicAuthPassword != null)
  {
    ((CommonsHttpMessageSender)this.getMessageSenders()[0]).setCredentials(getCredentials());
    ((CommonsHttpMessageSender)this.getMessageSenders()[0]).afterPropertiesSet();
  }
  super.initGateway();
    }

 private Credentials getCredentials() {
   return new NTCredentials(this.basicAuthUsername, this.basicAuthPassword, getHostname(), getDomain());
 }

}

Wednesday, June 25, 2014

javax.management.MBeanException: The configuration file, deployed-composites.xml, does not contain the composite-revision element

javax.management.MBeanException: The configuration file, deployed-composites.xml, does not contain the composite-revision element

We were receiving the following exception while deploying the composite to the SOA server in Solaris.

The exception was thrown while activating the component.

compositeMgrTask:
     [java] Connecting to: service:jmx:t3://localhost:8004/jndi/weblogic.management.mbeanservers.runtime
     [java] connection initiated
     [java] javax.management.MBeanException: The configuration file, deployed-composites.xml, does not contain the CRMASYNC/zz!5.3.19 composite-revision element.
     [java]     at oracle.as.jmx.framework.standardmbeans.spi.OracleStandardEmitterMBean.doInvoke(OracleStandardEmitterMBean.java:986)

The actual exception is the component was not deployed successfully due to some exception and it is trying to activate the same .

The exception while deploying the component is

[deployComposite] setting user/password..., user=weblogic
[deployComposite] Processing sar=/shared/11g/soa_deploy/code/config/scripts/../../LoadBalancerProbe/zz/deploy/sca_zz_rev5.3.19.jar
[deployComposite] Adding sar file -/shared/11g/soa_deploy/code/config/scripts/../../LoadBalancerProbe/zz/deploy/sca_zz_rev5.3.19.jar
[deployComposite] INFO: Creating HTTP connection to host:localhost, port:8004
[deployComposite] INFO: Received HTTP response from the server, response code=500
[deployComposite] ---->response code=500, error:There was an error deploying/undeploying composite on SOA1: Error in reading data from deployer client.: /var/tmp/sar_base_dir_07be0448-8481-4ade-a2e9-253e5a8ba33c/sca_zz_rev5.3.19.jar (No such file or directory).

Based on the error, the deployer could not able to retrieve the jar file from the tmp location.
After analysis, the /var/tmp space is full and the script could not able to write the jar file.
We can use df -kh command to find the space utilization


How to Fix

To resolve the issue login as root user and clear the /var/tmp folder.

Thursday, June 12, 2014

Generating JAXB artifacts from XSD/WSDL through Maven

Generating JAXB artifacts from XSD/WSDL through Maven

The maven-jaxb2-plugin can be used to generate the java classes from both XSD/WSDL.

Plugin configuration in Pom.xml

The below plug in configuration can be used in the pom.xml file to generate the sources.
<plugin>
  <groupId>org.jvnet.jaxb2.maven2</groupId>
  <artifactId>maven-jaxb2-plugin</artifactId>
  <version>0.7.3</version>
  <executions>
    <execution>
      <id>app1-stub-generation</id>
      <goals>
        <goal>generate</goal>
      </goals>
      <configuration>
        <schemaDirectory>src/main/resources</schemaDirectory>
        <schemaIncludes>
          <include>*.xsd</include>
        </schemaIncludes>
        <generatePackage>com.thomson.ecom.service.bean.demo</generatePackage>
        <clearOutputDir>false</clearOutputDir>
        <generateDirectory>src/main/java</generateDirectory>
        <strict>true</strict>
      </configuration>
    </execution>
 
 
  </executions>
</plugin>

Change the include accordingly to generate for wsdl -   <include>*.wsdl</include>

Generate the sources

To generate the sources, Right click on pom.xml-->Run As-->Maven generate-sources


This will generate all the java classes to src/main/java

Wednesday, June 11, 2014

Configuring JAXB2-Maven-Plugin not to clear the outputdirectory

Configuring JAXB2-Maven-Plugin not to clear the outputdirectory

JAXB2-Maven-Plugin will help us to generate the java classes from the xsd.
By default the plugin clears the existing contents in the ouputdirectory and generate the new java classes into the outputdirectory.

Some cases we may need to generate the java classes from multiple source xsd's so we have to configure the plugin not to clear the outputdirectory.

Yo have to add <clearOutputDir>false</clearOutputDir> in the plugin configuration.

<plugin>
            <groupId>org.codehaus.mojo</groupId>
            <artifactId>jaxb2-maven-plugin</artifactId>
            <executions>
                <execution>
                    <goals>
                        <goal>xjc</goal>
                    </goals>
                </execution>
            </executions>
            <configuration>
                <!-- The schema directory or xsd files. -->
                <schemaDirectory>${basedir}/src/main/resources</schemaDirectory>
                <!-- The package in which the source files will be generated. -->
                <packageName>com.service.bean.demo</packageName>
                 <clearOutputDir>false</clearOutputDir>
                <!-- The working directory to create the generated java source files. -->
                <outputDirectory>${basedir}/src/main/java</outputDirectory>
            </configuration>
        </plugin>

Tuesday, June 10, 2014

Changing the default Maven repository location in eclipse

Changing the default Maven repository location in eclipse

Sometimes we may required to modify the default maven repository location to custom location for the eclipse project.
Eclipse project will have the variable M2_REPO defined as read only.


The following steps will help as to change the default Mavan repository location.

Modify the settings.xml file in the <<USER_HOME>>/.m2 and add the localRepository value accordingly.


If the .m2 folder ia not available in the USER_HOME create the same(md .m2) and also create a settings.xml file and update the file with the following contents(change the value of localrepository and the repository url accordingly)

Saturday, June 7, 2014

Load Balancing Rules for Oracle SOA Suite Infrastructure

Load Balancing Rules for Oracle SOA Suite Infrastructure

This blog explain the details about the load balancer rule setup for Oracle SOA Suite infrastructure.


Download Load_Balancing_Rules_For_SOA.pdf

Sunday, June 1, 2014

Approach to Resolve the Load balancer routing the Oracle SOA Suite Request to Unavailable SOA-INFRA

Approach to Resolve the Load balancer routing the Oracle SOA Suite Request to Unavailable SOA-INFRA 

The below document explain the approach to resolve the Load balancer routing the Oracle SOA Suite request to unavailable SOA-INFRA.


Download Load_Balancer_Probe_SOA-INFRA.pdf

Friday, May 30, 2014

Oracle BPEL Vs. Oracle BPM

Oracle BPEL Vs. Oracle BPM

For the recent project i was comparing the Oracle BPEL and Oracle BPM and thought of sharing the same.
This document is based on my understanding and views not of oracle views.


Download Oracle_BPEL_Vs._Oracle_BPM.pdf

Friday, May 23, 2014

Component Metrics are Unavailable for the SOA Composite in EM console - Oracle SOA Suite 11g

Component Metrics are Unavailable for the SOA Composite in EM console - Oracle SOA Suite 11g

I was facing a strange issue with Oracle SOA Suite EM console. Whenever opening the SOA Composite the component metrics are not getting displayed and it is shown as Unavailable.


The issue is only happening in Development environment but it is working fine in all the other environments.
I could not able to find any exception related to this issue in any of the log files.

Unfortunately the Component metrics are getting displayed after refreshing the SOA Composite(from right corner of EM page as shown in the above diagram) from EM console


Deployment plan file to replace the Binding Adapter Properties/Attributes – Oracle SOA Suite

Deployment plan file to replace the Binding Adapter Properties/Attributes – Oracle SOA Suite

The deployment plan file will help us to dynamically replace the Oracle SOA Suite Composite properties.

This post explain the steps to replace the Properties/Attributes of the Direct Binding Adapter in Composite.xml. The same steps can be used to replace the Properties/Attributes of all the Binding Adapters.

Generate the Plan file:

The plan file can be generated through JDeveloper or through ANT script.

Generating Plan file through JDeveloper:

Right Click on Composite.xml and click on generate config Plan.


Change the generated plan file contents accordingly to replace the properties and attributes of the composites. 

Add the required attributes to the corresponding Binding and change the values accordingly(by default the attributes will not be added to the corresponding binding in the plan file) and also change the value of required properties accordingly.

Thursday, May 22, 2014

The selected WSDL contain a direct binding but seems to be of the wrong type - Oracle SOA Suite

The selected WSDL contain a direct binding but seems to be of the wrong type - Oracle SOA Suite

You will be receiving the message "The selected WSDL contain a direct binding but seems to be of the wrong type. Looking for Oracle Service Bus type.Please check your WSDL selection" while trying to create the direct binding to invoke the OSB service.


This message says the OSB proxy service is not configured with SB transport.
Configure the OSB Proxy service with the SB transport to invoke the same from SOA composite through Direct Binding.

When looking up the OSB service from JDeveloper SOA Resource Browser, the Proxy will be shown as direct for SB transport services.

Wednesday, May 21, 2014

Re-Deploying the DBAdapter application - Oracle SOA Suite

Re-Deploying the DBAdapter application - Oracle SOA Suite

Accidentally we have deleted the DBAdapter application from the weblogic server console in Oracle SOA Suite and all the database connection factories created was failing.

This post will explain how to Re-Deploy the Resource Adapter - DBAdapter application and recover the connection factories.

The same steps can be followed to recover any Resource Adapter applications

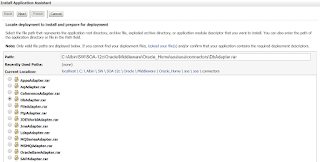
Steps to redeploy Resource Adapter

  • Login to weblogic console
  • Go to deployments
  • Click on Install 
  • Select $Oracle_HOME/soa/connectors as the path and select Dbadapter.rar
reinstall_resource_adapter

  • Click on Next
  • Click on Next and select the target server
reinstall_resource_adapter
          

Wednesday, May 14, 2014

Configuring the Oracle Enterprise Repository plugins for Jdeveloper

Configuring the Oracle Enterprise Repository plugins for Jdeveloper

This post explain the steps to configure the Oracle Enterprise Repository Plugins in JDeveloper(JDeveloper version used is 11.1.1.5.0)

In JDeveloper click on Help-->Check For Updates

Select the Oracle Enterprise Repository plugins  as shown below.
The Oracle Enterprise Repository Adapter plugin will help us to access the assets and artifacts available in the Oracle Enterprise Repository .
The Oracle Enterprise Repository Harvester will help us to  harvest a Oracle SOA Suite project to the Oracle Enterprise Repository.


Click on Next and click on Finish


Restart the JDeveloper while prompted
After successful installation of the plugins you can able to to see the "Oracle Enterprise Repository Connection" as new connection type  and also right clicking the SOA project we can see "Submit Project To Enterprise Repository" and right clicking the files(XSD, WSDL) we can see "Submit File To Enterprise Repository"

Tuesday, May 13, 2014

WLST script to Enable/Disable the debug flags in Weblogic Server

WLST script to Enable/Disable the debug flags in Weblogic Server


This tutorial explains the approach to enable/disable the debug flags in Weblogic Server.

The Debugging flags will help us to enable/disable the debugging for different modules in weblogic.

The flags can be enabled/disabled in different ways

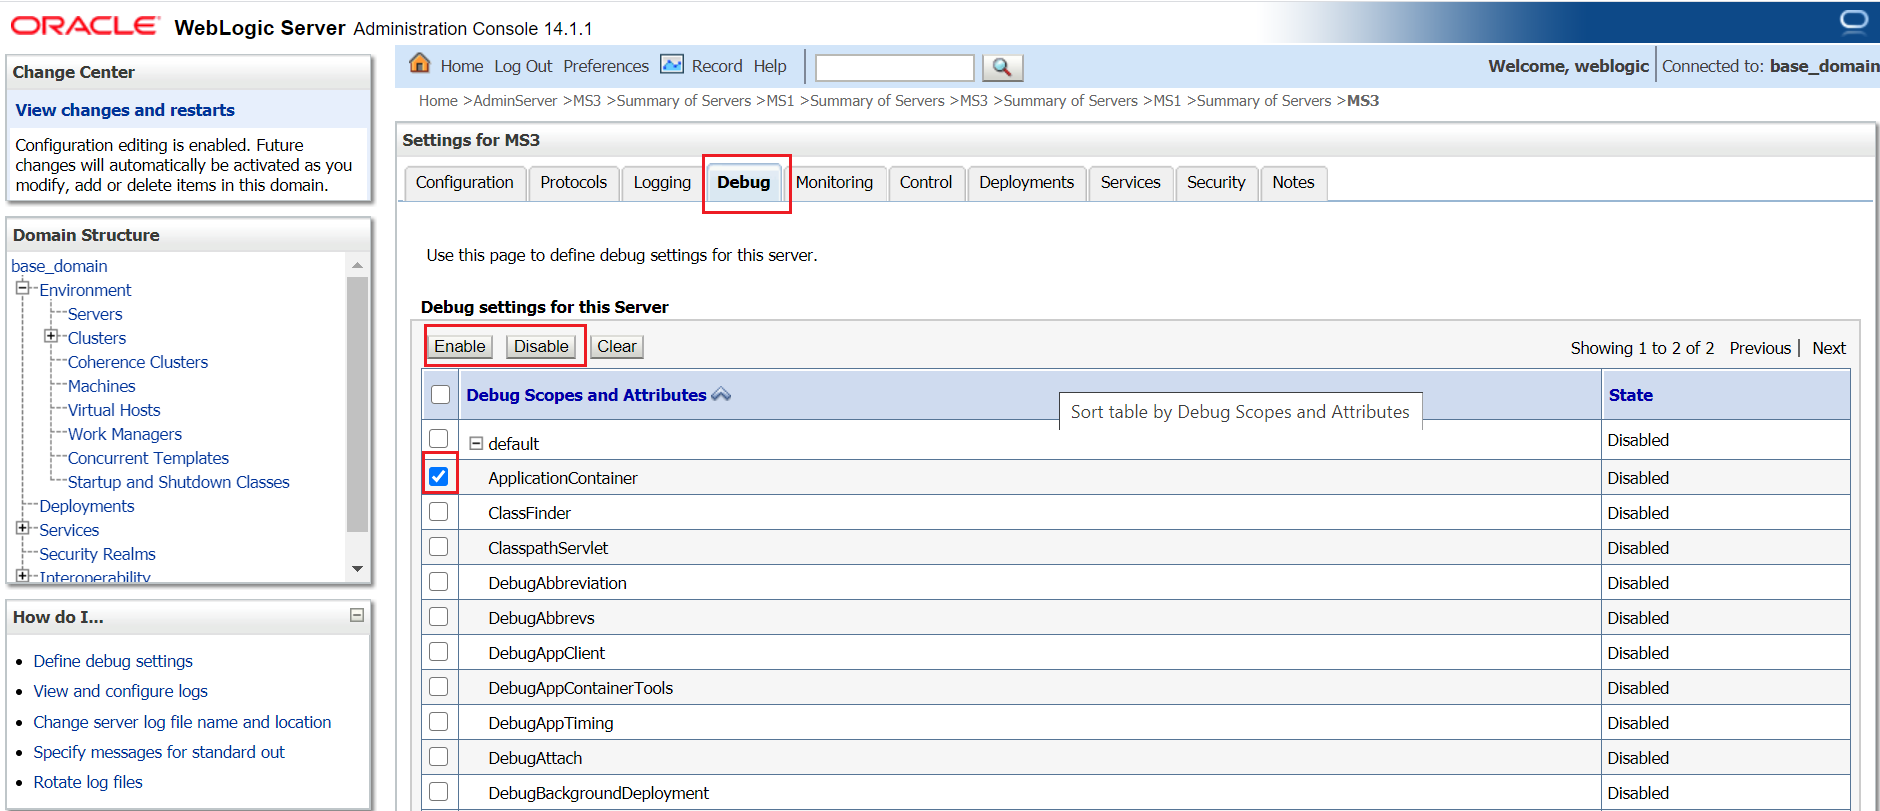
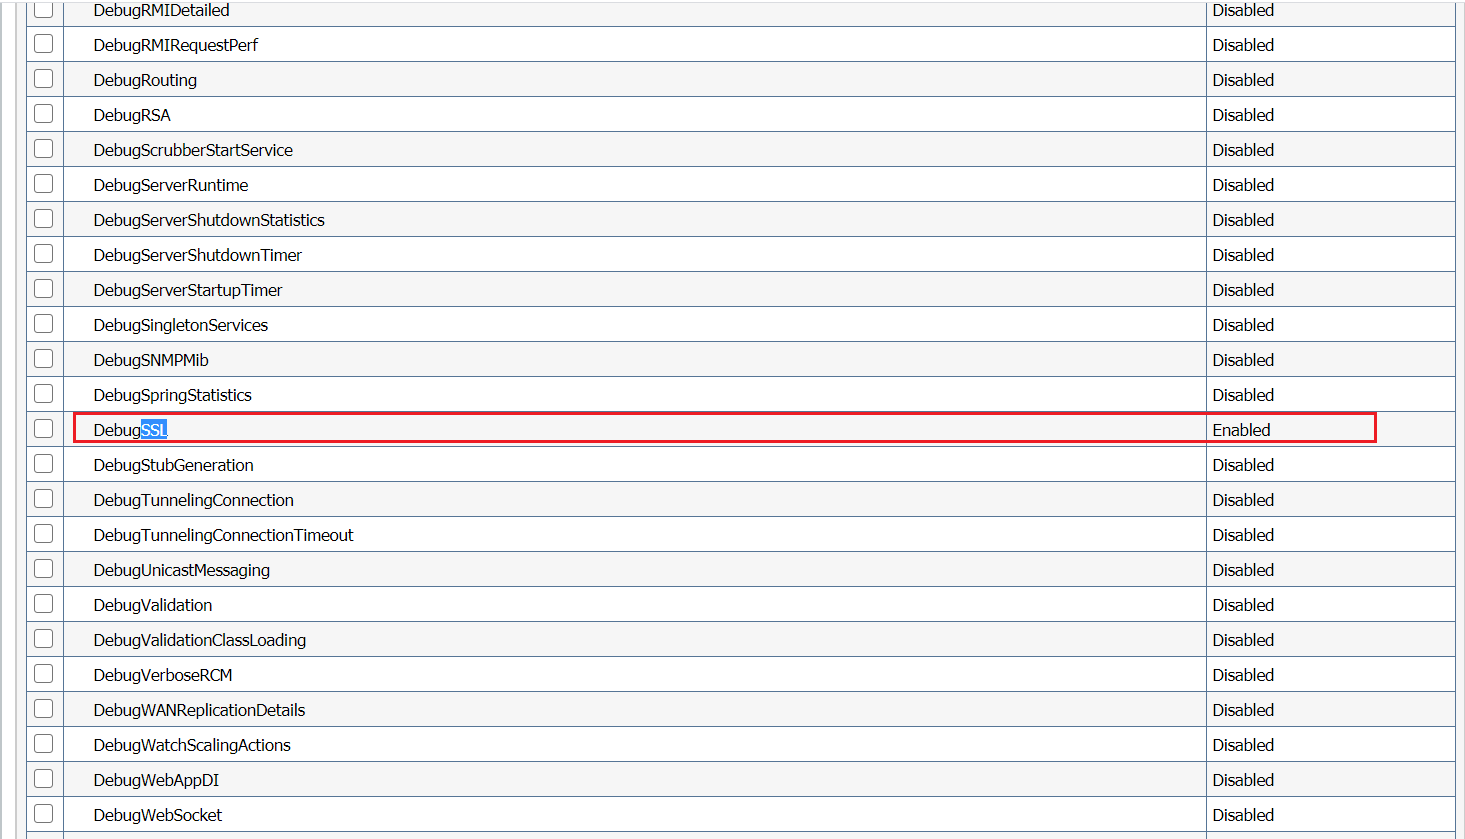
Admin Console


Access admin console — http://localhost:7001/console
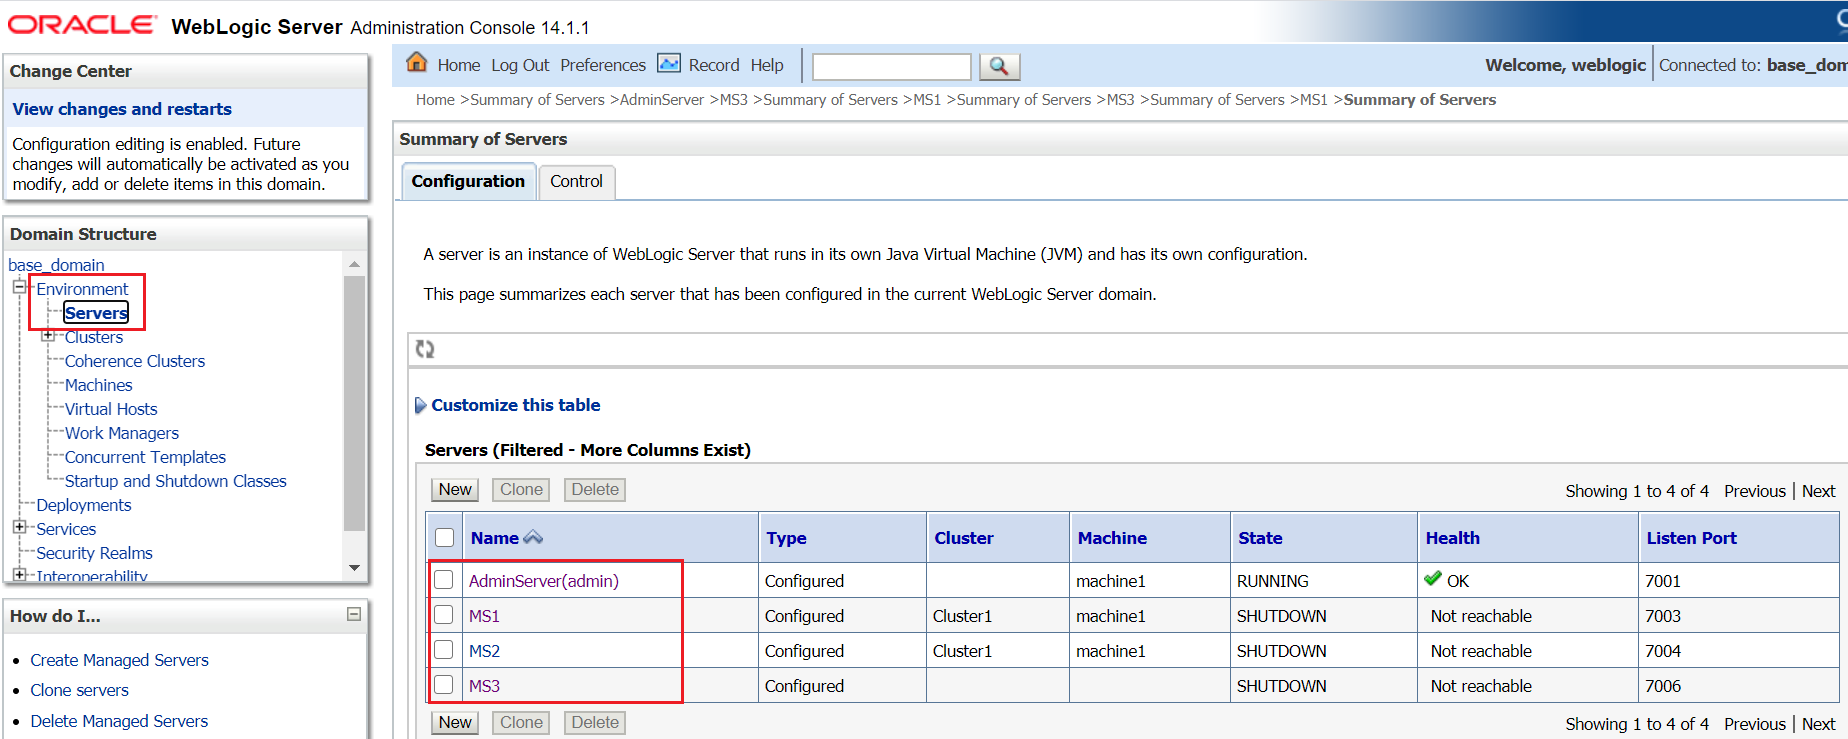
Navigate to Environment →Servers → <<Server>> → Debug


Select the required flags and click on Enable/Disable.


WLST Script


The below WLST script enable the Debug Flag ‘DebugSSL’ for configured servers

EnableORDisableDFlags.properties

serverflagconfigs=AdminServer=DebugSSL:false,MS1=DebugSSL:true


EnableORDisableDFlags.py
import re
from java.io import FileInputStreamdef EnableORDisableDFlags(): edit()
 startEdit()
 propInputStream = FileInputStream('EnableORDisableDFlags.properties')
 configProps = Properties()
 configProps.load(propInputStream)  
 
 serverflagconfigs = re.split(",",configProps.get("serverflagconfigs"))
 print serverflagconfigs
 
 for serverConfig in serverflagconfigs: 
 
   serverName=re.split("=",serverConfig)[0]
   config=re.split("=",serverConfig)[1]
   print config
   cd('/Servers/'+serverName+'/ServerDebug/'+serverName)
   flagName=re.split(":",config)[0]
   flagValue=re.split(":",config)[1]
   set(flagName,flagValue)
   print 'Modified the DFlag for '+serverName+' '+ flagName+':'+flagValue
 save()
 activate()  
   
  
def main():
    adminURL='t3://localhost:7001'
    adminUserName='weblogic'
    adminPassword='weblogic1'
    connect(adminUserName, adminPassword, adminURL)
    EnableORDisableDFlags();
    print 'Successfully Modified the DFlags'
    disconnect()
main()


Script -
https://github.com/techforum-repo/youttubedata/tree/master/scripts/wlst/EnableORDisableDFlags

Before executing the script, change the configurations as required.

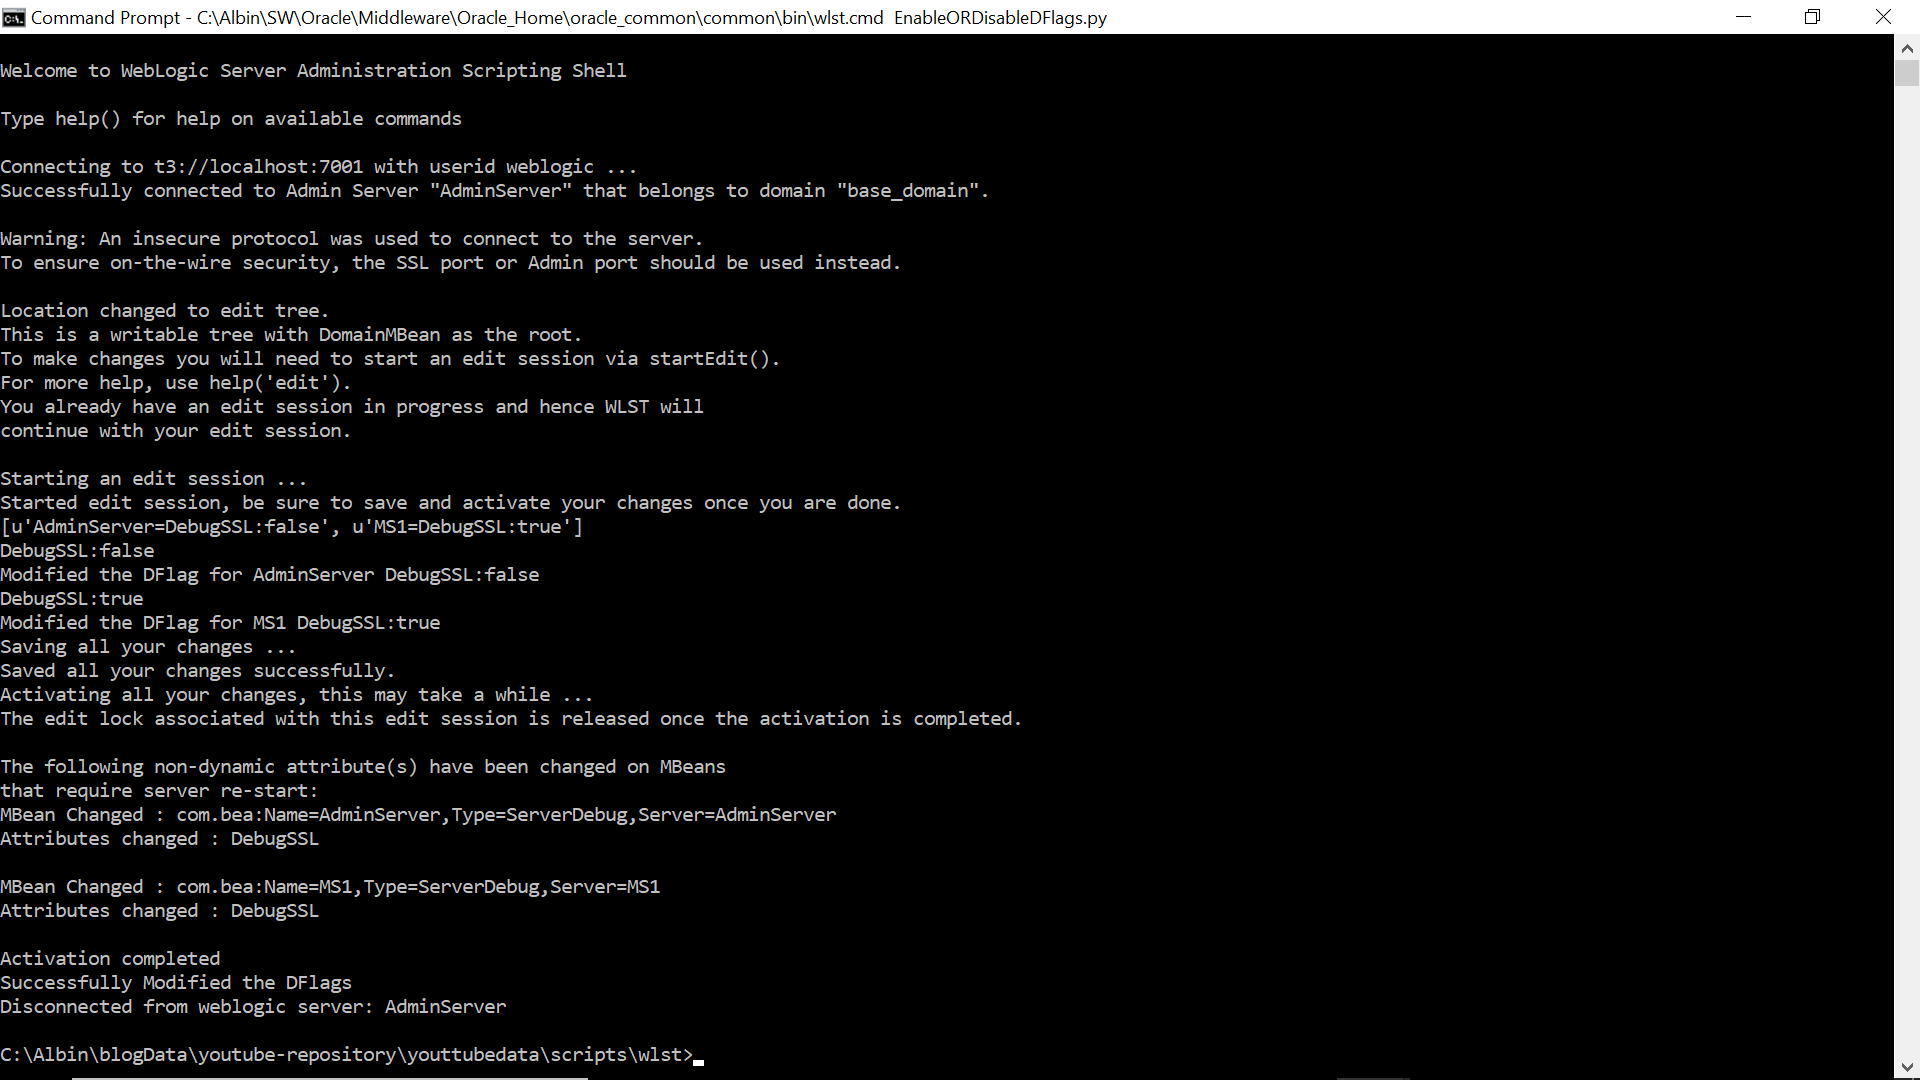
Execute the script — <<Oracle_Home>>\oracle_common\common\bin\wlst.cmd EnableORDisableDFlags.py


Now the DebugFlag is Enabled/Disabled based on the configurations


JVM start arguments


The debug flags can be enabled/disabled through server start up arguments

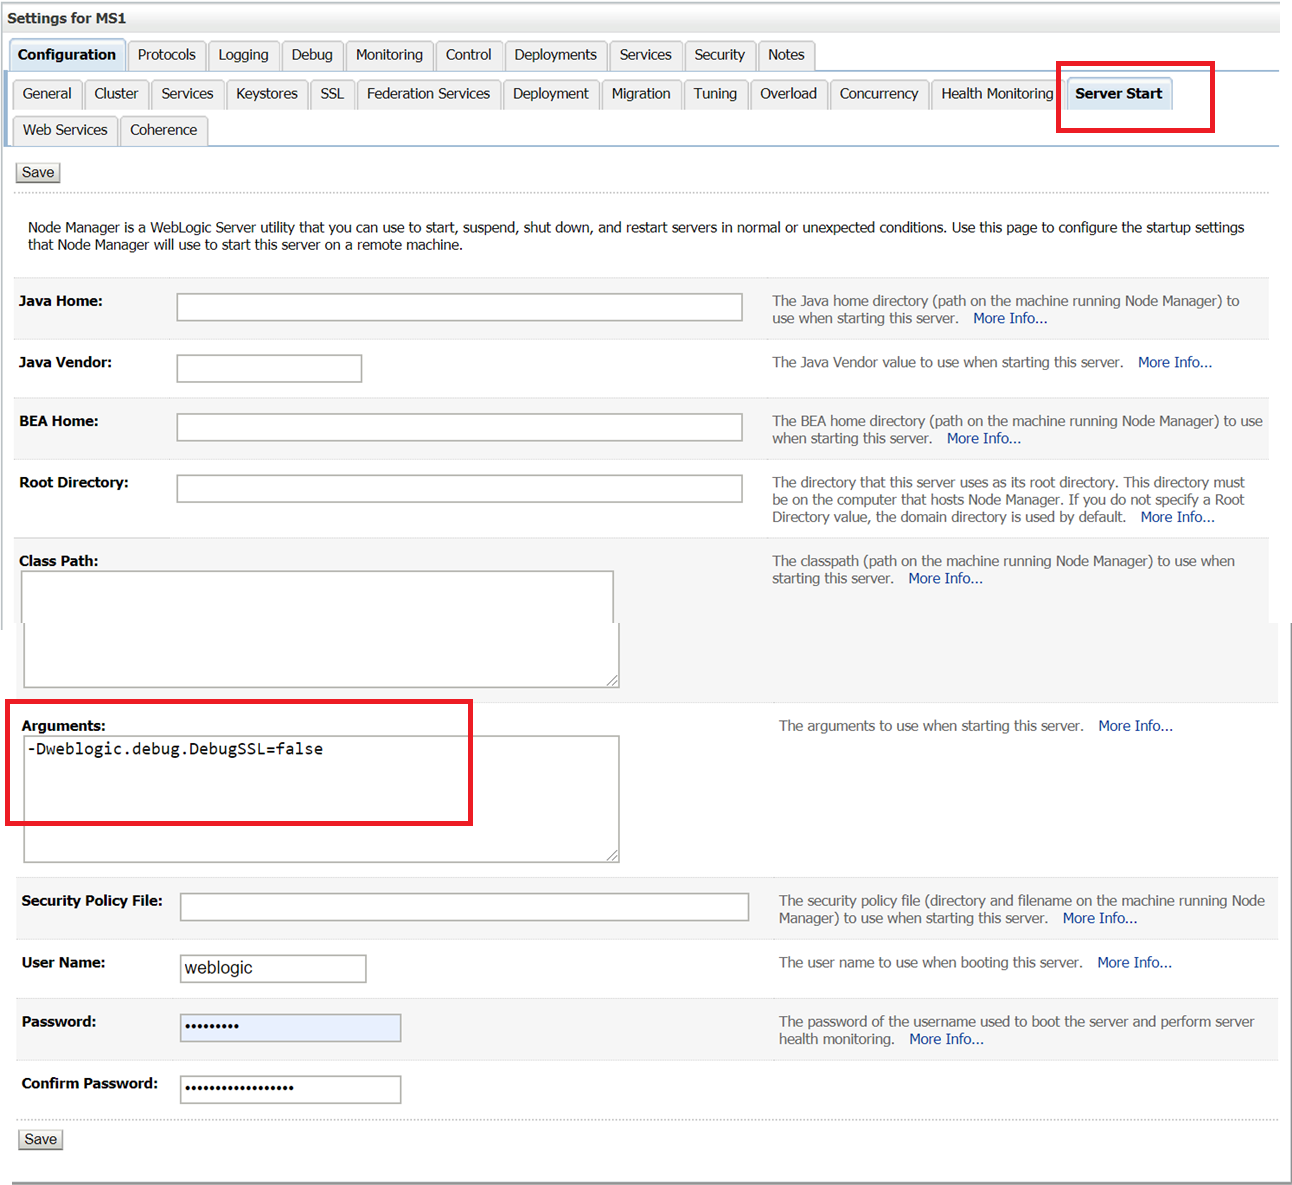
Add the flags with -D to the server start up arguments through console Environment →Servers →<<Server>> →Server Start

-Dweblogic.debug.DebugSSL=false


Other option is add the debug flags to the start up file startWebLogic.cmd/startWebLogic.sh or startManagedWebLogic.cmd/startManagedWebLogic.sh based on which file is used to start the server.

e.g.

JAVA_OPTIONS=”${JAVA_OPTIONS} -Dweblogic.debug.DebugSSL=true

The changes will take effect after restarting the server

Debug flags for the Reference


DebugAbbreviation
DebugAppContainer
DebugAsyncQueue
DebugBootstrapServlet
DebugClassRedef
DebugClassSize
DebugCluster
DebugClusterAnnouncements
DebugClusterFragments
DebugClusterHeartbeats
DebugConfigurationEdit
DebugConfigurationRuntime
DebugConnection
DebugConsensusLeasing
DebugDGCEnrollment
DebugDRSCalls
DebugDRSHeartbeats
DebugDRSMessages
DebugDRSQueues
DebugDRSStateTransitions
DebugDRSUpdateStatus
DebugDeploy
DebugDeployment
DebugDeploymentService
DebugDeploymentServiceInternal
DebugDeploymentServiceStatusUpdates
DebugDeploymentServiceTransport
DebugDeploymentServiceTransportHttp
DebugDescriptor
DebugDiagnosticAccessor
DebugDiagnosticArchive
DebugDiagnosticArchiveRetirement
DebugDiagnosticCollections
DebugDiagnosticContext
DebugDiagnosticDataGathering
DebugDiagnosticFileArchive
DebugDiagnosticImage
DebugDiagnosticInstrumentation
DebugDiagnosticInstrumentationActions
DebugDiagnosticInstrumentationConfig
DebugDiagnosticInstrumentationEvents
DebugDiagnosticInstrumentationWeaving
DebugDiagnosticInstrumentationWeavingMatches
DebugDiagnosticJdbcArchive
DebugDiagnosticLifecycleHandlers
DebugDiagnosticQuery
DebugDiagnosticWatch
DebugDiagnosticWlstoreArchive
DebugDiagnosticsHarvester
DebugDiagnosticsHarvesterData
DebugDiagnosticsHarvesterMBeanPlugin
DebugDiagnosticsHarvesterTreeBeanPlugin
DebugDiagnosticsModule
DebugDomainLogHandler
DebugEjbCaching

DebugEjbCmpDeployment
DebugEjbCmpRuntime
DebugEjbCompilation
DebugEjbDeployment
DebugEjbInvoke
DebugEjbLocking
DebugEjbMdbConnection
DebugEjbPooling
DebugEjbSecurity
DebugEjbSwapping
DebugEjbTimers
DebugEmbeddedLDAP
DebugEmbeddedLDAPLogToConsole
DebugEmbeddedLDAPWriteOverrideProps
DebugEventManager
DebugFailOver
DebugFileDistributionServlet
DebugHttp
DebugHttpLogging
DebugHttpSessions
DebugIIOP
DebugIIOPConnection
DebugIIOPMarshal
DebugIIOPNaming
DebugIIOPOTS
DebugIIOPReplacer
DebugIIOPSecurity
DebugIIOPStartup
DebugIIOPTransport
DebugIIOPTunneling
DebugJ2EEManagement
DebugJAXPIncludeClass
DebugJAXPIncludeLocation
DebugJAXPIncludeName
DebugJAXPIncludeTime
DebugJAXPUseShortClass
DebugJDBCConn
DebugJDBCDriverLogging
DebugJDBCInternal
DebugJDBCONS
DebugJDBCRAC
DebugJDBCRMI
DebugJDBCSQL
DebugJMSAME
DebugJMSBackEnd
DebugJMSBoot
DebugJMSCDS
DebugJMSCommon
DebugJMSConfig
DebugJMSDispatcher
DebugJMSDistTopic
DebugJMSDurableSubscribers
DebugJMSFrontEnd
DebugJMSJDBCScavengeOnFlush
DebugJMSLocking
DebugJMSMessagePath
DebugJMSModule
DebugJMSPauseResume
DebugJMSSAF
DebugJMSStore
DebugJMST3Server
DebugJMSWrappers

DebugJMSXA
DebugJMX
DebugJMXCompatibility
DebugJMXCore
DebugJMXDomain
DebugJMXEdit
DebugJMXRuntime
DebugJNDI
DebugJNDIFactories
DebugJNDIResolution
DebugJTA2PC
DebugJTA2PCStackTrace
DebugJTAAPI
DebugJTAGateway
DebugJTAGatewayStackTrace
DebugJTAHealth
DebugJTAJDBC
DebugJTALLR
DebugJTALifecycle
DebugJTAMigration
DebugJTANaming
DebugJTANamingStackTrace
DebugJTANonXA
DebugJTAPropagate
DebugJTARMI
DebugJTARecovery
DebugJTARecoveryStackTrace
DebugJTAResourceHealth
DebugJTATLOG
DebugJTAXA
DebugJTAXAStackTrace
DebugJpaDataCache
DebugJpaEnhance
DebugJpaJdbcJdbc
DebugJpaJdbcSchema
DebugJpaJdbcSql
DebugJpaManage
DebugJpaMetaData
DebugJpaProfile
DebugJpaQuery
DebugJpaRuntime
DebugJpaTool
DebugLeaderElection
DebugLibraries
DebugLoadBalancing
DebugLoggingConfiguration
DebugMessaging
DebugMessagingBridgeRuntime
DebugMessagingBridgeRuntimeVerbose
DebugMessagingBridgeStartup
DebugMessagingKernel
DebugMessagingKernelBoot
DebugMuxer
DebugMuxerConnection
DebugMuxerDetail
DebugMuxerException
DebugMuxerTimeout
DebugPathSvc
DebugPathSvcVerbose
DebugRA
DebugRAClassloader
DebugRAConnEvents

DebugRAConnections
DebugRADeployment
DebugRALifecycle
DebugRALocalOut
DebugRAParsing
DebugRAPoolVerbose
DebugRAPooling
DebugRASecurityCtx
DebugRAWork
DebugRAWorkEvents
DebugRAXAin
DebugRAXAout
DebugRAXAwork
DebugRC4
DebugRSA
DebugReplication
DebugReplicationDetails
DebugRouting
DebugSAFAdmin
DebugSAFLifeCycle
DebugSAFManager
DebugSAFMessagePath
DebugSAFReceivingAgent
DebugSAFSendingAgent
DebugSAFStore
DebugSAFTransport
DebugSAFVerbose
DebugSNMPAgent
DebugSNMPExtensionProvider
DebugSNMPProtocolTCP
DebugSNMPToolkit
DebugSSL
DebugScaContainer
DebugSecurityAdjudicator
DebugSecurityAtn
DebugSecurityAtz
DebugSecurityAuditor
DebugSecurityCertPath
DebugSecurityCredMap
DebugSecurityEEngine
DebugSecurityEncryptionService
DebugSecurityJACC
DebugSecurityJACCNonPolicy
DebugSecurityJACCPolicy
DebugSecurityKeyStore
DebugSecurityPasswordPolicy
DebugSecurityPredicate
DebugSecurityRealm
DebugSecurityRoleMap
DebugSecuritySAML2Atn
DebugSecuritySAML2CredMap
DebugSecuritySAML2Lib
DebugSecuritySAML2Service
DebugSecuritySAMLAtn
DebugSecuritySAMLCredMap
DebugSecuritySAMLLib
DebugSecuritySAMLService
DebugSecuritySSL
DebugSecuritySSLEaten
DebugSecurityService
DebugSecurityUserLockout
DebugSelfTuning
DebugServerLifeCycle
DebugServerMigration
DebugServerStartStatistics
DebugStoreAdmin
DebugStoreIOLogical
DebugStoreIOLogicalBoot
DebugStoreIOPhysical
DebugStoreIOPhysicalVerbose
DebugStoreXA
DebugStoreXAVerbose
DebugTunnelingConnection
DebugTunnelingConnectionTimeout
DebugURLResolution
DebugWANReplicationDetails
DebugWTCConfig
DebugWTCCorbaEx
DebugWTCGwtEx
DebugWTCJatmiEx
DebugWTCTDomPdu
DebugWTCUData
DebugWTCtBridgeEx
DebugWebAppIdentityAssertion
DebugWebAppModule
DebugWebAppSecurity
DebugWorkContext
DebugXMLEntityCacheIncludeClass
DebugXMLEntityCacheIncludeLocation
DebugXMLEntityCacheIncludeName
DebugXMLEntityCacheIncludeTime
DebugXMLEntityCacheUseShortClass
DebugXMLRegistryIncludeClass
DebugXMLRegistryIncludeLocation
DebugXMLRegistryIncludeName
DebugXMLRegistryIncludeTime
DebugXMLRegistryUseShortClass

Sunday, May 4, 2014

SOA-INFRA Application is in unknown Type - Oracle SOA Suite 11g

SOA-INFRA Application is in unknown Type - Oracle SOA Suite 11g:

I was facing a strange issue,the Type of the soa-infra application was unknown but the state and the health of the application is looking fine(Active and OK) in admin console.
Because of this the SOA node is not displayed in the em console.


Tried restarting the server without any luck and also updated(redeployed) the soa-infra application but still the type of the application is unknown.

I could not able to find any exception related to this issue in the log files and also there is no issue related to the database schema's.

Steps to resolve the issue

Delete the soa-infra application from the admin console deployments.
Install the soa-infra application(soa-infra-wls.ear) from the location SOA_HOME\soa\applications as Enterprise Application.

Saturday, May 3, 2014

WLST script to enable Backup/Archive configurations in weblogic server

WLST script to enable Backup/Archive configurations in weblogic server


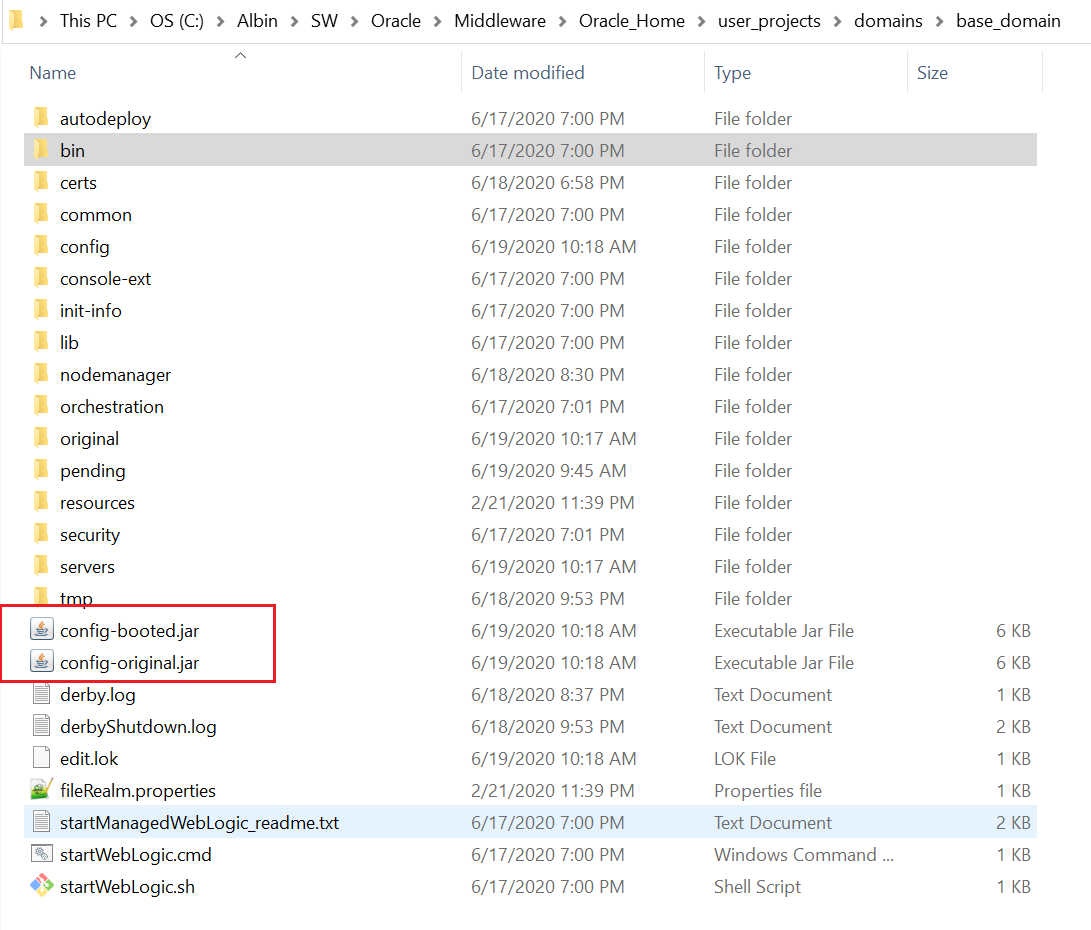
By enabling the backup/archiving in Weblogic, the administration Server can automatically backups the domain configuration (the entire domain-name/config directory) during the server boot to DOMAIN_HOME\config-original.jar and config-booted.jar.

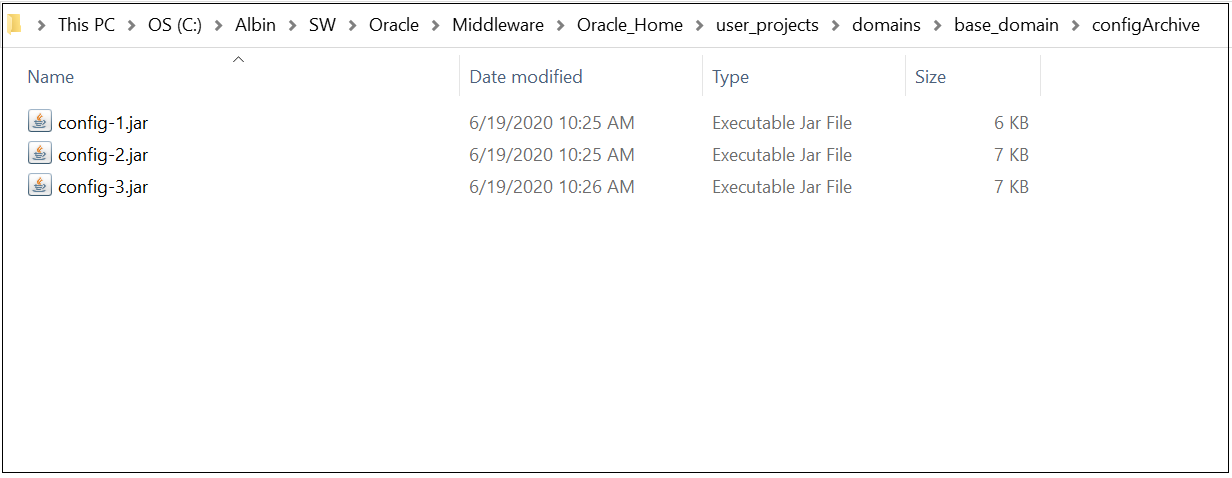
Also multiple versions of the domain config will be archived by the Administration Server, each time the domain configuration is modified into the DOMAIN_CONFIG\configArchive folder.

The configuration archives can be used for system restoration in cases where accidental configuration changes need to be reversed.

This tutorial explains how to use WLST script to enable backup/archive configurations.


WLST Script


The below WLST script will help us to enable the backup/archive configurations

EnableArchiving.py

adminURL='t3://localhost:7001'
adminUserName='weblogic'
adminPassword='weblogic1'
connect(adminUserName, adminPassword, adminURL)
domainRuntime()
edit()
startEdit()
cmo.setConfigBackupEnabled(true)
cmo.setArchiveConfigurationCount(5)
save()
activate()


Script
https://github.com/techforum-repo/youttubedata/blob/master/scripts/wlst/EnableArchiving.py

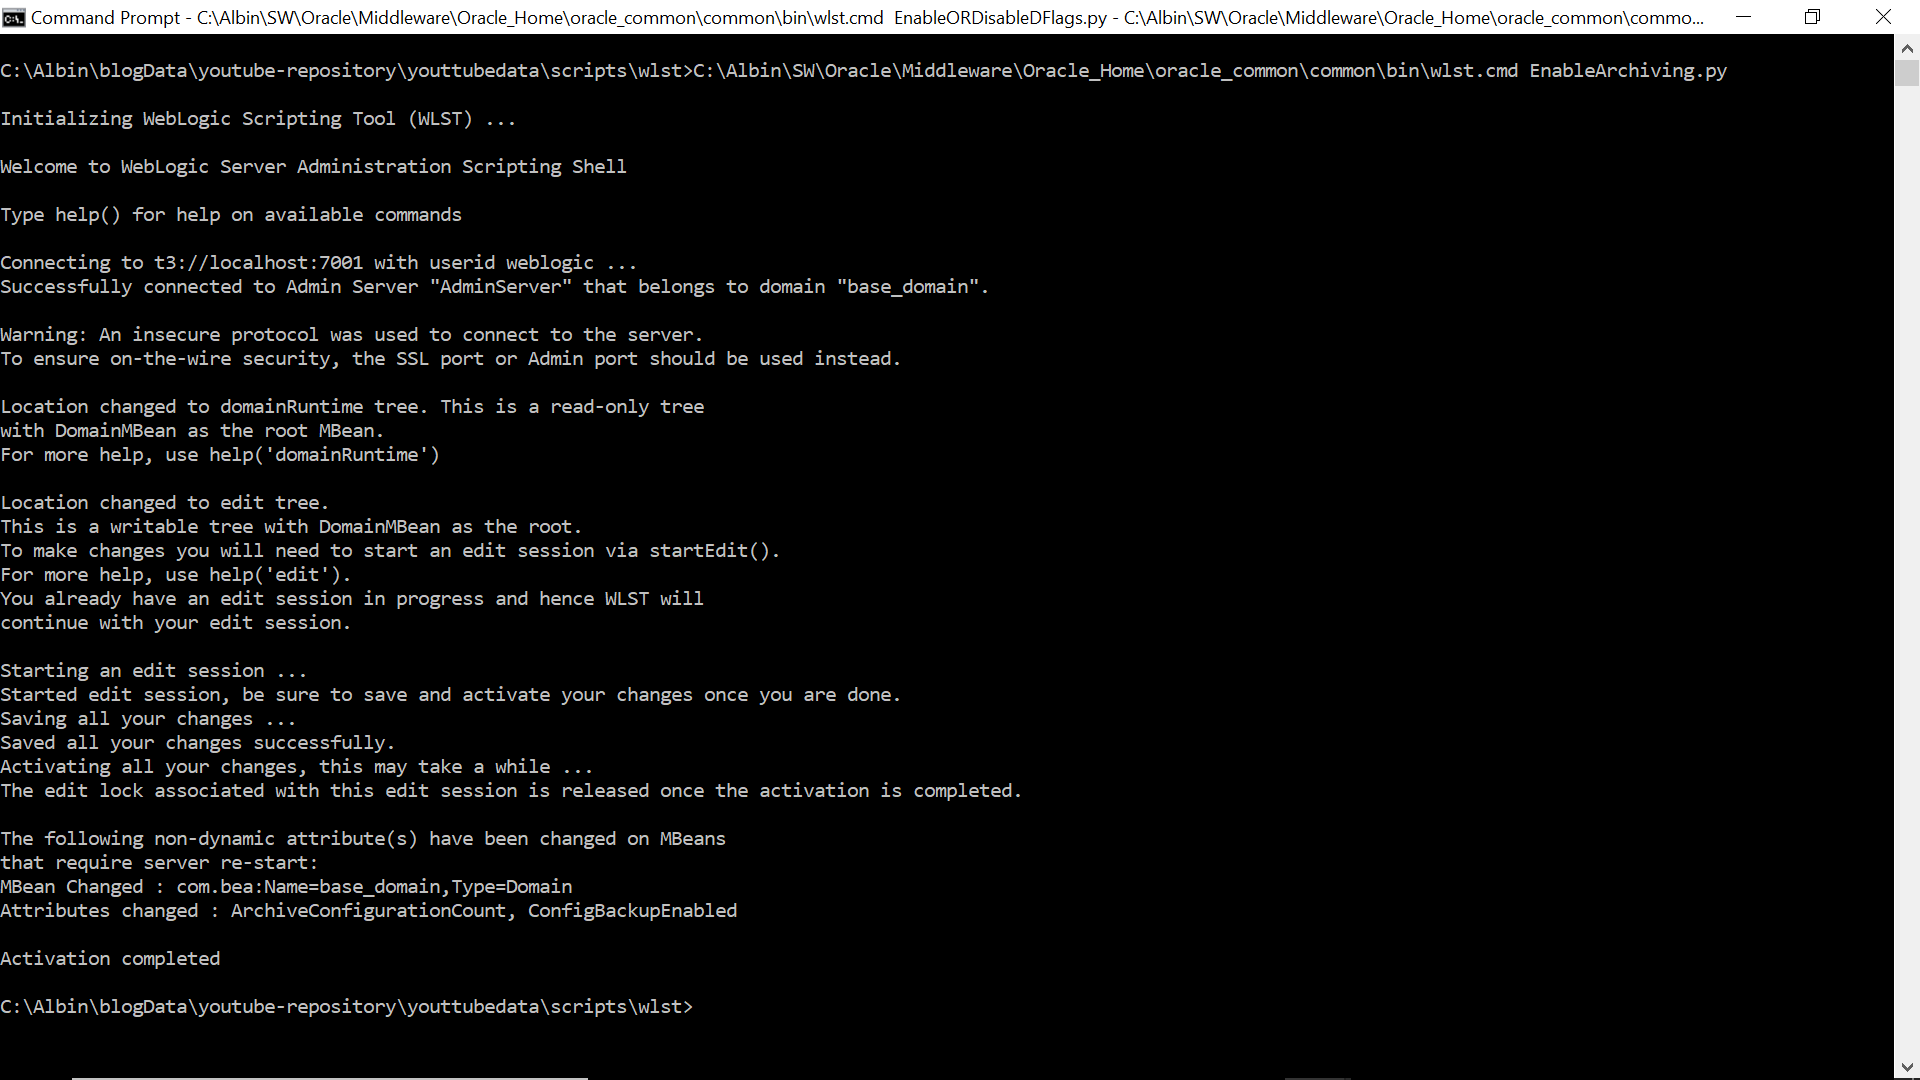
Execute the script

<<Oracle_Home>>\oracle_common\common\bin\wlst.cmd EnableArchiving.py


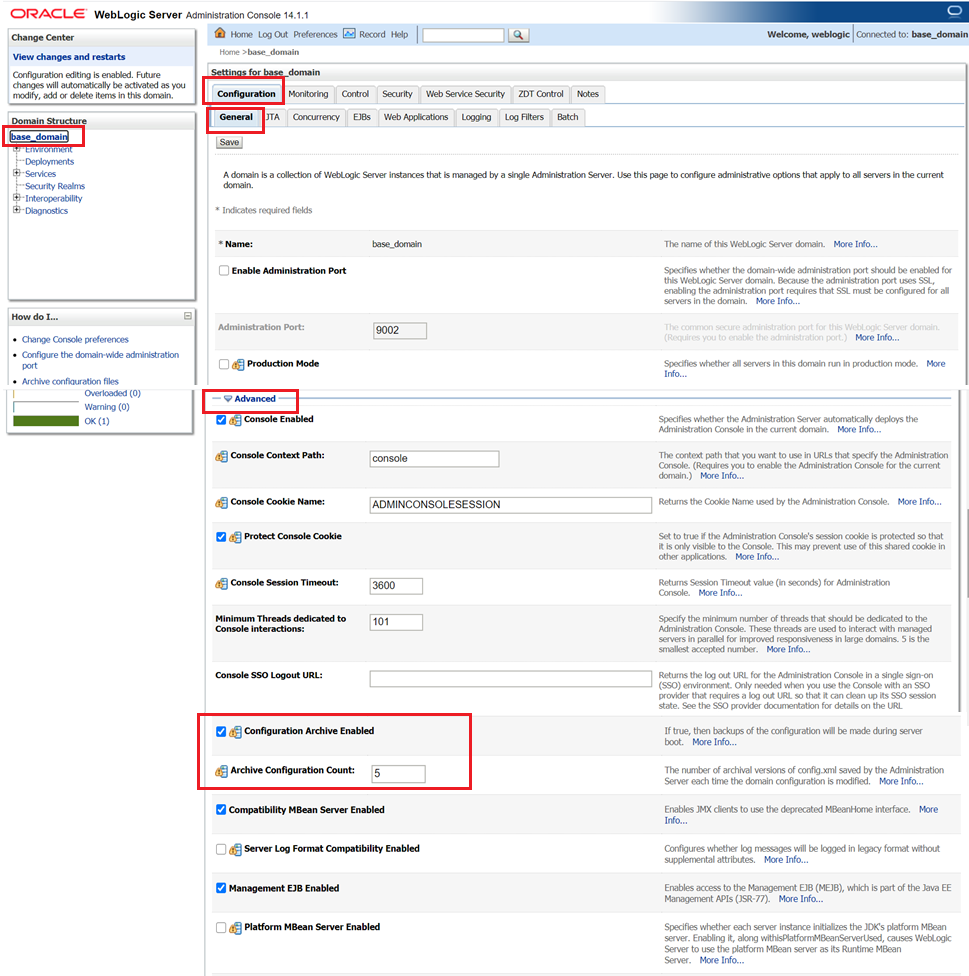
Verify the configuration


To verify the configuration- Login to admin console →Click on Domain in the left panel →Expand the Advanced in General Configuration section


When the Admin Server starts up it automatically makes a backup of DOMAIN_HOME/config directory and stores it in DOMAIN_HOME/config-original.jar(original configuration file while restarting the server) and once the start up completed(booted) successfully it makes a backup of DOMAIN_HOME/config directory and stores it in DOMAIN_HOME/config-booted.jar(the config file on which the server is booted successfully) .

Most of the cases both of the file contents will be same. If the server fails to boot successfully the config-booted.jar will not be generated and the old config-booted.jar file will be left as it is.


Also whenever the domain configuration is modified, the admin server archive the previous configurations to the DOMAN_HOME\configArchive folder.The files use the naming convention as config-number.jar, where number is the sequential number of the archive.After it reaches the maximum number of archive files specified in the configuration(ArchiveConfigurationCount — 5), older archive files will be discarded


Recover the configurations


Follow the below steps to recover the configurations from archive

Stop the servers

Rename the current <<DOMAIN-HOME>>/config folder to config-bkp

Create a folder with name config under <<DOMAIN-HOME>>

cd to <<DOMAIN-HOME>>/configArchive in a command prompt

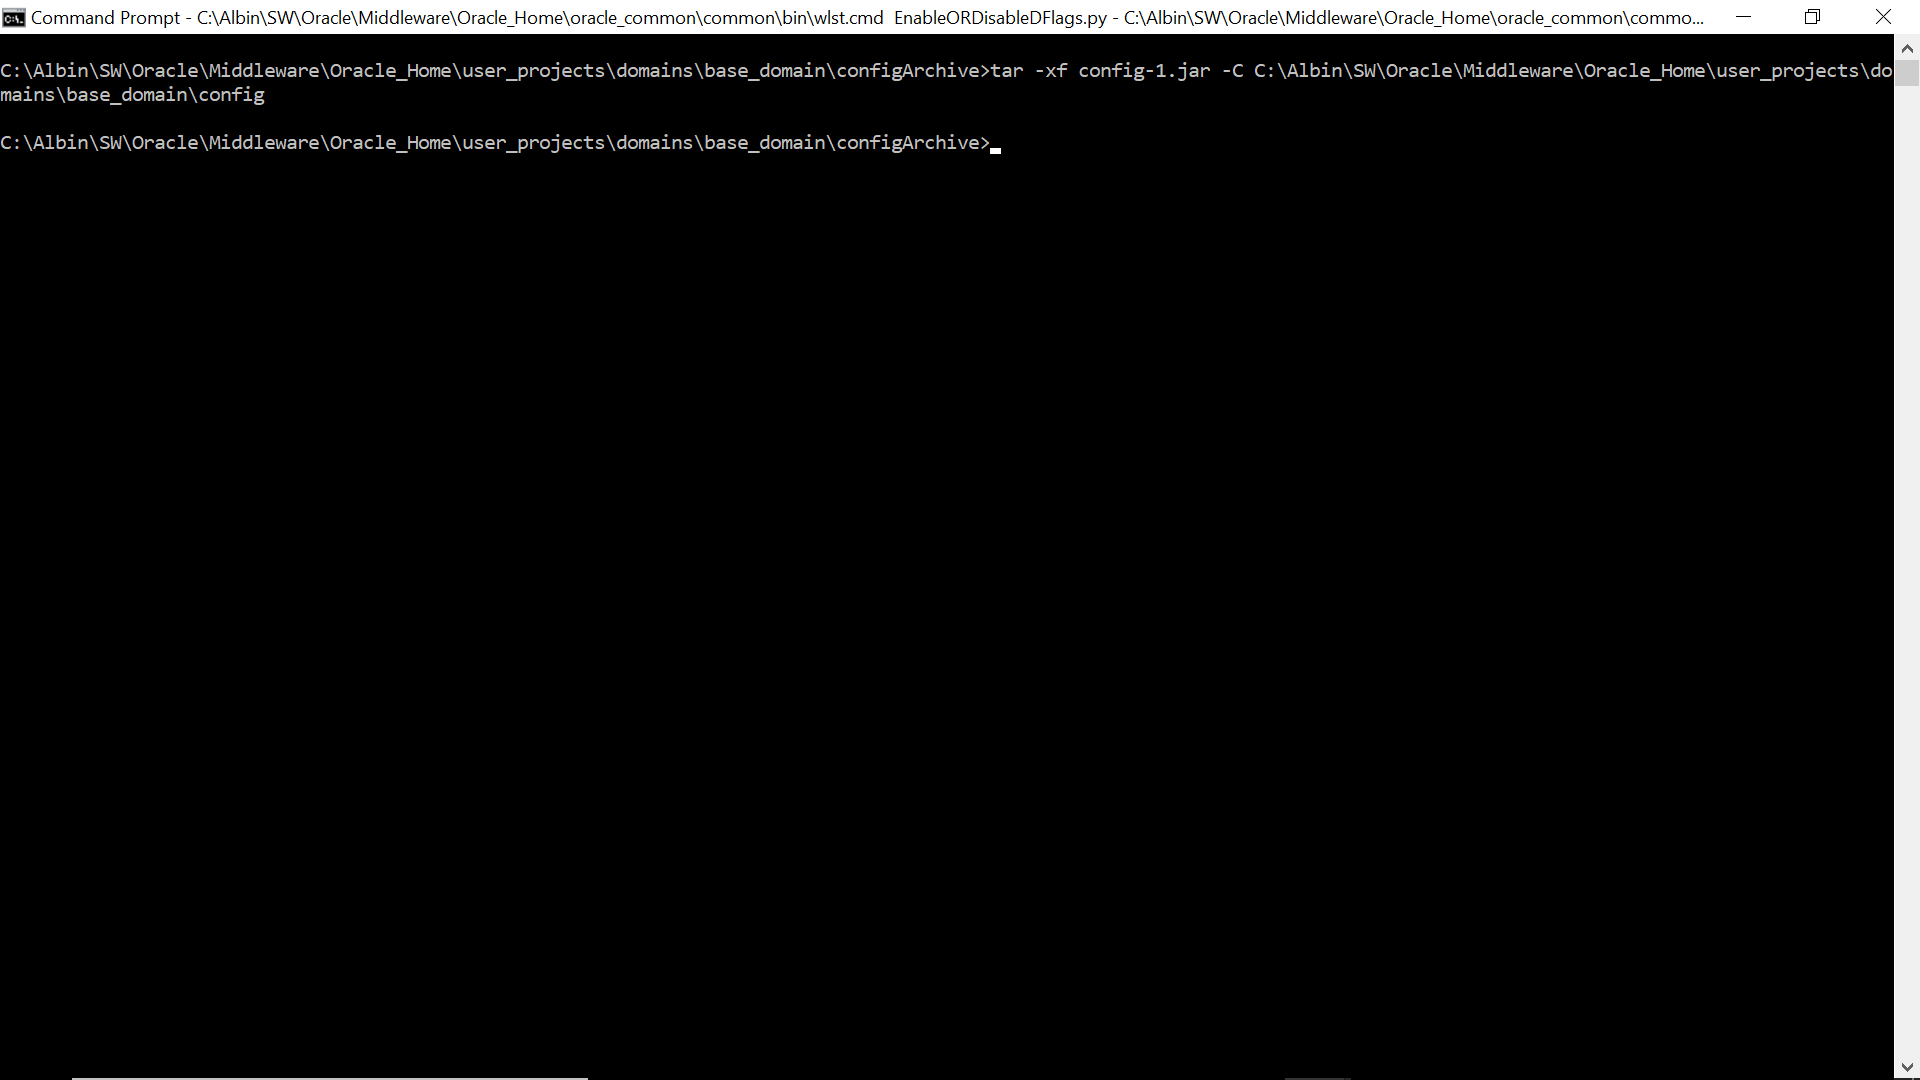
Execute the below command(change the archive file name as required)

tar -xf config-1.jar -C <<DOMAIN-HOME>>\config


Start the server — now the configurations are restored from the archive.

Friday, May 2, 2014

Transforming the REST XML message to SOAP message - OSB

Transforming the REST XML message to SOAP message - OSB

This post will explain how to Transform the REST XML message to SOAP message in OSB

While receiving the response from REST interface  with the content type as application\xml, the input XML will be plain without the target namespace specified.
But if you are invoking the BPEL with this message the BPEL cant perform any xpath operations on this message without target namespace.The target namespace should be added to the message.

The XSLT can be used to add the name space to the XML message but before performing this operation the SOAP envelope of the body variable should be removed
After removing the namespace the XML should be assigned to the body variable to send to target system.

Follow the below steps to achieve the same:

Remove SOAP Envelope:

The below XSLT will help as to remove the namespace from the XML.

Create a XSLT resource from SB console.
Add a Assign activity with the XSLT resource
Assign the output to a temp variable - var1.

<?xml version="1.0" encoding="UTF-8" ?>
<xsl:stylesheet version="1.0" xmlns:xsl="http://www.w3.org/1999/XSL/Transform">
  <xsl:template match="@* | node()">
        <xsl:copy>
          <xsl:apply-templates select="@* | node()" />
        </xsl:copy>
      </xsl:template>

      <xsl:template match="soapenv:*">
        <xsl:apply-templates select="@* | node()" />
  </xsl:template>
</xsl:stylesheet>